将 Hugging Face Spaces 和 Gradio 与 React 应用程序集成
- Barbara Streisand原创
- 2024-10-12 18:44:021147浏览
本文将快速介绍如何创建和部署机器学习模型以及与 React 应用程序集成。
以下是我们将使用的技术的概述
Hugging Face 是一个平台,我们可以在其中托管机器学习模型并创建空间以将它们与任何可用模型一起使用。
Gradio 是一个平台,可以构建用于与我们的机器学习模型交互或演示我们的机器学习模型的用户界面。
在拥抱中创造空间
让我们首先在这里创建一个拥抱脸的空间。选择空间的名称,然后在 Spaces SDK 下选择 Gradio

您可以将其他选项保留为默认值并继续创建空间。将创建的空间克隆到您的计算机并使用以下内容创建 app.py
import gradio as gr

def greet(name):
    return "Hello " + name + "!!"

demo = gr.Interface(fn=greet, inputs="text", outputs="text")
demo.launch()
完成这些后,提交更改并将其推送到您的空间。拥抱脸部应该自动构建它并显示我们应用程序的渐变界面,如下所示

现在我们已经构建了一个具有基本界面的渐变应用程序,并将其托管在拥抱的面部空间中。让我们在下一节中研究扩展我们的应用程序的功能。
注意:您需要在此处创建一个写入令牌,以便将更改推送到拥抱面部空间
创建视觉分类器模型
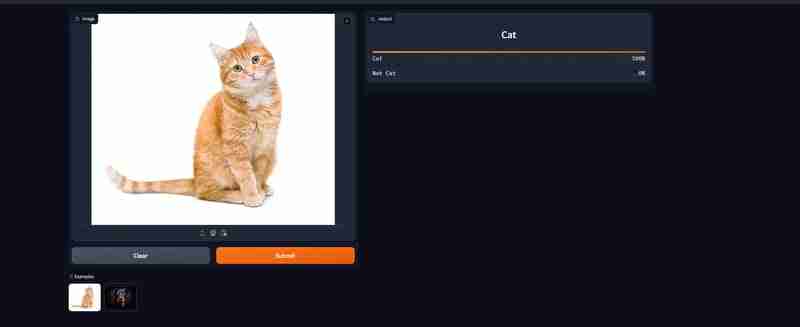
我们将使用 fast.ai 创建一个简单的分类,预测给定图像是否是猫。
首先,让我们获取训练图像数据集的路径。 fast.ai 已经提供了很多数据集,我们将使用其中的一个。以下是训练和导出模型的步骤
# Read the dataset from fastai
 path = untar_data(URLs.PETS)/'images'
 dls = ImageDataLoaders.from_name_func(
        path,get_image_files(path), valid_pct=0.2, seed=42,
        label_func=is_cat, item_tfms=Resize(224))

# Train the model with vision_learner
 learn = vision_learner(dls, resnet34, metrics=error_rate)
 learn.fine_tune(1)

# Export the model
 learn.path = Path('.')
 learn.export(
 'cats_classifier.pkl')
运行后,在同一目录中应该会生成一个模型文件。然后您可以使用它进行预测。
model = load_learner('cats_classifier.pkl')

def predict(image):
     img = PILImage.create(image)
     _,_,probs = model.predict(img)
     return {'Not a Cat':float("{:.2f}".format(probs[0].item())),
            'Cat':float("{:.2f}".format(probs[1].item()))}
然后使用上面的预测方法启动gradio
demo = gr.Interface(fn=predict, inputs=gr.Image(), outputs='label')
demo.launch()
要查看您的操作变化,请将您的更改推至拥抱脸部。
注意:由于生成的模型尺寸会很大,需要使用Git LFS来跟踪变化
然后您应该可以上传任何图像并确定它是否是猫

与 React 应用程序集成
使用 gradio 的优点之一是,它为我们提供了一个 API 来访问我们的模型。我们将研究如何将它与 React 集成。
如果您滚动到拥抱面部署模型的底部,您可以看到一个名为“use via Api”的按钮,您可以在其中找到连接到 api 的详细信息。我们将使用 @gradio/client 包连接到 api。这是连接到模型并获取结果的示例代码
import { Client } from "@gradio/client";

const response_0 = await fetch("https://raw.githubusercontent.com/gradio-app/gradio/main/test/test_files/bus.png");
const exampleImage = await response_0.blob();

const client = await Client.connect("ganesh1410/basic-classifier");
const result = await client.predict("/predict", {
                image: exampleImage,
});

// This should have the label and confidences
console.log(result.data);
您可以在此处查看我们模型的实际效果

这里是所有代码和演示的链接
- 使用 Gradio 拥抱脸部的演示
- 用于使用 Gradio 拥抱脸部模型的代码
- 使用我们训练好的模型的 React 应用程序演示和代码
以上是将 Hugging Face Spaces 和 Gradio 与 React 应用程序集成的详细内容。更多信息请关注PHP中文网其他相关文章!

