
使用 Node.js 和 Express 构建可扩展的 API

- WBOYWBOYWBOYWBOYWBOYWBOYWBOYWBOYWBOYWBOYWBOYWBOYWB原创
- 2024-09-07 08:30:031179浏览
Node.js 和 Express 已成为构建可扩展 API 的重要工具,对于保持高性能和确保无缝用户体验至关重要。凭借其事件驱动的架构,Node.js 可以高效地管理对实时应用程序不断增长的需求,使其成为后端开发的首选。一项研究发现,68% 的开发人员表示使用 Node.js 提高了工作效率,这主要是由于它能够在客户端和服务器端使用 JavaScript,从而简化了开发过程。在本博客中,我们将提供分步指南,并附有精确的代码示例,以帮助您使用 Node.js 和 Express 构建可扩展的 API。
构建可扩展 API 的关键原则
异步编程
Node.js 本质上是异步的,允许它同时处理多个请求,而不会阻塞事件循环。此功能对于可扩展性至关重要,因为它可以实现高效的资源管理,特别是在高负载条件下。
模块化架构
采用模块化方法至关重要。通过将应用程序分解为更小的、独立的模块,开发人员可以管理复杂性并促进独立扩展。每个模块应该专注于特定的功能,这样可以根据需要更轻松地测试、维护和扩展各个组件。
微服务
利用微服务架构可以显着增强可扩展性。这种方法允许独立扩展应用程序的不同部分,从而优化资源使用并提高整体性能。每个微服务都可以在不影响其他服务的情况下进行开发、部署和扩展。
有效的路由和中间件
Express.js 简化了路由的创建和中间件的集成。中间件函数可以处理身份验证、日志记录和错误处理等任务,使 API 更加健壮且易于管理。正确组织路线和控制器对于保持代码库的清晰度和效率至关重要。
错误处理和日志记录
实施全面的错误处理和日志记录机制对于维护 API 稳定性至关重要。这确保了可以快速识别和解决问题,最大限度地减少停机时间并增强用户体验。
API 文档
建议使用 Swagger 等工具来编写 API 文档。记录完善的 API 不仅可以帮助新开发人员更轻松地入职,还可以确保 API 对消费者来说是用户友好的,从而实现更好的集成和使用。
性能优化
优化代码以提高性能至关重要。技术包括最小化同步操作、管理资源消耗以及利用缓存策略(例如使用 Redis)来减少数据库负载并缩短响应时间。
负载测试
定期负载测试对于识别潜在瓶颈并确保 API 能够处理预期的流量峰值至关重要。监控响应时间和错误率等关键指标可以指导必要的调整和扩展策略。
如何使用 Node.js 和 Express 构建可扩展的 API
1. 设置您的项目
我们创建了文件夹scalable-api。在代码编辑器中打开此文件夹。
然后按照以下说明进行操作。
要初始化一个新的 Node.js 项目,请运行以下命令。
npm init -y
运行上述命令后,您的 package.json 文件将在该文件夹中创建。
现在,您必须运行以下命令来安装express。
npm install express
运行上述命令后,将在根文件夹中创建node_modules文件夹和package-lock.json文件。
2. 创建服务器
现在您已经安装了 Express,下一步是创建服务器文件并设置基本的 Express 服务器。
您必须在根文件夹中创建一个名为 app.js 的文件。
现在,您创建了文件 app.js,并在 app.js 中设置了基本的 Express 服务器。
const express = require('express');
const app = express();
const port = process.env.PORT || 3000;

// Middleware to parse JSON bodies
app.use(express.json());

// Basic route
app.get('/', (req, res) => {
    res.send('Hello World!');
});

// Start the server
app.listen(port, () => {
    console.log(`Server is running on port ${port}`);
});
现在,完成后,通过在终端中执行以下命令来运行服务器。
node app.js
运行上述命令后,您将在终端中看到以下消息
Starting the server...
Middleware set up.
Route set up.
Server is running on port 3000
要访问服务器,请打开 Chrome 浏览器或您正在使用的任何浏览器,导航到 http://localhost:3000 ,您将看到“Hello World”消息。
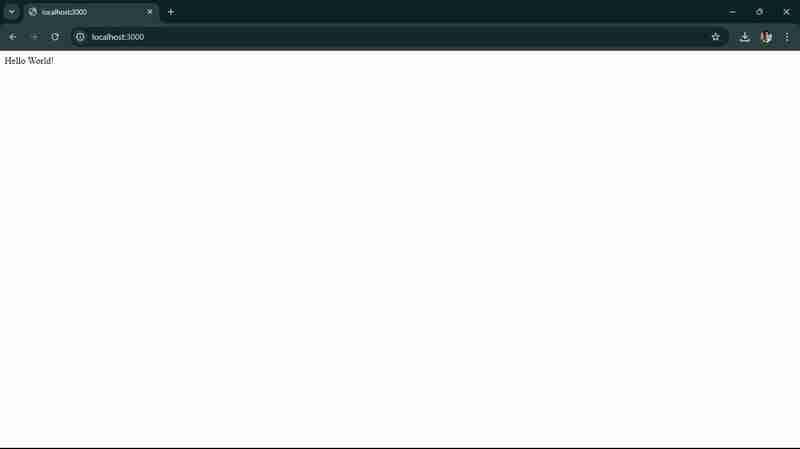
如上图所示。
使用 Node.js 和 Express 构建可扩展 API 的后续步骤通常包括:
3. Defining & Adding More Routes:
Adding More Routes:
You have to define additional routes to handle different endpoints. For example, let’s add routes for /api and /users.
// ... existing code ...

// New route for /api
app.get('/api', (req, res) => {
    res.send('API endpoint');
});

// New route for /users
app.get('/users', (req, res) => {
    res.send('Users endpoint');
});

// ... existing code ...
You to add above code in your app.js file and update your app.js file.
- app.get('/api', (req, res) => { ... }): This defines a new route that listens for GET requests on the /api endpoint. When a request is received, it sends back the response "API endpoint".
- app.get('/users', (req, res) => { ... }): This defines another route that listens for GET requests on the /users endpoint. When a request is received, it sends back the response "Users endpoint".
Now, let’s test the new routes.
start your server by running:
node app.js
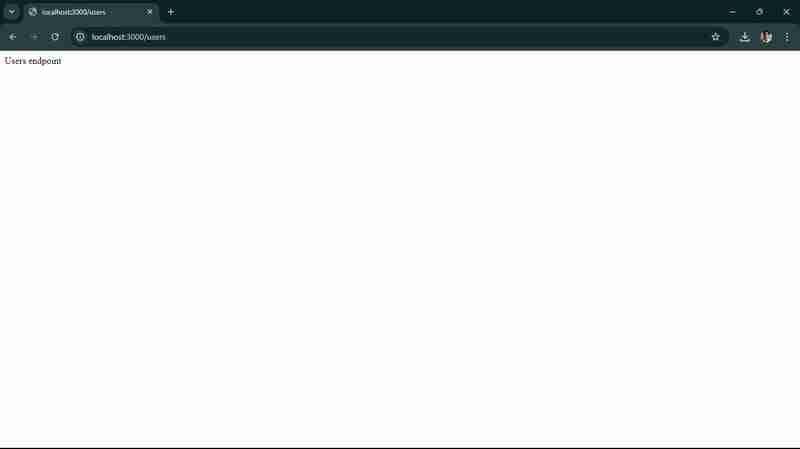
Now, open your browser, and go to http://localhost:3000/api , you’ll see the message “API endpoint”

Now, you should navigate to **http://localhost:3000/users,** you’ll see the message “Users endpoint”, shown in below screen
Now, your next step will be to connect to a database. For this, we’ll use we'll use MongoDB with Mongoose, a popular ODM (Object Data Modeling) library for MongoDB and Node.js.
4. Connecting to a Database.
- Install a mongoose.
You’ve to run the following command to install the Mongoose.
npm install mongoose
- now, you to update your app.js to Connect to MongoDB:
Let’s see how you can update your app.js file to connect to MongoDB database.
   const mongoose = require('mongoose');

   // Connect to MongoDB
   mongoose.connect('mongodb://localhost:27017/mydatabase', { useNewUrlParser: true, useUnifiedTopology: true })
       .then(() => console.log('Connected to MongoDB'))
       .catch(err => console.error('Could not connect to MongoDB', err));

   // ... existing code ...
Connect to MongoDB: Use mongoose.connect to connect to your MongoDB database. Replace 'mongodb://localhost:27017/mydatabase' with your actual MongoDB connection string if it's different.
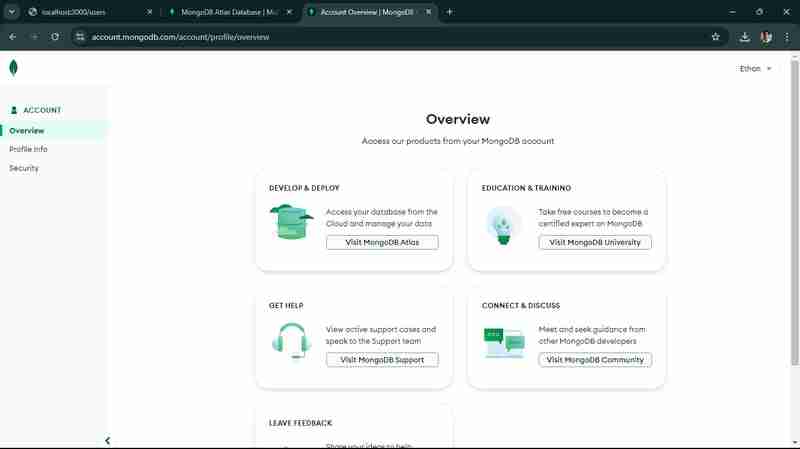
Now, that for that, You must first have set up your MongoDB, If you haven’t, let’s set it up now. Use MongoDB Atlas (Cloud Database). You have to create a MongoDB Atlas account, Go to MongoDB Atlas and sign up for free account.
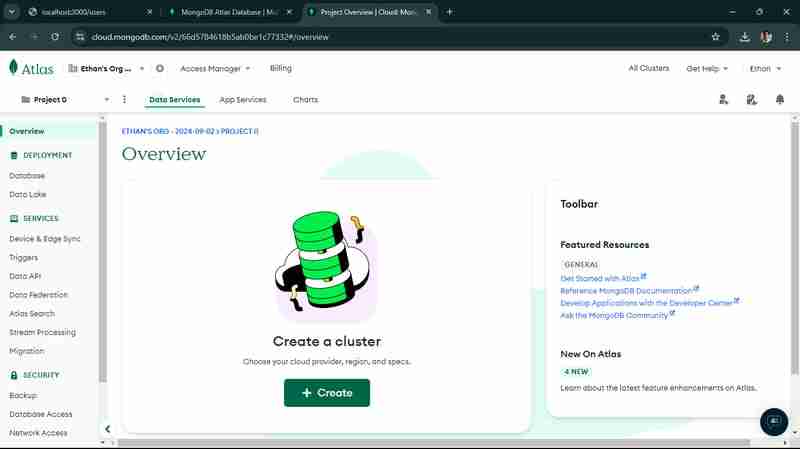
once you sign up via or Google or GitHub Account, You’ll see below screen after login.
You’ll to click on visit MongoDB Atlas, Click on Create a New Cluster,
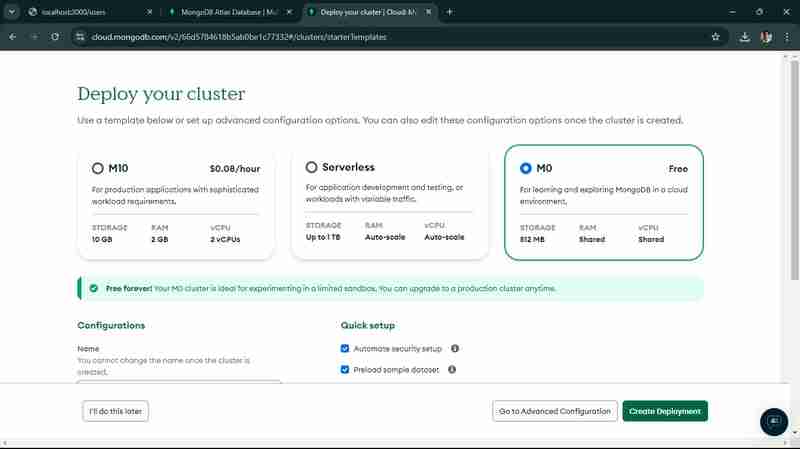
Once you click on Create as shown in above screen, you’ll be redirect to below screen, select M0 free version.
you have to keep your configuration as it is by default, now click on Create Deployment.
once, you click on that, you’ll come to this screen.
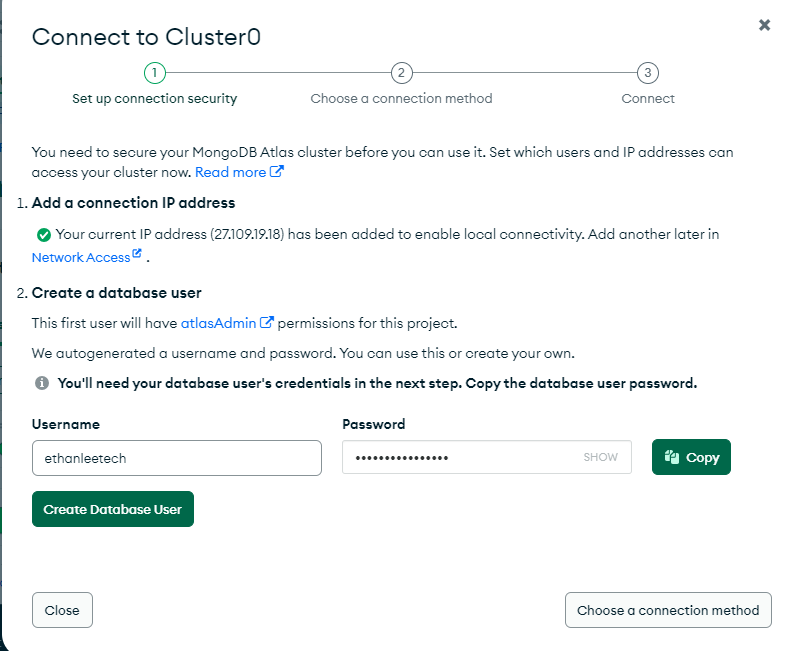
You’ve to notedown, your username and password, once you click on “Create Database User”,
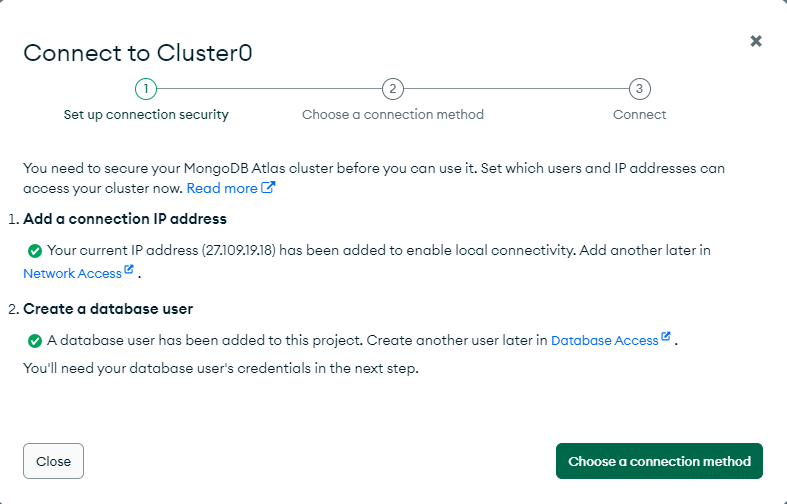
Once you click on “Choose a connection method”,
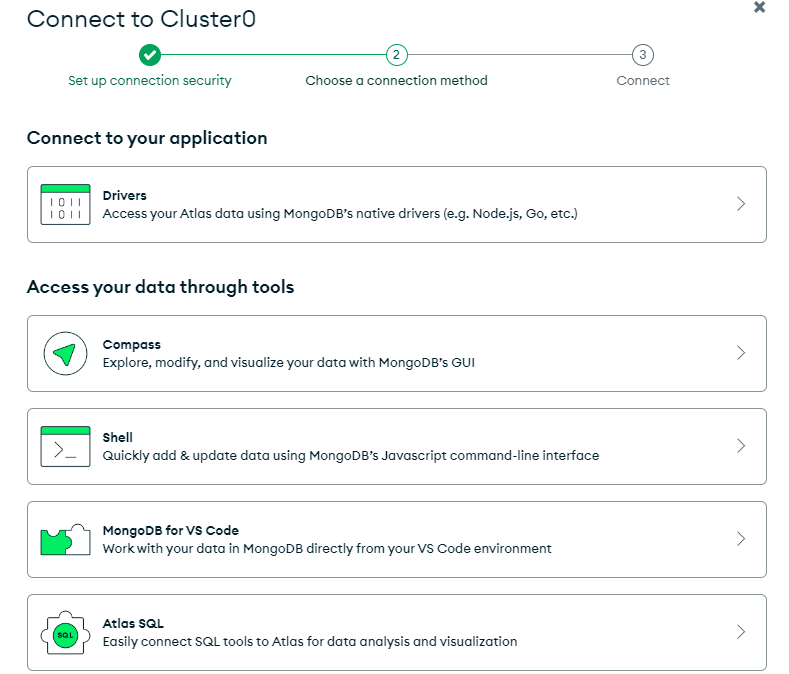
now, choose, Choose “Connect to your application”, You’ll see below screen.
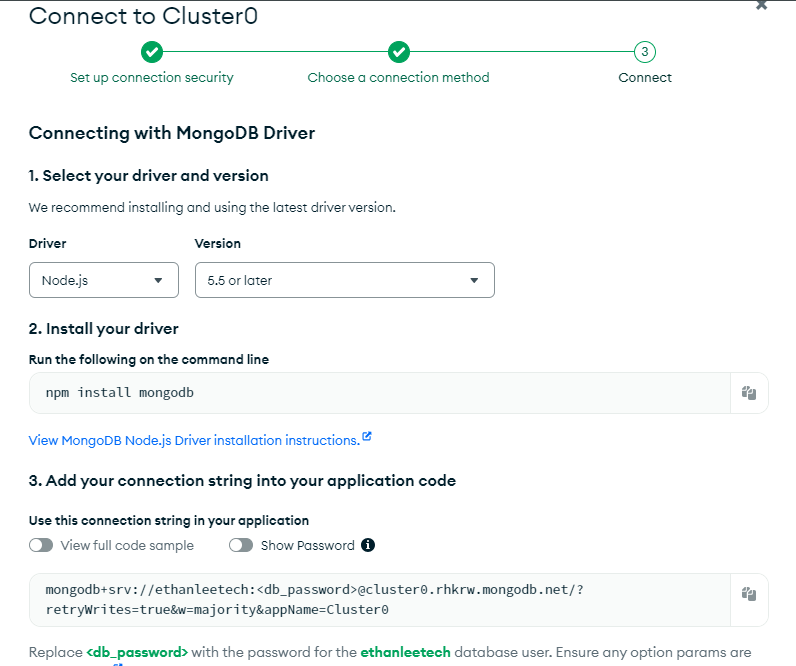
Now, you’ll see connection string like this - mongodb+srv://
replace it with your username and password you noted down earlier.
Now that, you to copy your MongoDB string and have to replace in your app.js code, and you have to update it.
now, you to run your node app.js file again in your terminal. You’ll see the message “Connected to MongoDB”

5. Implementing Middleware
So, now you see above successful message, now, next step is to add simple logging middleware using Morgan which is a popular HTTP request logger middleware for Node.js.
To install Morgan, run below command.
npm install morgan
now, you’ve to update, your app.js file to use Morgan.
   const express = require('express');
   const morgan = require('morgan'); // Import morgan
   const app = express();
   const port = process.env.PORT || 3000;

   console.log('Starting the server...');

   const mongoose = require('mongoose');

   // Replace with your actual MongoDB connection string
   const mongoURI = 'mongodb+srv://<username>:<password>@cluster0.mongodb.net/myFirstDatabase?retryWrites=true&w=majority';

   mongoose.connect(mongoURI, { useNewUrlParser: true, useUnifiedTopology: true })
       .then(() => console.log('Connected to MongoDB'))
       .catch(err => console.error('Could not connect to MongoDB', err));

   // Middleware to parse JSON bodies
   app.use(express.json());

   // Use morgan for logging
   app.use(morgan('tiny'));

   console.log('Middleware set up.');

   // Basic route
   app.get('/', (req, res) => {
       console.log('Received a request on /');
       res.send('Hello World!');
   });

   // New route for /api
   app.get('/api', (req, res) => {
       res.send('API endpoint');
   });

   // New route for /users
   app.get('/users', (req, res) => {
       res.send('Users endpoint');
   });

   console.log('Route set up.');

   // Start the server
   app.listen(port, () => {
       console.log(`Server is running on port ${port}`);
   });
now, run your node app.js, go to http://localhost:3000/ and you’ll see log entry for request in terminal. This step will add basic logging to your application.

Your next step is to define a schema and model for your MongoDB collections using Mongoose. This will allow you to interact with your database in a structured way.
6. Define a Schema and Model
You have to create a new file named user.js in a models directory you may need to create the models directory if it doesn't exist). You’ve define a User Schema and model for user.
   const mongoose = require('mongoose');

   // Define the User schema
   const userSchema = new mongoose.Schema({
       name: {
           type: String,
           required: true
       },
       email: {
           type: String,
           required: true,
           unique: true
       },
       password: {
           type: String,
           required: true
       }
   });

   // Create the User model
   const User = mongoose.model('User', userSchema);

   module.exports = User;
Now, you’ve to update the app.js to Use the User Model:
In app.js, import the User model and create a route to add a new user:
   const express = require('express');
   const morgan = require('morgan');
   const mongoose = require('mongoose');
   const User = require('./models/user'); // Import the User model
   const app = express();
   const port = process.env.PORT || 3000;

   console.log('Starting the server...');

   // Replace with your actual MongoDB connection string
   const mongoURI = 'mongodb+srv://<username>:<password>@cluster0.mongodb.net/myFirstDatabase?retryWrites=true&w=majority';

   mongoose.connect(mongoURI, { useNewUrlParser: true, useUnifiedTopology: true })
       .then(() => console.log('Connected to MongoDB'))
       .catch(err => console.error('Could not connect to MongoDB', err));

   // Middleware to parse JSON bodies
   app.use(express.json());

   // Use morgan for logging
   app.use(morgan('tiny'));

   console.log('Middleware set up.');

   // Basic route
   app.get('/', (req, res) => {
       console.log('Received a request on /');
       res.send('Hello World!');
   });

   // New route for /api
   app.get('/api', (req, res) => {
       res.send('API endpoint');
   });

   // New route for /users
   app.get('/users', (req, res) => {
       res.send('Users endpoint');
   });

   // Route to add a new user
   app.post('/users', async (req, res) => {
       try {
           const user = new User(req.body);
           await user.save();
           res.status(201).send(user);
       } catch (error) {
           res.status(400).send(error);
       }
   });

   console.log('Route set up.');

   // Start the server
   app.listen(port, () => {
       console.log(`Server is running on port ${port}`);
   });
now, that you’ve to open postman, you can also use desktop postman agent, click on new request, select request type to “Post”, Enter the URL - http://localhost:3000/users , now, select body tab, select row and json there.
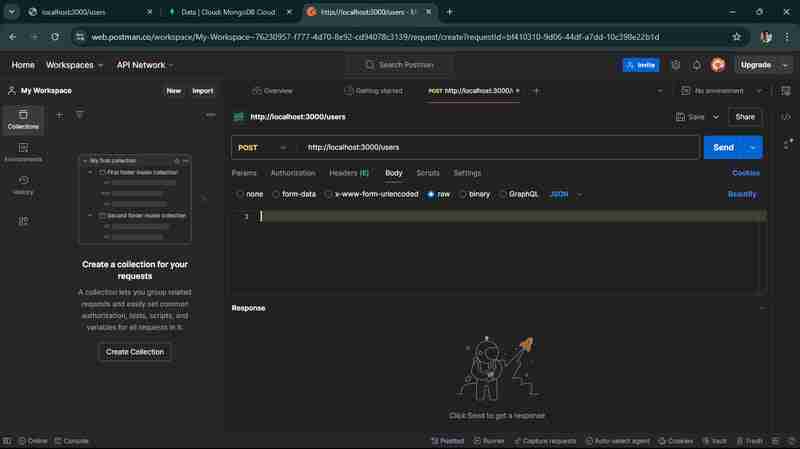
enter the following json in text area.
     {
         "name": "John Doe",
         "email": "john.doe@example.com",
         "password": "password123"
     }
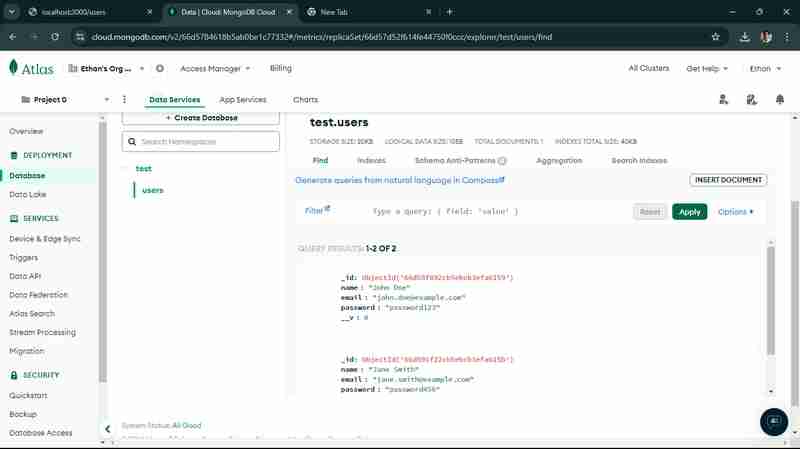
and once you send the request, it will reflect in your MongoDB Atlas account, you have to go database and have to select cluster0, find your database which you’ve create, go to the user, and here you’ll found the information, you send via a request. just like below screen.
7. Implemented CRUD Operations:
As we successfully added users to your MongoDB database, the next step is to implement additional CRUD (Create, Read, Update, Delete) operations for your User model. This will allow you to manage users more effectively.
Let's start by adding routes for reading, updating, and deleting users.
1. Read (GET) Users
Add a route to get all users and a route to get a user by ID.
// ... existing code ...

// Route to get all users
app.get('/users', async (req, res) => {
    try {
        const users = await User.find();
        res.send(users);
    } catch (error) {
        res.status(500).send(error);
    }
});

// Route to get a user by ID
app.get('/users/:id', async (req, res) => {
    try {
        const user = await User.findById(req.params.id);
        if (!user) {
            return res.status(404).send('User not found');
        }
        res.send(user);
    } catch (error) {
        res.status(500).send(error);
    }
});

// ... existing code ...
2. Update (PUT) Users
Add a route to update a user by ID.
// ... existing code ...

// Route to update a user by ID
app.put('/users/:id', async (req, res) => {
    try {
        const user = await User.findByIdAndUpdate(req.params.id, req.body, { new: true, runValidators: true });
        if (!user) {
            return res.status(404).send('User not found');
        }
        res.send(user);
    } catch (error) {
        res.status(400).send(error);
    }
});

// ... existing code ...
3. Delete (DELETE) Users
Add a route to delete a user by ID.
// ... existing code ...

// Route to delete a user by ID
app.delete('/users/:id', async (req, res) => {
    try {
        const user = await User.findByIdAndDelete(req.params.id);
        if (!user) {
            return res.status(404).send('User not found');
        }
        res.send(user);
    } catch (error) {
        res.status(500).send(error);
    }
});

// ... existing code ...
once, you update your above code in your app.js file,
start your server using node app.js command,
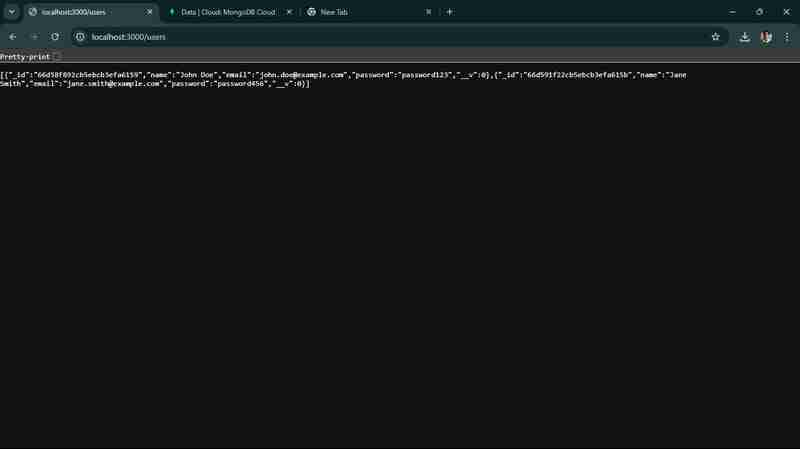
now, send request to get all users: You’ll see below screen, in your http://localhost:3000/users
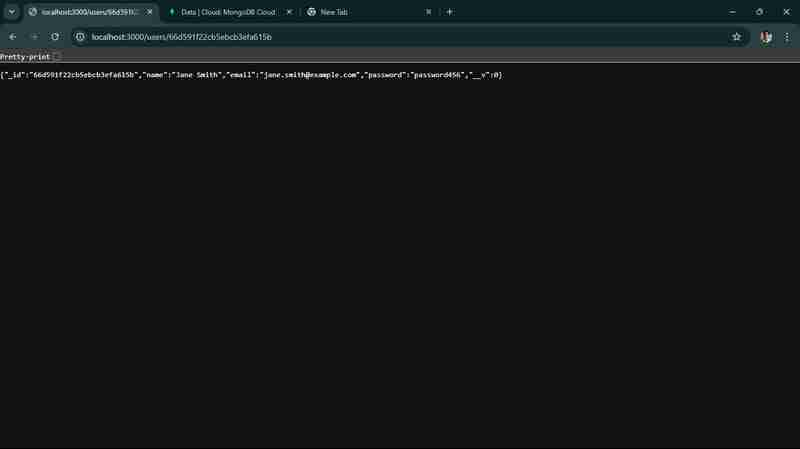
when you run get user by id, you’ll see in terminal as well on local host as well.
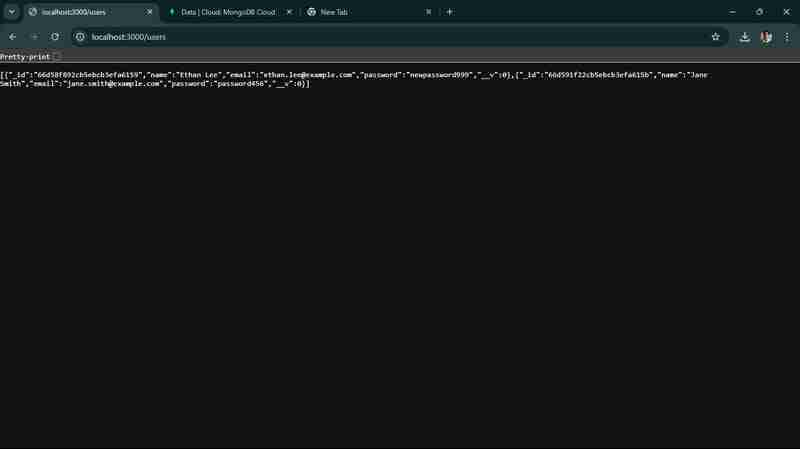
when you update any information, you’ll able to see it here. we changed name from john doe to Ethan lee,
when you run a delete request, one user will be deleted.

so, we successfully implemented and tested all the basic CRUD Operations for your API.
8. Implement Error Handling Middleware
Centralized error handling helps manage errors gracefully and provides consistent error responses.
Add Error Handling Middleware
   // ... existing code ...

   // Error handling middleware
   app.use((err, req, res, next) => {
       console.error(err.stack);
       res.status(500).send({ error: 'Something went wrong!' });
   });

   // Start the server
   app.listen(port, () => {
       console.log(`Server is running on port ${port}`);
   });
9. Use Environment Variables
Using environment variables helps manage configuration settings securely.
- Install dotenv
npm install dotenv
2. Create a .env File:
PORT=3000
MONGODB_URI=mongodb+srv://<username>:<password>@cluster0.mongodb.net/myFirstDatabase?retryWrites=true&w=majority
this is your updated app.js
   require('dotenv').config();
   const express = require('express');
   const morgan = require('morgan');
   const mongoose = require('mongoose');
   const cors = require('cors');
   const User = require('./models/user');
   const app = express();
   const port = process.env.PORT || 3000;

   console.log('Starting the server...');

   mongoose.connect(process.env.MONGODB_URI, { useNewUrlParser: true, useUnifiedTopology: true })
       .then(() => console.log('Connected to MongoDB'))
       .catch(err => console.error('Could not connect to MongoDB', err));

   // Middleware to parse JSON bodies
   app.use(express.json());

   // Use morgan for logging
   app.use(morgan('tiny'));

   // Use cors for handling CORS issues
   app.use(cors());

   console.log('Middleware set up.');

   // Basic route
   app.get('/', (req, res) => {
       console.log('Received a request on /');
       res.send('Hello World!');
   });

   // CRUD routes
   // ... existing CRUD routes ...

   // Error handling middleware
   app.use((err, req, res, next) => {
       console.error(err.stack);
       res.status(500).send({ error: 'Something went wrong!' });
   });

   console.log('Route set up.');

   // Start the server
   app.listen(port, () => {
       console.log(`Server is running on port ${port}`);
   });
10. Add Basic Authentication
For a more secure API, you might want to add basic authentication. Here’s a simple example using HTTP Basic Auth:
Install Basic Auth Middleware:
npm install express-basic-auth
2. Update app.js to Use Basic Auth:
   const basicAuth = require('express-basic-auth');

   // ... existing code ...

   // Use basic auth for all routes
   app.use(basicAuth({
       users: { 'admin': 'supersecret' },
       challenge: true
   }));

   // ... existing code ...
11. Document Your API
Using tools like Swagger can help you document your API endpoints.
Install Swagger UI
npm install swagger-ui-express swagger-jsdoc
Create a Swagger Configuration File
create a swagger.js file in root folder, you’ve to add following code to your file.
const swaggerJsDoc = require('swagger-jsdoc');
const swaggerUi = require('swagger-ui-express');

const swaggerOptions = {
    swaggerDefinition: {
        openapi: '3.0.0',
        info: {
            title: 'User API',
            version: '1.0.0',
            description: 'A simple Express User API'
        },
        servers: [
            {
                url: 'http://localhost:3000'
            }
        ]
    },
    apis: ['./app.js'] // Path to the API docs
};

const swaggerDocs = swaggerJsDoc(swaggerOptions);

module.exports = (app) => {
    app.use('/api-docs', swaggerUi.serve, swaggerUi.setup(swaggerDocs));
};
Update app.js to Use Swagger
Add the following code to your app.js file to set up Swagger:
update your app.js file
require('dotenv').config();
const express = require('express');
const morgan = require('morgan');
const mongoose = require('mongoose');
const cors = require('cors');
const User = require('./models/user');
const setupSwagger = require('./swagger'); // Import the Swagger setup function
const app = express();
const port = process.env.PORT || 3000;

console.log('Starting the server...');

mongoose.connect(process.env.MONGODB_URI, { useNewUrlParser: true, useUnifiedTopology: true })
    .then(() => console.log('Connected to MongoDB'))
    .catch(err => console.error('Could not connect to MongoDB', err));

// Middleware to parse JSON bodies
app.use(express.json());

// Use morgan for logging
app.use(morgan('tiny'));

// Use cors for handling CORS issues
app.use(cors());

console.log('Middleware set up.');

// Basic route
app.get('/', (req, res) => {
    console.log('Received a request on /');
    res.send('Hello World!');
});

// CRUD routes
// ... existing CRUD routes ...

// Setup Swagger
setupSwagger(app);

// Error handling middleware
app.use((err, req, res, next) => {
    console.error(err.stack);
    res.status(500).send({ error: 'Something went wrong!' });
});

console.log('Route set up.');

// Start the server
app.listen(port, () => {
    console.log(`Server is running on port ${port}`);
});
Add Swagger Comments to Your Routes
Add comments to your routes in app.js to document them with Swagger. Here’s an example for the GET /users route:
/**
 * @swagger
 * /users:
 *   get:
 *     summary: Retrieve a list of users
 *     responses:
 *       200:
 *         description: A list of users
 *         content:
 *           application/json:
 *             schema:
 *               type: array
 *               items:
 *                 type: object
 */
app.get('/users', async (req, res) => {
    try {
        const users = await User.find();
        res.send(users);
    } catch (error) {
        res.status(500).send(error);
    }
});

/**
 * @swagger
 * /users/{id}:
 *   get:
 *     summary: Retrieve a single user by ID
 *     parameters:
 *       - in: path
 *         name: id
 *         required: true
 *         schema:
 *           type: string
 *         description: The user ID
 *     responses:
 *       200:
 *         description: A single user
 *         content:
 *           application/json:
 *             schema:
 *               type: object
 *       404:
 *         description: User not found
 */
app.get('/users/:id', async (req, res) => {
    try {
        const user = await User.findById(req.params.id);
        if (!user) {
            return res.status(404).send('User not found');
        }
        res.send(user);
    } catch (error) {
        res.status(500).send(error);
    }
});

// Add similar comments for other routes...
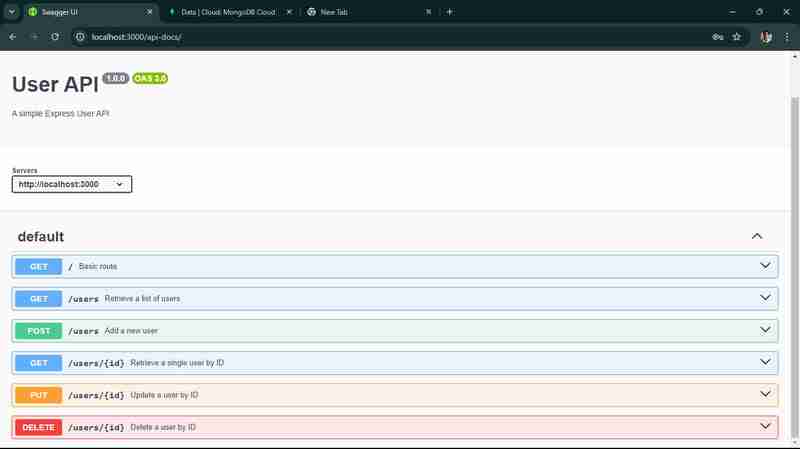
now, when you go to http://localhost:3000/api-docs , use your username and password which is in app.js

You’ll get this, you should be able to access the Swagger UI and see the documentation for your API.
You have successfully built a scalable API with Node.js and Express, complete with CRUD operations, basic authentication, and API documentation using Swagger. This should provide a comprehensive demo for your technical article. You can deploy your API over cloud which make it accessible for all people on the internet, you can use services like Heroku for deployment.
Conclusion
Building scalable APIs with Node.js and Express requires a strategic approach, including modular architecture, optimized performance with non-blocking I/O, clustering, efficient database management, and robust security measures. By implementing caching, monitoring tools, and auto-scaling, your API can handle thousands of requests per second, ensuring reliability and performance under heavy loads. Ready to scale your API with Node.js and Express? Contact us today to build a future-proof API solution for your business needs!
FAQs
1. What are the main advantages of using Node.js for building APIs?
Node.js offers several advantages for API development, including its asynchronous, non-blocking architecture that allows for handling multiple requests simultaneously. This leads to improved performance and scalability. Additionally, Node.js uses JavaScript, enabling developers to work across both the client and server sides, which streamlines the development process.
2. Why should I use Express.js with Node.js?
Express.js is a minimal and flexible web application framework that simplifies the process of building APIs with Node.js. It provides robust routing, middleware support, and easy integration with various databases, making it an excellent choice for developing RESTful APIs quickly and efficiently.
3. How can I ensure my API is scalable?
To ensure your API is scalable, consider implementing a microservices architecture, which allows different components to be scaled independently. Additionally, optimize your code for performance, use caching strategies, and conduct regular load testing to identify and address potential bottlenecks.
4. What are some best practices for error handling in Node.js APIs?
Best practices for error handling in Node.js APIs include using middleware to catch errors globally, logging errors for monitoring and debugging, and providing meaningful error messages to clients. It's also essential to handle different types of errors (e.g., validation errors, database errors) appropriately to enhance user experience.
5. ViitorCloud 如何帮助您使用 Node.js 和 Express 构建可扩展的 API?
ViitorCloud 提供根据您的业务需求量身定制的全面开发服务,专门使用 Node.js 和 Express 构建可扩展的 API。我们经验丰富的开发人员团队利用 API 设计和架构方面的最佳实践,确保您的应用程序能够有效地处理高负载。 ViitorCloud 专注于性能优化和强大的开发流程,可以帮助您创建不仅满足当前需求而且适应未来增长的 API,为您的数字解决方案提供坚实的基础。
以上是使用 Node.js 和 Express 构建可扩展的 API的详细内容。更多信息请关注PHP中文网其他相关文章!