Spinner(列表選項框)的基本使用
本節引言:
本來本節是想給大家介紹一個Gallery(畫廊)的一個控制項的,後來想想還是算了,因為 在Android 4.1後就已經被棄用了,儘管我們可以透過相容不來使用Gallery,不過想想 還是算了,因為Gallery每次切換圖片的時候,都需要重新建立視圖,這無疑會造成 很大資源浪費!我們可以透過其他方法來實現Gallery效果,例如透過HorizontalScrollView 來實現水平滾動效果,或者編寫一個水平方向的ListView~有興趣自己谷歌!
本節學習的是一個叫做Spinner的Adapter控制項! 應用場景:當我們的app需要使用者輸入資料時,除了讓使用者自己打字以外,還有一種比較貼心的設計: 列出一組選項讓使用者從中挑選,從而方便了我們的用戶! 話不多說,開始學習Spinner的基本用法~
##1.相關屬性
- android:dropDownHorizontalOffset:設定列錶框的水平偏移距離
- android:dropDownVerticalOffset:設定列錶框的水平垂直距離
- android:dropDownSelector:列錶框被選取時的背景
- android:dropDownWidth:設定下拉列錶框的寬度
- android:gravity:設定裡面元件的對其方式
- android:popupBackground:設定列錶框的背景
- android:prompt:設定對話框模式的列錶框的提示訊息(標題) ,只能夠引用string.xml 中的資源id,而不能直接寫字串
- android:spinnerMode:列錶框的模式,有兩個可選值:dialog:對話方塊風格的視窗 dropdown:下拉式選單風格的視窗(預設)
#可選屬性:- android:entries:使用陣列資源設定下拉列錶框的清單項目
2.使用範例:
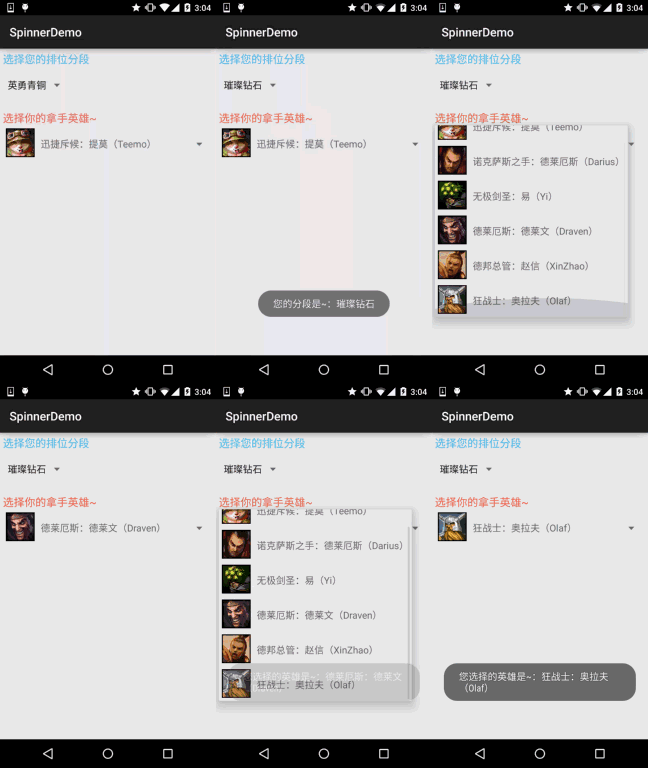
對了,Spinner會預設選取第一個值,就是預設呼叫spinner.setSection(0), 你可以透過這個設定預設的選中值,另外,會觸發一次OnItemSelectedListener 事件,暫時沒找到解決方法,下面折衷的處理是:新增一個boolean值,然後設定 為false,在onItemSelected時進行判斷,false說明是預設觸發的,不做任何操作 將boolean值設為true;true的話則正常觸發事件! 範例中寫了兩個不同的Spinner,從資料來源,列錶框風格等進行比較~ 接下來我們來看下
效果圖:

#程式碼實作:
這裡依然使用的我們前面的可重複使用BaseAdapter:第一個Spinner的資料來源編寫:在res/values下寫一個:myarrays.xml的文件,內容如下:
<?xml version="1.0" encoding="utf-8"?>
<resources>
<string-array name="data">
;item>不屈白銀</item>
<item>榮耀黃金</item>
gt;璀璨鑽石</ item>
<item>超凡大師</item>
<item>最強王</item <
##接著是第二個Spinner的版面:
item_spin_hero.xml
:
<resources>
<string-array name="data">
;item>不屈白銀</item>
<item>榮耀黃金</item>
gt;璀璨鑽石</ item>
<item>超凡大師</item>
<item>最強王</item <
##接著是第二個Spinner的版面:
item_spin_hero.xml
:
<?xml version="1.0" encoding="utf- 8"?><LinearLayout xmlns:android="http://schemas.android.com/apk/res/android" android:layout_width="match_parent"
match_parent" android:orientation="horizontal"
android:padding="5dp">
<Image android:layout_width="48dp"
android:layout_height="48dp"
androidroidsrc="@mipmap/iv_lol_lt1" android:id=" @+id/txt_name"
android:layout_width="wrap_content"
android:layout_height="wrap android:layout_marginTop="15dp"
android :text="德瑪西亞"
android:textSize="16sp" />
</LinearLayout>
# return hName;### }###### public void sethIcon(int hIcon) #### public void sethName(String hName) { ### this.hName = hName;### }###}######
<Image android:layout_width="48dp"
android:layout_height="48dp"
androidroidsrc="@mipmap/iv_lol_lt1" android:id=" @+id/txt_name"
android:layout_width="wrap_content"
android:layout_height="wrap android:layout_marginTop="15dp"
android :text="德瑪西亞"
android:textSize="16sp" />
</LinearLayout>
#
再加入寫一個實體實體類別:Hero.java:
/**
* 由 Jay 創立於 2015 年 9 月 24 日 0024.
*/
public class Hero {
# # private int hIcon;
# private String hName;
public Hero() {
this.hIcon = hIcon;
this.hName = hName;
}
public int gethIcon( public String gethName() { * 由 Jay 創立於 2015 年 9 月 24 日 0024.
*/
public class Hero {
# # private int hIcon;
# private String hName;
public Hero() {
this.hIcon = hIcon;
this.hName = hName;
}
最後是MainActivity的佈局與Java程式碼部分:
佈局檔案:activity_main.xml:
## xmlns:tools="http://schemas.android.com/tools"
# android:layout_width="match_parent"
android:layout_width="match_parent"
android:layout_width="match_parent"
android:layout_width="match_parent"
="match_parent"
android:orientation="vertical"
android:padding="5dp"
tools:context=".MainActivity">##> ="wrap_content"
android:layout_height="wrap_content"
android:text="選擇您的排位分段"# android:textSize ="18sp 〈 />
android:layout_wid="
android: entries="@array/data"
android:prompt="@string/spin_title"
and idth="wrap_content 「
android:layout_height="wrap_content"
android:layout_marginTop="10 textColor= "#F5684A"
android:textSize="18sp" />
##
layout_height="64dp " />
#3.程式碼範例下載:SpinnerDemo.zip
本節小結##好的,本節介紹了Spinner(下拉選項框)的使用,範例還蠻有趣的,哈哈~! 別問我哪個區什麼段位,我可是人機小王子,可惜一直在青銅分段苦苦掙扎~ 你知道為什麼的
,好吧,本節就到這裡~
# android:layout_width="match_parent"
android:layout_width="match_parent"
android:layout_width="match_parent"
android:layout_width="match_parent"
="match_parent"
android:orientation="vertical"
android:padding="5dp"
tools:context=".MainActivity">##> ="wrap_content"
android:layout_height="wrap_content"
android:text="選擇您的排位分段"# android:textSize ="18sp 〈 />
android:layout_wid="
android: entries="@array/data"
android:prompt="@string/spin_title"
and idth="wrap_content 「
android:layout_height="wrap_content"
android:layout_marginTop="10 textColor= "#F5684A"
android:textSize="18sp" />
##
layout_height="64dp " />
#
MainActivity.java:
public class MainActivity extends AppCompatActivity Implements AdapterView.OnItemSelectedListener{
private Spinner spin_one;
//判斷是否為剛進入時觸發onItemSelected的標誌
private boolean one_selected = false;
private boolean two_selected = false;
mData = null;
# private BaseAdapter myAdadpter = null;
@Override
pro]0void @Override
super.onCreate(savedInstanceState);
setContentView(R. layout) .activity_main);
mContext = MainActivity.this;
mData
# private void bindViews( ) {
spin_one = (Spinner) findViewById(R.id.spin_one);
# mData.add(new Hero (R) .mipmap.iv_lol_icon1,"迅捷斥候:提摩(提摩)"));
mData.add(new Hero(R.mipmap.iv_lol_icon2,"諾克薩斯(大流士)" ));
mData.add(new Hero(R.mipmap.iv_lol_icon3,"無極劍聖:容易(簡單)"));
mipmap.iv_lol_icon4,"德萊厄斯:德萊文(Draven)"));
mData.add(new Hero(R.mipmap.iv_lol_icon5,"德邦總管:趙信(XinZhao)"));
mData.add (new Hero(R.mipmap.iv_lol_icon6,"狂戰士:歐拉夫(歐拉夫)"));
item_spin_hero) {
@覆蓋上
公用無效bindView(ViewHolder持有人,英雄obj){
holder.setImageResource(R.id.img_icon, . (R.id.txt_name,obj.gethName( )) ;
}
};
(this);
spin_two.setOnItemSelectedListener(this);
}
@Override
public void onItemSelected(AdapterView parent, View view, int position, case R . id.spin_one:
if(one_selected){
ent.getItemAtPosition(position).toString(),
)。 show();
}else one_selected = true;
break;
case R.id.spin_two:
if(two_selected){
TextView txt_name = (TextView) view.findViewById (R .id.txt_name);
Toast.makeText(mContext,"您選擇的英雄為 + Toast.LENGTH_SHORT).show();
}else two_selected = true;
break;
onNothingSelected(AdapterView<?> parent) {
# }
}
另外關於Spinner的OnItemSelectedListener,以及如何取得選取項目的值,就自己看上面的 程式碼啦~
本節小結##好的,本節介紹了Spinner(下拉選項框)的使用,範例還蠻有趣的,哈哈~! 別問我哪個區什麼段位,我可是人機小王子,可惜一直在青銅分段苦苦掙扎~ 你知道為什麼的
,好吧,本節就到這裡~
#


