Bitmap所引起的OOM問題
本節引言:
上節,我們已經學習了Bitmap的基本用法,而本節我們要來探討的Bitmap的OOM問題, 大家在實際開發上可能遇到過,或是沒遇到因為Bitmap引起的OOM問題,本節我們 就來圍繞這個話題來進行學習~了解什麼是OOM,為什麼會引起OOM,改善Bitmap引起的 OOM問題~
1.什麼是OOM?為什麼會引起OOM?
答案:Out Of Memory(記憶體溢出),我們都知道Android系統會為每個APP分配一個獨立的工作空間, 或者說分配一個單獨的Dalvik虛擬機,這樣每個APP都可以獨立運作而不相互影響!而Android對於每個 Dalvik虛擬機器都會有一個最大記憶體限制,如果目前佔用的記憶體加上我們申請的記憶體資源超過了這個限制 ,系統就會拋出OOM錯誤!另外,這裡別跟RAM混淆了,即時目前RAM中剩餘的記憶體有1G多,但是OOM還是會發生!別把RAM(實體記憶體)和OOM扯到一起!另外RAM不足的話,就是殺應用了,而不是只是OOM了! 而這個Dalvik中的最大記憶體標準,不同的機型是不一樣的,可以呼叫:
ActivityManager activityManager = (ActivityManager)context.getSystemService(Context.ACTIVITY_SERVICE);
Log.e("HEHE","最大内存:" + activityManager.getMemoryClass());
得到正常的最大記憶體標準,又或直接在命令列鍵入:
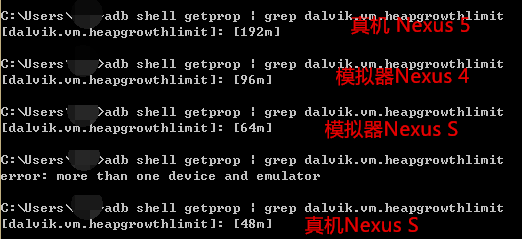
adb shell getprop | grep dalvik.vm.heapgrowthlimit
你也可以開啟系統原始碼/system/build.prop文件,看下文件中這一部分的資訊得出:
dalvik.vm.heapstartsize=8m
dalvik.vm.heapgrowthlimit=192m
dalvik.vm.heapsize=512m
dalvik.vm.heaptargetutilization=0.75
dalvik.vm.heapminfree=2m
dalvik.vm.heapmaxfree=8m
我們關注的地方有三個:heapstartsize堆記憶體的初始大小,heapgrowthlimit標準的應用的最大堆 記憶體大小,heapsize則是設定了使用android:largeHeap的應用程式的最大堆記憶體大小!
我這裡試了下手邊幾個機型的正常最大記憶體分配標準:

你也可以試試自己手邊的機子~
好啦,不扯了,關於OOM問題的產生,就扯到這裡,再扯就到記憶體管理那一塊了,可是個大塊頭, 現在還啃不動...下面我們來看看避免Bitmap OOM的一些技巧吧!
2.避免Bitmap引起的OOM技巧小結
#1)採用低記憶體佔用量的編碼方式
上一節說了BitmapFactory.Options這個類,我們可以設定下其中的inPreferredConfig屬性,
預設是Bitmap.Config.ARGB_8888,我們可以修改成Bitmap.Config.ARGB_4444
Bitmap.Config ARGB_4444:每個像素佔四位,即A=4,R =4,G=4,B=4,那麼一個像素點佔4+4+4+4=16位元
Bitmap.Config ARGB_8888:每個像素佔八位,即A=8,R=8, G=8,B=8,那麼一個像素點佔8+8+8+8=32位元
預設使用ARGB_8888,即一個像素佔4個位元組!
2)圖片壓縮
同樣是BitmapFactory.Options,我們透過inSampleSize設定縮放倍數,例如寫2,即長寬變成原來的1/2,圖片就是原來的1/4,如果不進行縮放的話設定為1即可!但是不能一味的壓縮,畢竟這個值太小 的話,圖片會很模糊,而且要避免圖片的拉伸變形,所以需要我們在程式中動態的計算,這個 inSampleSize的合適值,而Options中又有這樣一個方法:inJustDecodeBounds,將該參數設為 true後,decodeFiel並不會分配記憶體空間,但可以計算出原始圖片的長寬,調用 options.outWidth/outHeight取得圖片的寬高,然後經過一定的演算法,即可得到適合的 inSampleSize,這裡感謝街神提供的程式碼-摘自鴻洋blog!
public static int caculateInSampleSize(BitmapFactory.Options options, int reqWidth, int reqHeight) {
    int width = options.outWidth;
    int height = options.outHeight;
    int inSampleSize = 1;
    if (width > reqWidth || height > reqHeight) {
        int widthRadio = Math.round(width * 1.0f / reqWidth);
        int heightRadio = Math.round(height * 1.0f / reqHeight);
        inSampleSize = Math.max(widthRadio, heightRadio);
    }
    return inSampleSize;
}
然後使用下上述的方法即可:
BitmapFactory.Options options = new BitmapFactory.Options();
options.inJustDecodeBounds = true; // 设置了此属性一定要记得将值设置为false
Bitmap bitmap = null;
bitmap = BitmapFactory.decodeFile(url, options);
options.inSampleSize = computeSampleSize(options,128,128);
options.inPreferredConfig = Bitmap.Config.ARGB_4444;
/* 下面两个字段需要组合使用 */
options.inPurgeable = true;
options.inInputShareable = true;
options.inJustDecodeBounds = false;
try {
    bitmap = BitmapFactory.decodeFile(url, options);
} catch (OutOfMemoryError e) {
        Log.e(TAG, "OutOfMemoryError");
}
3.及時回收圖像
如果引用了大量的Bitmap對象,而應用又不需要同時顯示所有圖片。可以將暫時不用到的Bitmap對象 及時回收掉。對於一些明確知道圖片使用情況的場景可以主動recycle回收,例如引導頁的圖片,使用 完就recycle,畫面動畫,載入一張,畫一張,釋出一張!使用時加載,不顯示時直接置null或recycle! 如:imageView.setImageResource(0); 不過某些情況下會出現特定圖片反覆加載,釋放,再加載等,低效率的事情...
#4.其他方法
#下面這些方法,我並沒用過,大家可以自行查閱相關資料:
1.簡單透過SoftReference引用方式管理圖片資源
建個SoftReference的hashmap 使用圖片時先查詢這個hashmap是否有softreference, softreference裡的圖片是否為空, 如果為空就載入圖片到softreference並加入hashmap。 無需再程式碼裡顯式的處理圖片的回收與釋放,gc會自動處理資源的釋放。 這種方式處理起來簡單實用,能一定程度上避免前一種方法反覆加載釋放的低效率。但還不夠優化。
範例程式碼:
private Map<String, SoftReference> imageMap
                                           = new HashMap<String, SoftReference>();

public Bitmap loadBitmap(final String imageUrl,final ImageCallBack imageCallBack) {
    SoftReference reference = imageMap.get(imageUrl);
    if(reference != null) {
        if(reference.get() != null) {
            return reference.get();
        }
    }
    final Handler handler = new Handler() {
        public void handleMessage(final android.os.Message msg) {
            //加入到缓存中
            Bitmap bitmap = (Bitmap)msg.obj;
            imageMap.put(imageUrl, new SoftReference(bitmap));
            if(imageCallBack != null) {
                imageCallBack.getBitmap(bitmap);
            }
        }
    };
    new Thread(){
        public void run() {
            Message message = handler.obtainMessage();
            message.obj = downloadBitmap(imageUrl);
            handler.sendMessage(message);
        }
    }.start();
    return null ;
}

// 从网上下载图片
private Bitmap downloadBitmap (String imageUrl) {
    Bitmap bitmap = null;
    try {
        bitmap = BitmapFactory.decodeStream(new URL(imageUrl).openStream());
        return bitmap ;
    } catch (Exception e) {
        e.printStackTrace();
        return null;
    }
}
public interface ImageCallBack{
    void getBitmap(Bitmap bitmap);
}
2.LruCache + sd的快取方式
Android 3.1版本起,官方也提供了LruCache來進行cache處理,當儲存Image的大小大於LruCache 設定的數值,那麼近期使用次數最少的圖片就會被回收掉,系統會自動釋放記憶體!
使用範例:
步驟:
#1)要先設定快取圖片的記憶體大小,我在這裡設定為手機記憶體的1/8, 手機記憶體的取得方式:int MAXMEMONRY = (int) (Runtime.getRuntime() .maxMemory() / 1024);
2)LruCache裡面的鍵值對分別是URL和對應的圖片
3)重寫了一個叫做sizeOf的方法,回傳的是圖片數量。
private LruCache mMemoryCache;
private LruCacheUtils() {
    if (mMemoryCache == null)
        mMemoryCache = new LruCache(
                MAXMEMONRY / 8) {
            @Override
            protected int sizeOf(String key, Bitmap bitmap) {
                // 重写此方法来衡量每张图片的大小,默认返回图片数量。
                return bitmap.getRowBytes() * bitmap.getHeight() / 1024;
            }

            @Override
            protected void entryRemoved(boolean evicted, String key,
                    Bitmap oldValue, Bitmap newValue) {
                Log.v("tag", "hard cache is full , push to soft cache");

            }
        };
}
4)下面的方法分別是清空快取、新增圖片到快取、從快取中取得圖片、從快取中移除。
移除和清除快取是必須要做的事,因為圖片快取處理不當就會報記憶體溢出,所以一定要注意。
public void clearCache() {
    if (mMemoryCache != null) {
        if (mMemoryCache.size() > 0) {
            Log.d("CacheUtils",
                    "mMemoryCache.size() " + mMemoryCache.size());
            mMemoryCache.evictAll();
            Log.d("CacheUtils", "mMemoryCache.size()" + mMemoryCache.size());
        }
        mMemoryCache = null;
    }
}

public synchronized void addBitmapToMemoryCache(String key, Bitmap bitmap) {
    if (mMemoryCache.get(key) == null) {
        if (key != null && bitmap != null)
            mMemoryCache.put(key, bitmap);
    } else
        Log.w(TAG, "the res is aready exits");
}

public synchronized Bitmap getBitmapFromMemCache(String key) {
    Bitmap bm = mMemoryCache.get(key);
    if (key != null) {
        return bm;
    }
    return null;
}

/**
 * 移除缓存
 *
 * @param key
 */
public synchronized void removeImageCache(String key) {
    if (key != null) {
        if (mMemoryCache != null) {
            Bitmap bm = mMemoryCache.remove(key);
            if (bm != null)
                bm.recycle();
        }
    }
}
上述內容摘自-圖片快取之記憶體快取技術LruCache,軟體引用
#本節小結:
本節跟大家講解了OOM問題的發生緣由,也總結了一下網路上給出的一些避免因Bitmap而引起OOM 的一些方案,因為公司做的APP都是地圖類的,很少涉及到圖片,所以筆者並沒有遇到過OOM的問題, 所以對此並不怎麼熟悉~後續在進階課程的記憶體管理,我們再慢慢糾結這個OOM的問題,好的, 本節就到這裡,謝謝~
參考文獻:Android應用程式中OOM問題剖析與解決方案


