Bitmap (bitmap) full analysis Part 1
Introduction to this section:
In the previous section we explained the 13 types of Drawable types in Android. Have you applied them to your own? What about projects? In this section, we will discuss some uses of Bitmap. Before starting the content of this section, we Let’s first distinguish the concepts of several nouns:
- Drawable: A general graphic object used to load images in common formats, which can be images such as PNG and JPG. They are also the 13 Drawable type visual objects learned earlier! We can understand it as a place for placing paintings - Picture frame!
- Bitmap(bitmap): We can think of it as an easel, we put the painting on it first, and then we can Perform some processing, such as obtaining image file information, performing rotation and cutting, zooming in and out, etc.!
- Canvas(canvas): As the name suggests, canvas, we can paint (draw) on it, you can either use Paint(brush), To draw various shapes or write words, you can also use Path(path) to draw multiple points and then connect them into various graphics!
- Matrix(Matrix): Used for graphics special effects processing, color matrix (ColorMatrix), and Matrix for image processing Pan, zoom, rotate, tilt and more!
The above are all the underlying graphics classes in Android: android.graphics provides us with the interface! Well, without further ado, let’s start this section! PS: Official document: Bitmap
##1. Understand Bitmap, BitmapFactory, BitmapFacotry.Options
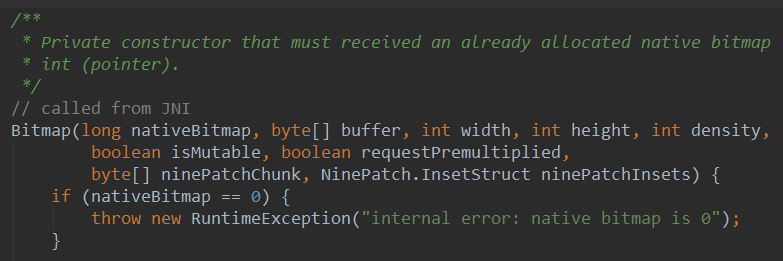
As the title says, I could have said it directly The three things are related, but I just want toproud, so I have to look at the code! If you open the source code of the Bitmap class, you will see something like this in the construction method of Bitmap:
What I probably want to say is: the structure of Bitmap The method is private and cannot be instantiated outside, only through JNI! Of course, we will definitely be provided with an interface for us to create Bitmap, and this interface class is:
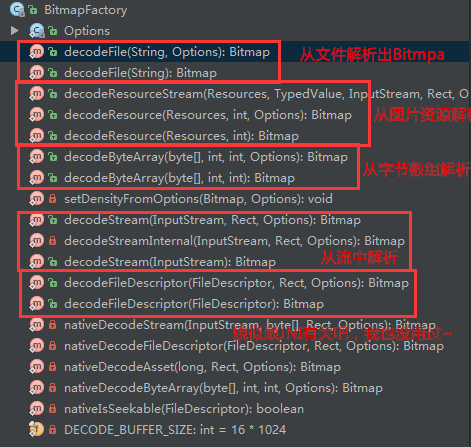
BitmapFactory! Come on, open the BitmapFactory class. We click on the Structure on the left to see that BitmapFactory gives us These methods are provided, most of which are decodeXxx, to create Bitmap in various forms!
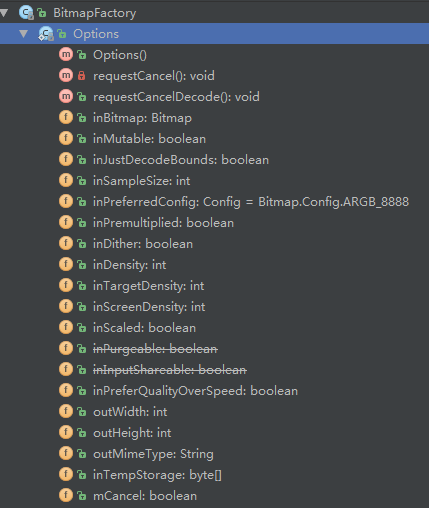
Then we discovered that each method will have an Options type parameter, click on it to take a look: So we discovered that this thing is a static inner class:
BitmapFacotry.Options! And he is used to set the options during decoding!
We set the values of some parameters here, such as setting inJustDecodeBounds to true to avoid OOM (memory overflow), What, I don’t know OOM, it’s okay, I’ll explain it to you later! Finally back to our Bitmap! Well, in Bitmap There are many methods, so I won’t explain them one by one. Let’s pick a few that are used more and explain them! Chinese document: Android Chinese API (136) - Bitmap
2.Bitmap common methods
Common methods
- public boolean compress (Bitmap.CompressFormat format, int quality, OutputStream stream) Compressing the bitmap to the specified OutputStream can be understood as saving the Bitmap to a file! format: Format, PNG, JPG, etc.; quality: Compression quality, 0-100, 0 represents the lowest quality compression, 100 is the maximum quality (PNG is lossless, and quality settings will be ignored) stream:Output stream The return value represents whether the compression is successful to the specified stream!
- void recycle(): Recycle the memory space occupied by the bitmap and mark the bitmap as Dead
- boolean isRecycled(): Judgment bit Whether the image memory has been released
- int getWidth(): Get the width of the bitmap
- int getHeight(): Get the height of the bitmap
- boolean isMutable(): Whether the image can be modified
- int getScaledWidth(Canvas canvas): Get the width of the image after the specified density conversion
- int getScaledHeight(Canvas canvas): Get the height of the image after the specified density conversion
Static method :
- Bitmap createBitmap(Bitmap src): Use src as the original image to generate an immutable new image
- Bitmap createScaledBitmap(Bitmap src, int dstWidth, int dstHeight , boolean filter): Use src as the original image to create a new image, specify the height and width of the new image and whether to change it.
- Bitmap createBitmap(int width, int height, Config config): Create a bitmap of the specified format and size
- Bitmap createBitmap(Bitmap source , int x, int y, int width, int height) takes the source as the original image, creates a new image, and specifies the starting coordinates and the height and width of the new image.
- public static Bitmap createBitmap(Bitmap source, int x, int y, int width, int height, Matrix m, boolean filter)
##BitmapFactory.OptionSetting parameters:
- boolean inJustDecodeBounds - If set to true, the image will not be obtained and memory will not be allocated, but the height and width information of the image will be returned.
- int inSampleSize——The multiple of image scaling. If it is set to 4, then the width and height are both 1/4 of the original size, and the image is 1/16 of the original size.
- int outWidth——Get the width value of the picture
- int outHeight——Get the height value of the picture
- int inDensity - Pixel compression ratio used for the bitmap
- int inTargetDensity - Pixel compression ratio used for the target bitmap (the bitmap to be generated)
- boolean inScaled - Image compression when set to true, from inDensity to inTargetDensity.
Okay, that’s all. You have to check the documentation yourself~
3. Get the Bitmap bitmap
There are two ways to obtain bitmaps from resources: through BitmapDrawable or BitmapFactory, as demonstrated below: We first have to get this
BitmapDrawable method:
You can create a constructor to construct a BitmapDrawable object, such as building a BitmapDrawable through a stream:
BitmapDrawable bmpMeizi = new BitmapDrawable(getAssets().open("pic_meizi.jpg"));
Bitmap mBitmap = bmpMeizi.getBitmap();
img_bg.setImageBitmap(mBitmap);
BitmapFactory method:
are all static methods, which can be called directly. Bitmaps can be obtained through resource ID, path, file, data stream, etc.!
//通过资源ID
private Bitmap getBitmapFromResource(Resources res, int resId) {
      return BitmapFactory.decodeResource(res, resId);
}

//文件
private Bitmap getBitmapFromFile(String pathName) {
      return BitmapFactory.decodeFile(pathName);
}

//字节数组
public Bitmap Bytes2Bimap(byte[] b) {
    if (b.length != 0) {
        return BitmapFactory.decodeByteArray(b, 0, b.length);
    } else {
        return null;
    }
}

//输入流
private Bitmap getBitmapFromStream(InputStream inputStream) {
      return BitmapFactory.decodeStream(inputStream);
}
4. Get Bitmap related information:
This, as long as we get the Bitmap object, we can call the relevant method to get the corresponding parameters, getByteCount to get the size, getHeight and getWidth ~ I won’t write them here, check the documentation yourself!
5. Pull out a certain corner of the picture
Sometimes, you may want to pull off a certain corner of the picture, just use Bitmap's createBitmap() to pull it off. The parameters are: the processed bitmap object, the starting x, y coordinates, and the intercepted width and height
Bitmap bitmap1 = BitmapFactory.decodeResource(getResources(), R.mipmap.pic_meizi);
Bitmap bitmap2 = Bitmap.createBitmap(bitmap1,100,100,200,200);
img_bg = (ImageView) findViewById(R.id.img_bg);
img_bg.setImageBitmap(bitmap2);
Running renderings:
Original image:
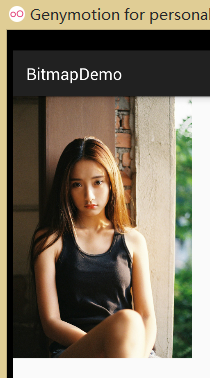
Cut off the corner:
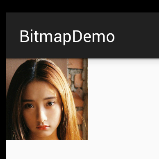
6. Scale the Bitmap
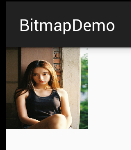
We don’t use Matrix to compare Bitmap here, but directly use the createScaledBitmap provided by Bitmap to implement it. The parameters are: processed bitmap object, scaled width and height,
7. Use Bitmap to take screenshots
Running renderings:

Implementation code:
public class MainActivity extends AppCompatActivity {
    static ByteArrayOutputStream byteOut = null;
    private Bitmap bitmap = null;
    private Button btn_cut;

    @Override
    protected void onCreate(Bundle savedInstanceState) {
        super.onCreate(savedInstanceState);
        setContentView(R.layout.activity_main);
        btn_cut = (Button) findViewById(R.id.btn_cut);
        btn_cut.setOnClickListener(new View.OnClickListener() {
            @Override
            public void onClick(View v) {
                captureScreen();
            }
        });
    }

    public void captureScreen() {
        Runnable action = new Runnable() {
            @Override
            public void run() {
                final View contentView = getWindow().getDecorView();
                try{
                    Log.e("HEHE",contentView.getHeight()+":"+contentView.getWidth());
                    bitmap = Bitmap.createBitmap(contentView.getWidth(),
                            contentView.getHeight(), Bitmap.Config.ARGB_4444);
                    contentView.draw(new Canvas(bitmap));
                    ByteArrayOutputStream byteOut = new ByteArrayOutputStream();
                    bitmap.compress(Bitmap.CompressFormat.JPEG, 100, byteOut);
                    savePic(bitmap, "sdcard/short.png");
                }catch (Exception e){e.printStackTrace();}
                finally {
                    try{
                        if (null != byteOut)
                            byteOut.close();
                        if (null != bitmap && !bitmap.isRecycled()) {
//                            bitmap.recycle();
                            bitmap = null;
                        }
                    }catch (IOException e){e.printStackTrace();}

                }
            }
        };
        try {
            action.run();
        } catch (Exception e) {
            e.printStackTrace();
        }
    }

    private void savePic(Bitmap b, String strFileName) {
        FileOutputStream fos = null;
        try {
            fos = new FileOutputStream(strFileName);
            if (null != fos) {
                boolean success= b.compress(Bitmap.CompressFormat.PNG, 100, fos);
                fos.flush();
                fos.close();
                if(success)
                    Toast.makeText(MainActivity.this, "截屏成功", Toast.LENGTH_SHORT).show();
            }
        } catch (FileNotFoundException e) {
            e.printStackTrace();
        } catch (IOException e) {
            e.printStackTrace();
        }
    }
}
Code analysis:
The code is very simple, final View contentView = getWindow().getDecorView(); this code is to get the current XML View of the root node! Then set the size of the screenshot and call contentView.draw(new Canvas(bitmap)); OK, then The bitmap is converted into a stream, and then written to the SD card. It’s gone~ Of course, we can also see from the results that the screenshot captures only the content of the modified APP! If you want to capture the full screen, Google it yourself~!
Summary of this section:
This section will explain to you Bitmap, BitmapFactory and its static internal class Options , and BitmapDrawable For basic use, in fact, we only need to know how to create Bitmap. Its extension is generally implemented through Matrix and Canvas. Bitmap, we pay more attention to the OOM problem. In the next section, we will learn how to avoid the OOM problem of Bitmap! Thank you~

