
解釋各種機器學習模型程式碼範例:利用LIME進行解釋

- PHPz轉載
- 2023-11-06 11:13:011359瀏覽
機器學習模型變得越來越複雜和準確,但它們的不透明性仍然是一個重大挑戰。理解為什麼一個模型會做出特定的預測,對於建立信任和確保它按照預期行事至關重要。在本文中,我們將介紹LIME,並使用它來解釋各種常見的模型。
LIME
一個強大的Python庫LIME(Local Interpretable Model-agnostic Explanations)可以幫助解釋機器學習分類器(或模型)的行為。 LIME的主要目的是為單一預測提供可解釋的、人類可讀的解釋,尤其是針對複雜的機器學習模型。透過提供對這些模型如何運作的詳細理解,LIME鼓勵人們對機器學習系統的信任

#隨著機器學習模型變得越來越複雜,理解它們的內部工作原理可能會變得具有挑戰性。 LIME透過為特定實例建立本地解釋來解決這個問題,使用戶更容易理解並信任機器學習模型
LIME的主要特點:
- 建立簡單、可解釋的解釋來理解複雜ML模型的預測。
- 檢查單一預測來識別模型中潛在的偏差和錯誤。
- 理解有助於準確預測的特徵來提高模型表現。
- 提供透明度和可解釋性來增強使用者對機器學習系統的信任。
LIME透過使用一個更簡單的、圍繞特定實例的本地可解釋模型來近似複雜的ML模型來運行。 LIME工作流程的主要可以分成步驟:
- 選擇要解釋的實例。
- 透過產生一組相鄰樣本來幹擾實例。
- 使用複雜ML模型獲得擾動樣本的預測。
- 擬合一個更簡單的,可解釋的模型(例如,線性迴歸或決策樹)對受干擾的樣本及其預測。
- 解釋更簡單的模型,為原始實例提供解釋。
在不同模型中使用LIME
#開始使用LIME之前,需要進行安裝。可以透過使用pip指令來安裝LIME:
pip install lime
1、分類模型
要將LIME與分類模型一起使用,需要建立一個解釋器對象,然後為特定實例產生解釋。以下是使用LIME函式庫和分類模型的簡單範例:
# Classification- Lime import lime import lime.lime_tabular from sklearn import datasets from sklearn.ensemble import RandomForestClassifier # Load the dataset and train a classifier data = datasets.load_iris() classifier = RandomForestClassifier() classifier.fit(data.data, data.target) # Create a LIME explainer object explainer = lime.lime_tabular.LimeTabularExplainer(data.data, mode="classification", training_labels=data.target, feature_names=data.feature_names, class_names=data.target_names, discretize_cnotallow=True) # Select an instance to be explained (you can choose any index) instance = data.data[0] # Generate an explanation for the instance explanation = explainer.explain_instance(instance, classifier.predict_proba, num_features=5) # Display the explanation explanation.show_in_notebook()

#2、迴歸模型
在使用LIME進行迴歸模型解釋時,和使用LIME進行分類模型解釋相似。需要建立一個解譯器對象,並為特定實例產生解釋。以下是使用LIME函式庫和迴歸模型的範例:
#Regression - Lime import numpy as np from sklearn.model_selection import train_test_split from sklearn.linear_model import LinearRegression from lime.lime_tabular import LimeTabularExplainer # Generate a custom regression dataset np.random.seed(42) X = np.random.rand(100, 5) # 100 samples, 5 features y = 2 * X[:, 0] + 3 * X[:, 1] + 1 * X[:, 2] + np.random.randn(100) # Linear regression with noise # Split the data into training and testing sets X_train, X_test, y_train, y_test = train_test_split(X, y, test_size=0.2, random_state=42) # Train a simple linear regression model model = LinearRegression() model.fit(X_train, y_train) # Initialize a LimeTabularExplainer explainer = LimeTabularExplainer(training_data=X_train, mode="regression") # Select a sample instance for explanation sample_instance = X_test[0] # Explain the prediction for the sample instance explanation = explainer.explain_instance(sample_instance, model.predict) # Print the explanation explanation.show_in_notebook()

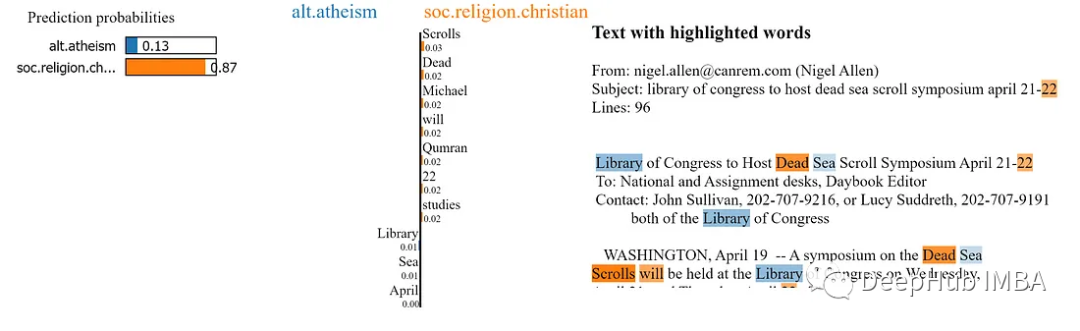
#3、解釋文字
## LIME也可以用來解釋由文字模型所做的預測。要與文字模型一起使用LIME,需要建立LIME文字解釋器對象,然後為特定實例產生解釋。以下是一個使用LIME函式庫和文字模型的範例:
# Text Model - Lime import lime import lime.lime_text from sklearn.feature_extraction.text import TfidfVectorizer from sklearn.naive_bayes import MultinomialNB from sklearn.datasets import fetch_20newsgroups # Load a sample dataset (20 Newsgroups) for text classification categories = ['alt.atheism', 'soc.religion.christian'] newsgroups_train = fetch_20newsgroups(subset='train', categories=categories) # Create a simple text classification model (Multinomial Naive Bayes) tfidf_vectorizer = TfidfVectorizer() X_train = tfidf_vectorizer.fit_transform(newsgroups_train.data) y_train = newsgroups_train.target classifier = MultinomialNB() classifier.fit(X_train, y_train) # Define a custom Lime explainer for text data explainer = lime.lime_text.LimeTextExplainer(class_names=newsgroups_train.target_names) # Choose a text instance to explain text_instance = newsgroups_train.data[0] # Create a predict function for the classifier predict_fn = lambda x: classifier.predict_proba(tfidf_vectorizer.transform(x)) # Explain the model's prediction for the chosen text instance explanation = explainer.explain_instance(text_instance, predict_fn) # Print the explanation explanation.show_in_notebook()
#4、圖片模型
LIME可以用來解釋影像模型的預測結果。需要建立一個LIME影像解釋器對象,並為特定實例產生解釋
import lime import lime.lime_image import sklearn # Load the dataset and train an image classifier data = sklearn.datasets.load_digits() classifier = sklearn.ensemble.RandomForestClassifier() classifier.fit(data.images.reshape((len(data.images), -1)), data.target) # Create a LIME image explainer object explainer = lime.lime_image.LimeImageExplainer() # Select an instance to be explained instance = data.images[0] # Generate an explanation for the instance explanation = explainer.explain_instance(instance, classifier.predict_proba, top_labels=5)
##在使用LIME產生解釋之後,可以視覺化解釋,了解每個特徵對預測的貢獻。對於表格數據,可以使用show_in_notebook或as_pyplot_figure方法來顯示解釋。對於文字和圖像數據,可以使用show_in_notebook方法來顯示說明。
透過理解每個特徵的貢獻,我們可以更深入地了解模型的決策過程,並識別出潛在的偏差或問題所在
LIME提供了一些先進的技術來提高解釋的質量,這些技術包括:
#調整擾動樣本的數量:增加擾動樣本的數量可以提高解釋的穩定性和準確性。
#########選擇可解釋的模型:選擇適當的可解釋模型(例如,線性迴歸、決策樹)會影響解釋的品質。 ############特徵選擇:自訂解釋中使用的特徵數量可以幫助專注於對預測最重要的貢獻。 ######LIME的限制和替代方案
儘管LIME是一個強大的解釋機器學習模型的工具,但它也存在一些限制:
局部解釋:LIME著重局部解釋,這可能無法捕捉模型的整體行為。
成本高:使用LIME產生解釋可能會很費時,尤其是對於大型資料集和複雜模型
如果LIME不能滿足您的需求,還有其他方法來解釋機器學習模型,如SHAP (SHapley Additive exPlanations)和anchor。
總結
LIME是一個寶貴的工具,可以解釋機器學習分類器(或模型)正在進行的工作。透過提供一種實用的方法來理解複雜的機器學習模型,LIME使用戶能夠信任並改進他們的系統
透過為單一預測提供可解釋的解釋,LIME可以幫助建立對機器學習模型的信任。這種信任在許多產業中都是至關重要的,尤其是在使用ML模型做出重要決策時。透過更了解他們的模型是如何運作的,使用者可以自信地依賴機器學習系統並做出數據驅動的決策。
以上是解釋各種機器學習模型程式碼範例:利用LIME進行解釋的詳細內容。更多資訊請關注PHP中文網其他相關文章!