
如何在 JavaScript 中的 React Native 中安裝 yup?

- 王林轉載
- 2023-09-13 11:53:07702瀏覽
Yup是一個NPM包,我們可以在react-native應用程式中安裝。它用於驗證儲存在單一物件中的表單值。此外,我們可以使用 Yup 將不同類型的驗證新增至不同的表單欄位。
使用者可以在專案目錄中執行以下命令來在React Native中安裝Yup。
npm i Yup
如果使用者使用 Yarn,可以使用下列命令。
yarn i Yup
文法
使用者可以按照以下語法在react-native應用程式中使用Yup進行表單驗證。
const schema = Yup.object().shape({
   key1: Yup.string().required("Required"),
});
await schema.validate(values);
在上面的語法中,我們使用 Yup 建立了模式,並使用 validate() 方法根據模式中定義的規則來驗證值。這裡,值是一個包含表單屬性名稱和值對的物件。
步驟
第 1 步 - 首先,開發人員需要從 Yup 中匯入所需的內容。
步驟 2 - 在 App() 元件中,使用 Yup 建立一個“userFormSchema”,它定義了 Student_id、age 和 Portfolio 欄位的規則。這裡,student_id 是一個字串和必填字段,age 是一個正整數和必填字段,portfolio 是網站的 URL。
第 3 步 - 現在,使用「useState」掛鉤定義學生資訊和驗證訊息的狀態。
-
第4步 - 定義handleChange()函數,該函數將鍵和值作為參數,並更新「initialValue」狀態物件中的值。
第 5 步 - 接下來,定義 validateValues() 函數,該函數透過將 userFormSchema 作為參考、將 StudentInfo 物件作為參數來使用 validate() 方法來驗證表單價值觀。
第 6 步 - 根據表單值的驗證將訊息設定為「訊息」狀態。
範例 1
在下面的範例中,我們建立了一個表單來收集學生資訊。我們新增了三個輸入欄位來取得 Student_id、年齡和作品集網站的 URL。此外,我們還建立了提交按鈕。
每當使用者點擊提交按鈕時,都會呼叫 validateValues() 函數,該函數會在螢幕上顯示驗證訊息。
import React, { useState } from "react";
import * as Yup from "yup";
import { TouchableOpacity, View, TextInput, Text, Button } from "react-native";
const App = () => {
   // creating the user form schema using Yup to validate student_id, age, and portfolio
   const userFormSchema = Yup.object().shape({
   student_id: Yup.string().required("Required"),
   age: Yup.number().required("Required").positive().integer(),
   portfolio: Yup.string().url().nullable(),
   });
   const [studentInfo, setStudentInfo] = useState({
      student_id: "",
      age: 13,
      portfolio: "",
   });
   const [message, setMessage] = useState("");

   function handleChange(key, val) {
      setStudentInfo({ ...studentInfo, [key]: val });
   }
   // creating the handleFormSubmit function to handle the form submission
   async function validateValues() {
      try {
         await userFormSchema.validate(studentInfo);
         setMessage("Form is successfully submitted with no errors!");
      } catch (error) {
         console.log(error);
         setMessage("Form is not submitted due to errors!");
      }
   }
   return (
      // rendering the form
      <View style = {{ width: "70%" }}>
         {/* text inputs */}
         <TextInput
            placeholder = "student_id"
            value = {studentInfo.student_id}
            onChangeText = {(value) => handleChange("student_id", value)}
         />
         <TextInput
            placeholder = "age"
            value = {studentInfo.age}
            onChangeText = {(value) => handleChange("age", value)}
         />

         <TextInput
            placeholder = "portfolio"
            value = {studentInfo.portfolio}
            onChangeText = {(value) => handleChange("portfolio", value)}
         />
         {/* submit button */}
         <TouchableOpacity onPress = {validateValues}>
            <Text> Submit Form </Text>
         </TouchableOpacity>
         <Text> {message} </Text>
      </View>
   );
};
export default App;
輸出

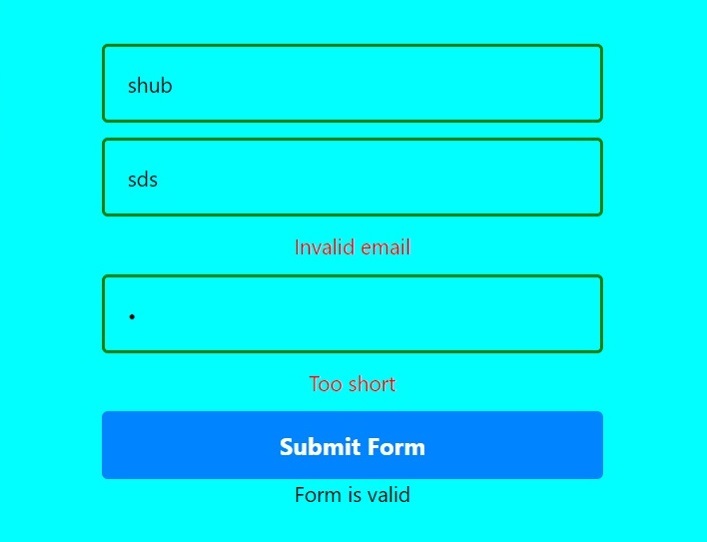
範例 2
下面的例子是上面例子的進階版。在這裡,我們有三個輸入字段,其中包含使用者名稱、電子郵件和密碼。
此外,我們還使用 Yup 建立了 userFormSchema 來驗證表單。在這裡,我們定義了規則,因此名稱的長度應至少為三個字符,並且始終是必需的。電子郵件應遵循格式並始終為必填項,密碼長度應至少為六個字元。
此外,我們也為輸入欄位和錯誤訊息提供了一些樣式。當使用者點擊提交按鈕時,它會呼叫handleFormSubmit()函數,該函數透過呼叫validateValues()函數來取得驗證結果。它顯示基於表單驗證的輸出訊息。
import React, { useState } from "react";
import * as Yup from "yup";
import {
   StyleSheet,
   TouchableOpacity,
   View,
   TextInput,
   Text,
} from "react-native";
const App = () => {
   // creating the user form schema using Yup to validate name, email and password
   const userFormSchema = Yup.object().shape({
      name: Yup.string().min(3, "Too short").required("Required"),
      email: Yup.string().email("Invalid email").required("Required"),
      password: Yup.string().min(6, "Too short").required("Required"),
   });
   //  creating the styles for the elements
   const elementStyles = StyleSheet.create({
      container: {
         flex: 1,
         alignItems: "center",
         backgroundColor: "aqua",
         justifyContent: "center",
      },
      error: {
         marginBottom: 10,
         color: "red",
      },
      button: {
         backgroundColor: "#0084ff",
         width: "70%",
         borderRadius: 4,
         alignItems: "center",
         padding: 12,
      },
      input: {
         borderWidth: 2,
         padding: 15,
         marginBottom: 10,
         width: "70%",
         borderColor: "green",
         borderRadius: 4,
      },
      buttonText: {
         color: "#fff",
         fontSize: 16,
         fontWeight: "bold",
      },
   });
   // creating the state for the form
   const [initialValues, setInitialValues] = useState({
      name: "",
      email: "",
      password: "",
   });
   // creating the state for the errors
   const [errors, setErrors] = useState({});
   const [message, setMessage] = useState("");
   // creating the handleChange function to handle the change in the input fields
   function handleChange(key, val) {
      setInitialValues({ ...initialValues, [key]: val });
   }
   // creating the validateValues function to validate the form
   async function validateValues() {
      try {
         // validating the form using the userFormSchema
         await userFormSchema.validate(initialValues, { abortEarly: false });
         setErrors({});
      } catch (error) {
         //  if the form is invalid, then the errors are set to the state
         const newErrors = error.inner.reduce((acc, cur) => {
            acc[cur.path] = cur.message;
            return acc;
         }, {});
         setErrors(newErrors);
      }
   }
   // creating the handleFormSubmit function to handle the form submission
   function handleFormSubmit() {
      // validating the form values
      validateValues().then(() => {
         // set message based on the form is valid or invalid.
         if (Object.keys(errors).length === 0) {
         setMessage("Form is valid");
         } else {
            setMessage("Form is invalid");
         }
      });
   }
   return (
      // rendering the form
      <View style = {elementStyles.container}>
         {/* text inputs */}
         <TextInput
            style = {elementStyles.input}
            placeholder = "Name"
            value = {initialValues.name}
         onChangeText = {(value) => handleChange("name", value)}
         />
         {errors.name && <Text style = {elementStyles.error}> {errors.name} </Text>}
         <TextInput
            style = {elementStyles.input}
            placeholder = "Email"
            value = {initialValues.email}
            onChangeText = {(value) => handleChange("email", value)}
         />
         {errors.email && <Text style=  {elementStyles.error}> {errors.email} </Text>}
         <TextInput
            style = {elementStyles.input}
            placeholder = "Password"
            value = {initialValues.password}
            onChangeText = {(value) => handleChange("password", value)}
            secureTextEntry
         />
         {errors.password && (
            <Text style = {elementStyles.error}> {errors.password} </Text>
         )}
         {/* submit button */}
         <TouchableOpacity style = {elementStyles.button} onPress = {handleFormSubmit}>
            <Text style = {elementStyles.buttonText}> Submit Form </Text>
         </TouchableOpacity>
         <Text> {message} </Text>
      </View>
   );
};
export default App;
輸出
#使用者學會了使用 Yup 和 React-Native 來進行表單驗證。開發人員可以使用像 Yup 這樣的函式庫,而不是編寫自訂表單驗證程式碼,這使得程式碼更具可讀性和簡單性。
以上是如何在 JavaScript 中的 React Native 中安裝 yup?的詳細內容。更多資訊請關注PHP中文網其他相關文章!