
Magento中的個人化後端配置

- WBOYWBOYWBOYWBOYWBOYWBOYWBOYWBOYWBOYWBOYWBOYWBOYWB原創
- 2023-08-31 11:33:05718瀏覽
在本教學中,我將示範 Magento 後端的自訂模組配置。在後端提供一組模組的可配置選項總是有用的,這允許管理員輕鬆配置模組特定的設定。我們將透過在 Magento 中建立自訂模組來逐步完成設定模組配置的過程。
#Magento 中的自訂設定簡介
身為開發人員,在建立自訂模組的過程中,您可能會覺得如果能夠將某些模組特定設定的控制權轉移到後端就好了。 Magento 允許您使用基於 XML 檔案的配置系統來實現這一點。您只需按照 Magento 的約定設定文件,它們就會自動神奇地被拾取!大多數時候,您在設定基本前端儲存時需要處理核心模組提供的大量可配置設定。
我假設您熟悉 Magento 中的基本模組創建過程。如果您想了解有關 Magento 中自訂模組的更多信息,這是一篇不錯的文章。話雖如此,Magento 遵循約定優於配置的範例,如果您是自訂模組開發過程的新手,這應該會讓事情更容易理解。
建立自訂模組以提供自訂配置
在本教程中,我將建立一個名為「CustomConfig」的基本自訂模組,該模組在系統 > 配置選單下提供後端配置。以下是所需設定所需的文件清單:
-
app/etc/modules/Envato_All.xml:這是一個用於啟用我們的自訂模組的檔案。 -
app/code/local/Envato/CustomConfig/etc/config.xml:這是一個模組設定檔。 -
app/code/local/Envato/CustomConfig/etc/system.xml:這是一個宣告我們模組的設定選項的檔案。 -
app/code/local/Envato/CustomConfig/Model/Options.php:這是一個模型文件,為配置的某些表單元素提供選項。 -
app/code/local/Envato/CustomConfig/Helper/Data.php:這是 Magento 翻譯系統使用的檔案。
檔案設定
首先,我們將建立一個模組啟用程式檔案。建立檔案「app/etc/modules/Envato_All.xml」並將以下內容貼到該檔案中。我們使用“Envato”作為模組命名空間,使用“CustomConfig”作為模組名稱。預設情況下它將啟用我們的“CustomConfig”模組。
<?xml version="1.0"?>
<config>
  <modules>
    <Envato_CustomConfig>
      <active>true</active>
      <codePool>local</codePool>
    </Envato_CustomConfig>
  </modules>
</config>
接下來,我們需要建立一個模組設定檔。建立“app/code/local/Envato/CustomConfig/etc/config.xml”並將以下內容貼到該檔案中。
<?xml version="1.0"?>
<config>
    <modules>
        <Envato_CustomConfig>
            <version>0.0.1</version>
        </Envato_CustomConfig>
    </modules>
    <global>
        <helpers>
            <customconfig>
                <class>Envato_CustomConfig_Helper</class>
            </customconfig>
        </helpers>
        <models>
             <customconfig>
                <class>Envato_CustomConfig_Model</class>
             </customconfig>
        </models>
    </global>
    <adminhtml>
        <acl>
            <resources>
                <admin>
                    <children>
                        <system>
                            <children>
                                <config>
                                    <children>
                                        <customconfig_options>
                                            <title>Custom Configuration Section</title>
                                        </customconfig_options>
                                    </children>
                                </config>
                            </children>
                        </system>
                    </children>
                </admin>
            </resources>
        </acl>
    </adminhtml>
</config>
您應該熟悉 Magento 約定的模型和輔助類別宣告。當然,<adminhtml></adminhtml> 標籤對您來說是新的,這是我們在本教程中關心的內容。讓我們詳細了解每個標籤以了解其代表的含義。
<adminhtml></adminhtml>標籤用來定義admin端的資源。在我們的範例中,模組的配置頁面是一種資源。此外,我們使用 <acl></acl> 標籤來包裝 <resources></resources> 標籤,這意味著只有經過驗證的使用者才能存取它。
接下來的幾個標籤用來定義後端配置頁面的路徑。所以我們的設定頁面的路徑看起來像是「admin/system/config/customconfig_options」。當然,最後一個標籤 <customconfig_options></customconfig_options> 應該是唯一的,這樣就不會與其他擴充功能衝突。
接下來,讓我們定義最重要的檔案「system.xml」。建立「app/code/local/Envato/CustomConfig/etc/system.xml」並將以下內容貼到該檔案中。
<?xml version="1.0"?>
<config>
    <tabs>
        <customconfig translate="label" module="customconfig">
            <label>Custom Configuration Tab</label>
            <sort_order>1</sort_order>
        </customconfig>
    </tabs>

    <sections>
        <customconfig_options translate="label" module="customconfig">
            <label>Custom Configuration Settings</label>
            <tab>customconfig</tab>
            <frontend_type>text</frontend_type>
            <sort_order>1</sort_order>
            <show_in_default>1</show_in_default>
            <show_in_website>1</show_in_website>
            <show_in_store>1</show_in_store>
            <groups>
                <section_one translate="label">
                    <label>Section One</label>
                    <frontend_type>text</frontend_type>
                    <sort_order>1</sort_order>
                    <show_in_default>1</show_in_default>
                    <show_in_website>1</show_in_website>
                    <show_in_store>1</show_in_store>
                    <fields>
                        <custom_field_one>
                            <label>Custom Text Field</label>
                            <frontend_type>text</frontend_type>
                            <sort_order>1</sort_order>
                            <show_in_default>1</show_in_default>
                            <show_in_website>1</show_in_website>
                            <show_in_store>1</show_in_store>
                            <comment>Example of text field.</comment>
                        </custom_field_one>
                    </fields>
                </section_one>
                <section_two translate="label">
                    <label>Section Two</label>
                    <frontend_type>text</frontend_type>
                    <sort_order>2</sort_order>
                    <show_in_default>1</show_in_default>
                    <show_in_website>1</show_in_website>
                    <show_in_store>1</show_in_store>
                    <fields>
                        <custom_field_two>
                            <label>Custom Select Field</label>
                            <frontend_type>select</frontend_type>
                            <source_model>customconfig/options</source_model>
                            <sort_order>1</sort_order>
                            <show_in_default>1</show_in_default>
                            <show_in_website>1</show_in_website>
                            <show_in_store>1</show_in_store>
                            <comment>Example of select field.</comment>
                        </custom_field_two>
                        <custom_field_three>
                            <label>Custom Radio Field</label>
                            <frontend_type>radios</frontend_type>
                            <source_model>customconfig/options</source_model>
                            <sort_order>2</sort_order>
                            <show_in_default>1</show_in_default>
                            <show_in_website>1</show_in_website>
                            <show_in_store>1</show_in_store>
                            <comment>Example of radios field.</comment>
                        </custom_field_three>
                        <custom_field_four>
                            <label>Custom Multiselect Field</label>
                            <frontend_type>multiselect</frontend_type>
                            <source_model>customconfig/options</source_model>
                            <sort_order>3</sort_order>
                            <show_in_default>1</show_in_default>
                            <show_in_website>1</show_in_website>
                            <show_in_store>1</show_in_store>
                            <comment>Example of multiselect field.</comment>
                        </custom_field_four>
                    </fields>
                </section_two>
            </groups>
        </customconfig_options>
    </sections>
</config>
正如你可能已經猜到的,這個檔案負責在後端顯示我們模組的設定頁面。讓我們仔細看看該文件中的一些重要標籤。
<tabs></tabs> 標籤用於定義將顯示在設定頁面左側的選項卡。 <sections></sections> 標籤用於定義每個選項卡下的部分。
讓我們試著透過一個例子來理解它。前往 Magento 後端的系統 > 設定。您會注意到有不同的標籤,例如常規、目錄、客戶等。
在每個選項卡下,您也會看到不同的部分。例如,在進階標籤下有管理、系統、進階和開發人員部分。在我們的例子中,我們將在自訂配置選項卡下有一個自訂配置設定部分。
接下來,我們使用 <groups></groups> 標籤將相似的配置欄位分組在一起。例如,您希望在不同部分下顯示圖像相關欄位和電子郵件相關欄位。為此,我們定義了 <section_one></section_one> 和 <section_two></section_two> 標籤。
最后,我们使用 <fields></fields> 标签包裹每个部分的字段。在我们的示例中,我们在“第一部分”字段集下提供了一个文本字段,而选择框、单选按钮和多项选择等其他字段则在“第二部分”字段集下可用。这就是“system.xml”文件。
接下来,让我们创建一个模型文件“app/code/local/Envato/CustomConfig/Model/Options.php”。
<?php
class Envato_CustomConfig_Model_Options
{
  /**
   * Provide available options as a value/label array
   *
   * @return array
   */
  public function toOptionArray()
  {
    return array(
      array('value'=>1, 'label'=>'One'),
      array('value'=>2, 'label'=>'Two'),
      array('value'=>3, 'label'=>'Three'),
      array('value'=>4, 'label'=>'Four')
    );
  }
}
这里没有什么特别的 - 它只是用于将选项提供给单选表单字段并在配置表单中选择表单字段。
最后,我们需要创建“app/code/local/Envato/CustomConfig/Helper/Data.php”文件,以确保 Magento 的翻译系统正常工作。它几乎是一个空文件,但按照约定应该存在!
<?php
/**
 * Sample Widget Helper
 */
class Envato_CustomConfig_Helper_Data extends Mage_Core_Helper_Abstract
{
}
我们已经完成了文件设置。在下一节中,我们将检查它在 Magento 后端的外观。
浏览后端以测试自定义配置
前往 Magento 后端并清除所有缓存。可以通过转至系统 > 缓存管理来访问它。
现在,转到系统 > 配置打开配置页面。您应该会注意到页面左侧的自定义配置选项卡。在其下方,可以使用自定义配置设置链接,单击该链接将打开我们模块的配置页面。如果您看不到它,请尝试退出管理部分并重新登录。
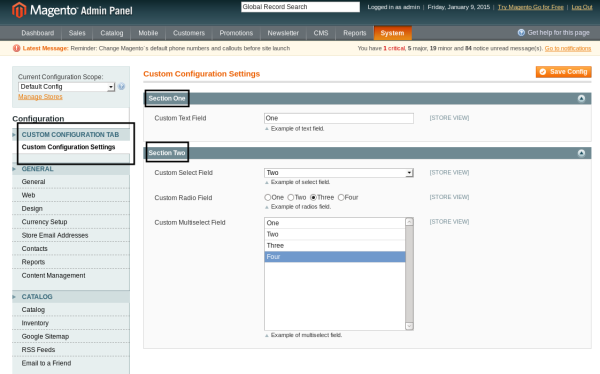
这是一个开箱即用的漂亮界面,不是吗?您可以尝试一下,填写表单并点击保存配置按钮来提交更改,Magento 将处理剩下的事情。
要访问代码中配置参数的值,可以使用 getStoreConfig 静态方法。例如,您可以使用以下语法检索 custom_field_one 参数的值:
Mage::getStoreConfig('customconfig_options/section_one/custom_field_one');
语法相当简单 - 您需要使用 system.XML 文件中定义的“section_name/group_name/field_name”模式。
结论
管理系统配置是 Magento 最强大、最有用的部分之一。 Magento 允许您非常轻松地插入自定义配置参数,这要归功于最强大的电子商务系统之一的可扩展性!使用下面的提要分享您的想法!
以上是Magento中的個人化後端配置的詳細內容。更多資訊請關注PHP中文網其他相關文章!