| #註解 |
#說明 |
##@ EnableCaching | 開啟快取註解功能 |
@Cacheable | 在方法執行前spring 先查看快取中是否有數據,如果有數據,則直接傳回快取資料;若沒有數據,呼叫方法並將方法傳回值放到快取中 |
#@CachePut | 將方法的回傳值放到快取中 |
@CacheEvict | 將一條或多條資料從快取中刪除 |
2.1、@EnableCaching
這個註解的主要作用是啟用快取註解的功能,並使其他Spring Cache註解生效。使用方式也十分簡單,直接加在專案的啟動類別上方即可。
@Slf4j
@SpringBootApplication
@EnableCaching
public class CacheDemoApplication {
    public static void main(String[] args) {
        SpringApplication.run(CacheDemoApplication.class, args);
        log.info("项目启动成功...");
    }
}
2.2、@Cacheable
@Cacheable註解主要是在方法執行前 先查看快取中是否有資料。如果有數據,則直接傳回快取資料;若沒有數據,呼叫方法並將方法傳回值放到快取中。
註解中的參數傳遞主要使用的是**SpEL(Spring Expression Language)**對資料進行獲取傳遞,這有點類似於JSP中的EL表達式,常用方式如下幾種:
「#p0」:取得參數清單中的第一個參數。其中的「#p」為固定寫法,0為下標,代表第一個;
「#root.args[0]」:取得方法中的第一個參數。其中0為下標,代表第一個。
「#user.id」:取得參數 user 的 id 屬性。注意的是這裡的 user 必須要和參數清單中的參數名稱一致
「#result.id」:取得傳回值中的 id 屬性。
來自Spring Cache原始碼:Spring Expression Language (SpEL) expression used for making the method
在@Cacheable註解中有幾種常用的屬性可進行需求性設定:
/**
 * @description 通过id获取用户信息
 * @author xBaozi
 * @date 14:23 2022/7/3
 **/
@Cacheable(value = "userCache", key = "#id", unless = "#result == null")
@GetMapping("/{id}")
public User getById(@PathVariable Long id) {
    User user = userService.getById(id);
    return user;
}
2.3、@CachePut
@CachPut 註解主要是將方法的回傳值放到快取中。這裡同樣是使用SpEL取得數據,常用的屬性如下:
- value:快取的名稱,每個快取名稱下面可以有多個key
- key:快取的key。
- condition:條件判斷,滿足條件時對資料進行緩存,值得注意的是該參數在Redis中無效
- The parameter " unless" can be used in Redis as a conditional statement to avoid caching data if a certain condition is met.
/**
 * @description 新增用户信息并返回保存的信息
 * @author xBaozi
 * @date 14:38 2022/7/3
 **/
@CachePut(value = "userCache", key = "#user.id")
@PostMapping
public User save(User user) {
    userService.save(user);
    return user;
}
2.4、@CacheEvict
@CacheeEvict@CacheeEvict 主要是將一條或多條數據從快取中刪除,同樣使用SpEL獲取數據,常用的屬性如下:
- value:快取的名稱,每個快取名稱下面可以有多個key
- key:快取的key。
- condition:條件判斷,滿足條件時對資料進行緩存,值得注意的是該參數在Redis中無效
- The parameter " unless" can be used in Redis as a conditional statement to avoid caching data if a certain condition is met.
/**
 * @description 更新用户信息
 * @author xBaozi
 * @date 14:41 2022/7/3
 **/
@CacheEvict(value = "userCache", key = "#result.id")
@PutMapping
public User update(User user) {
    userService.updateById(user);
    return user;
}3、使用Redis當作快取產品因為Spring 預設的快取技術無法持久化保存快取數據,即服務掛了快取也掛了,因此就需要使用Redis進行操作(其實也是因為學習了Redis)前面的SpringBoot整合Redis快取驗證碼裡面有記錄一些Redis的基本操作。 3.1、座標導入導入maven 座標:spring-boot-starter-data-redis、spring-boot-starter-cache<!--Spring Data Redis-->
<dependency>
<groupId>org.springframework.boot</groupId>
<artifactId>spring-boot-starter-data-redis</artifactId>
</dependency>
<!--Spring Cache-->
<dependency>
<groupId>org.springframework.boot</groupId>
<artifactId>spring-boot-starter-cache</artifactId>
</dependency>3.2、yml設定
spring: redis:
host: localhost
port: 6379
## password: 123456
data: password: 123456
# time-to-live: 1800000 # 設定快取有效期限
3.3、開啟註解功能
在啟動類別com/itheima/CacheDemoApplication.java
#在啟動類別com/itheima/CacheDemoApplication.java##Application.java##Application#com/itheima/CacheDemoApplication.java#. @EnableCaching 註解,開啟快取註解功能
@Slf4j
@SpringBootApplication
@ServletComponentScan
@EnableCaching
public class ReggieApplication {
    public static void main(String[] args) {
        SpringApplication.run(ReggieApplication.class, args);
        log.info("springBoot项目启动成功……");
    }
}3.4、使用@Cacheable需要提醒的是,在使用快取的時候,返回值必須實現Serializable 序列化接口,否則會拋出錯誤。 這是因為在NoSql 資料庫中,並沒有與我們Java 基本類型對應的資料結構,所以在儲存至NoSql 資料庫中時,我們必須將物件進行序列化,同時在網路傳輸中我們要注意到兩個應用中javabean 的serialVersionUID 要保持一致,不然就不能正常的進行反序列化。 /**
* @description 新增套餐信息
* @author xBaozi
* @date 17:55 2022/5/13
* @param setmealDto 需要新增套餐的数据
**/
@CacheEvict(value = "setmealCache",allEntries = true)
@PostMapping
public Result<String> save(@RequestBody SetmealDto setmealDto) {
log.info("套餐信息为{}", setmealDto);
setmealService.saveWithDish(setmealDto);
return Result.success("套餐" + setmealDto.getName() + "新增成功");
}3.5、使用@CacheEvict該新屬性稱為allEntries,它是一個布林類型,用來指示是否需要清除快取中的所有元素。預設為false,表示不需要。如果將 allEntries 設為 true,Spring Cache 將不考慮指定的 key。有時候,把所有元素一次清除並緩存比逐一清除元素更有效率。 /**
* @description 更新套餐信息并更新其关联的菜品
* @author xBaozi
* @date 11:28 2022/5/14
* @param setmealDto 需要更新的套餐信息
**/
@CacheEvict(value = "setmealCache",allEntries = true)
@PutMapping
public Result<String> updateWithDish(@RequestBody SetmealDto setmealDto) {
log.info(setmealDto.toString());
setmealService.updateWithDish(setmealDto);
return Result.success("套餐修改成功");
}
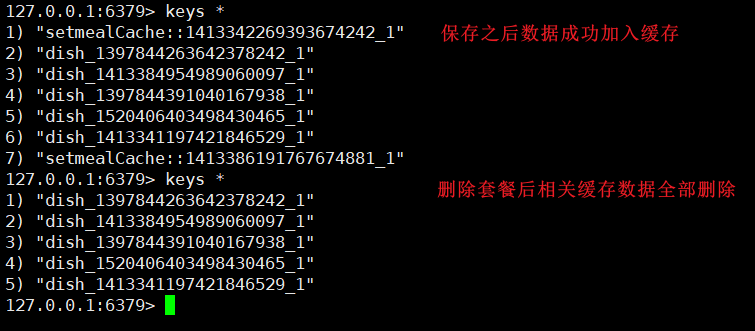
4、测试
代码编写完成之后,重启工程,然后访问后台管理系统,对套餐数据进行新增以及删除,而后观察Redis中的数据发现写的代码是能正常跑到!成功!