
如何使用Python繪製分形圖案

- WBOYWBOYWBOYWBOYWBOYWBOYWBOYWBOYWBOYWBOYWBOYWBOYWB轉載
- 2023-05-07 13:55:071452瀏覽
一、目標
寫一個可以畫等邊三角形的程序,並且在三角形的每條邊上,它必須能夠畫出一個稍微小一點的向外的三角形。能夠根據人的意願多次重複此過程,從而創建一些有趣的模式。
二、表示影像
把影像表示為一個二維的像素陣列。像素陣列中的每個單元格將代表該像素的顏色(RGB)。
為此,可以使用NumPy庫產生像素數組,並使用Pillow將其轉換為可以儲存的映像。
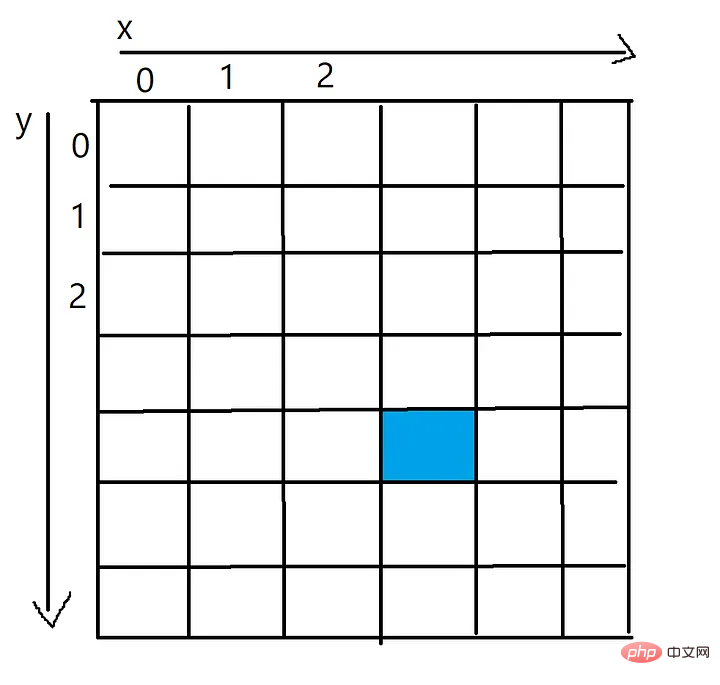
藍色像素的x值為3,y值為4,可以透過一個二維數組訪問,如pixels[4][3]
三、畫一條線
現在開始編碼,首先,需要一個可以取得兩組座標並在它們之間畫一條線的函數。
下面的程式碼透過在兩點之間插值來運作,每一步都會在像素陣列中新增新的像素。你可以把這個過程看成是在一條線上逐個像素地進行著色。
可以在每個程式碼片段中使用連續字元“\”來容納一些較長的程式碼行。
import numpy as np
from PIL import Image
import math
def plot_line(from_coordinates, to_coordinates, thickness, colour, pixels):
# 找出像素阵列的边界
max_x_coordinate = len(pixels[0])
max_y_coordinate = len(pixels)
# 两点之间沿着x轴和y轴的距离
horizontal_distance = to_coordinates[1] - from_coordinates[1]
vertical_distance = to_coordinates[0] - from_coordinates[0]
# 两点之间的总距离
distance = math.sqrt((to_coordinates[1] - from_coordinates[1])**2 \
+ (to_coordinates[0] - from_coordinates[0])**2)
# 每次给一个新的像素上色时,将向前走多远
horizontal_step = horizontal_distance/distance
vertical_step = vertical_distance/distance
# 此时,将进入循环以在像素数组中绘制线
# 循环的每一次迭代都会沿着线添加一个新的点
for i in range(round(distance)):
# 这两个坐标是直线中心的坐标
current_x_coordinate = round(from_coordinates[1] + (horizontal_step*i))
current_y_coordinate = round(from_coordinates[0] + (vertical_step*i))
# 一旦得到了点的坐标,
# 就在坐标周围画出尺寸为thickness的图案
for x in range (-thickness, thickness):
for y in range (-thickness, thickness):
x_value = current_x_coordinate + x
y_value = current_y_coordinate + y
if (x_value > 0 and x_value < max_x_coordinate and \
y_value > 0 and y_value < max_y_coordinate):
pixels[y_value][x_value] = colour
# 定义图像的大小
pixels = np.zeros( (500,500,3), dtype=np.uint8 )
# 画一条线
plot_line([0,0], [499,499], 1, [255,200,0], pixels)
# 把像素阵列变成一张真正的图片
img = Image.fromarray(pixels)
# 显示得到的图片,并保存它
img.show()
img.save('Line.png')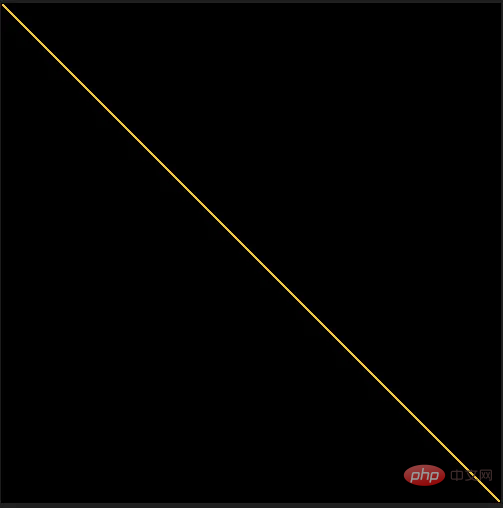
此函數在像素陣列的每個角落之間繪製一條黃線時的結果
四、畫三角形
#現在有了一個可以在兩點之間畫線的函數,可以畫第一個等邊三角形了。
給定三角形的中心點和邊長,可以用公式計算出高度:h = ½(√3a)。
現在利用這個高度、中心點和邊長,可以計算出三角形的每個角的位置。使用之前製作的plot_line函數,可以在每個角落之間畫一條線。
def draw_triangle(center, side_length, thickness, colour, pixels):
    # 等边三角形的高度是,h = ½(√3a)
    # 其中a是边长
    triangle_height = round(side_length * math.sqrt(3)/2)
    # 顶角
    top = [center[0] - triangle_height/2, center[1]]
    # 左下角
    bottom_left = [center[0] + triangle_height/2, center[1] - side_length/2]
    # 右下角
    bottom_right = [center[0] + triangle_height/2, center[1] + side_length/2]
    # 在每个角之间画一条线来完成三角形
    plot_line(top, bottom_left, thickness, colour, pixels)
    plot_line(top, bottom_right, thickness, colour, pixels)
    plot_line(bottom_left, bottom_right, thickness, colour, pixels)
在500x500像素PNG的中心繪製三角形時的結果
五、生成分形
一切都已準備就緒,可以用Python創建第一個分形。
但是最後一步是最難完成的,三角形函數為它的每一邊調用自己,需要能夠計算每個新的較小三角形的中心點,並正確地旋轉它們,使它們垂直於它們所附著的一側。
透過從旋轉的座標中減去中心點的偏移量,然後應用公式來旋轉一對座標,可以用這個函數來旋轉三角形的每個角。
def rotate(coordinate, center_point, degrees):
    # 从坐标中减去旋转的点
    x = (coordinate[0] - center_point[0])
    y = (coordinate[1] - center_point[1])
    # Python的cos和sin函数采用弧度而不是度数
    radians = math.radians(degrees)
    # 计算旋转点
    new_x = (x * math.cos(radians)) - (y * math.sin(radians))
    new_y = (y * math.cos(radians)) + (x * math.sin(radians))
    # 将在开始时减去的偏移量加回旋转点上
    return [new_x + center_point[0], new_y + center_point[1]]
將每個座標旋轉35度的三角形
#可以旋轉一個三角形後,思考如何在第一個三角形的每條邊上畫一個新的小三角形。
為了實現這一點,擴展draw_triangle函數,為每條邊計算一個新三角形的旋轉和中心點,其邊長被參數shrink_side_by減少。
一旦它計算出新三角形的中心點和旋轉,它就會呼叫draw_triangle(自身)來從目前線的中心畫出新的、更小的三角形。然後,這將反過來打擊同一個程式碼區塊,為一個較小的三角形計算另一組中心點和旋轉。
這就是所謂的循環演算法,因為draw_triangle函數現在會呼叫自己,直到達到希望繪製的三角形的最大深度。有這個轉義句子是很重要的,因為理論上這個函數會一直循環下去(但實際上呼叫堆疊會變得太大,導致堆疊溢位錯誤)。
def draw_triangle(center, side_length, degrees_rotate, thickness, colour, \
                  pixels, shrink_side_by, iteration, max_depth):
    # 等边三角形的高度是,h = ½(√3a)
    # 其中'a'是边长
    triangle_height = side_length * math.sqrt(3)/2
    # 顶角
    top = [center[0] - triangle_height/2, center[1]]
    # 左下角
    bottom_left = [center[0] + triangle_height/2, center[1] - side_length/2]
    # 右下角
    bottom_right = [center[0] + triangle_height/2, center[1] + side_length/2]
    if (degrees_rotate != 0):
        top = rotate(top, center, degrees_rotate)
        bottom_left = rotate(bottom_left, center, degrees_rotate)
        bottom_right = rotate(bottom_right, center, degrees_rotate)
    # 三角形各边之间的坐标
    lines = [[top, bottom_left],[top, bottom_right],[bottom_left, bottom_right]]
    line_number = 0
    # 在每个角之间画一条线来完成三角形
    for line in lines:
        line_number += 1
        plot_line(line[0], line[1], thickness, colour, pixels)
        # 如果还没有达到max_depth,就画一些新的三角形
        if (iteration < max_depth and (iteration < 1 or line_number < 3)):
            gradient = (line[1][0] - line[0][0]) / (line[1][1] - line[0][1])
            new_side_length = side_length*shrink_side_by
            # 正在绘制的三角形线的中心
            center_of_line = [(line[0][0] + line[1][0]) / 2, \
                              (line[0][1] + line[1][1]) / 2]
            new_center = []
            new_rotation = degrees_rotate
            # 需要旋转traingle的数量
            if (line_number == 1):
                new_rotation += 60
            elif (line_number == 2):
                new_rotation -= 60
            else:
                new_rotation += 180
            # 在一个理想的世界里,这将是gradient=0,
            # 但由于浮点除法的原因,无法
            # 确保永远是这种情况
            if (gradient < 0.0001 and gradient > -0.0001):
                if (center_of_line[0] - center[0] > 0):
                    new_center = [center_of_line[0] + triangle_height * \
                                 (shrink_side_by/2), center_of_line[1]]
                else:
                    new_center = [center_of_line[0] - triangle_height * \
                                  (shrink_side_by/2), center_of_line[1]]
            else:
                # 计算直线梯度的法线
                difference_from_center = -1/gradient
                # 计算这条线距中心的距离
                # 到新三角形的中心
                distance_from_center = triangle_height * (shrink_side_by/2)
                # 计算 x 方向的长度,
                # 从线的中心到新三角形的中心
                x_length = math.sqrt((distance_from_center**2)/ \
                                     (1 + difference_from_center**2))
                # 计算出x方向需要走哪条路
                if (center_of_line[1] < center[1] and x_length > 0):
                    x_length *= -1
                # 现在计算Y方向的长度
                y_length = x_length * difference_from_center
                # 用新的x和y值来偏移线的中心
                new_center = [center_of_line[0] + y_length, \
                              center_of_line[1] + x_length]
            draw_triangle(new_center, new_side_length, new_rotation, \
                          thickness, colour, pixels, shrink_side_by, \
                          iteration+1, max_depth)
三角形分形,收縮邊=1/2,最大深度=2
以上是如何使用Python繪製分形圖案的詳細內容。更多資訊請關注PHP中文網其他相關文章!