Gitlab學習之企業常用的一些git規範
- 青灯夜游轉載
- 2023-04-01 08:30:021814瀏覽

俗話說,沒有規矩不成方圓,我們的git也需要規範。
下面介紹一下企業常用的一些規格。
分支管理規範
分支命名不能千奇百怪,必須有統一的命名方式。主要有以下幾種:
| #分支管理 | 命名規範 | |
|---|---|---|
| master | 穩定版本分支,上線完成迴歸後,由專案技術負責人從release 分支合併進來,並打tag | |
| test/yyyyMMdd_ 功能名稱範例:test/20220426_blog | #測試人員使用分支,測試時從feature 分支合併進來 | |
| feature/yyyyMMdd_ 功能名稱_負責人員範例:feature/20220426_blog_xiumubai | 新功能開發使用分支,基於master建立 | |
| fix/yyyyMMdd_ 功能名稱_負責人員範例:fix/20220426_blog_xiumubai | 緊急線上bug修復使用分支,基於master建立 |
#用於上線的分支,基於master 建立,必須對要併入的feature 分支進行Code review 後,才可併入上線
##版本號管理規範
 當我們上線的時候,需要給版本號打tag,下面是版本號規範:
项目上线release分支创建定义:

第一个数字是主版本。第二个数字是次版本。第三个数字是补丁版本(hotfix 类的更新)。

主版本:含有破坏性更新、大调整等。 例如:1.1.0 > 2.0.0

次版本:增加新功能特性。例如:1.1.0 > 1.2.0

补丁版本:修复问题等。例如:1.1.0 > 1.1.1
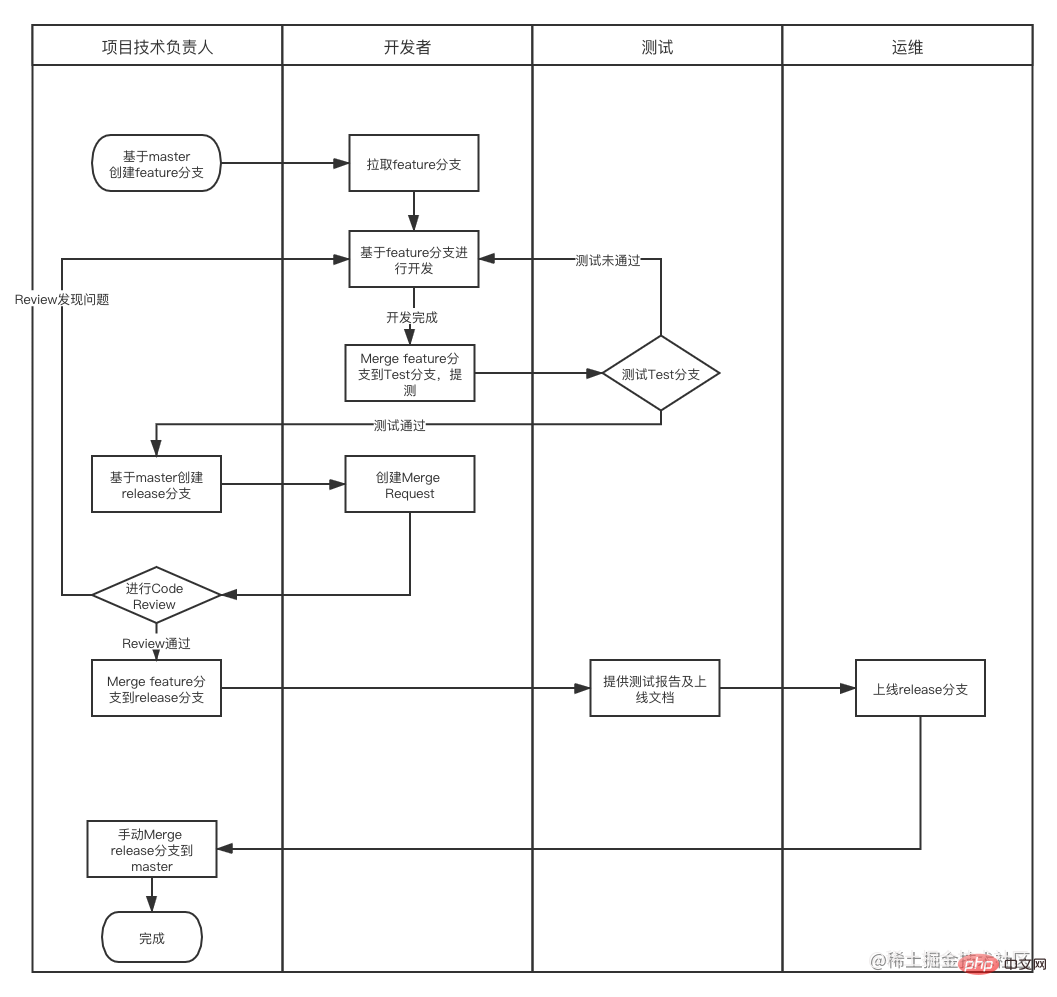
下圖是一個圍繞git規範來的開發流程圖:
| #最後是commit的時候,需要對commit資訊規範,必須加前綴 | 前綴 |
|---|---|
| ## feat | 新功能 |
| fix | 修正 |
| ##docs | 文件變更 |
| style | 程式碼格式 |
| refactor | 重構 |
| perf | 效能最佳化 |
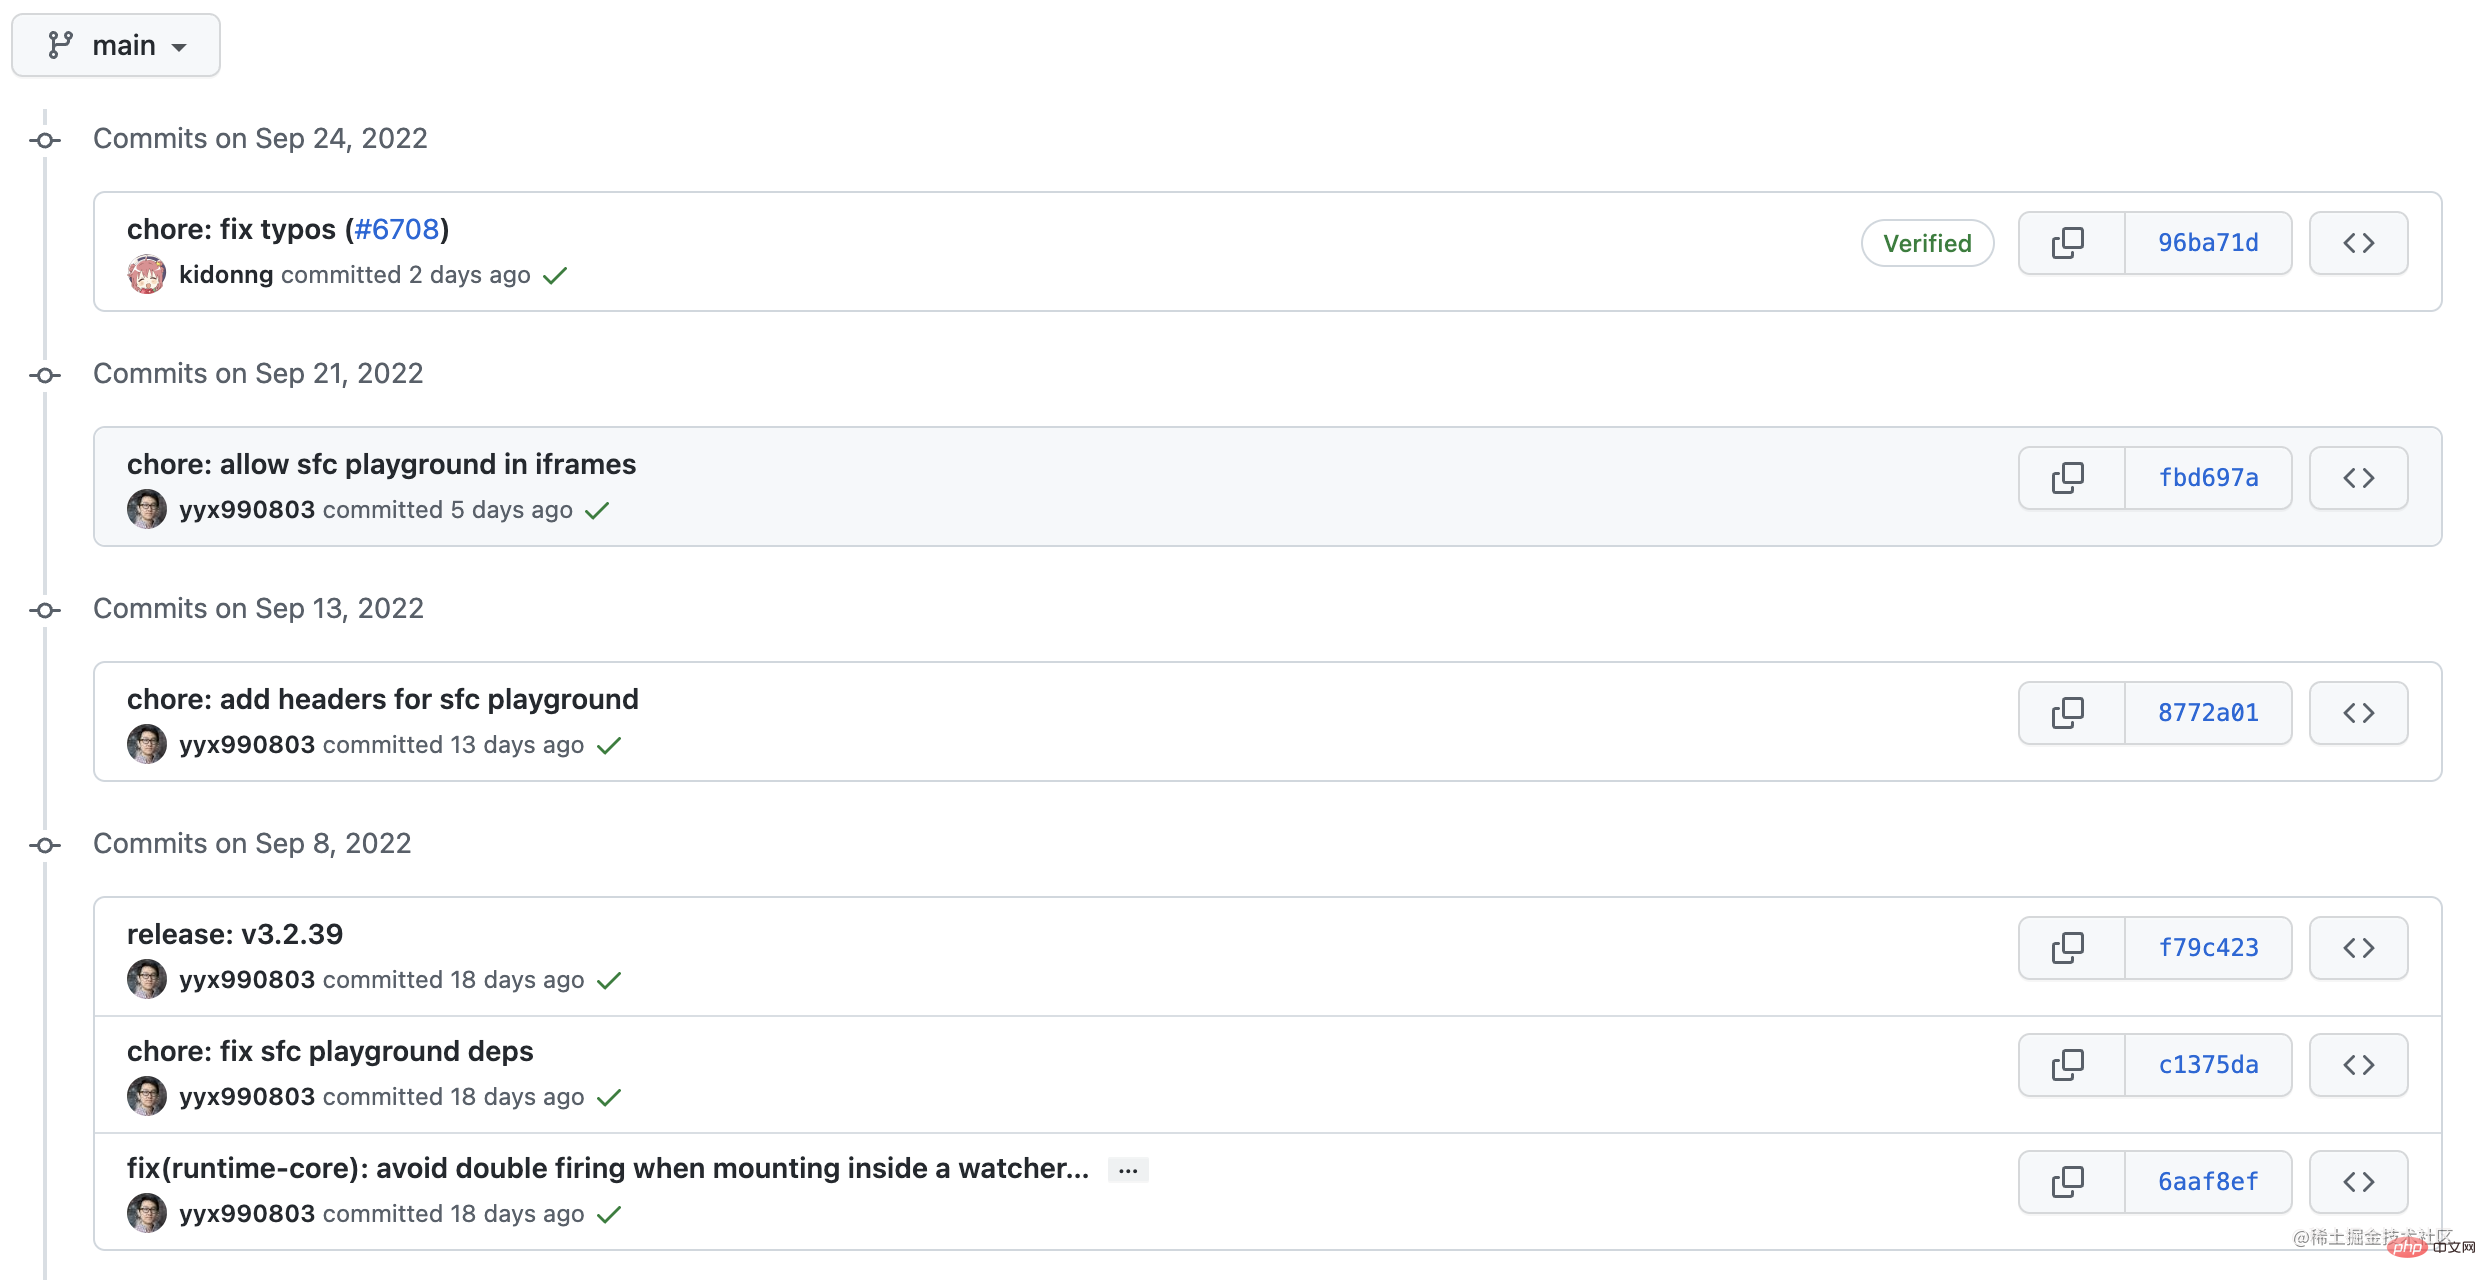
下图是vue3源码的提交信息规范:

下面我们就实际操作一下,如果通过husky+commitlint集成一个统一规范的git commit信息。
配置 git 提交的校验钩子
- husky: git提交时触发hooks
- commitlint: 对提交的内容做规范校验 husky,主要对pre-commit和commit-msg钩子做校验。
# 安装husky
yarn add husky -D
# 初始化husky配置,在根目录新增.husky配置文件。初始化配置pre-commit
npx husky-init
# 另外新增一个hooks,commit-msg
npx husky add .husky/commit-msg
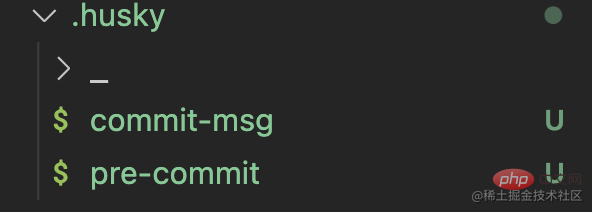
目录结构是下面这样子的:

在commit-msg文件中添加 npm run commitlint
在pre-commit文件中有个npm run test我们先注释掉,不然会报错。
安装commitlint
# 添加依赖文件
yarn add @commitlint/config-conventional @commitlint/cli -D
添加配置文件,新建commitlint.config.js,然后添加下面的代码:
module.exports = {
  extends: ['@commitlint/config-conventional'],
  // 校验规则
  rules: {
    'type-enum': [
      2,
      'always',
      [
        'feat',
        'fix',
        'docs',
        'style',
        'refactor',
        'perf',
        'test',
        'chore',
        'revert',
        'build',
      ],
    ],
    'type-case': [0],
    'type-empty': [0],
    'scope-empty': [0],
    'scope-case': [0],
    'subject-full-stop': [0, 'never'],
    'subject-case': [0, 'never'],
    'header-max-length': [0, 'always', 72],
  },
}
配置scripts
因为我们需要运行npm run commitlint,所以需要在package.json文件中添加如下代码:
# 在scrips中添加下面的代码
{
"scripts": {
    "commitlint": "commitlint --config commitlint.config.js -e -V"
  },
}配置结束,现在当我们填写commit信息的时候,前面就需要带着下面的subject
'feat',
'fix',
'docs',
'style',
'refactor',
'perf',
'test',
'chore',
'revert',
'build',
比如:git commit -m "feat: test",注意feat:后面有个空格
我们来写一个错误的来测试一下:

提示subject是空的。
使用正确的提交方式,提交成功了

使用 commitizen 做git规范化提交
由于添加了commitlint验证,对于不熟悉提交规范的新手同学会有一定影响,可以添加 commitizen 工具,手动生成规范化commit。
Commitizen是一个格式化commit message的工具。
# 工具安装
yarn add -D commitizen
使用cz-conventional-changelog
安装工具
yarn add cz-conventional-changelog -D
配置命令
"script": {
    "commit": "cz"
}
在package.json 中添加定义commitizen使用规则,
{
	"config": {
    "commitizen": {
      "path": "./node_modules/cz-conventional-changelog"
    }
  },
}当执行git commit的时候,就可以提示我们填写代码规则了
自定义 commitizen 规则
使用 cz-customizable 工具
# 安装依赖
yarn add cz-customizable -D
配置命令
"script": {
    "commit": "git-cz"
}
在package.json 中添加自定义commitizen,使用git-cz执行git commit命令
"config": {
    "commitizen": {
        "path": "./node_modules/cz-customizable"
    }
}
在根目录创建的.cz-config.js, 自定义commit提示内容
module.exports = {
  types: [
    { value: 'feat', name: '✨feat:     新功能' },
    { value: 'fix', name: '?fix:      修复' },
    { value: 'docs', name: '✏️docs:     文档变更' },
    { value: 'style', name: '?style:    代码格式(不影响代码运行的变动)' },
    {
      value: 'refactor',
      name: '♻️refactor: 重构(既不是增加feature,也不是修复bug)'
    },
    { value: 'perf', name: '⚡️perf:     性能优化' },
    { value: 'test', name: '✅test:     增加测试' },
    { value: 'chore', name: '?chore:    构建过程或辅助工具的变动' },
    { value: 'revert', name: '⏪️revert:   回退' },
    { value: 'build', name: '?️build:    打包' },
    { value: 'ci', name: '?CI:   related changes' }
  ],
  // override the messages, defaults are as follows
  messages: {
    type: '请选择提交类型(必选):',
    // scope: '请输入文件修改范围(可选):',
    customScope: '请输入修改范围(可选):',
    subject: '请简要描述提交(必填):',
    // body: '请输入详细描述(可选,待优化去除,跳过即可):',
    // breaking: 'List any BREAKING CHANGES (optional):\n',
    footer: '请输入要关闭的issue(待优化去除,跳过即可):',
    confirmCommit: '确认使用以上信息提交?(y/n/e/h)'
  },
  // used if allowCustomScopes is true
  allowCustomScopes: true,
  // allowBreakingChanges: ['feat', 'fix'],
  skipQuestions: ['body', 'footer'],
  // limit subject length, commitlint默认是72
  subjectLimit: 72
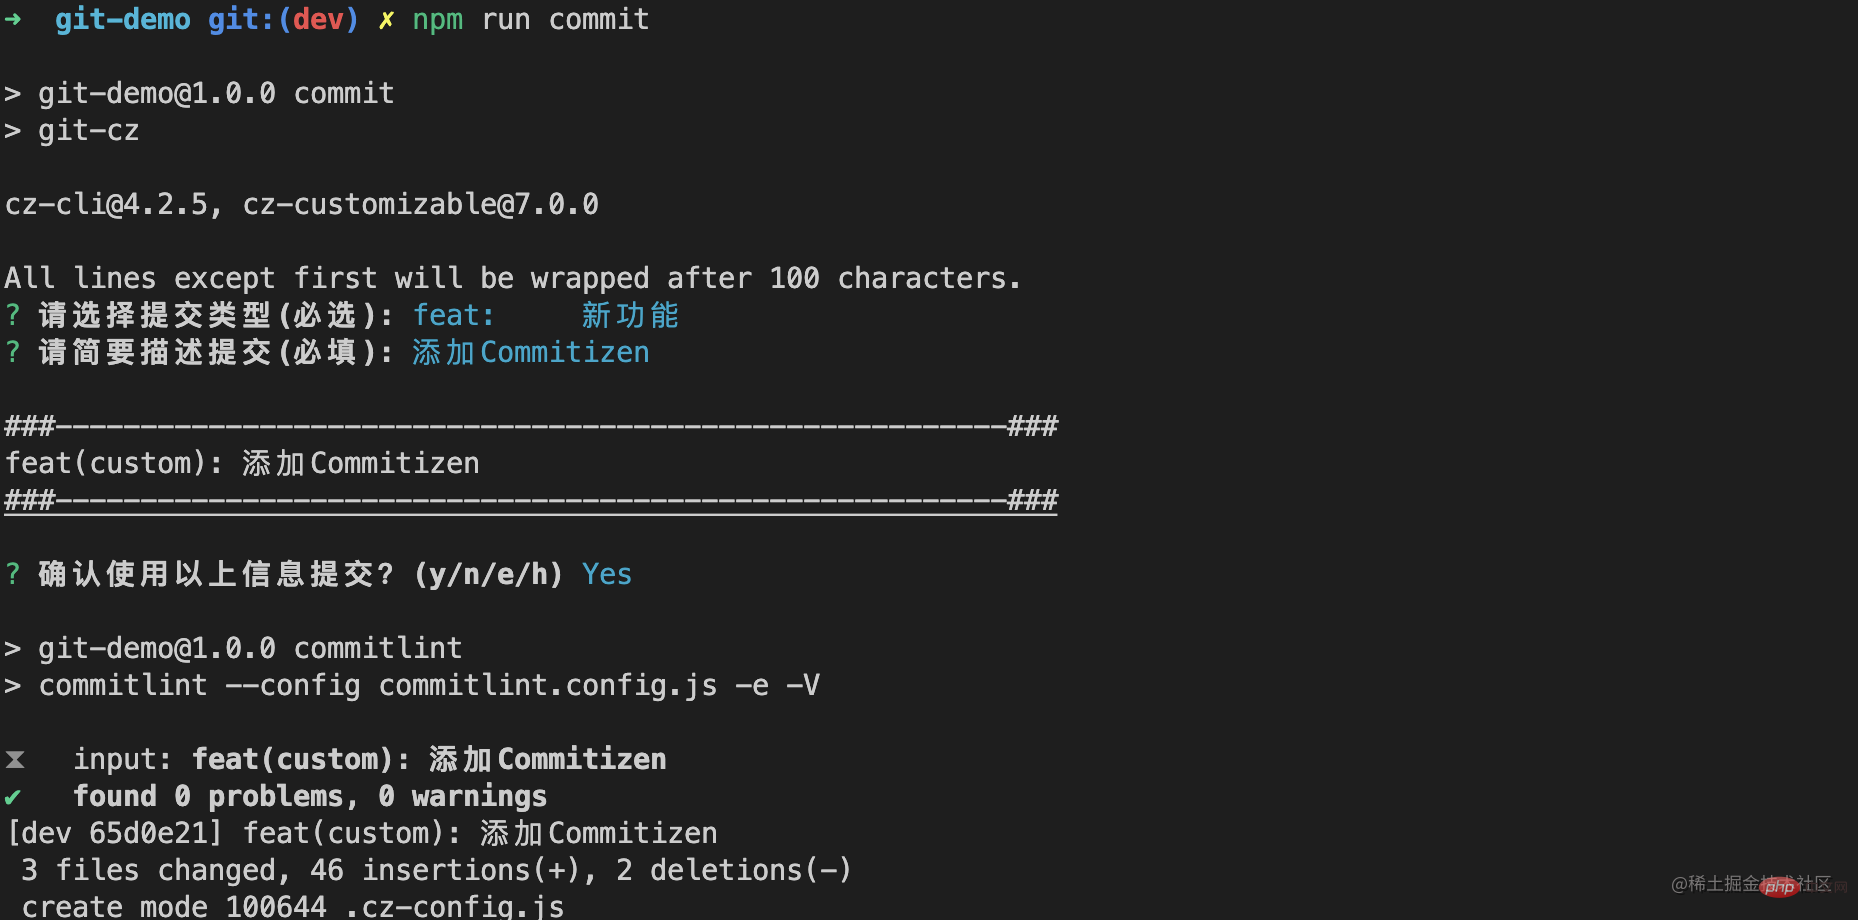
}当我们提交代码的时候,需要先git add .,然后执行npm run commit,就可以根据响应的提示填写commit信息 了,如下图所示:

(学习视频分享:编程基础视频)
以上是Gitlab學習之企業常用的一些git規範的詳細內容。更多資訊請關注PHP中文網其他相關文章!

