Angular學習以Tooltip為例了解自訂指令
- 青灯夜游轉載
- 2022-04-13 11:28:032559瀏覽
本篇文章帶大家繼續angular的學習,以Tooltip為例來了解一下自訂指令,希望對大家有幫助!

在先前的文章中,我們已經概覽了 Angular 的相關內容。在自訂指令的部分,我們已經能夠實現編寫,但是,在實際場景中,我們還需要標準化的管理。
Angular 是 Angular.js 的升版。 【相關教學推薦:《angular教學》】
So,本文,我們就以 Tooltip 來講解下自訂指令的內容。
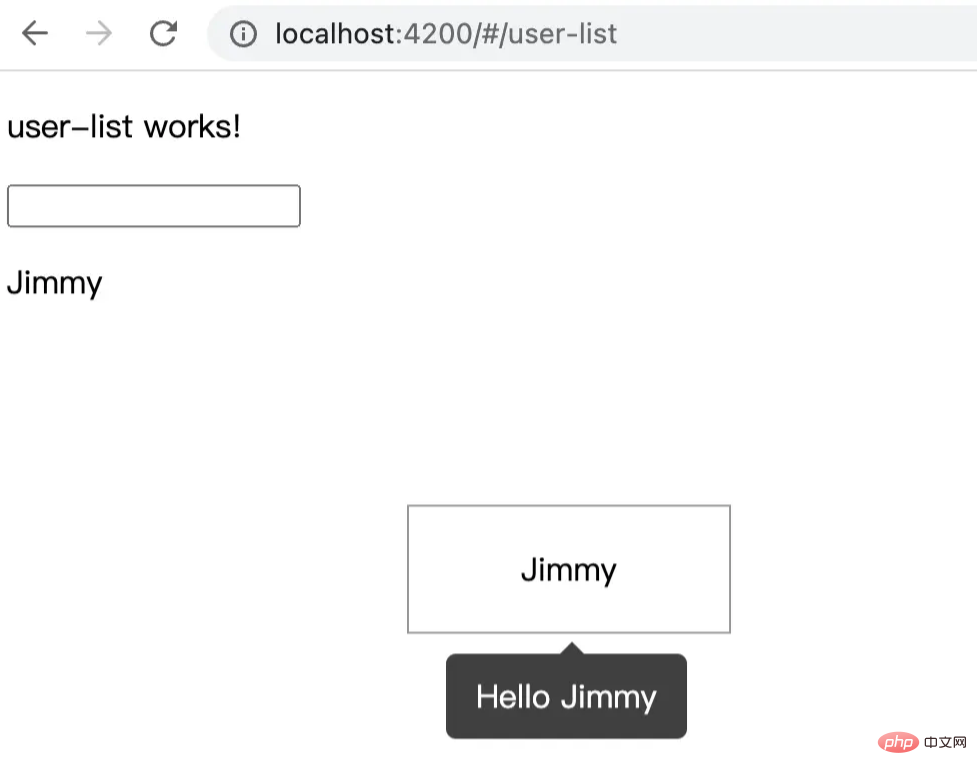
線上效果圖,如下:

#目錄結構
在上一篇文章的實作的程式碼專案基礎上,執行命令列:
# 进入 directives 文件夹
$ cd directives

# 创建 tooltip 文件夹
$ mkdir tooltip

# 进入 tooltip 文件夹
$ cd tooltip

# 创建 tooltip 组件
$ ng generate component tooltip

# 创建 tooltip 指令
$ ng generate directive tooltip
執行完上面的命令列之後,你會得到app/directive/tooltip 的檔案目錄結構如下:
tooltip
├── tooltip                                           // tooltip 组件
│    ├── user-list.component.html                     // 页面骨架
│    ├── user-list.component.scss                     // 页面独有样式
│    ├── user-list.component.spec.ts                  // 测试文件
│    └── user-list.component.ts                       // javascript 文件
├── tooltip.directive.spec.ts                         // 测试文件
└── tooltip.directive.ts                              // 指令文件
嗯,這裡我將元件放在tooltip 的同級,主要是方便管理。當然,這個因人而異,你可以放在公共元件 components 資料夾內。
寫tooltip 元件
在html 檔案中,有:
<div class="caret"></div>
<div class="tooltip-content">{{data.content}}</div>
在樣式文件在 .scss 中,有:
$black: #000000;
$white: #ffffff;
$caret-size: 6px;
$tooltip-bg: transparentize($black, 0.25); // transparentize 是 sass 的语法
$grid-gutter-width: 30px;
$body-bg-color: $white;
$app-anim-time: 200ms;
$app-anim-curve: ease-out;
$std-border-radius: 5px;
$zindex-max: 100;

// :host 伪类选择器,给组件元素本身设置样式
:host {
  position: fixed;
  padding: $grid-gutter-width/3 $grid-gutter-width/2;
  background-color: $tooltip-bg;
  color: $body-bg-color;
  opacity: 0;
  transition: all $app-anim-time $app-anim-curve;
  text-align: center;
  border-radius: $std-border-radius;
  z-index: $zindex-max;
}

.caret { // 脱字符
  width: 0;
  height: 0;
  border-left: 6px solid transparent;
  border-right: 6px solid transparent;
  border-bottom: 6px solid $tooltip-bg;
  position: absolute;
  top: -$caret-size;
  left: 50%;
  margin-left: -$caret-size/2;
  border-bottom-color: $tooltip-bg;
}
嗯~,
css是個神奇的東西,之後會安排一篇文章來講解下sass相關的內容...
然後,在javascript 檔案tooltip.component.ts 內容如下:
import {
  Component,
  ElementRef, // 元素指向
  HostBinding,
  OnDestroy,
  OnInit
} from '@angular/core';

@Component({
  selector: 'app-tooltip', // 标识符,表明我这个组件叫做啥,这里是 app-tooltip
  templateUrl: './tooltip.component.html', // 本组件的骨架
  styleUrls: ['./tooltip.component.scss'] // 本组件的私有样式
})
export class TooltipComponent implements OnInit {

  public data: any; // 在 directive 上赋值
  private displayTimeOut:any;

  // 组件本身 host 绑定相关的装饰器
  @HostBinding('style.top')  hostStyleTop!: string;
  @HostBinding('style.left') hostStyleLeft!: string;
  @HostBinding('style.opacity') hostStyleOpacity!: string;

  constructor(
    private elementRef: ElementRef
  ) { }

  ngOnInit(): void {
    this.hostStyleTop = this.data.elementPosition.bottom + 'px';

    if(this.displayTimeOut) {
      clearTimeout(this.displayTimeOut)
    }

    this.displayTimeOut = setTimeout((_: any) => {
      // 这里计算 tooltip 距离左侧的距离,这里计算公式是:tooltip.left + 目标元素的.width - (tooltip.width/2)
      this.hostStyleLeft = this.data.elementPosition.left + this.data.element.clientWidth / 2 - this.elementRef.nativeElement.clientWidth / 2 + 'px'
      this.hostStyleOpacity = '1';
      this.hostStyleTop = this.data.elementPosition.bottom + 10 + 'px'
    }, 500)
  }


  // 组件销毁
  ngOnDestroy() {
    // 组件销毁后,清除定时器,防止内存泄露
    if(this.displayTimeOut) {
      clearTimeout(this.displayTimeOut)
    }
  }
}
寫tooltip 指令
這是本文的重點,具體的說明,我在程式碼上標註出來~
#相關的檔案tooltip.directive.ts 內容如下:
import {
ApplicationRef, // 全局性调用检测
ComponentFactoryResolver, // 创建组件对象
ComponentRef, // 组件实例的关联和指引,指向 ComponentFactory 创建的元素
Directive, ElementRef,
EmbeddedViewRef, // EmbeddedViewRef 继承于 ViewRef,用于表示模板元素中定义的 UI 元素。
HostListener, // DOM 事件监听
Injector, // 依赖注入
Input
} from '@angular/core';
import { TooltipComponent } from './tooltip/tooltip.component';
@Directive({
selector: '[appTooltip]'
})
export class TooltipDirective {
@Input("appTooltip") appTooltip!: string;
private componentRef!: ComponentRef<TooltipComponent>;
// 获取目标元素的相关位置,比如 left, right, top, bottom
get elementPosition() {
return this.elementRef.nativeElement.getBoundingClientRect();
}
constructor(
protected elementRef: ElementRef,
protected appRef: ApplicationRef,
protected componentFactoryResolver: ComponentFactoryResolver,
protected injector: Injector
) { }
// 创建 tooltip
protected createTooltip() {
this.componentRef = this.componentFactoryResolver
.resolveComponentFactory(TooltipComponent) // 绑定 tooltip 组件
.create(this.injector);
this.componentRef.instance.data = { // 绑定 data 数据
content: this.appTooltip,
element: this.elementRef.nativeElement,
elementPosition: this.elementPosition
}
this.appRef.attachView(this.componentRef.hostView); // 添加视图
const domElem = (this.componentRef.hostView as EmbeddedViewRef<any>).rootNodes[0] as HTMLElement;
document.body.appendChild(domElem);
}
// 删除 tooltip
protected destroyTooltip() {
if(this.componentRef) {
this.appRef.detachView(this.componentRef.hostView); // 移除视图
this.componentRef.destroy();
}
}
// 监听鼠标移入
@HostListener('mouseover')
OnEnter() {
this.createTooltip();
}
// 监听鼠标移出
@HostListener('mouseout')
OnOut() {
this.destroyTooltip();
}
}到這裡,已經完成了99% 的功能了,下面我們在頁面上呼叫即可。
頁面上呼叫
我們在user-list.component.html 上新增下面的內容:
<p style="margin-top: 100px;">
<!-- [appTooltip]="'Hello Jimmy'" 是重点 -->
<span
[appTooltip]="'Hello Jimmy'"
style="margin-left: 200px; width: 160px; text-align: center; padding: 20px 0; display: inline-block; border: 1px solid #999;"
>Jimmy</span>
</p>TooltipDirective 這個指令我們已經在app.module.ts 上進行聲明,我們直接呼叫即可。目前的效果如下:

我們實作的tooltip# 是底部居中展示,也就是我們平常使用框架,例如angular ant design 中tooltip 的bottom 屬性。對於其他屬性,讀者有興趣的話,可以進行擴充。
至此,我們可以很好的維護自己寫的指令檔了。
更多程式相關知識,請造訪:程式設計入門! !
以上是Angular學習以Tooltip為例了解自訂指令的詳細內容。更多資訊請關注PHP中文網其他相關文章!

