
聊聊Go的並發程式設計 (二)

- 咔咔原創
- 2021-07-07 16:16:551946瀏覽
聊聊Go的goroutine和Channel
相關文章推薦:《聊聊Go的並發程式設計(一)》
使用案例還是在第一篇的第二節中寫的程式碼,不過這裡只需要一段即可。
package mainimport (
"fmt"
"time")func createWorker(id int) chan<div class="cl-preview-section" style="box-sizing: border-box; color: rgba(0, 0, 0, 0.75); font-family: -apple-system, " sf ui text arial sc sans gb yahei micro hei sans-serif font-size: font-variant-ligatures: common-ligatures white-space: normal background-color: rgb></div><div class="cl-preview-section" style="box-sizing: border-box; color: rgba(0, 0, 0, 0.75); font-family: -apple-system, " sf ui text arial sc sans gb yahei micro hei sans-serif font-size: font-variant-ligatures: common-ligatures white-space: normal background-color: rgb>這裡咔咔將原始原始碼放在這裡,如果你想跟著文章的節奏走,可以放到你的編輯器中進行操作。 <p style="box-sizing: border-box; margin-top: 0px; margin-bottom: 16px; font-size: 18px; color: rgb(77, 77, 77); line-height: 26px; overflow: auto hidden;"></p>
<div class="cl-preview-section" style="box-sizing: border-box; color: rgba(0, 0, 0, 0.75); font-family: -apple-system, " sf ui text arial sc sans gb yahei micro hei sans-serif font-size: font-variant-ligatures: common-ligatures white-space: normal background-color: rgb><p style="box-sizing: border-box; margin-top: 0px; margin-bottom: 16px; font-size: 18px; color: rgb(77, 77, 77); line-height: 26px; overflow: auto hidden;">那這段程式碼的問題在哪裡呢? </p></div>
<div class="cl-preview-section" style="box-sizing: border-box; color: rgba(0, 0, 0, 0.75); font-family: -apple-system, " sf ui text arial sc sans gb yahei micro hei sans-serif font-size: font-variant-ligatures: common-ligatures white-space: normal background-color: rgb><p style="box-sizing: border-box; margin-top: 0px; margin-bottom: 16px; font-size: 18px; color: rgb(77, 77, 77); line-height: 26px; overflow: auto hidden;">可以看到channelDemo函數最後使用了一個sleep,這玩意在程式中可不能亂用。 </p></div>
<div class="cl-preview-section" style="box-sizing: border-box; color: rgba(0, 0, 0, 0.75); font-family: -apple-system, " sf ui text arial sc sans gb yahei micro hei sans-serif font-size: font-variant-ligatures: common-ligatures white-space: normal background-color: rgb><p style="box-sizing: border-box; margin-top: 0px; margin-bottom: 16px; font-size: 18px; color: rgb(77, 77, 77); line-height: 26px; overflow: auto hidden;">說到這裡跟大家講一個小故事,咔咔之前在網路上看到一段就是加了sleep的程式碼。 </p></div>
<div class="cl-preview-section" style="box-sizing: border-box; color: rgba(0, 0, 0, 0.75); font-family: -apple-system, " sf ui text arial sc sans gb yahei micro hei sans-serif font-size: font-variant-ligatures: common-ligatures white-space: normal background-color: rgb><p style="box-sizing: border-box; margin-top: 0px; margin-bottom: 16px; font-size: 18px; color: rgb(77, 77, 77); line-height: 26px; overflow: auto hidden;">然後一個新手程式設計師不明白為什麼要加這個sleep,然後問題專案經理,專案經理說老闆發現程式慢之後會找咱們優化,每一次優化把這個sleep的時間縮短即可。讓老闆感覺到我們在做事情。 </p></div>
<div class="cl-preview-section" style="box-sizing: border-box; color: rgba(0, 0, 0, 0.75); font-family: -apple-system, " sf ui text arial sc sans gb yahei micro hei sans-serif font-size: font-variant-ligatures: common-ligatures white-space: normal background-color: rgb><p style="box-sizing: border-box; margin-top: 0px; margin-bottom: 16px; font-size: 18px; color: rgb(77, 77, 77); line-height: 26px; overflow: auto hidden;">新手就是新手對不懂程式碼都會進行標註,然後就寫了一句註解「專案經理要求這裡運行緩慢,老闆讓優化時,程式碼得到明顯的速度提升」。 </p></div>
<div class="cl-preview-section" style="box-sizing: border-box; color: rgba(0, 0, 0, 0.75); font-family: -apple-system, " sf ui text arial sc sans gb yahei micro hei sans-serif font-size: font-variant-ligatures: common-ligatures white-space: normal background-color: rgb><p style="box-sizing: border-box; margin-top: 0px; margin-bottom: 16px; font-size: 18px; color: rgb(77, 77, 77); line-height: 26px; overflow: auto hidden;">這句話很不巧的是被老闆給看見了,老闆不認識程式碼,但文字還是認識的哈!於是,專案經理下馬。 </p></div>
<div class="cl-preview-section" style="box-sizing: border-box; color: rgba(0, 0, 0, 0.75); font-family: -apple-system, " sf ui text arial sc sans gb yahei micro hei sans-serif font-size: font-variant-ligatures: common-ligatures white-space: normal background-color: rgb><p style="box-sizing: border-box; margin-top: 0px; margin-bottom: 16px; font-size: 18px; color: rgb(77, 77, 77); line-height: 26px; overflow: auto hidden;">所以說對於sleep大多數都是一個測試狀態,堅決不會出現在線上的,所以呢?就要解決程式碼中的這個sleep。 </p></div>
<div class="cl-preview-section" style="box-sizing: border-box; color: rgba(0, 0, 0, 0.75); font-family: -apple-system, " sf ui text arial sc sans gb yahei micro hei sans-serif font-size: font-variant-ligatures: common-ligatures white-space: normal background-color: rgb><p style="box-sizing: border-box; margin-top: 0px; margin-bottom: 16px; font-size: 18px; color: rgb(77, 77, 77); line-height: 26px; overflow: auto hidden;">那么大家在回忆一下,在这里为什么要加sleep呢?</p></div>
<div class="cl-preview-section" style="box-sizing: border-box; color: rgba(0, 0, 0, 0.75); font-family: -apple-system, " sf ui text arial sc sans gb yahei micro hei sans-serif font-size: font-variant-ligatures: common-ligatures white-space: normal background-color: rgb><p style="box-sizing: border-box; margin-top: 0px; margin-bottom: 16px; font-size: 18px; color: rgb(77, 77, 77); line-height: 26px; overflow: auto hidden;">发送到channel的数据都是在另一个goroutine中进行并发打印的,并发打印就会出现问题,因为根本不会知道什么时候才打印完毕。</p></div>
<div class="cl-preview-section" style="box-sizing: border-box; color: rgba(0, 0, 0, 0.75); font-family: -apple-system, " sf ui text arial sc sans gb yahei micro hei sans-serif font-size: font-variant-ligatures: common-ligatures white-space: normal background-color: rgb><p style="box-sizing: border-box; margin-top: 0px; margin-bottom: 16px; font-size: 18px; color: rgb(77, 77, 77); line-height: 26px; overflow: auto hidden;">所以说这个sleep就会为了应对这个不知道什么时候打印完的问题,给个1毫秒让进行打印。</p></div>
<div class="cl-preview-section" style="box-sizing: border-box; color: rgba(0, 0, 0, 0.75); font-family: -apple-system, " sf ui text arial sc sans gb yahei micro hei sans-serif font-size: font-variant-ligatures: common-ligatures white-space: normal background-color: rgb><p style="box-sizing: border-box; margin-top: 0px; margin-bottom: 16px; font-size: 18px; color: rgb(77, 77, 77); line-height: 26px; overflow: auto hidden;">这种做法是非常不好的,接下来看看使用一种新的方式来解决这个问题。</p></div>
<div class="cl-preview-section" style="box-sizing: border-box; color: rgba(0, 0, 0, 0.75); font-family: -apple-system, " sf ui text arial sc sans gb yahei micro hei sans-serif font-size: font-variant-ligatures: common-ligatures white-space: normal background-color: rgb><p style="box-sizing: border-box; margin-top: 0px; margin-bottom: 16px; font-size: 18px; color: rgb(77, 77, 77); line-height: 26px; overflow: auto hidden;">以下代码是修改完的代码。</p></div>
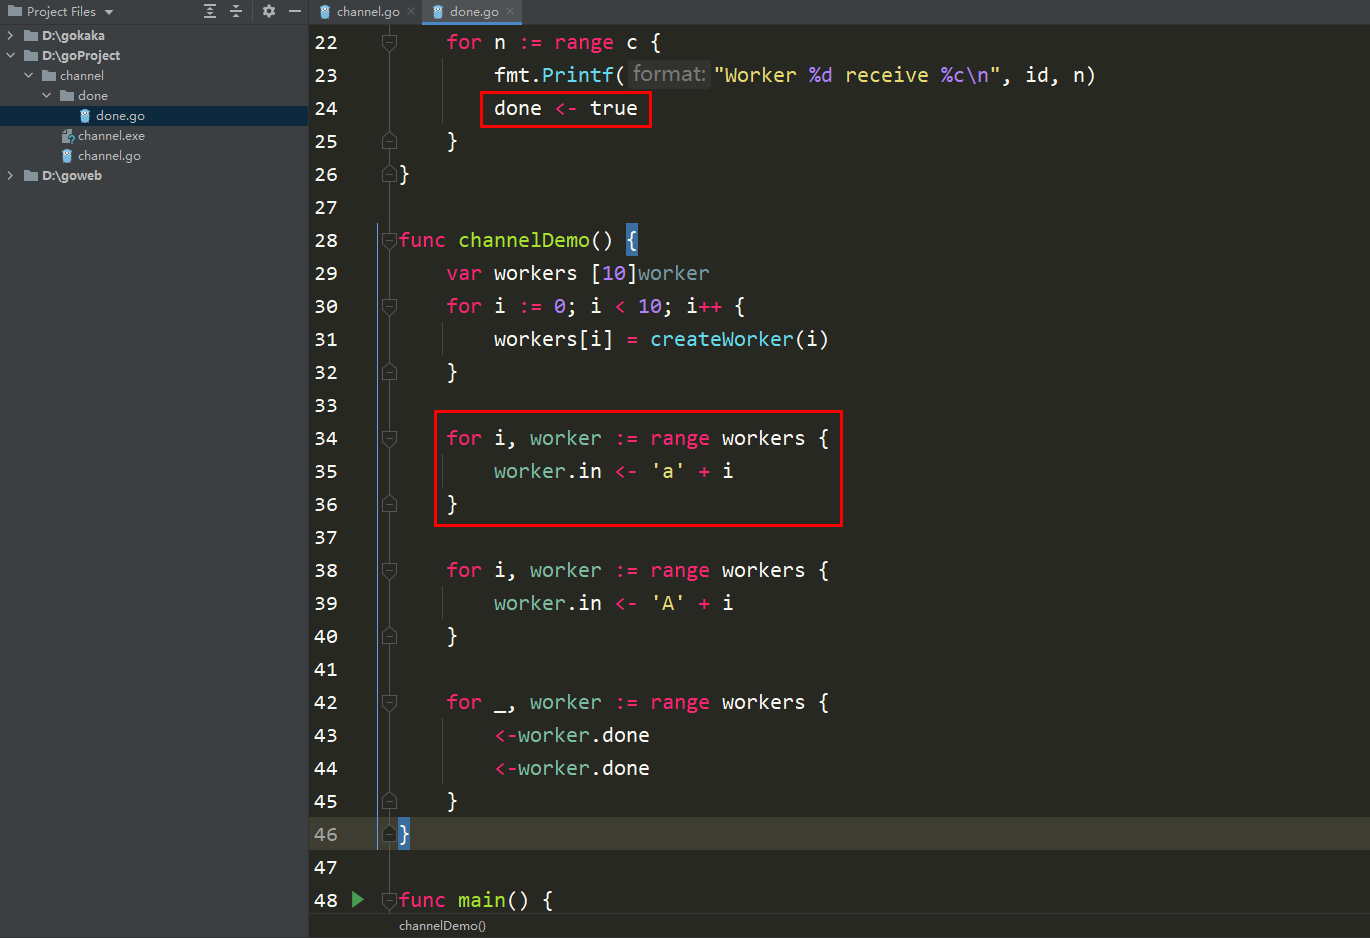
<div class="cl-preview-section" style="box-sizing: border-box; color: rgba(0, 0, 0, 0.75); font-family: -apple-system, " sf ui text arial sc sans gb yahei micro hei sans-serif font-size: font-variant-ligatures: common-ligatures white-space: normal background-color: rgb><pre style="box-sizing: border-box; font-family: " source code pro sans mono menlo monaco consolas inconsolata courier monospace sc yahei sans-serif font-size: margin-top: margin-bottom: line-height: color: rgb>package mainimport (
"fmt")type worker struct {
in chan int
done chan bool}func createWorker(id int) worker {
w := worker{
in: make(chan int),
done: make(chan bool),
}
go doWorker(id, w.in, w.done)
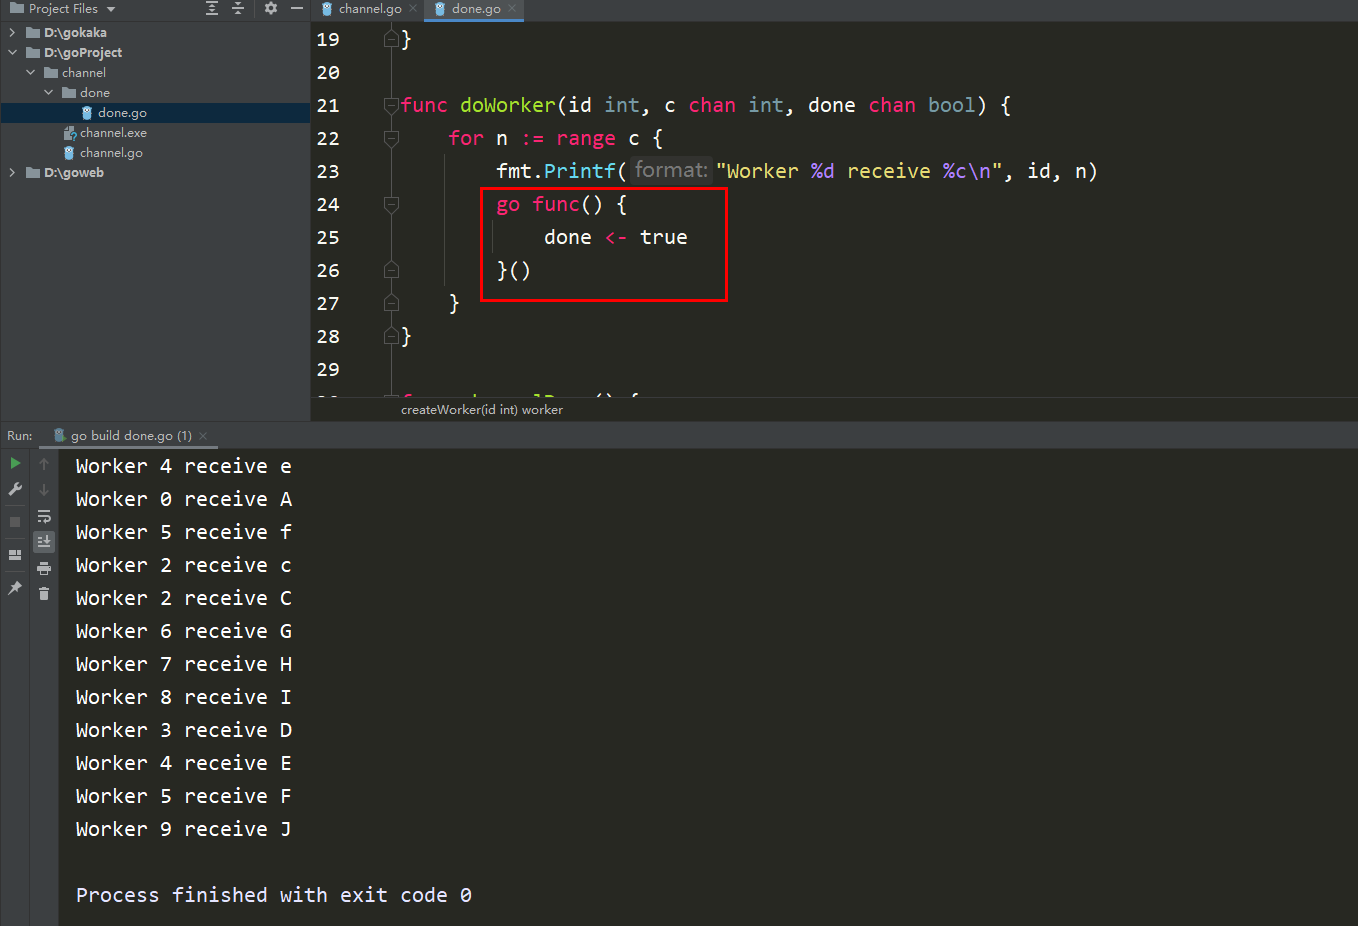
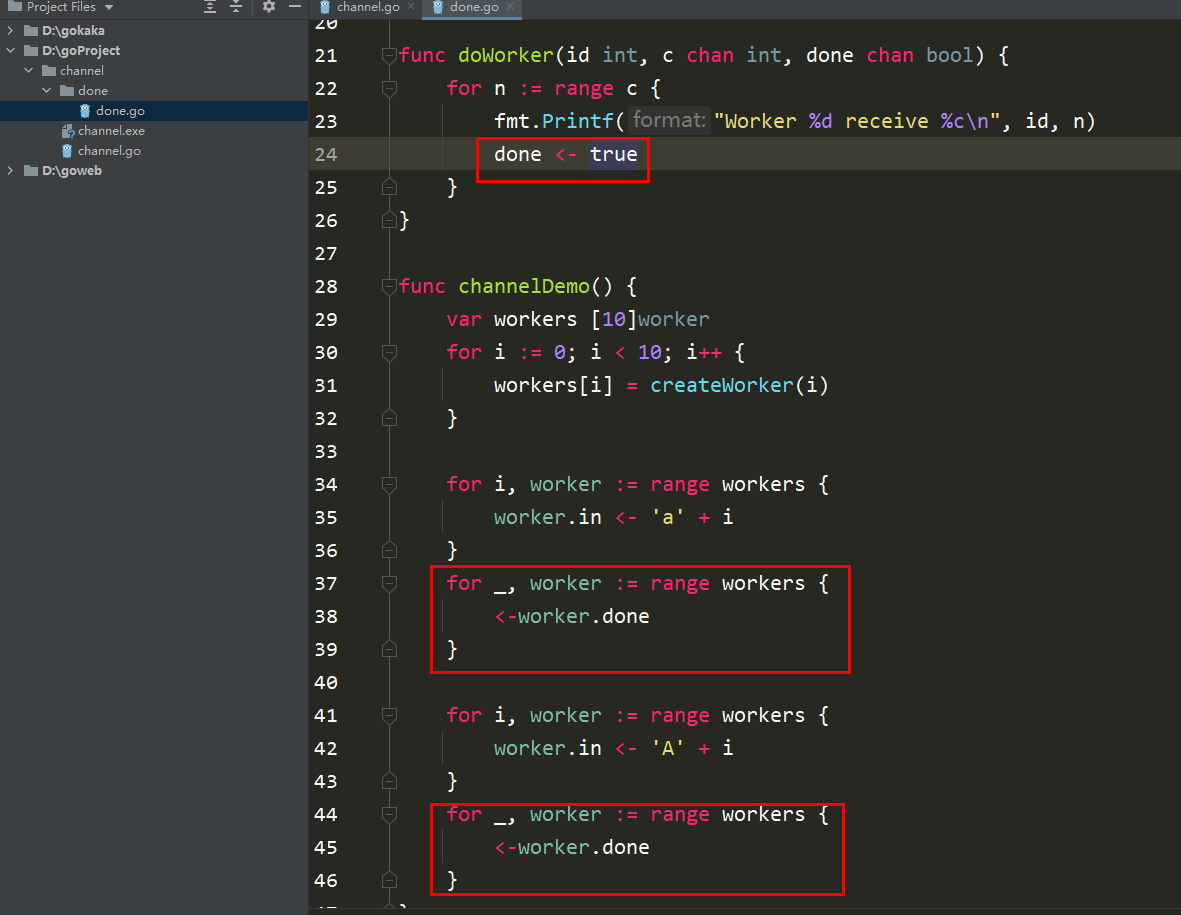
return w}func doWorker(id int, c chan int, done chan bool) {
for n := range c {
fmt.Printf("Worker %d receive %c\n", id, n)
done 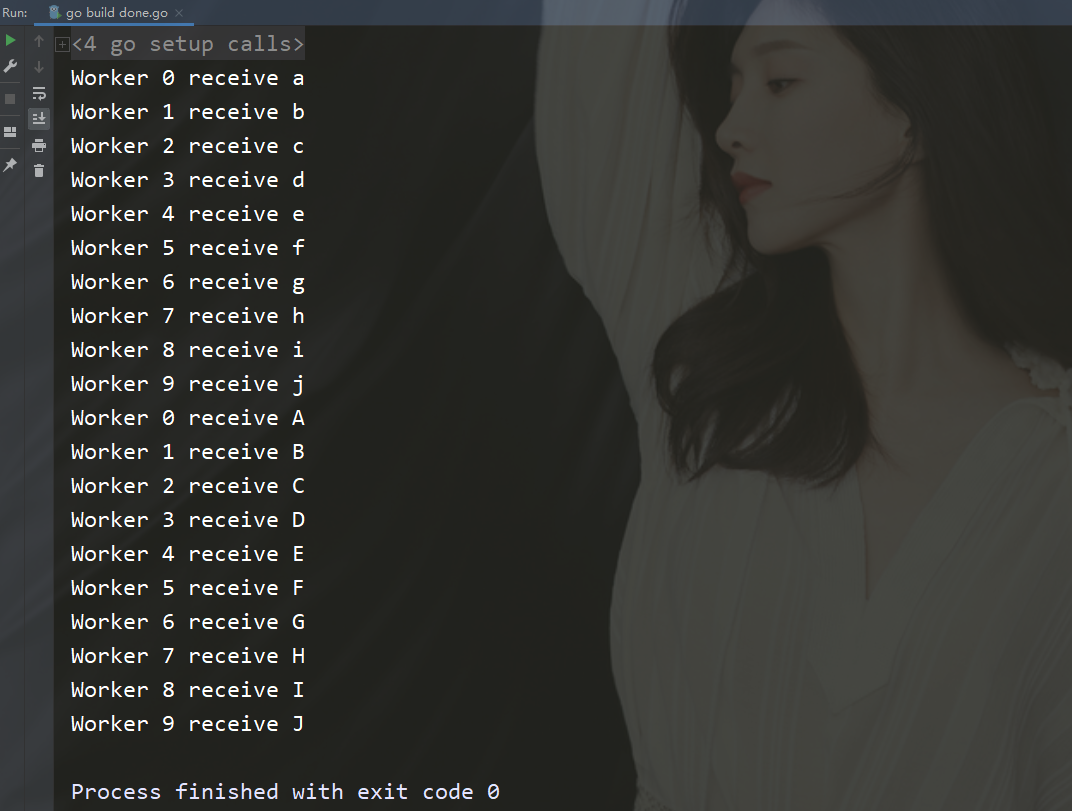
#是不是有點懵,這怎麼成有序的了,如果是並行的那還有必要開那10個worker,直接按照順序打印就好了。
#########現在就來解決這個問題,我不希望發一個任務然後等它結束。 ############最好的就是把他們全部發出去,等待它們全部結束再退出來。 ######package mainimport (
"fmt")type worker struct {
in chan int
done chan bool}func createWorker(id int) worker {
w := worker{
in: make(chan int),
done: make(chan bool),
}
go doWorker(id, w.in, w.done)
return w}func doWorker(id int, c chan int, done chan bool) {
for n := range c {
fmt.Printf("Worker %d receive %c\n", id, n)
done 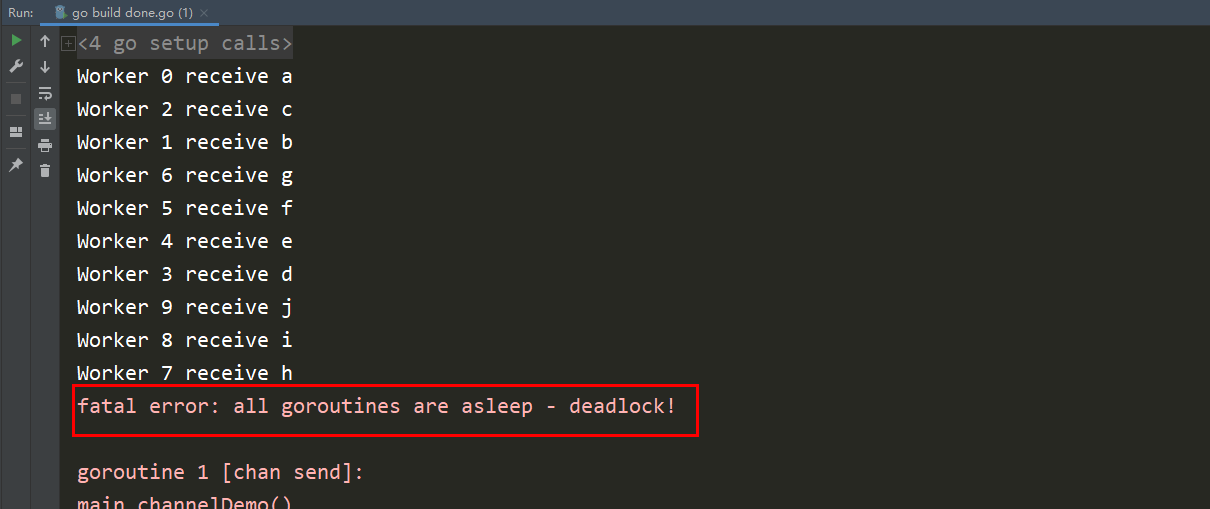
package mainimport (
	"fmt"
	"sync")type worker struct {
	in chan int
	wg *sync.WaitGroup}func createWorker(id int, wg *sync.WaitGroup) worker {
	w := worker{
		in: make(chan int),
		wg: wg,
	}
	go doWorker(id, w.in, wg)
	return w}func doWorker(id int, c chan int, wg *sync.WaitGroup) {
	for n := range c {
		fmt.Printf("Worker %d receive %c\n", id, n)
		wg.Done()
	}}func channelDemo() {
var wg sync.WaitGroup var workers [10]worker for i := 0; i 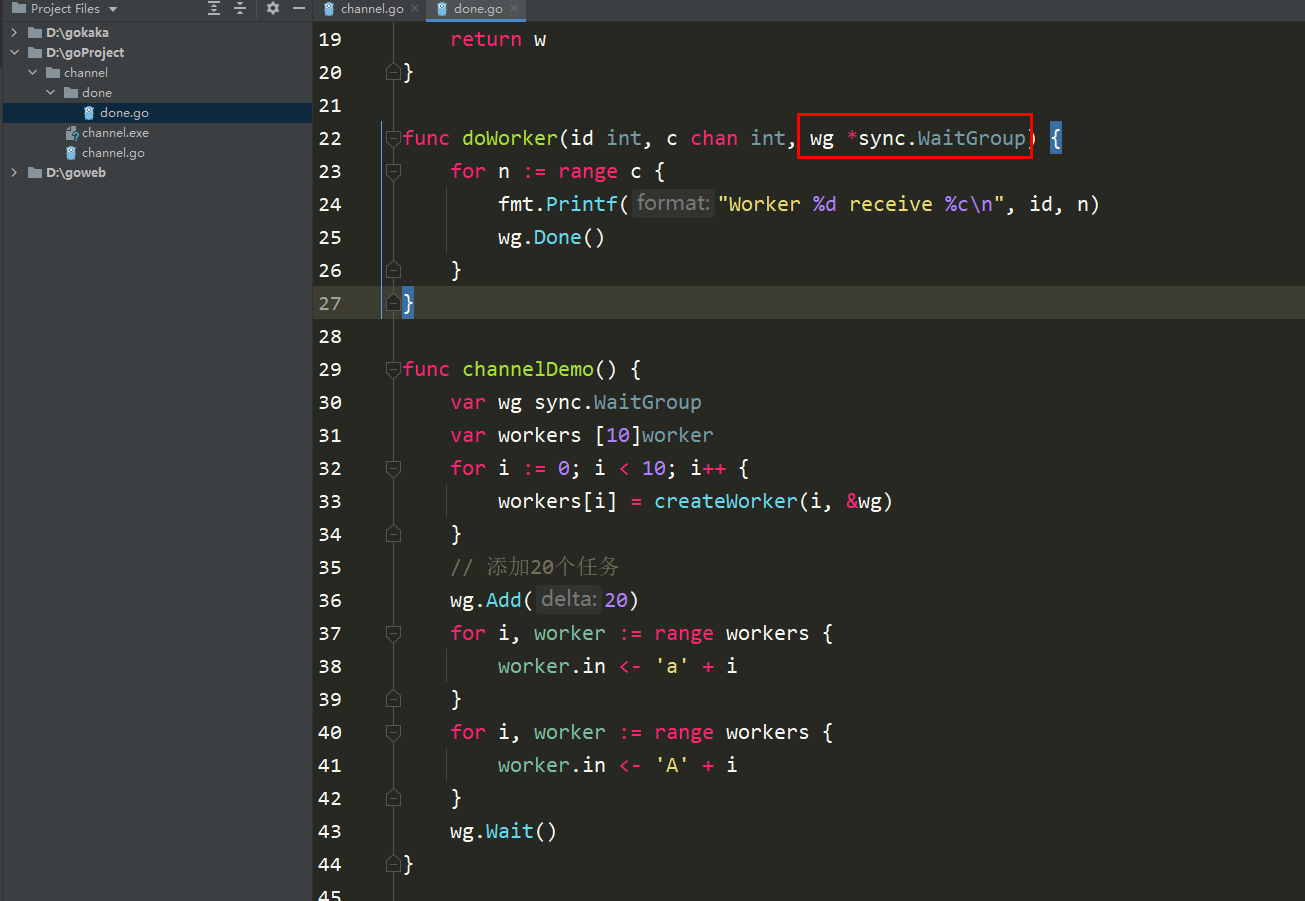
package mainimport (
	"fmt"
	"sync")type worker struct {
	in   chan int
	done func()}func createWorker(id int, wg *sync.WaitGroup) worker {
	w := worker{
		in: make(chan int),
		done: func() {
			wg.Done()
		},
	}
	go doWorker(id, w)
	return w}func doWorker(id int, w worker) {
	for n := range w.in {
		fmt.Printf("Worker %d receive %c\n", id, n)
		w.done()
	}}func channelDemo() {
var wg sync.WaitGroup var workers [10]worker for i := 0; i package mainimport (
"fmt"
"math/rand"
"time")func generator() chan int {
out := make(chan int)
go func() {
i := 0
for {
// 随机睡眠1500毫秒以内
time.Sleep(
time.Duration(rand.Intn(1500)) *
time.Millisecond)
// 往out这个channel发送i值
out package mainimport (
"fmt"
"math/rand"
"time")func worker(id int, c chan int) {
for n := range c {
fmt.Printf("Worker %d receive %d\n", id, n)
}}func createWorker(id int) chan
package mainimport (
	"fmt"
	"math/rand"
	"time")func worker(id int, c chan int) {
	for n := range c {
		fmt.Printf("Worker %d receive %d\n", id, n)
	}}func createWorker(id int) chan
package mainimport (
"fmt"
"math/rand"
"time")func worker(id int, c chan int) {
for n := range c {
// 手动让消耗速度变慢
time.Sleep(5 * time.Second)
fmt.Printf("Worker %d receive %d\n", id, n)
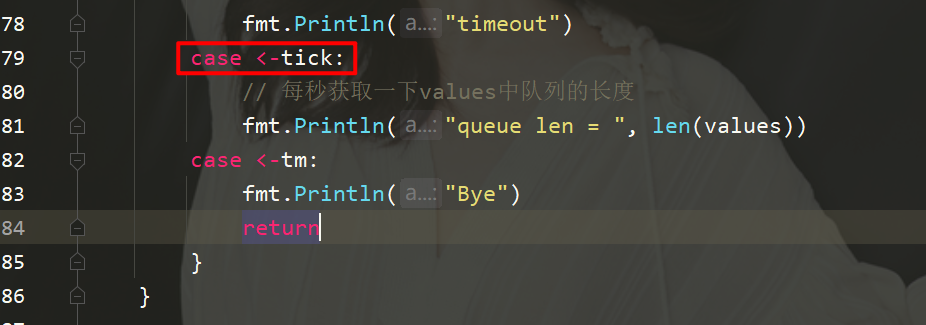
}}func createWorker(id int) chan 0 {
activeWorker = worker // 取出索引为0的值
activeValue = values[0]
}
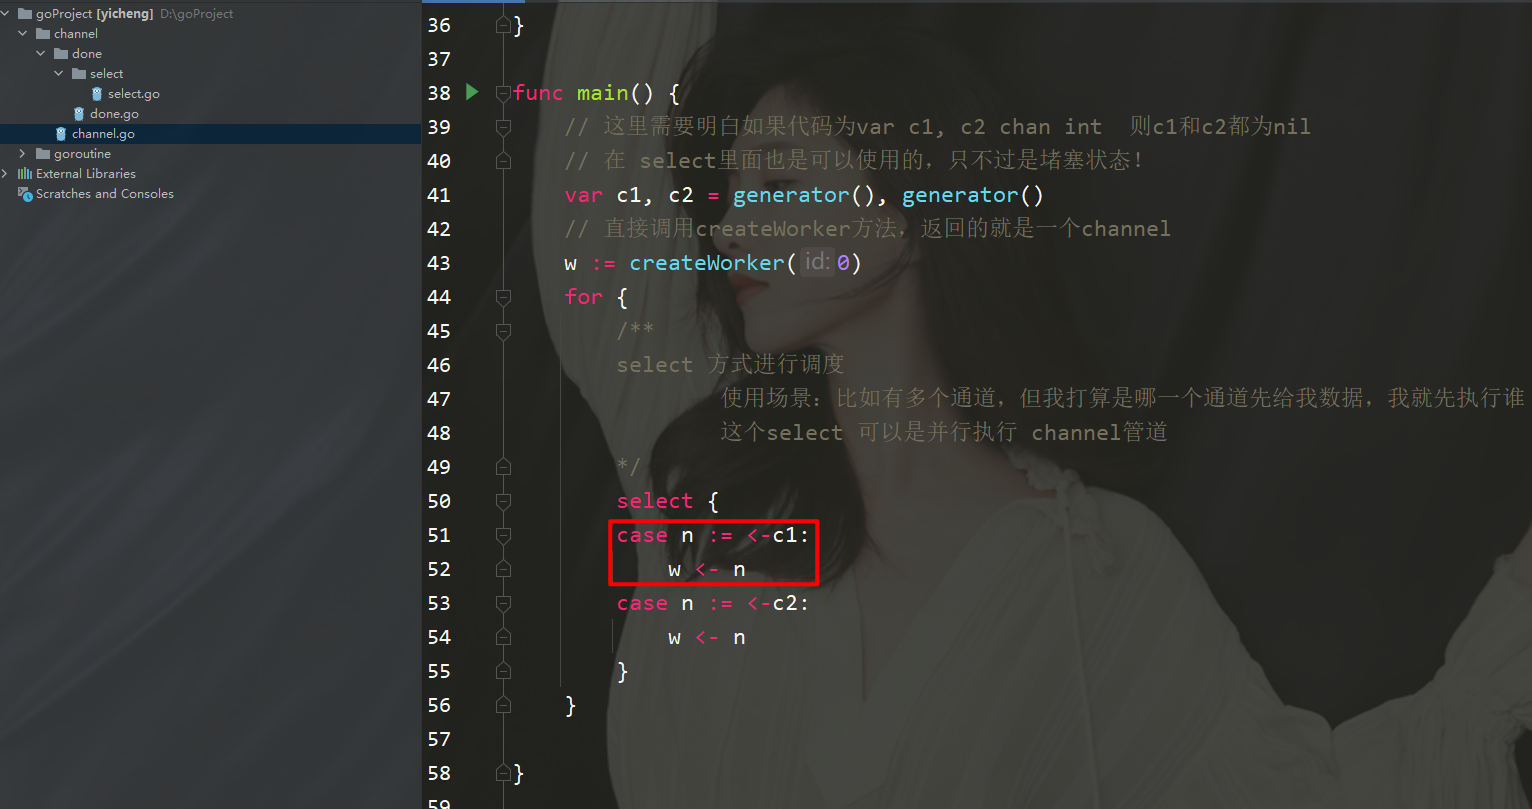
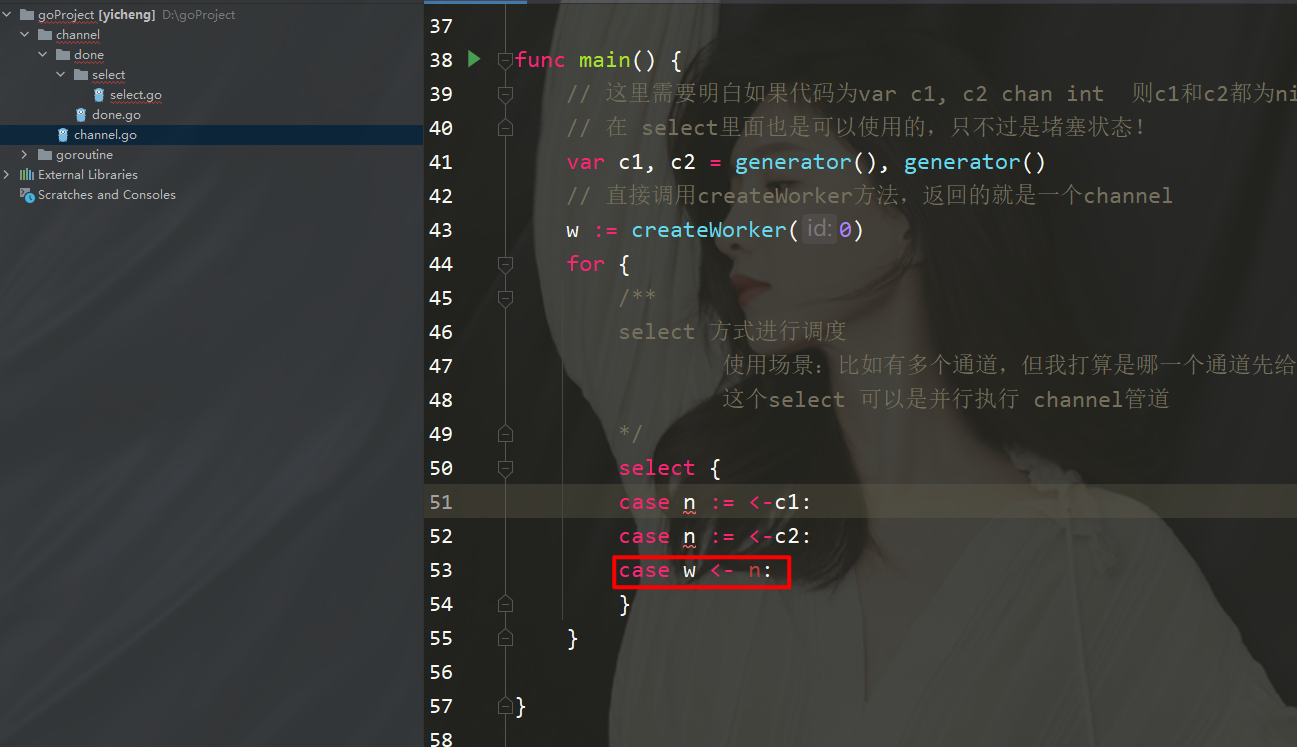
/**
select 方式进行调度
使用场景:比如有多个通道,但我打算是哪一个通道先给我数据,我就先执行谁
这个select 可以是并行执行 channel管道
*/
select {
case n := 
package mainimport (
	"fmt"
	"math/rand"
	"time")func worker(id int, c chan int) {
	for n := range c {
		// 手动让消耗速度变慢
		time.Sleep(time.Second)
		fmt.Printf("Worker %d receive %d\n", id, n)
	}}func createWorker(id int) chan 0 {
			activeWorker = worker			// 取出索引为0的值
			activeValue = values[0]
		}
		/**
		select 方式进行调度
		        使用场景:比如有多个通道,但我打算是哪一个通道先给我数据,我就先执行谁
		        这个select 可以是并行执行 channel管道
		*/
		select {
case n := 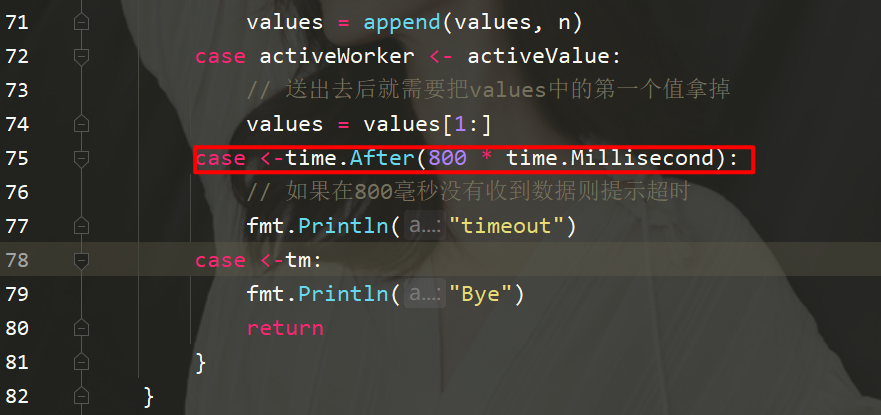
package mainimport (
	"fmt"
	"math/rand"
	"time")func worker(id int, c chan int) {
	for n := range c {
		// 手动让消耗速度变慢
		time.Sleep(time.Second)
		fmt.Printf("Worker %d receive %d\n", id, n)
	}}func createWorker(id int) chan 0 {
			activeWorker = worker			// 取出索引为0的值
			activeValue = values[0]
		}
		/**
		select 方式进行调度
		        使用场景:比如有多个通道,但我打算是哪一个通道先给我数据,我就先执行谁
		        这个select 可以是并行执行 channel管道
		*/
		select {
case n := 以上是聊聊Go的並發程式設計 (二)的詳細內容。更多資訊請關注PHP中文網其他相關文章!
陳述:
本文內容由網友自願投稿,版權歸原作者所有。本站不承擔相應的法律責任。如發現涉嫌抄襲或侵權的內容,請聯絡admin@php.cn