
uniapp如何實現增加提示的功能

- 藏色散人原創
- 2020-12-16 17:28:105131瀏覽
uniapp增加提示的實作方法:首先判斷input並取得焦點;然後透過介面取得數據,並做前端模擬處理;接著設定input框的change事件;最後設定點選事件,並實作搜尋點選即可。

本教學操作環境:Windows7系統、uni-app2.5.1版本,此方法適用於所有品牌電腦。
推薦(免費):uni-app開發教學
uniapp實作一個搜尋加上提示功能(含傳參等)
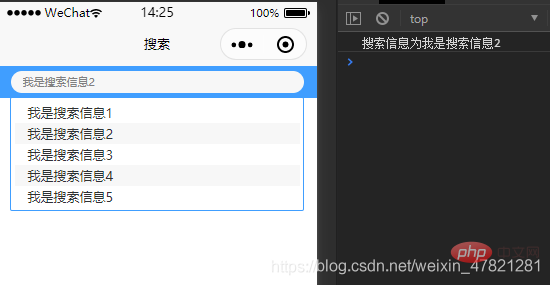
#先看程式碼,複製使用即可,我已幫您考慮到使用v-for循環或其他可能帶來的問題。 (這裡推薦您安裝外掛程式使用scss)您將看到以下效果。
<template>
<view>
<input>
<!-- 判断input获取焦点同时后台给到了数据 -->
<view>
<view>
{{item.title}}
</view>
</view>
</view></template><script>
export default {
data() {
return {
Value: '', //搜索内容
placeholder: '请输入搜索内容', //提示
isValue: false, //文字框是否显示
SearchList: []
}
},
methods: {
ShowValue() {
this.isValue = !this.isValue if (this.isValue) { //如果获取到了焦点
this.getList()
} else {
//失去焦点 清空数据
}
},
getList(value) { //这一步是获取数据 您可以通过接口获取 这里做前端模拟处理
// 需要和后台协商没有数据时候传递默认的几条
// axios.get('/getList?value='+value).then(res=>{ //请求案例
// this.SearchList = res.data.data
// })
if (!value) {
let arr = [{
id: 1,
title: "我是搜索信息1"
},
{
id: 2,
title: "我是搜索信息2"
},
{
id: 3,
title: "我是搜索信息3"
},
{
id: 4,
title: "我是搜索信息4"
},
{
id: 5,
title: "我是搜索信息5"
},
]
this.SearchList = arr } else {
this.getList()
}
},
GetValue(event) { //input框的change事件
console.log('当前输入' + event.detail.value)
// 有值就获取 没有就让他为空
event.detail.value ? this.Value = event.detail.value : this.Value = ''
event.detail.value ? this.getList(this.Value) : this.getList(this.Value)
},
SetValue(value) { //点击事件 搜索点击这一条
console.log('搜索信息为' + value)
this.Value = value this.placeholder = value this.SearchList = []
this.isValue = !this.isValue // 拿到数据 做页面跳转操作比如
// uni.navigateTo({
// url:"../cart/cart"
// })
}
},
onLoad() {}
}</script><style>
$max:100%;
.box {
width: $max;
padding: 10 30rpx; //上下10 左右30
height: 64rpx;
display: flex;
justify-content: center;
align-items: center;
min-height: 32px;
position: relative;
background: #409EFF;
.S-input {
width: 660rpx;
background: #f7f7f7;
padding-left: 30rpx;
border-radius:32rpx;
}
.InputList {
position: absolute;
width: 690rpx;
height: auto;
min-height: 100rpx;
top: 74rpx;
border: 1rpx solid #409EFF;
border-radius: 5rpx;
padding: 10rpx;
.listSon {
height: 50rpx;
line-height: 50rpx;
font-size: 32rpx;
text-indent:1em;
}
.listSon:nth-of-type(even){
background: #f7f7f7;
}
}
}</style>
附加和可能出現的有用資訊已添加註釋
其他有關uniapp的疑問或此方法不理解的地方您可留言,我會盡快回覆並幫您解決。
以上是uniapp如何實現增加提示的功能的詳細內容。更多資訊請關注PHP中文網其他相關文章!
陳述:
本文內容由網友自願投稿,版權歸原作者所有。本站不承擔相應的法律責任。如發現涉嫌抄襲或侵權的內容,請聯絡admin@php.cn
上一篇:uniapp怎麼重新整理目前頁面下一篇:uniapp怎麼重新整理目前頁面