案例分享--小程式圖片分組上傳
- php是最好的语言原創
- 2018-08-09 10:43:152368瀏覽
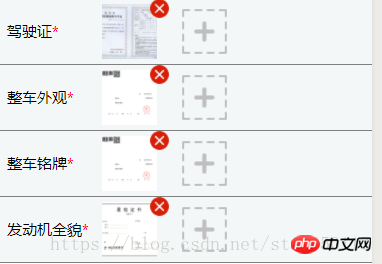
在開發小程中,在一個專案需求需要上傳多組照片,上傳頁面部分截圖如下:

因為分組比較多,不可能每一組寫一個佈局,因此使用for循環進行圖片的選擇顯示,首先定義資料
fileList: [{
      name: "驾驶证",
      cid:"0",
      picimage:[],
    }, {
        name: "整车外观",
        cid: "1",
        picimage: [],
      }, {
        name: "整车铭牌",
        cid: "2",
        picimage: [],
    }, {
        name: "发动机全貌",
        cid: "3",
        picimage: [],
    },{
        name: "增压器全貌",
        cid: "4",
        picimage: [],
    }]
頁面佈局程式碼部分就不貼出了,使用循環遇到的問題有:1.呼叫同一個wx.chooseImage ()會出現第二章覆蓋第一張;2.所有組別同時沒辦法區分。解決方法:1.選擇圖片時,將圖片concat到陣列中去。 2.為每個群組設定一個id,當點擊選擇圖片按鈕時將id傳過去,chooseImage根據所接收到的id選擇將圖片顯示在哪個分組,關鍵代碼如下:
chooseWxImage: function (e) {
    var _this = this;
    var id = e.currentTarget.dataset.picid;
    console.log("id-----" + id)
    if (_this.data.fileList[id].picimage.length>1){
      wx.showModal({
        content: '你最多只能选择2张照片',
        showCancel:false,
      })
    }else{
    wx.chooseImage({
      count:2,
      sizeType: "compressed",
      sourceType: ['album', 'camera'],
      success: function (res) {
        var arr = _this.data.fileList[id].picimage;
        for (let i in res.tempFilePaths) {
          arr.push(res.tempFilePaths[i])
        }
        _this.setData({
          fileList: _this.data.fileList
        })
      }
    })}
  },
上傳部分,因為小程式只能一張一張上傳,因此需要對uploading方法進行處理,先將所有圖片數組放到一個集合中,然後對集合進行遍歷,以數組為單位進行上傳。
upload: function (e) {
    var that = this;
    var fileList = that.data.fileList;
    var tempath = [] ;//图片地址,将所有图片数组放进去
    for(let i in fileList){
      tempath.push(fileList[i].picimage)
      }

    console.log("tempimage"+tempath)
    wx.showLoading({
      title: '上传中...',
    })
      for (let j in tempath) {
        requestUtil.uploadimg({//uploading为封装的一个方法
          url: '上传地址',
          path: tempath[j],//遍历地址,将每个数组循环上传
          })
      wx.hideLoading();
      wx.showToast({
        title: '上传成功!',
        icon:'success',
        duration:'2500',
      })
      }
    }


//多张图片上传,这部分代码是参考网上的,使用当中遇到一个bug就是如果传过来的数组为空的话,就会卡死小程序,因此需要加上判断数组不能为空
function uploadimg(data) {
	var that = this,
		i = data.i ? data.i : 0,//当前上传的哪张图片
		success = data.success ? data.success : 0,//上传成功的个数
		fail = data.fail ? data.fail : 0;//上传失败的个数
	wx.uploadFile({
		url: data.url,
		filePath: data.path[i],
		name: 'file',//这里根据自己的实际情况改
		formData: data.formData,//这里是上传图片时一起上传的数据
		success: (resp) => {
      if (resp.statusCode == 200) {
        success++;//图片上传成功,图片上传成功的变量+1
			  console.log(resp)
			  console.log(i);
      }
		},
		fail: (res) => {
			fail++;//图片上传失败,图片上传失败的变量+1
      console.log(data.path)
			console.log('fail:' + i + "fail:" + fail);
		},
		complete: () => {
			console.log(i);
			i++;//这个图片执行完上传后,开始上传下一张
			if (i == data.path.length) {   //当图片传完时,停止调用
				console.log('执行完毕');
				console.log('成功:' + success + " 失败:" + fail);
			} else {//若图片还没有传完,则继续调用函数
				console.log(i);
				data.i = i;
				data.success = success;
				data.fail = fail;
				that.uploadimg(data);
			}
		}
	});
}
相關推薦:
以上是案例分享--小程式圖片分組上傳的詳細內容。更多資訊請關注PHP中文網其他相關文章!
陳述:
本文內容由網友自願投稿,版權歸原作者所有。本站不承擔相應的法律責任。如發現涉嫌抄襲或侵權的內容,請聯絡admin@php.cn

