微信小程式內實作上傳圖片附後端程式碼
- php中世界最好的语言原創
- 2018-05-31 14:13:423814瀏覽
這次帶給大家微信小程式內實作上傳圖片附後端程式碼,微信小程式內實作上傳圖片的注意事項有哪些,下面就是實戰案例,一起來看一下。
當然小程式也是可以上傳圖片的,微信小程式文件也寫的很清楚。
上傳圖片
先選擇圖片
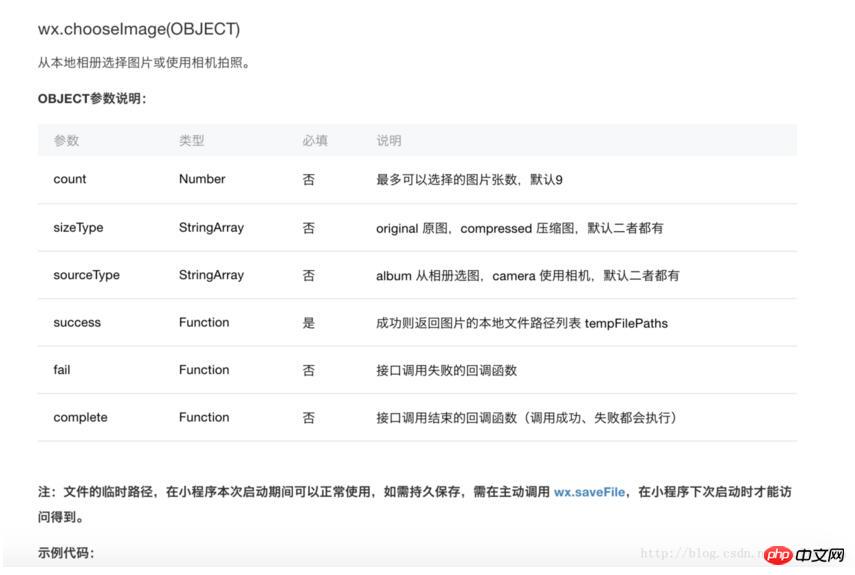
透過wx.chooseImage(OBJECT)實作

#官方範例程式碼
wx.chooseImage({
 count: 1, // 默认9
 sizeType: ['original', 'compressed'], // 可以指定是原图还是压缩图,默认二者都有
 sourceType: ['album', 'camera'], // 可以指定来源是相册还是相机,默认二者都有
 success: function (res) {
 // 返回选定照片的本地文件路径列表,tempFilePath可以作为img标签的src属性显示图片
 var tempFilePaths = res.tempFilePaths
 }
})
圖片最多可以選擇9張, 也可以透過拍攝照片實現,當選擇完圖片之後會取得到圖片路徑, 這個路徑在本次啟動期間有效。
如果需要儲存就需要用wx.saveFile(OBJECT)
#上傳圖片
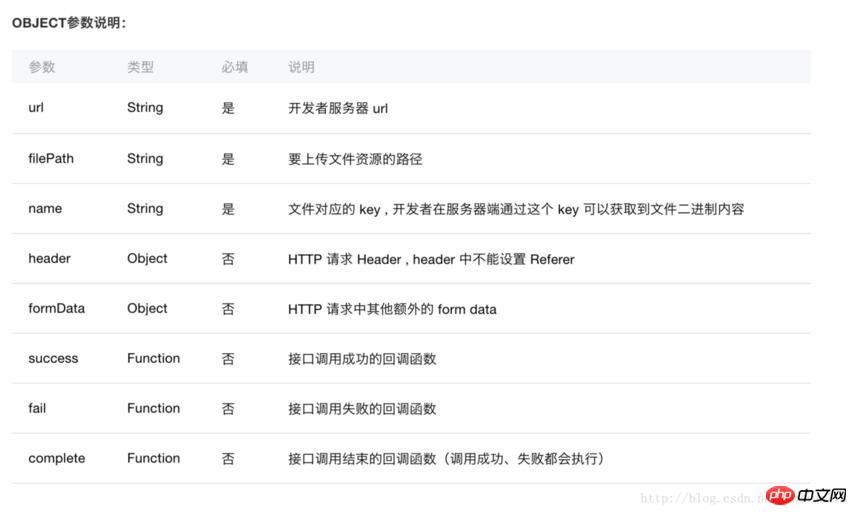
透過wx.uploadFile(OBJECT) 可以將本機資源檔案上傳到伺服器。
原則就是客戶端發起一個 HTTPS POST 請求,其中 content-type為 multipart/form-data。

官方範例程式碼
wx.chooseImage({
 success: function(res) {
 var tempFilePaths = res.tempFilePaths
 wx.uploadFile({
  url: 'http://example.weixin.qq.com/upload', //仅为示例,非真实的接口地址
  filePath: tempFilePaths[0],
  name: 'file',
  formData:{
  'user': 'test'
  },
  success: function(res){
  var data = res.data
  //do something
  }
 })
 }
})
範例程式碼
看完了官方文件, 寫一個上傳圖片就沒有那麼麻煩了,下面是真實場景的代碼
import constant from '../../common/constant';
Page({
 data: {
 src: "../../image/photo.png", //绑定image组件的src
  //略...
 },
 onLoad: function (options) {
  //略...
 },
 uploadPhoto() {
 var that = this;
 wx.chooseImage({
  count: 1, // 默认9
  sizeType: ['compressed'], // 可以指定是原图还是压缩图,默认二者都有
  sourceType: ['album', 'camera'], // 可以指定来源是相册还是相机,默认二者都有
  success: function (res) {
  // 返回选定照片的本地文件路径列表,tempFilePath可以作为img标签的src属性显示图片
  var tempFilePaths = res.tempFilePaths;
  upload(that, tempFilePaths);
  }
 })
 }
})
function upload(page, path) {
 wx.showToast({
 icon: "loading",
 title: "正在上传"
 }),
 wx.uploadFile({
  url: constant.SERVER_URL + "/FileUploadServlet",
  filePath: path[0],
  name: 'file',
  header: { "Content-Type": "multipart/form-data" },
  formData: {
  //和服务器约定的token, 一般也可以放在header中
  'session_token': wx.getStorageSync('session_token')
  },
  success: function (res) {
  console.log(res);
  if (res.statusCode != 200) {
   wx.showModal({
   title: '提示',
   content: '上传失败',
   showCancel: false
   })
   return;
  }
  var data = res.data
  page.setData({ //上传成功修改显示头像
   src: path[0]
  })
  },
  fail: function (e) {
  console.log(e);
  wx.showModal({
   title: '提示',
   content: '上传失败',
   showCancel: false
  })
  },
  complete: function () {
  wx.hideToast(); //隐藏Toast
  }
 })
}
後端代碼
#後端是用java寫的,一開始的時候,後端開始用了有些框架接收上傳的圖片,出現了各種問題,後來使用了純粹的Servlet就沒有了問題, 把程式碼貼出來省的以後麻煩了。
注意: 程式碼使用了公司內部的框架,建議修改後再使用
public class FileUploadServlet extends HttpServlet {
 private static final long serialVersionUID = 1L;
 private static Logger logger = LoggerFactory.getLogger(FileUploadServlet.class);
 public FileUploadServlet() {
  super();
 }
 protected void doGet(HttpServletRequest request, HttpServletResponse response) throws ServletException, IOException {
  JsonMessage<Object> message = new JsonMessage<Object>();
  EOSResponse eosResponse = null;
  String sessionToken = null;
  FileItem file = null;
  InputStream in = null;
  ByteArrayOutputStream swapStream1 = null;
  try {
   request.setCharacterEncoding("UTF-8");
   //1、创建一个DiskFileItemFactory工厂
   DiskFileItemFactory factory = new DiskFileItemFactory();
   //2、创建一个文件上传解析器
   ServletFileUpload upload = new ServletFileUpload(factory);
   //解决上传文件名的中文乱码
   upload.setHeaderEncoding("UTF-8");
   // 1. 得到 FileItem 的集合 items
   List<FileItem> items = upload.parseRequest(request);
   logger.info("items:{}", items.size());
   // 2. 遍历 items:
   for (FileItem item : items) {
    String name = item.getFieldName();
    logger.info("fieldName:{}", name);
    // 若是一个一般的表单域, 打印信息
    if (item.isFormField()) {
     String value = item.getString("utf-8");
     if("session_token".equals(name)){
      sessionToken = value;
     }
    }else {
     if("file".equals(name)){
      file = item;
     }
    }
   }
   //session校验
   if(StringUtils.isEmpty(sessionToken)){
    message.setStatus(StatusCodeConstant.SESSION_TOKEN_TIME_OUT);
    message.setErrorMsg(StatusCodeConstant.SESSION_TOKEN_TIME_OUT_MSG);
   }
   String userId = RedisUtils.hget(sessionToken,"userId");
   logger.info("userId:{}", userId);
   if(StringUtils.isEmpty(userId)){
    message.setStatus(StatusCodeConstant.SESSION_TOKEN_TIME_OUT);
    message.setErrorMsg(StatusCodeConstant.SESSION_TOKEN_TIME_OUT_MSG);
   }
   //上传文件
   if(file == null){
   }else{
    swapStream1 = new ByteArrayOutputStream();
    in = file.getInputStream();
    byte[] buff = new byte[1024];
    int rc = 0;
    while ((rc = in.read(buff)) > 0) {
     swapStream1.write(buff, 0, rc);
    }
    Usr usr = new Usr();
    usr.setObjectId(Integer.parseInt(userId));
    final byte[] bytes = swapStream1.toByteArray();
    eosResponse= ServerProxy.getSharedInstance().saveHeadPortrait(usr, new RequestOperation() {
     @Override
     public void addValueToRequest(EOSRequest request) {
      request.addMedia("head_icon_media", new EOSMediaData(EOSMediaData.MEDIA_TYPE_IMAGE_JPEG, bytes));
     }
    });
    // 请求成功的场合
    if (eosResponse.getCode() == 0) {
     message.setStatus(ConstantUnit.SUCCESS);
    } else {
     message.setStatus(String.valueOf(eosResponse.getCode()));
    }
   }
  } catch (Exception e) {
   e.printStackTrace();
  } finally{
   try {
    if(swapStream1 != null){
     swapStream1.close();
    }
   } catch (IOException e) {
    e.printStackTrace();
   }
   try {
    if(in != null){
     in.close();
    }
   } catch (IOException e) {
    e.printStackTrace();
   }
  }
  PrintWriter out = response.getWriter();
  out.write(JSONObject.toJSONString(message));
 }
 protected void doPost(HttpServletRequest request, HttpServletResponse response) throws ServletException, IOException {
  doGet(request, response);
 }
}
相信看了本文案例你已經掌握了方法,更多精彩請關注php中文網其它相關文章!
推薦閱讀:
以上是微信小程式內實作上傳圖片附後端程式碼的詳細內容。更多資訊請關注PHP中文網其他相關文章!
陳述:
本文內容由網友自願投稿,版權歸原作者所有。本站不承擔相應的法律責任。如發現涉嫌抄襲或侵權的內容,請聯絡admin@php.cn
上一篇:微信小程式上傳圖片實戰案例解析下一篇:微信小程式上傳圖片實戰案例解析

