JavaScript原型繼承實例詳解
- 零下一度原創
- 2017-07-02 10:24:111598瀏覽
這篇文章主要為大家詳細介紹了JavaScript原型繼承的相關資料,具有一定的參考價值,有興趣的小夥伴們可以參考一下
在傳統的基於Class的語言如Java、C++中,繼承的本質是擴展一個已有的Class,並產生新的Subclass。
由於這類語言嚴格區分類和實例,繼承實際上是類型的擴展。但是,JavaScript由於採用原型繼承,我們無法直接擴充一個Class,因為根本不存在Class這種類型。
但是辦法還是有的。我們先回顧Student建構子:
function Student(props) {
  this.name = props.name || 'Unnamed';
}

Student.prototype.hello = function () {
  alert('Hello, ' + this.name + '!');
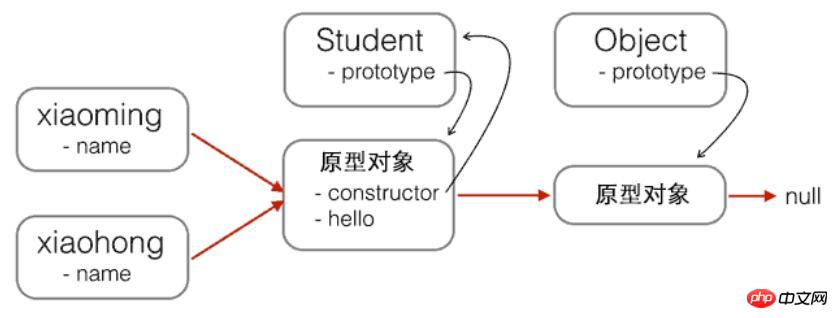
}以及Student的原型鏈:

現在,我們要基於Student#來擴展 PrimaryStudent,可以先定義出PrimaryStudent:
function PrimaryStudent(props) {
  // 调用Student构造函数,绑定this变量:
  Student.call(this, props);
  this.grade = props.grade || 1;
}但是,呼叫了Student建構子不等於繼承了Student,PrimaryStudent#創建的物件的原型是:
new PrimaryStudent() ----> PrimaryStudent.prototype ----> Object.prototype -- --> null
必須想辦法把原型鏈修改為:
new PrimaryStudent() ----> PrimaryStudent.prototype ----> ; Student.prototype ----> Object.prototype ----> null
這樣,原型鏈對了,繼承關係就對了。新的基於PrimaryStudent建立的物件不但能呼叫PrimaryStudent.prototype定義的方法,也可以呼叫 Student.prototype定義的方法。
如果你想用最簡單粗暴的方法這樣乾:
PrimaryStudent.prototype = Student.prototype;
是不行的!如果這樣的話,PrimaryStudent和Student共用原型對象,那還要定義PrimaryStudent幹啥?
我們必須藉助一個中間物件來實現正確的原型鏈,這個中間物件的原型要指向Student.prototype。為了實現這一點,參考道爺(就是發明JSON的那個道格拉斯)的程式碼,中間物件可以用一個空函數F來實現:
// PrimaryStudent构造函数:
function PrimaryStudent(props) {
  Student.call(this, props);
  this.grade = props.grade || 1;
}

// 空函数F:
function F() {
}

// 把F的原型指向Student.prototype:
F.prototype = Student.prototype;

// 把PrimaryStudent的原型指向一个新的F对象,F对象的原型正好指向Student.prototype:
PrimaryStudent.prototype = new F();

// 把PrimaryStudent原型的构造函数修复为PrimaryStudent:
PrimaryStudent.prototype.constructor = PrimaryStudent;

// 继续在PrimaryStudent原型(就是new F()对象)上定义方法:
PrimaryStudent.prototype.getGrade = function () {
  return this.grade;
};

// 创建xiaoming:
var xiaoming = new PrimaryStudent({
  name: '小明',
  grade: 2
});
xiaoming.name; // '小明'
xiaoming.grade; // 2

// 验证原型:
xiaoming.proto === PrimaryStudent.prototype; // true
xiaoming.proto.proto === Student.prototype; // true

// 验证继承关系:
xiaoming instanceof PrimaryStudent; // true
xiaoming instanceof Student; // true
用一張圖來表示新的原型鏈:

注意,函數F只用於橋接,我們只建立了一個new F()實例,而且,沒有改變原有的Student定義的原型鏈。
如果把繼承這個動作用一個inherits()函數封裝起來,還可以隱藏F的定義,並簡化程式碼:
function inherits(Child, Parent) {
  var F = function () {};
  F.prototype = Parent.prototype;
  Child.prototype = new F();
  Child.prototype.constructor = Child;
}
这个inherits()函数可以复用:
function Student(props) {
  this.name = props.name || 'Unnamed';
}

Student.prototype.hello = function () {
  alert('Hello, ' + this.name + '!');
}

function PrimaryStudent(props) {
  Student.call(this, props);
  this.grade = props.grade || 1;
}

// 实现原型继承链:
inherits(PrimaryStudent, Student);

// 绑定其他方法到PrimaryStudent原型:
PrimaryStudent.prototype.getGrade = function () {
  return this.grade;
};
小結
JavaScript的原型繼承實作方式就是:
1.定義新的建構函數,並在內部用call()呼叫希望「繼承」的建構函數,並綁定this;
2.借助中間函數F實現原型鏈繼承,最好透過封裝的inherits函數完成;
3.繼續在新的建構函式的原型上定義新方法。
以上是JavaScript原型繼承實例詳解的詳細內容。更多資訊請關注PHP中文網其他相關文章!

