tarnado的簡介與使用實例
- 零下一度原創
- 2017-06-30 14:26:442307瀏覽
目錄
tarnado
#tarnado原始碼安裝
tarnado測試程式
application類別的解析
#一. tarnado簡介
最近在學習Python,無意間接觸到的tarnado ,感覺tarnado還蠻好的那麼tarnado到底什麼呢? tarnado是由Python開發的一個非阻塞式web伺服器框架,他與許多主流的web框架有很大的不同(當然其他的web框架我還真的不知道多少),epoll和非阻塞的方式讓他可以每秒數以千計的連接,非常適合與即時的web服務。以下地址為tarnado官方的解釋
二. tarnado源碼安裝
到上面的地址上去下載tornado-1.2.1.tar.gz
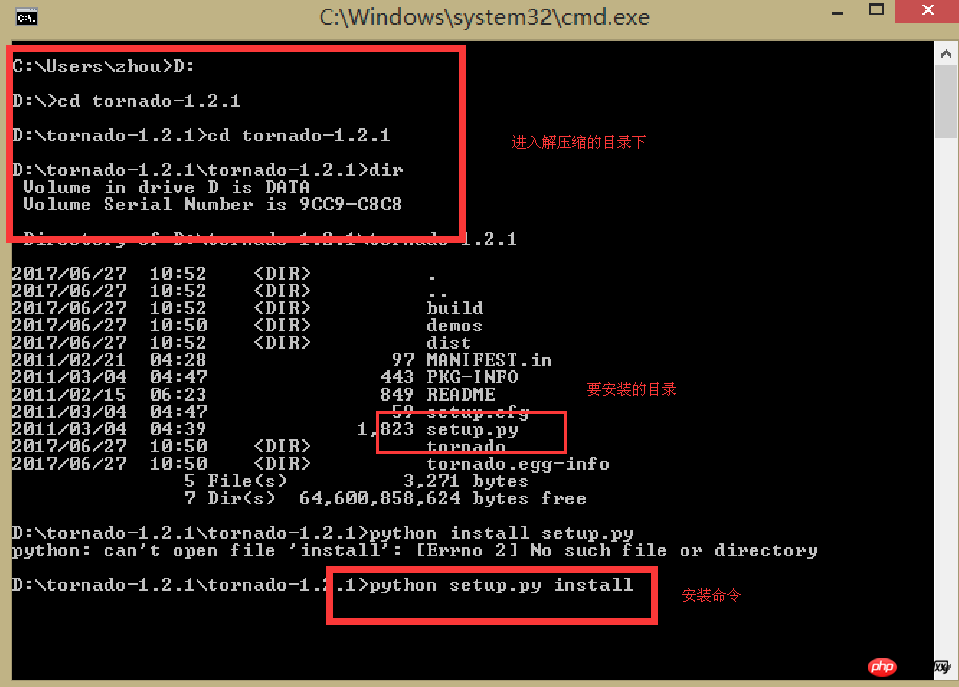
解壓縮之後在cmd在命令框中找到此路徑,進行安裝,具體步驟如下:

# 注意:經過本人測試,在python3.5上此程式碼不能執行,在2.7上面可以執行,因此建議安裝在python2.7上進行測試和學習。
三.測試程式
安裝完成之後,開啟pycharm, 新建py檔,把下面測試程式碼寫入,執行後,在瀏覽器中輸入http: //127.0.0.1:8888會顯示hello, world字樣,就代表這安裝成功。


1 import tornado.ioloop 2 import tornado.web 3 4 class MainHandler(tornado.web.RequestHandler): 5 def get(self): 6 self.write("Hello, world") 7 8 application = tornado.web.Application([ 9 (r"/", MainHandler),10 ])11 12 if __name__ == "__main__":13 application.listen(8888)14 tornado.ioloop.IOLoop.instance().start()#
四.application類別的解析
# 下面終於要進行application的解析了,但是在解析之前,大概先說一下關於測試程式碼的執行流程。


1 #!/usr/bin/env python 2 # -*- coding:utf-8 -*- 3 # zhou 4 # 2017/6/27 5 6 # 导入两个模块 7 import tornado.ioloop 8 import tornado.web 9 10 # 1. 把类RequestHandler载入到内存中11 # 2. 把类RequestHandler做为参数传入MainHandler中12 # 3. 把类MainHandler载入到内存中13 # 以上三个步骤实质上都不会坐任何操作,仅仅只是把类装载到内存中以便后续调用14 class MainHandler(tornado.web.RequestHandler):15 def get(self):16 self.write("Hello, world")17 18 19 # 丛这一步骤开始才开始真正的创建对象20 # 1. 类Application创建了一个对象,名称为application21 # 2. r"/" 这个是正则表达式类型的/,也就是我们在浏览器中输入的url22 # 3. 把类MainHandler作为参数传递到application中23 # 4. 这里面传递的仅仅只是一个变量[]24 application = tornado.web.Application([25 (r"/", MainHandler),26 ])27 28 if __name__ == "__main__":29 30 # 调用application对象中的listen方法,把8888作为端口号传递进去31 application.listen(8888)32 tornado.ioloop.IOLoop.instance().start()接下來就首先剖析的是下面這一行程式碼
application =
A collection of request handlers that make up a web application.把许多请求处理器组合起来以实现web应用
<br>
1. application的初始化過程

 ##
## 1 def __init__(self, handlers=None, default_host="", transforms=None, 2 wsgi=False, **settings): 3 if transforms is None: 4 self.transforms = [] 5 if settings.get("gzip"): 6 self.transforms.append(GZipContentEncoding) 7 self.transforms.append(ChunkedTransferEncoding) 8 else: 9 self.transforms = transforms10 self.handlers = []11 self.named_handlers = {}12 self.default_host = default_host13 self.settings = settings14 self.ui_modules = {}15 self.ui_methods = {}16 self._wsgi = wsgi17 self._load_ui_modules(settings.get("ui_modules", {}))18 self._load_ui_methods(settings.get("ui_methods", {}))19 if self.settings.get("static_path"):20 path = self.settings["static_path"]21 handlers = list(handlers or [])22 static_url_prefix = settings.get("static_url_prefix",23 "/static/")24 handlers = [25 (re.escape(static_url_prefix) + r"(.*)", StaticFileHandler,26 dict(path=path)),27 (r"/(favicon\.ico)", StaticFileHandler, dict(path=path)),28 (r"/(robots\.txt)", StaticFileHandler, dict(path=path)),29 ] + handlers30 if handlers: self.add_handlers(".*$", handlers)31 32 # Automatically reload modified modules33 if self.settings.get("debug") and not wsgi:34 import autoreload35 autoreload.start()
初始化程式碼
###################################################if transforms is None:
    self.transforms = []if settings.get("gzip"):
        self.transforms.append(GZipContentEncoding)
    self.transforms.append(ChunkedTransferEncoding)else:
    self.transforms = transforms###################################################这里面主要包含了三个类:
    GZipContentEncoding(OutputTransform)        # gzip内容编码ChunkedTransferEncoding(OutputTransform)    # 分块传输编码OutputTransform()                           # 是上面两个类的父类        解释:A transform modifies the result of an HTTP request(e.g., GZip encoding)
        主要是用来对一个http请求的结果进行转换的,可以是gzip压缩
代碼二# < 1>. 就是為物件application封裝了一系列的變量,ui_modules和ui_methods這兩個變數暫時還沒看懂,之後會補充。
self.handlers = []
self.named_handlers = {}
self.default_host = default_host
self.settings = settings
self.ui_modules = {}
self.ui_methods = {}
self._wsgi = wsgi
程式碼三 <1>. 主要是為物件application封裝ui的模組的方法,以及上面的ui模組和方法的區別在哪裡呢,我認為應該是自己定義的和系統預設給的模組和方法。
self._load_ui_modules(settings.get("ui_modules", {}))
self._load_ui_methods(settings.get("ui_methods", {}))
他主要调用了两个方法,在此仅仅对第一个方法进行简单的描述(_load_ui_modules)
因为第二个方法和这个modules是一样的


1 def _load_ui_modules(self, modules): 2 if type(modules) is types.ModuleType: 3 self._load_ui_modules(dict((n, getattr(modules, n)) 4 for n in dir(modules))) 5 elif isinstance(modules, list): 6 for m in modules: self._load_ui_modules(m) 7 else: 8 assert isinstance(modules, dict) 9 for name, cls in modules.iteritems():10 try:11 if issubclass(cls, UIModule):12 self.ui_modules[name] = cls13 except TypeError:14 pass
对于上面源代码解析
# 把传入的模块modules全部变成字典的形式封装到ui_modules变量中def _load_ui_modules(self, modules):# types是一个.py文件,他主要是为了定义一些简单的函数,类似于内置函数可以直接拿来使用的# types里面关于ModuleType的描述是:ModuleType = type(sys) 也就是sys的类型<type 'module'># 这里其实就是为了判断传出的modules是不是一个模块的类型,如果是就把它变成一个字典形式递归判断if type(modules) is types.ModuleType: self._load_ui_modules(dict((n, getattr(modules, n)) for n in dir(modules)))#判断modules是不是一个列表,如果是列表,就把列表里面的元素重新代入方法中进行调用 elif isinstance(modules, list):for m in modules: self._load_ui_modules(m)else:# 此处是一个断言机制,也就是说已经肯定了modules一定是一个字典形式的样子assert isinstance(modules, dict)# 因为modules是一个字典,所以就把键和值分别赋值给name和cls,然后判断每一个键的值cls是不是UIModule的一个子类,如果是# 就把这个值添加到前面封装的一个变量中self.ui_modules[name] = clsfor name, cls in modules.iteritems():try:if issubclass(cls, UIModule): self.ui_modules[name] = clsexcept TypeError:pass
代码四
<1>. 它定义了一系列的变量,最重要的变量是handler, 其中又引出了一个类StaticFileHandler而这个类又是继承了RequestHandler,因为此处并没有创建任何关于这个类的对象,所以此处不再深究等真正调用时候在来关注。
但是从条件语句中,我们就可以看出来,当setting中不含static的时候,并不会去创建这些变量,这一点是要注意的。
# 定义了一系列的变量如handlers,path,static_url_prefix   # 当settings中包含了static_path这个键的时候,才会去定义这些变量         if self.settings.get("static_path"):
    path = self.settings["static_path"]
    handlers = list(handlers or [])
    static_url_prefix = settings.get("static_url_prefix",                                     "/static/")
    handlers = [
        (re.escape(static_url_prefix) + r"(.*)", StaticFileHandler,
         dict(path=path)),
        (r"/(favicon\.ico)", StaticFileHandler, dict(path=path)),
        (r"/(robots\.txt)", StaticFileHandler, dict(path=path)),
    ] + handlers
代码五
<1>. 添加给定的处理器到系统的处理器列表中。(其实这样说可能不太准确, 因为我们从代码四就可以看出来,如果我们给定的url包含了static_path,那么给定的处理器无论如何都会发生改变)
if handlers: self.add_handlers(".*$", handlers)代码六
add_handles函数的解析
def add_handlers(self, host_pattern, host_handlers):# 添加给定的处理器到系统的处理器列表中,注意主机模式是按顺序进行处理的,直到第一个被匹配到的这就意味着所有给定主机的处理器必须被添加到处理器中"""Appends the given handlers to our handler list.

    Note that host patterns are processed sequentially in the
    order they were added, and only the first matching pattern is
    used.  This means that all handlers for a given host must be
    added in a single add_handlers call."""# 如果给定主机模式不是以"$"结尾的,就添加$到结尾if not host_pattern.endswith("$"):
        host_pattern += "$"handlers = []# The handlers with the wildcard host_pattern are a special# case - they're added in the constructor but should have lower# precedence than the more-precise handlers added later.# If a wildcard handler group exists, it should always be last# in the list, so insert new groups just before it.# 带有通配符的handlers是一个特殊情况,他们本来在构造方法就已经被添加了,但是他们的优先级却低于一些重要的处理器,因此应该在之后被添加# 所以如果带有通配符的处理器组存在,就应该把他们放在一个列表的最后面,否则就插在他的前面# 下面这段代码就是这个意思,如果他的pattern是'.*$'开头的,代表他是没有通配符的,所以就把他插入最后一个的前面,否则有通配符的就直接添加到后面if self.handlers and self.handlers[-1][0].pattern == '.*$':
        self.handlers.insert(-1, (re.compile(host_pattern), handlers))else:
        self.handlers.append((re.compile(host_pattern), handlers))# 这个是对我们传入的host_handlers进行一个解析,把第一个采纳数给pattern,第二个给handler如果有三个,就赋值给kwargs如果没有第三个kwargs=={}for spec in host_handlers:if type(spec) is type(()):assert len(spec) in (2, 3)
            pattern = spec[0]
            handler = spec[1]if len(spec) == 3:
                kwargs = spec[2]else:
                kwargs = {}# 赋值完成之后就把这些参数封装到类URLSpec中spec = URLSpec(pattern, handler, kwargs)# 类URLSpec创建了对象spec之后,会重新给self.named_handlers添加一个handlers的键值对,如果键值本身就存在,就会往日志里面写入警告信息        handlers.append(spec)if spec.name:if spec.name in self.named_handlers:
                logging.warning("Multiple handlers named %s; replacing previous value",
                    spec.name)
            self.named_handlers[spec.name] = spec
代码七
类URLSpec的解析
在代码六中创建了一个spec对象,用的类URLSpec创建的
class URLSpec(object):# 这个类的作用主要是在url和handlers之间做一个特定的映射,主要的体现应该就是前面的变量name_handlers# 前面的赋值语句:self.named_handlers[spec.name] = spec"""Specifies mappings between URLs and handlers."""def __init__(self, pattern, handler_class, kwargs={}, name=None):"""Creates a URLSpec.

        Parameters:
        # 传递进来得主机模式
        pattern: Regular expression to be matched.  Any groups in the regex
            will be passed in to the handler's get/post/etc methods as
            arguments.

        # 这个不是特别懂,但是意思是RequestHandler的子类将被调用
        handler_class: RequestHandler subclass to be invoked.
        kwargs (optional): A dictionary of additional arguments to be passed
            to the handler's constructor.

        # 这个handler的名字,是一个额外的参数
        name (optional): A name for this handler.  Used by
            Application.reverse_url."""if not pattern.endswith('$'):
            pattern += '$'self.regex = re.compile(pattern)
        self.handler_class = handler_class
        self.kwargs = kwargs
        self.name = name
        self._path, self._group_count = self._find_groups()
代码八
方法self._find_groups()
这个方法比较有意思,后面会带一个例子来解释一下
def _find_groups(self):# 就是给特定的url返回一个元组,下面的就是例子,括号里面的内容都会转换成%s,后面的2代表小括号括号的个数"""Returns a tuple (reverse string, group count) for a url.

    For example: Given the url pattern /([0-9]{4})/([a-z-]+)/, this method
    would return ('/%s/%s/', 2)."""# 得到pattern的字符串形式,去掉开头的^和结尾的$符号pattern = self.regex.patternif pattern.startswith('^'):
        pattern = pattern[1:]if pattern.endswith('$'):
        pattern = pattern[:-1]# 如果正常情况下regex.groups的值应该是等于count的,除非特别复杂的url,会返回两个noneif self.regex.groups != pattern.count('('):# The pattern is too complicated for our simplistic matching,# so we can't support reversing it.return (None, None)        # 这个就是把url转换成元组的具体代码,代码实现的是把括号里面的内容全部转换成%spieces = []for fragment in pattern.split('('):if ')' in fragment:
            paren_loc = fragment.index(')')if paren_loc >= 0:
                pieces.append('%s' + fragment[paren_loc + 1:])else:
            pieces.append(fragment)    # 把picese重新拼接成字符,返回回去return (''.join(pieces), self.regex.groups)
import re
pattern = "/abcd123([0-9]{4})/lwjeg([a-z-]+)/"regex = re.compile(pattern)
pieces = []print(pattern.split('('))for fragment in pattern.split('('):if ')' in fragment:# 找到‘)’的位置paren_loc = fragment.index(')')if paren_loc >= 0:# 把')'之后的所有内容拼接起来pieces.append('%s' + fragment[paren_loc + 1:])else:
pieces.append(fragment)print(pieces)
结果:
['/abcd123', '[0-9]{4})/lwjeg', '[a-z-]+)/']
['/abcd123', '%s/lwjeg', '%s/']代码九
# 自动的去重载改变的模块,这个调用的是autorelaad模块实现的    # Automatically reload modified modulesif self.settings.get("debug") and not wsgi:import autoreload
    autoreload.start()
至此
application = tornado.web.Application([<br> (r"/", MainHandler),<br>])
以上是tarnado的簡介與使用實例的詳細內容。更多資訊請關注PHP中文網其他相關文章!

