C#開發實例-訂位螢幕截圖工具(二)建立專案、註冊熱鍵、顯示截圖主窗口
- 黄舟原創
- 2017-03-14 13:19:402789瀏覽
開發環境
作業系統:Windows Server 2008 R2
整合開發環境(IDE):Microsoft Visual Studio 2010
開發語言: c
#建立專案
檔案」新建》專案

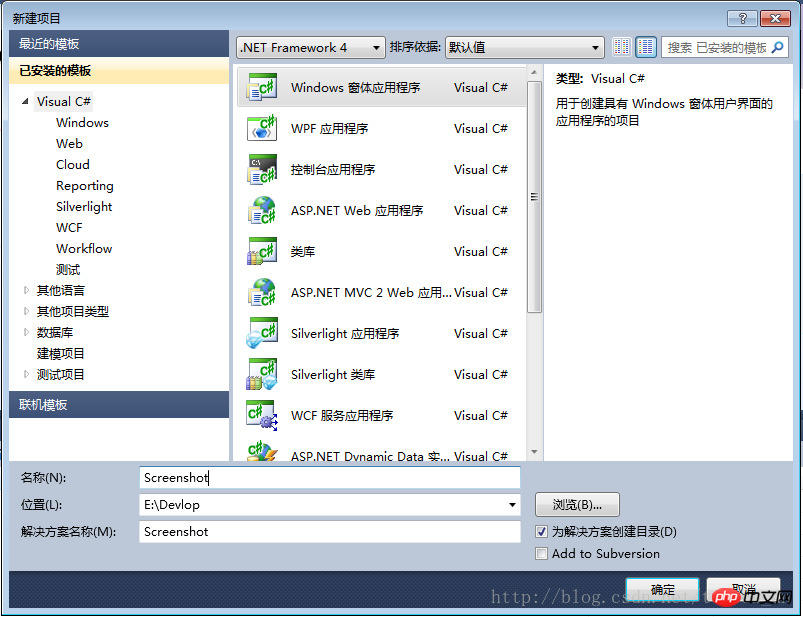 ## .NET Framework可以選擇2.0版本,也可以選擇4.0版本;
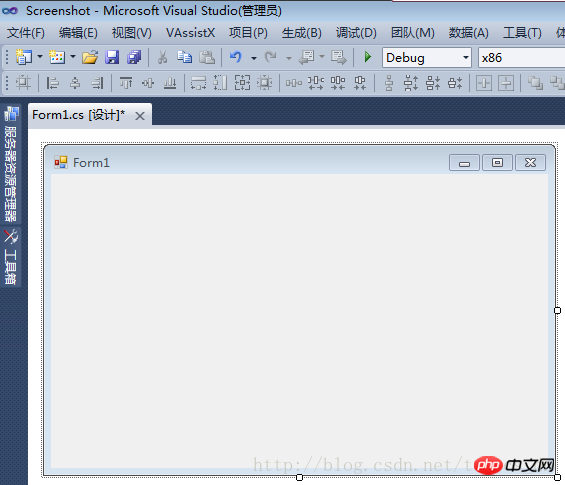
專案建立成功,如下圖:
#修改主視窗屬性
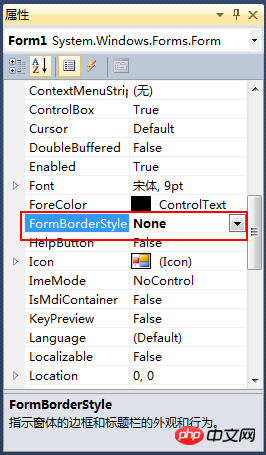
修改窗體的“
FormB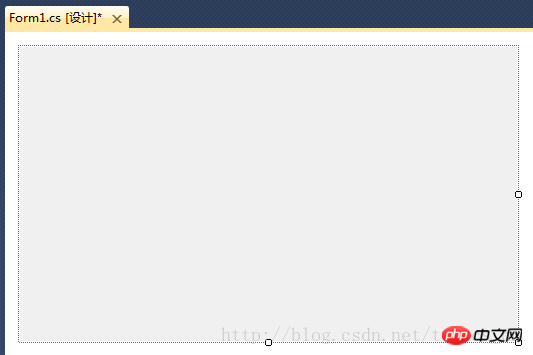 ord
ord
erStyle”屬性為“none”,實作一個沒有邊框的窗體
修改後視窗設計器中顯示如下: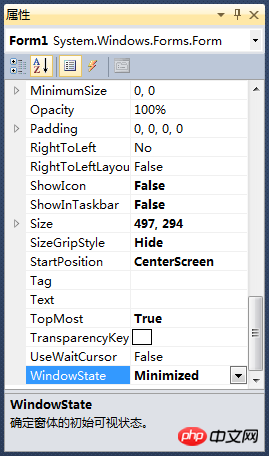
依序按下圖修改
其它屬性,屬性值黑體加粗的是修改過的
屬性說明:ShowInTaskbar=False,讓視窗不在Windows工作列中出現;
SizeGripStyle=Hide,停用視窗右下角可以改變大小的功能;WindowsState=Minimized ,視窗啟動後最小化;
設定完這些屬性後,編譯,運行,程式是在運行狀態,但是卻看不到程式的視窗;
#實作熱鍵功能這裡需要使用WindowsAPI註冊熱鍵:RegisterHotKey##該函數定義一個系統範圍的熱鍵
。
函數
原型:BOOL RegisterHotKey(HWND hWnd,int id,UINT fsModifiers,UINT vk);取消熱鍵註冊:UnregisterHotKey
此函數釋放呼叫執行緒先前登記的熱鍵。
GlobalAddAtom#只適用於桌面應用程式。 在全域原子表中新增一個
字串
,並傳回這個字串的唯一識別碼(原子ATOM)。 API及局部變數
定義: /// <summary>
/// 向全局原子表添加一个字符串,并返回这个字符串的唯一标识符(原子ATOM)。
/// </summary>
/// <param name="lpString">自己设定的一个字符串</param>
/// <returns></returns>
[System.Runtime.InteropServices.DllImport("Kernel32.dll")]
public static extern Int32 GlobalAddAtom(string lpString);
/// <summary>
/// 注册热键
/// </summary>
/// <param name="hWnd"></param>
/// <param name="id"></param>
/// <param name="fsModifiers"></param>
/// <param name="vk"></param>
/// <returns></returns>
[System.Runtime.InteropServices.DllImport("user32.dll")]
public static extern bool RegisterHotKey(IntPtr hWnd, int id, uint fsModifiers, Keys vk);
/// <summary>
/// 取消热键注册
/// </summary>
/// <param name="hWnd"></param>
/// <param name="id"></param>
/// <returns></returns>
[System.Runtime.InteropServices.DllImport("user32.dll")]
public static extern bool UnregisterHotKey(IntPtr hWnd, int id);
/// <summary>
/// 热键ID
/// </summary>
public int hotKeyId = 100;
/// <summary>
/// 热键模式:0=Ctrl + Alt + A, 1=Ctrl + Shift + A
/// </summary>
public int HotKeyMode = 1;
/// <summary>
/// 控制键的类型
/// </summary>
public enum KeyModifiers : uint
{
None = 0,
Alt = 1,
Control = 2,
Shift = 4,
Windows = 8
}
/// <summary>
/// 用于保存截取的整个屏幕的图片
/// </summary>
protected Bitmap screenImage;註冊熱鍵: private void Form1_Load(object sender, EventArgs e)
{
//隐藏窗口
this.Hide();
//注册快捷键
//注:HotKeyId的合法取之范围是0x0000到0xBFFF之间,GlobalAddAtom函数得到的值在0xC000到0xFFFF之间,所以减掉0xC000来满足调用要求。
this.hotKeyId = GlobalAddAtom("Screenshot") - 0xC000;
if (this.hotKeyId == 0)
{
//如果获取失败,设定一个默认值;
this.hotKeyId = 0xBFFE;
}
if (this.HotKeyMode == 0)
{
RegisterHotKey(Handle, hotKeyId, (uint)KeyModifiers.Control | (uint)KeyModifiers.Alt, Keys.A);
}
else
{
RegisterHotKey(Handle, hotKeyId, (uint)KeyModifiers.Control | (uint)KeyModifiers.Shift, Keys.A);
}
}熱鍵回應函數: /// <summary>
/// 处理快捷键事件
/// </summary>
/// <param name="m"></param>
protected override void WndProc(ref Message m)
{
//if (m.Msg == 0x0014)
//{
// return; // 禁掉清除背景消息
//}
const int WM_HOTKEY = 0x0312;
switch (m.Msg)
{
case WM_HOTKEY:
ShowForm();
break;
default:
break;
}
base.WndProc(ref m);
}
截圖窗口實作原理截圖視窗實際上是一個沒有邊框,沒有選單,沒有工具列的一個全螢幕頂層視窗。 當按下熱鍵時,程式首先取得整個螢幕的圖片,儲存到「screenImage」變數中;然後新增遮罩層,將其設為窗體的背景圖,將視窗大小設為主螢幕的大小,顯示視窗;讓人感覺是在桌面上加一個半透明的遮罩層一樣。 ######程式碼如下:### /// <summary>
/// 如果窗口为可见状态,则隐藏窗口;
/// 否则则显示窗口
/// </summary>
protected void ShowForm()
{
if (this.Visible)
{
this.Hide();
}
else
{
Bitmap bkImage = new Bitmap(Screen.AllScreens[0].Bounds.Width, Screen.AllScreens[0].Bounds.Height);
Graphics g = Graphics.FromImage(bkImage);
g.CopyFromScreen(new Point(0, 0), new Point(0, 0), Screen.AllScreens[0].Bounds.Size, CopyPixelOperation.SourceCopy);
screenImage = (Bitmap)bkImage.Clone();
g.FillRectangle(new SolidBrush(Color.FromArgb(64, Color.Gray)), Screen.PrimaryScreen.Bounds);
this.BackgroundImage = bkImage;
this.ShowInTaskbar = false;
this.FormBorderStyle = System.Windows.Forms.FormBorderStyle.None;
this.Width = Screen.PrimaryScreen.Bounds.Width;
this.Height = Screen.PrimaryScreen.Bounds.Height;
this.Location = Screen.PrimaryScreen.Bounds.Location;
this.WindowState = FormWindowState.Maximized;
this.Show();
}
}###取消熱鍵註冊######關閉視窗時,要取消熱鍵註冊,程式碼如下:### /// <summary>
/// 当窗口正在关闭时进行验证
/// </summary>
/// <param name="sender"></param>
/// <param name="e"></param>
private void Form1_FormClosing(object sender, FormClosingEventArgs e)
{
if (e.CloseReason == CloseReason.ApplicationExitCall)
{
e.Cancel = false;
UnregisterHotKey(this.Handle, hotKeyId);
}
else
{
this.Hide();
e.Cancel = true;
}
}###到這裡,熱鍵註冊,截圖視窗的顯示等功能已經基本完成。 ###注意:測試本程式碼時最好在窗體上新增一個按鈕,用於關閉或隱藏截圖視窗;因為截圖視窗是全螢幕的,不能回應ESC鍵,所以只能透過任務管理器來結束進程退出。 調試時最好是在窗體上添加一個Label控件來顯示需要的變數信息,因為截圖窗口是頂層的全屏窗口,斷點被命中時根本沒辦法操作VS。
#以上是C#開發實例-訂位螢幕截圖工具(二)建立專案、註冊熱鍵、顯示截圖主窗口的詳細內容。更多資訊請關注PHP中文網其他相關文章!
陳述:
本文內容由網友自願投稿,版權歸原作者所有。本站不承擔相應的法律責任。如發現涉嫌抄襲或侵權的內容,請聯絡admin@php.cn

