多執行緒編程
其實建立執行緒之後,執行緒並不是總是保持一個狀態的,其狀態大概如下:
New 建立
Runnable 就緒。等待調度
Running 運行
Blocked 阻塞。阻塞可能在 Wait Locked Sleeping
Dead 消亡
線程有著不同的狀態,也有不同的類型。大致可分為:
主執行緒
子執行緒
守護執行緒(後台執行緒)
前台執行緒
簡單了解完這些之後,我們開始看看具體的程式碼使用了。
1、執行緒的建立
Python 提供兩個模組進行多執行緒的操作,分別是thread 和threading
前者是比較低階的模組,用於更底層的操作,一般應用層級的開發不常用。
#!/usr/bin/env python3
# -*- coding: UTF-8 -*-
import time
import threading
class MyThread(threading.Thread):
    def run(self):
        for i in range(5):
            print('thread {}, @number: {}'.format(self.name, i))
            time.sleep(1)
def main():
    print("Start main threading")
    # 创建三个线程
    threads = [MyThread() for i in range(3)]
    # 启动三个线程
    for t in threads:
        t.start()
    print("End Main threading")
if __name__ == '__main__':
    main()
運行結果:
Start main threading
thread Thread-1, @number: 0
thread Thread-2, @number: 0
thread Thread-3, @number: 0
End Main threading
thread Thread-2, @number: 1
thread Thread-1, @number: 1
thread Thread-3, @number: 1
thread Thread-1, @number: 2
thread Thread-3, @number: 2
thread Thread-2, @number: 2
thread Thread-2, @number: 3
thread Thread-3, @number: 3
thread Thread-1, @number: 3
thread Thread-3, @number: 4
thread Thread-2, @number: 4
thread Thread-1, @number: 4
注意喔,這裡不同的環境輸出的結果肯定是不一樣的。
2、執行緒合併(join方法)
上面的範例列印出來的結果來看,主執行緒結束後,子執行緒還在運行。那我們需要主執行緒要等待子執行緒運行完後,再退出,該怎麼辦呢?
這時候,就需要用到 join 方法了。
在上面的例子,新增一段程式碼,具體如下:
#!/usr/bin/env python3
# -*- coding: UTF-8 -*-
import time
import threading
class MyThread(threading.Thread):
    def run(self):
        for i in range(5):
            print('thread {}, @number: {}'.format(self.name, i))
            time.sleep(1)
def main():
    print("Start main threading")
    # 创建三个线程
    threads = [MyThread() for i in range(3)]
    # 启动三个线程
    for t in threads:
        t.start()
    # 一次让新创建的线程执行 join
    for t in threads:
        t.join()
    print("End Main threading")
if __name__ == '__main__':
    main()
從列印的結果,可以清楚看到,相較於上面範例列印出來的結果,主執行緒是在等待子執行緒運行結束後才結束的。
Start main threading
thread Thread-1, @number: 0
thread Thread-2, @number: 0
thread Thread-3, @number: 0
thread Thread-1, @number: 1
thread Thread-3, @number: 1
thread Thread-2, @number: 1
thread Thread-2, @number: 2
thread Thread-1, @number: 2
thread Thread-3, @number: 2
thread Thread-2, @number: 3
thread Thread-1, @number: 3
thread Thread-3, @number: 3
thread Thread-3, @number: 4
thread Thread-2, @number: 4
thread Thread-1, @number: 4
End Main threading
3、執行緒同步與互斥鎖
使用執行緒載入取得數據,通常都會造成資料不同步的情況。當然,這時候我們可以為資源加鎖,也就是存取資源的執行緒需要獲得鎖才能存取。
其中 threading 模組給了我們一個 Lock 功能。
lock = threading.Lock()
在線程中獲取鎖定
lock.acquire()
使用完成後,我們肯定需要釋放鎖定
lock.release()
當然為了支援在同一線程中多次請求相同資源,Python 提供了可重入鎖(RLock)。 RLock 內部維護一個 Lock 和一個 counter 變量,counter 記錄了 acquire 的次數,從而使得資源可以被多次 require。直到一個線程所有的 acquire 都被 release,其他的線程才能獲得資源。
那麼怎麼建立重入鎖呢?也是一句程式碼的事情:
r_lock = threading.RLock()
4、Condition 條件變數
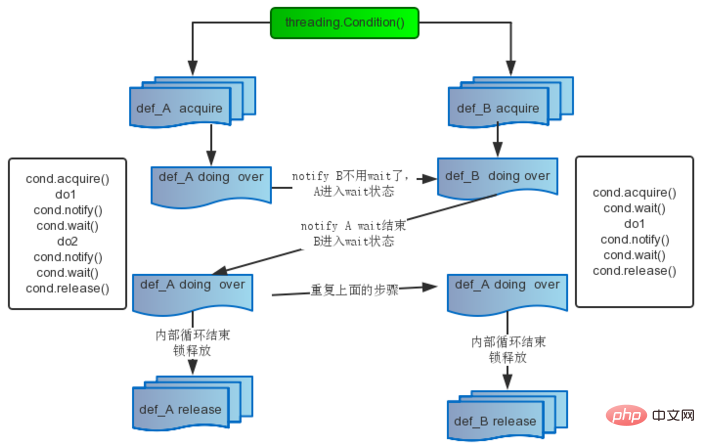
實用鎖定可以達到執行緒同步,但是在更複雜的環境,需要針對鎖定進行一些條件判斷。 Python 提供了 Condition 物件。使用 Condition 物件可以在某些事件觸發或達到特定的條件後才處理數據,Condition 除了具有 Lock 物件的 acquire 方法和 release 方法外,還提供了 wait 和 notify 方法。執行緒首先 acquire 一個條件變數鎖。如果條件不足,則該線程 wait,如果滿足就執行線程,甚至可以 notify 其他線程。其他處於 wait 狀態的執行緒接到通知後會重新判斷條件。
其中條件變數可以看成不同的線程先後 acquire 獲得鎖,如果不滿足條件,可以理解為被扔到一個( Lock 或 RLock )的 waiting 池。直達其他執行緒 notify 之後再重新判斷條件。不斷的重複這個過程,從而解決複雜的同步問題。

此模式常用於生產者消費者模式,請看以下線上購物買家和賣家的範例:
#!/usr/bin/env python3
# -*- coding: UTF-8 -*-
import threading, time
class Consumer(threading.Thread):
    def __init__(self, cond, name):
        # 初始化
        super(Consumer, self).__init__()
        self.cond = cond
        self.name = name
    def run(self):
        # 确保先运行Seeker中的方法
        time.sleep(1)
        self.cond.acquire()
        print(self.name + ': 我这两件商品一起买,可以便宜点吗')
        self.cond.notify()
        self.cond.wait()
        print(self.name + ': 我已经提交订单了,你修改下价格')
        self.cond.notify()
        self.cond.wait()
        print(self.name + ': 收到,我支付成功了')
        self.cond.notify()
        self.cond.release()
        print(self.name + ': 等待收货')
class Producer(threading.Thread):
    def __init__(self, cond, name):
        super(Producer, self).__init__()
        self.cond = cond
        self.name = name
    def run(self):
        self.cond.acquire()
        # 释放对琐的占用,同时线程挂起在这里,直到被 notify 并重新占有琐。
        self.cond.wait()
        print(self.name + ': 可以的,你提交订单吧')
        self.cond.notify()
        self.cond.wait()
        print(self.name + ': 好了,已经修改了')
        self.cond.notify()
        self.cond.wait()
        print(self.name + ': 嗯,收款成功,马上给你发货')
        self.cond.release()
        print(self.name + ': 发货商品')
cond = threading.Condition()
consumer = Consumer(cond, '买家(两点水)')
producer = Producer(cond, '卖家(三点水)')
consumer.start()
producer.start()
輸出的結果如下:
买家(两点水): 我这两件商品一起买,可以便宜点吗
卖家(三点水): 可以的,你提交订单吧
买家(两点水): 我已经提交订单了,你修改下价格
卖家(三点水): 好了,已经修改了
买家(两点水): 收到,我支付成功了
买家(两点水): 等待收货
卖家(三点水): 嗯,收款成功,马上给你发货
卖家(三点水): 发货商品
5、線程間通訊
如果程式中有多個線程,這些線程避免不了需要相互通訊的。那麼我們怎樣才能在這些線程之間安全地交換資訊或資料呢?
從一個執行緒向另一個執行緒發送資料最安全的方式可能就是使用 queue 庫中的佇列了。建立一個被多個執行緒共享的 Queue 對象,這些執行緒透過使用 put() 和 get() 操作來向佇列中新增或刪除元素。
# -*- coding: UTF-8 -*-
from queue import Queue
from threading import Thread
isRead = True
def write(q):
    # 写数据进程
    for value in ['两点水', '三点水', '四点水']:
        print('写进 Queue 的值为:{0}'.format(value))
        q.put(value)
def read(q):
    # 读取数据进程
    while isRead:
        value = q.get(True)
        print('从 Queue 读取的值为:{0}'.format(value))
if __name__ == '__main__':
    q = Queue()
    t1 = Thread(target=write, args=(q,))
    t2 = Thread(target=read, args=(q,))
    t1.start()
    t2.start()
輸出的結果如下:
写进 Queue 的值为:两点水
写进 Queue 的值为:三点水
从 Queue 读取的值为:两点水
写进 Queue 的值为:四点水
从 Queue 读取的值为:三点水
从 Queue 读取的值为:四点水
Python 也提供了Event 物件用於執行緒間通信,它是由執行緒設定的訊號標誌,如果訊號標誌位真,則其他執行緒等待直到訊號接觸。
Event 物件實作了簡單的執行緒通訊機制,它提供了設定訊號,清楚訊號,等待等用於實現執行緒間的通訊。
設定訊號
使用 Event 的 set() 方法可以設定 Event 物件內部的訊號標誌為真。 Event 物件提供了 isSe() 方法來判斷其內部訊號標誌的狀態。當使用event 物件的set() 方法後,isSet() 方法傳回真
清除訊號
使用Event 物件的clear() 方法可以清除Event 物件內部的訊號標誌,即將其設為假,當使用Event 的clear 方法後,isSet() 方法返回假
等待
Event 物件wait 的方法只有在內部訊號為真的時候才會很快的執行並完成返回。當 Event 物件的內部訊號標誌位元假時,則 wait 方法會一直等待到其為真時才傳回。
範例:
# -*- coding: UTF-8 -*-
import threading
class mThread(threading.Thread):
    def __init__(self, threadname):
        threading.Thread.__init__(self, name=threadname)
    def run(self):
        # 使用全局Event对象
        global event
        # 判断Event对象内部信号标志
        if event.isSet():
            event.clear()
            event.wait()
            print(self.getName())
        else:
            print(self.getName())
            # 设置Event对象内部信号标志
            event.set()
# 生成Event对象
event = threading.Event()
# 设置Event对象内部信号标志
event.set()
t1 = []
for i in range(10):
    t = mThread(str(i))
    # 生成线程列表
    t1.append(t)
for i in t1:
    # 运行线程
    i.start()
輸出的結果如下:
1
0
3
2
5
4
7
6
9
8
#6、後台執行緒
##預設情況下,主執行緒退出之後,即使子線程沒有join。那麼主執行緒結束後,子執行緒仍會繼續執行。如果希望主執行緒退出後,其子執行緒也退出而不再執行,則需要設定子執行緒為後台執行緒。 Python 提供了 setDeamon 方法。