
 Article Tags


What should I do if win10 cannot detect the camera and does not have an image device?
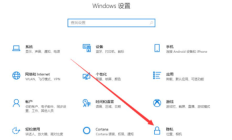
The camera is something we often use when using computers, but some users may encounter the problem that Win10 cannot detect the camera and has no image device. If you encounter this situation, you can go to the privacy options in settings, find the camera item, and then you can solve the problem. Below are the detailed steps. Win10 cannot detect the camera and there is no image device problem. Solution 1: Enable the camera function of the win10 system 1. First check whether the camera permission is turned on. The "win+i" shortcut key opens the settings window, and now we can see the camera under Privacy. 2. Find the camera in the left column. On the right, we can see that the access permission for the camera of this device has been turned off. Click Change. 3. Select to turn it on, and the following is
Sep 10, 2024 am 10:46 AM
How to add one-key shutdown settings to Win10 right-click menu Win10 right-click menu
Turning the computer on and off is very important to us. You can use shortcut keys to shut down the computer, and you can also add one-click functions to the right-click menu! So how to add one-click shutdown to the right-click menu of Win10? Users can directly open the Shell folder under the registry editor to set it up. Next, this site will teach you how to set up the one-click shutdown of the Win10 right-click menu! Method to add one-key shutdown settings to the Win10 right-click menu 1. Press the Win+X key combination, or right-click the start menu in the lower left corner. In the hidden menu item that opens, click Run (Win+R). In the run window, enter the regedit command. , OK or Enter to quickly open the Registry Editor. 2. In the Registry Editor window, expand to the following paths:
Sep 10, 2024 am 10:46 AM
How to solve the problem of noise in win10 microphone. How to solve the problem of noise in win10 microphone.
We may encounter some problems when using the Win10 system. For example, what should we do if there is noise in the microphone? Just look for the speaker icon in the lower right corner, then right-click, select the recording device, enter the microphone setting interface, and just follow the steps. Let’s talk in detail about how to solve the problem of microphone noise in Win10! Solution to Win10 microphone noise 1. Find the speaker icon in the lower right corner, as shown in the picture. 2. Right-click to select the recording device and enter the microphone setting interface. 3. Here you can see whether our microphone device is working. Right-click the default microphone and select Properties. 4. Under the enhancement options bar, we can select two options: noise suppression and echo cancellation. After the settings are completed, click OK to save.
Sep 10, 2024 am 10:46 AM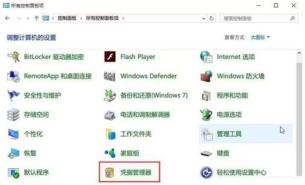
How to check username and password on win10 computer
When we use win10 system, we sometimes need to add a network password to operate, but some users accidentally forget the password. How to read the username and password of win10 computer? Just go to the control panel and look for the username and URL. Next, I will tell you in detail how to view the username and password of a win10 computer. How to view the user name and password of Windows 10 computer 1. First open the Control Panel, find the Credential Manager in the large icon view mode and open it. 2. Our username and URL are saved under the web credentials. 3. Click to view detailed information. 4. At this time, you find that the password is hidden. You can click Show to display the password in plain text. Windows Security will pop up. Enter here.
Sep 10, 2024 am 10:45 AM
How to adjust the charging limit of win11 back to 80? Tutorial on how to adjust the charging limit of win11 back to 80
Many users find that the charging limit is only 80% after upgrading their laptops to the Win11 system. So how can the charging limit of Win11 be adjusted back to 80%? If your computer is ASUS, you can directly open the MyASUS software to set it up. Below we will introduce in detail how to adjust the charging limit of Win11 back to 80%. Tutorial on adjusting the charging limit back to 80 in win11 1. ASUS notebook 1. ASUS users can open the "MyASUS" software. 2. Then click the "Customize" option in the left column to enter. 3. Then enter the "Power and Performance" settings above. 4. Finally, select "Long-term usage mode". 2. Lenovo notebook 1. Lenovo notebook can open the "Lenovo Computer Manager" software. 2. in
Sep 10, 2024 am 10:45 AM
How to turn off the touchpad on win11 laptop win11 solution to turn off the touchpad
When people use laptops, they usually use an external mouse and rarely use a writing tablet. Some users using win11 system want to turn off the notebook's writing pad, but don't know how to do it. Today's win11 tutorial will teach you how to set it up. Friends who need it can go to the PHP Chinese website to see the complete method! How to turn off the touchpad on a win11 laptop 1. First, click on a blank space on the taskbar and select "Taskbar Settings". 2. After opening the taskbar settings, find "Bluetooth and other devices" on the left. 3. Then you can see the "Touchpad" settings on the right side. 4. After expanding, select "More Touchpad Settings" under the relevant settings. 5. Finally, check "Disable when plugging in an external USB pointing device", and then click "OK"
Sep 10, 2024 am 10:45 AM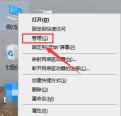
What should I do if Win10 cannot run as administrator? Win10 cannot run as administrator. Detailed explanation
Some friends find that there is no function to run as administrator on the desktop when using Win10 system. What should they do? Just right-click "This PC", then find "Manage", then find "Administrator" and set it up. Next, let’s take a look at the specific operation method of Win10 unable to run as administrator! Win10 cannot find the detailed explanation of running as administrator 1. Right-click this computer on the desktop, which is also my computer, and select "Manage". 2. Expand to Computer Management - System Tools - Local Users and Groups - Users, find and open Administrator on the right. 3. In the Administrator properties interface, uncheck "Account is disabled" and click OK.
Sep 10, 2024 am 10:45 AM
What to do if Win11 preview pane cannot be displayed Win11 preview pane cannot be displayed problem analysis
When we use the Win11 system, we sometimes need to perform operations such as previewing files. But what should I do if the Win11 preview pane cannot be opened? Don't worry, we can directly open the properties of "This PC" and select "Advanced system settings" to operate. Next, let me give you a detailed introduction on how to solve the problem that the Win11 preview pane cannot be displayed. Win11 preview pane cannot be displayed problem analysis 1. First, right-click "This PC" and select the "Properties" option. 2. Click "Advanced System Settings" in the relevant link in the pop-up window. 3. Then click the "Settings" button under Performance. 4. Finally, check "Better Settings" or "Better Appearance", then click "OK" to save and the problem is solved.
Sep 10, 2024 am 10:45 AM
How to enable built-in positioning in win10 and how to set up the built-in positioning function in win10
The win10 system we use comes with a positioning function, which is usually turned off by default. If we turn it on, software that requires positioning can be used directly. So how do you turn on this built-in positioning function? Follow me and take a look. I hope this win10 tutorial today can help more people solve their problems. How to set up the built-in positioning function in win10 1. First, we open the “Control Panel”. 2. Then click the view mode in the upper right corner of "Control Panel" and change it to "Large Icons" or "Small Icons". 3. Then find "Set Positioning" and open "Set Positioning". 4. Check "Enable Windows Positioning Platform" in "Set Positioning".
Sep 10, 2024 am 10:44 AM
How to change the background of Win10 folder to black? How to change the background of Win10 folder from black to white?
When you are using win10, you may find that the background of your folders has turned black, which makes you uncomfortable to use. So how do I change it back to white? It's actually very simple, just right-click on the folder, select "Properties", and then click "Change Icon". Next, I will give you a detailed introduction on how to change the background of the win10 folder from black to white. How to change the folder background black to white in win10? Method 1: First, right-click the folder and select Properties. 2. Next, click the Customize tab and click the Change Icon button below. 3. After that, the change icon interface appears, click to restore the default value. 4. Return to the folder properties interface, click Apply or OK~ Then you will see that the folder background color is restored to normal.
Sep 10, 2024 am 10:43 AM
How to solve the problem of win10 service denied access? win10 service denied access?
Many people using win10 system find that access is denied by the service. What's going on? Just go into the registry editor, find the wuauserv folder and set it up. Let me tell you in detail how to solve the problem of service access denied in win10. How to solve win10 service access denied. The core reason for access denial is that the current user does not have full operating permissions on the system. Modify this part first. The specific steps are as follows: 1. Press the WIN+R keys at the same time, enter regedit and press Enter to confirm. 2. Find HKEY_LOCAL_MACHINE\SYSTEM\CurrentControlSet\Services\wuauserv. 3. Right-click the folder and click
Sep 10, 2024 am 10:43 AM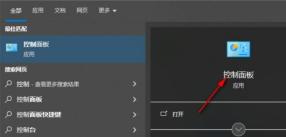
Where is the sleep function of win10? Introduction to the location of sleep function of win10
Where is the sleep function of win10? It’s actually very simple! You only need to open the Start menu, then click on Control Panel, then find System and Security, then select Power Options, and finally find Change Plan Settings behind the Balance option. Now let me talk about the location of win10 sleep function in detail! Introduction to the location of win10 sleep function 1. Search for control panel in the start menu and click to enter the control panel. 2. In the control panel, set [View by] on the right to [Category], and then click the [System and Security] option to enter. 3. After entering the new window that opens, find [Power Options] and left-click the power option. 4. In the window to set up the power plan, click [Change Plan] after the [Balance] option.
Sep 10, 2024 am 10:43 AM
How to enable spatial sound effects in win11 How to enable spatial sound effects in win11
In the win11 system, there is a function called spatial sound effects, which can make us sound more enjoyable and feel like we are immersed in the scene. However, this function is turned off at first. Many users want to turn it on but don’t know how. Today I will teach you how to set it up, let’s take a look at the specific steps! How to enable spatial sound effect settings in Windows 11: 1. Press the Win key, or click the Start icon on the taskbar, and then click Settings under pinned applications. 2. In the system settings window, find and click Sound (Volume Level, Output, Input, Sound Device). 3. The current path is: System>Sound, select the speaker device, and enter the properties interface. 4. Under spatial sound effects, select the type (select immersive audio that simulates the real environment
Sep 10, 2024 am 10:42 AM
How to solve the pin unavailable status 0xc000006d in Win10 system
Hello everyone, recently when a friend was using the Win10 system, he found that he could not enter the system after entering the PIN code. What should he do? In fact, this problem is not difficult to solve. You only need to enter the System folder under the registry to find the answer. Below I will give you a detailed introduction on how to solve the problem of pin unavailable status 0xc000006d in Win10 system. Solution to Win10 system pin unavailable status 0xc000006d 1. Press "win+r" to open run and enter regedit. 2. Open the registry in sequence: HKEY_LOCAL_MACHINE\SOFTWARE\Policies\Microsoft\Windows\
Sep 10, 2024 am 10:41 AM
Hot tools Tags

Undresser.AI Undress
AI-powered app for creating realistic nude photos

AI Clothes Remover
Online AI tool for removing clothes from photos.

Undress AI Tool
Undress images for free

Clothoff.io
AI clothes remover

Video Face Swap
Swap faces in any video effortlessly with our completely free AI face swap tool!

Hot Article
How to fix KB5055523 fails to install in Windows 11?
How to fix KB5055518 fails to install in Windows 10?
Roblox: Grow A Garden - Complete Mutation Guide
Roblox: Bubble Gum Simulator Infinity - How To Get And Use Royal Keys
How to fix KB5055612 fails to install in Windows 10?
Hot Tools

vc9-vc14 (32+64 bit) runtime library collection (link below)
Download the collection of runtime libraries required for phpStudy installation

VC9 32-bit
VC9 32-bit phpstudy integrated installation environment runtime library

PHP programmer toolbox full version
Programmer Toolbox v1.0 PHP Integrated Environment

VC11 32-bit
VC11 32-bit phpstudy integrated installation environment runtime library

SublimeText3 Chinese version
Chinese version, very easy to use

