Simple use of ViewPager
Introduction to this section:
This section brings a UI control introduced after Android 3.0 - ViewPager (view sliding switching tool), which is really unexpected How to call this control? Its general function: View switching can be completed through gesture sliding. It is generally used for APPs. Boot page or image carousel, because it was introduced after 3.0. If you want to use it in a lower version, you need to introduce v4 Compatibility package~, we can also see that ViewPager is in: android.support.v4.view.ViewPager directory~ Let’s learn the basic usage of this control~ Official API document: ViewPager
##1. Brief introduction of ViewPager
ViewPager is a simple page switching component. We can Fill it with multiple Views, and then we can left Swipe right to switch different Views. We can setPageTransformer() method for our ViewPager Set the animation effect when switching. Of course, we haven’t learned animation yet, so we set animation for ViewPager Let’s leave it to the next chapter, Drawing and Animation! Like the ListView and GridView we learned earlier, we also need an Adapter (Adapter) binds our View and ViewPager, and ViewPager has a specific Adapter-2. Use of PagerAdapterPagerAdapter! In addition, Google officially recommends that we use Fragment to fill ViewPager, so It is more convenient to generate each Page and manage the life cycle of each Page! We are provided with two Fragments Dedicated Adapter: FragmentPageAdapter and FragmentStatePagerAdapter Let’s briefly analyze the difference between these two Adapters:
##FragmentPageAdapter
- : and Like PagerAdapter, it will only cache the current Fragment and the one on the left and the one on the right. One, that is, a total of 3 Fragments will be cached. If there are four pages 1, 2, 3, and 4: is on page 1: cache 1, 2 is on page 2: cache 1, 2, 3
FragmentStatePagerAdapter
On page 3: Destroy page 1, cache 2, 3, 4
On page 4: Destroy page 2, cache 3, 4
For more pages, and so on~- : When Fragment is not useful to the user When seen, the entire Fragment will be destroyed. Only the state of the Fragment will be saved! When the page needs to be redisplayed, a new page will be generated!
To sum up, FragmentPageAdapter is suitable for occasions with fewer fixed pages; while FragmentStatePagerAdapter is suitable for For situations where there are many pages or the page content is very complex (it takes up a lot of memory)!
Let’s first introduce the most common PagerAdapter. If you want to use this PagerAdapter, you need to rewrite the following four methods: Of course, this is only an official suggestion. In fact, we only need to rewrite getCount() and isViewFromObject()~
- getCount(): Get how many views there are in the viewpager
- destroyItem(): Remove a page at a given position. It is the adapter's responsibility to remove this view from the container. This is to ensure that the view can be removed when finishUpdate(viewGroup) returns.
The other two methods involve a key:
- instantiateItem(): ①Add the view at the given position to the ViewGroup (container), create and display it ②Return an Object (key) representing the newly added page. Usually, it is enough to directly return the view itself. Of course, you can also Customize your own key, but the key must have a one-to-one correspondence with each view
- isViewFromObject(): Determine whether the Key returned by the instantiateItem(ViewGroup, int) function is the same as a page view represent the same view (that is, whether they are corresponding, and the corresponding ones represent the same View), usually we write directly return view == object!
Usage example 1: The simplest usage
Running effect diagram:

Key part of the code:
Okay, the code is very simple to write: first is the layout of each View, in triplicate, and the other two Views are the same :
view_one.xml:
< LinearLayout xmlns:android="http://schemas.android.com/apk/res/android"
android:layout_width="match_parent"
android:layout_height="match_parent"
android:background=" ../style/images/android-tutorial-viewpager.html"
android:gravity="center"
android:orientation="vertical">
<TextView
android ;
android:textStyle="bold" />
</LinearLayout>
然后编写一个自定义个的PagerAdapter:
MyPagerAdapter.java:
private ArrayList<View> viewLists;
public MyPagerAdapter() {
}
public MyPagerAdapter(ArrayList<View> viewLists) {
super();
this.viewLists = viewLists;
}
@Override
public int getCount() {
return viewLists.size();
}
@Override
public boolean isViewFromObject(View view, Object object) {
return view == object;
}
@Override
public Object instantiateItem(ViewGroup container, int position) {
container.addView(viewLists.get(position));
return viewLists.get(position);
}
@Override
public void destroyItem(ViewGroup container, int position, Object object) {
container.removeView(viewLists.get(position));
}
}
接着到Activity了,和以前学的ListView非常类似:
OneActivity.java:
private ViewPager vpager_one;
private ArrayList<View> aList;
private MyPagerAdapter mAdapter;
@Override
protected void onCreate(Bundle savedInstanceState) {
super.onCreate(savedInstanceState);
setContentView(R.layout.activity_one);
vpager_one = (ViewPager) findViewById(R.id.vpager_one);
aList = new ArrayList<View>();
LayoutInflater li = getLayoutInflater();
aList.add(li.inflate(R.layout.view_one,null,false));
aList.add(li.inflate(R.layout.view_two,null,false));
aList.add(li.inflate(R.layout.view_three,null,false));
mAdapter = new MyPagerAdapter(aList);
vpager_one.setAdapter(mAdapter);
}
}
Okay, the key code is the above part, it is very easy to understand~
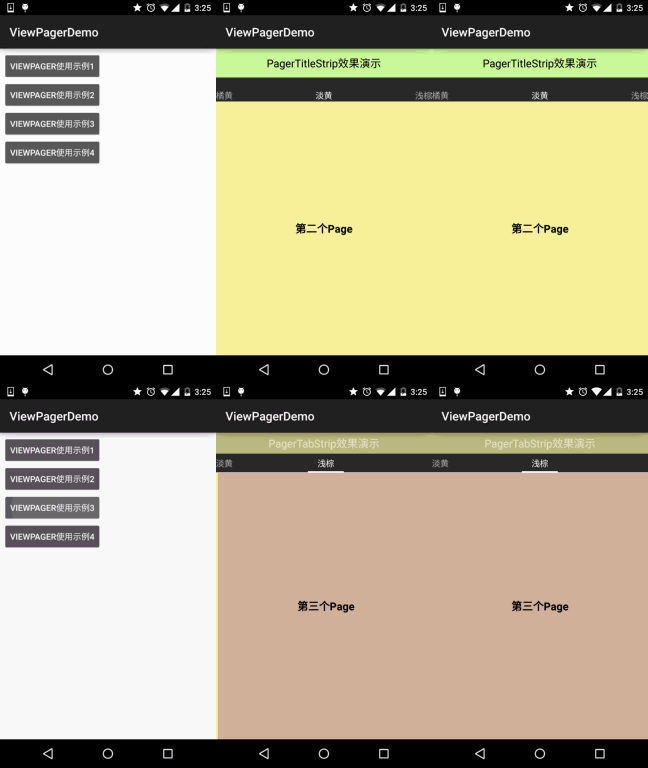
Usage example 2: Title bar - PagerTitleStrip and PagerTabStrip
is to follow the ViewPager sliding As for the sliding titles, these two are officially provided, one is ordinary text, One is underlined, and you can click on the text to switch pages. Let’s write a simple example~
Running renderings:

Key code implementation:
The difference between the two here is just that the layout is different, everything else is the same:
PagerTitleStrip The layout of Activtiy: activity_two.xml:
android:layout_width="match_parent"
android:layout_height="match_parent"
android:orientation="vertical">
<TextView
android:layout_width="match_parent"
android:layout_height="48dp"
android:background="../style/images/android-tutorial-viewpager.html"
android:gravity="center"
android:text="PagerTitleStrip效果演示"
android:textColor="#000000"
android:textSize="18sp" />
<android.support.v4.view.ViewPager
android:id="@+id/vpager_two"
android:layout_width="wrap_content"
android:layout_height="wrap_content"
android:layout_gravity="center">
<android.support.v4.view.PagerTitleStrip
android:id="@+id/pagertitle"
android:layout_width="wrap_content"
android:layout_height="40dp"
android:layout_gravity="top"
android:textColor="../style/images/android-tutorial-viewpager.html" />
</android.support.v4.view.ViewPager>
</LinearLayout>
而PagerTabStrip所在的布局:
activity_three.xml:
android:layout_width="match_parent"
android:layout_height="match_parent"
android:orientation="vertical">
<TextView
android:layout_width="match_parent"
android:layout_height="35dp"
android:background="../style/images/android-tutorial-viewpager.html"
android:gravity="center"
android:text="PagerTabStrip效果演示"
android:textSize="18sp" />
<android.support.v4.view.ViewPager
android:id="@+id/vpager_three"
android:layout_width="wrap_content"
android:layout_height="wrap_content"
android:layout_gravity="center">
<android.support.v4.view.PagerTabStrip
android:id="@+id/pagertitle"
android:layout_width="wrap_content"
android:layout_height="wrap_content"
android:layout_gravity="top" />
</android.support.v4.view.ViewPager>
</LinearLayout>
The next two are the same. Let's first write a custom PagerAdapter, except for the previously rewritten one. In addition to the four methods, we need to rewrite another method: getPageTitle(), which sets the title~ The code is as follows:
MyPagerAdapter2.java:
* Created by Jay on 2015/10/8 0008.
*/
public class MyPagerAdapter2 extends PagerAdapter {
private ArrayList< ;View> viewLists;
private ArrayList<String> titleLists;
public MyPagerAdapter2() {}
public MyPagerAdapter2(ArrayList<View> viewLists,ArrayList<String> titleLists)
{
this.viewLists = viewLists;
this.titleLists = titleLists;
}
@Override
public int getCount() {
return viewLists.size();
}
@Override
public boolean isViewFromObject(View view, Object object) {
return view == object;
}
@Override
public Object InstantiaTeitem (ViewGroup Container, Int Position) {
Container.adDView (ViewLists.Get (POSITION));
@Override
public void destroyItem(ViewGroup container, int position, Object object) {
container.removeView(viewLists.get(position));
}
@Override
use using using use using ‐ ‐ ‐ ‐ ‐long ‐‐ ) {
using using using through through through out through out out through out out through out out out out off ’ s ’ through ’ s ’ through’s' ’ through‐‐‐‐‐‐‐‐‐ off‐, to
最后是Activity部分,两个都是一样的:
TwoActivity.java:
* Created by Jay on 2015/10/8 0008.
*/
public class TwoActivity extends AppCompatActivity {
private ViewPager vpager_two;
private ArrayList<View> aList;
private ArrayList<String> sList;
private MyPagerAdapter2 mAdapter;
@Override
public void onCreate(Bundle savedInstanceState) {
super.onCreate(savedInstanceState);
setContentView(R.layout.activity_two);
vpager_two = (ViewPager) findViewById(R.id.vpager_two);
aList = new ArrayList<View>();
LayoutInflater li = getLayoutInflater();
aList.add(li.inflate(R.layout.view_one,null,false));
aList.add(li.inflate(R.layout.view_two,null,false));
aList.add(li.inflate(R.layout.view_three, null, false));
sList = new ArrayList<String>();
sList.add("橘黄");
sList.add("淡黄");
sList.add("浅棕");
mAdapter = new MyPagerAdapter2(aList,sList);
vpager_two.setAdapter(mAdapter);
}
}
Okay, it’s very simple. If you have any questions, just download the demo and you will understand~
Usage example 3: ViewPager realizes the effect of TabHost:
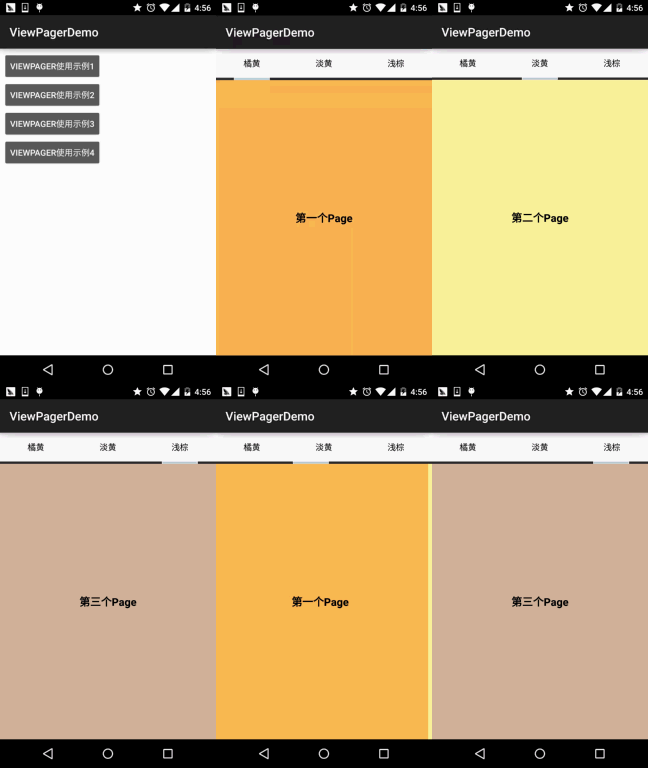
Of course, Example 2 is often just a good idea but not useful. In actual development, we may need to customize this title bar ourselves. Now let’s write a simple example to achieve the effect of TabHost. If you don’t know what TabHost is If so, please see the renderings!
Running renderings:

## Implementation of logical analysis:
Let's explain the logic to achieve the above effect, and then paste the code:First is the layout: a LinearLayout at the top, wrapped in three TextViews, the weight attribute is 1, and then follows For an ImageView of a slider, we set the width to match_parent; the bottom is our ViewPager, which may There are two properties you don't know. One is: flipInterval: This specifies the time interval between View animations!Layout code:And persistentDrawingCache: sets the drawing cache strategy of the control. There are four optional values:
none: Do not save the drawing cache in memory; animation : Only the animation drawing cache is saved; scrolling: Only the scrolling effect drawing cache is saved; all: All drawing caches should be saved in memory; can be used at the same time 2, animation|scrolling like this~
activity_four.xml:
xmlns:tools="http://schemas.android.com/tools"
android:id="@+id/LinearLayout1"
android:layout_width="match_parent"
android:layout_height="match_parent"
android:orientation="vertical"
tools:context=".MainActivity">
<LinearLayout
android:layout_width="fill_parent"
android:layout_height="48dp"
android:background="../style/images/android-tutorial-viewpager.html">
<TextView
android:id="@+id/tv_one"
android:layout_width="fill_parent"
android:layout_height="fill_parent"
android:layout_weight="1.0"
android:gravity="center"
android:text="橘黄"
android:textColor="#000000" />
<TextView
android:id="@+id/tv_two"
android:layout_width="fill_parent"
android:layout_height="fill_parent"
android:layout_weight="1.0"
android:gravity="center"
android:text="淡黄"
android:textColor="#000000" />
<TextView
android:id="@+id/tv_three"
android:layout_width="fill_parent"
android:layout_height="fill_parent"
android:layout_weight="1.0"
android:gravity="center"
android:text="浅棕"
android:textColor="#000000" />
</LinearLayout>
<ImageView
android:id="@+id/img_cursor"
android:layout_width="fill_parent"
android:layout_height="wrap_content"
android:scaleType="matrix"
android:src="@mipmap/line" />
<android.support.v4.view.ViewPager
android:id="@+id/vpager_four"
android:layout_width="wrap_content"
android:layout_height="0dp"
android:layout_gravity="center"
android:layout_weight="1.0"
android:flipInterval="30"
android:persistentDrawingCache="animation" />
</LinearLayout>
Next comes our Activity, let’s think about it:
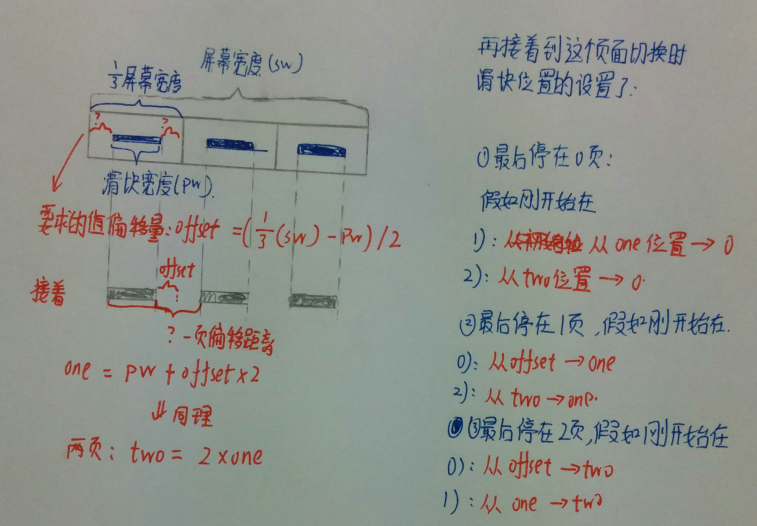
Step 1: We need to make our moving block the first Center the text below, then you need to calculate the offset here: First get the picture width pw, and then get the screen width sw. The calculation method is very simple:
offset (offset) = ((sw / 3)-pw) / 2 //Screen width/3 -The width of the picture, and then divide it by 2, right or left!
Then we call setImageMatrix to set the current position of the slider:
At the same time, we also switch between one page and two pages and calculate the moving distance of the slider. It is very simple:
one = offset * 2 + pw;
two = one * 2;Step 2: When we slide the page , our slider needs to move, we need to add a OnPageChangeListener event, we need to make a judgment on the page after sliding, and record the page before sliding. Which page, I drew a picture below, it may be easier to understand!
PS: I haven’t written for a long time. The handwriting is very ugly. I wish I could see it clearly. Ugly handwriting is beautiful, haha~

Well, if you still can’t understand it, you can just draw it yourself. Here’s the code:
FourActvitiy.java:
* Created by Jay on 2015/10/8 0008.
*/
public class FourActivity extends AppCompatActivity implements View.OnClickListener,
ViewPager.OnPageChangeListener {
private ViewPager vpager_four;
private ImageView img_cursor ;
private TextView tv_one;
private TextView tv_two;
private TextView tv_three;
private ArrayList<View> listViews;
private int offset = 0;//moving bar image Offset
private int currIndex = 0;//The number of the current page
private int bmpWidth;//The length of the moving bar image
private int one = 0; //The distance the moving bar slides by one page
private int two = 0; //The slider moves the distance between two pages
@Override
public void onCreate(Bundle savedInstanceState) {
super.onCreate(savedInstanceState);
setContentView(R.layout.activity_four);
initViews();
}
private void initViews() {
vpager_four = (ViewPager) findViewById(R.id.vpager_four );
tv_one = (TextView) findViewById(R.id.tv_one);
tv_two = (TextView) findViewById(R.id.tv_two);
tv_three = (TextView) findViewById(R.id. tv_three);
img_cursor = (ImageView) findViewById(R.id.img_cursor);
//Related settings for underline animation:
bmpWidth = BitmapFactory.decodeResource(getResources(), R.mipmap .line).getWidth();//Get the picture width
DisplayMetrics dm = new DisplayMetrics();
getWindowManager().getDefaultDisplay().getMetrics(dm);
int screenW = dm.widthPixels; //Get resolution width
offset = (screenW / 3 - bmpWidth) / 2;// Calculate offset
Matrix matrix = new Matrix();
matrix.postTranslate(offset, 0);
img_cursor.setImageMatrix(matrix) ;//Set the initial position of animation
listViews = new ArrayList<View>();
LayoutInflater mInflater = getLayoutInflater();
listViews.add(mInflater.inflate(R.layout.view_one, null, false));
listViews.add( mInflater.inflate(R.layout.view_two, null, false));
listViews.add(mInflater.inflate(R.layout.view_three, null, false));
vpager_four.setAdapter(new MyPagerAdapter(listViews ));
vpager_four.setCurrentItem(0); tv_three.setOnClickListener(this);
vpager_four.addOnPageChangeListener(this);
}
@Override
public void onClick(View v) {
switch (v. getid ()) {
case r.id.tv_one:
vpager_four.setcurrentity (0);
Break; vpager_four.setCurrentItem(1);
break;
case R.id.tv_three:
vpager_four.setCurrentItem(2);
break;
}
}
@Override
public void onPageSelected(int index) {
Animation animation = null;
switch (index) {
case 0:
if (currIndex == 1) {
animation = new TranslateAnimation(one, 0, 0, 0);
} else if (currIndex == 2) {
animation = new TranslateAnimation(two, 0, 0, 0);
}
break;
case 1:
if (currIndex == 0) {
animation = new TranslateAnimation(offset, one, 0, 0);
} else if (currIndex == 2) {
animation = new TranslateAnimation(two, one, 0, 0);
}
break;
case 2:
if (currIndex
animation = new Translateanimation (One, Two, 0, 0);
}
Break Position
animation.setDuration(300); //Set animation time to 300 milliseconds
img_cursor.startAnimation(animation); //Start animation
}
@Override
public void onPageScrollStateChanged(int i) {
}
@Override
public void onPageScrolled(int i, float v, int i1) {
}
}
Well, you may not be familiar with animation. It’s okay. We’ll take you through it in the next chapter~
Well, when we explained Fragment earlier, we explained a usage example: Android basic introductory tutorial - 5.2.4 Fragment example intensive explanation - bottom navigation bar + ViewPager sliding switching page, which will not be detailed here. If you are interested, just click on the link to have a look~
4. Code sample downloadViewPagerDemo.zip
Summary of this section:
Regarding ViewPager, due to space limitations, some places are not mentioned. For others, you need to consult the documentation yourself~In addition, as mentioned above, we will discuss the animation of ViewPager below. One chapter to explain! Okay, that’s all~
Well, before the National Day, I said I would finish the entire series during the National Day holiday, but in the end I didn’t write a single chapter. I’m really sorry... Because the girl comes over to play, so, you know~, I will speed up the progress~, and strive to advance as soon as possible!


