Simple use of DrawerLayout (official side sliding menu)
Introduction to this section:
This section brings you the last control in the basic UI control part: DrawerLayout, a side slide provided by the official menu The control, like the ViewPager in the previous section, was introduced after 3.0. To use it in lower versions, you need the v4 compatibility package. When it comes to side sliding, I believe Many people have used SlidingMenu on github, but there seem to be two versions, one is independent and the other depends on the other. An open source project: ActionBarSherlock; since Google provides us with this control, why not use it? In the Material Design design specifications, the animation effects of many side-sliding menus that can be seen everywhere can be mostly achieved through Toolbar + DrawerLayout to achieve ~, in this section we will explore a basic usage of this DrawerLayout ~ Some people like to use it Called the drawer control~Official document: DrawerLayout
1. Precautions for use
- 1.Main content view It must be the first subview of DrawerLayout
- 2. The width and height of the main content view need to match_parent
- 3. The specified side slide must be displayed When the view's android:layout_gravity attributeandroid:layout_gravity = "start", the menu slides out from left to right. When android:layout_gravity = "end", slide out the menu from right to left It is not recommended to use left and right!!!
- The width of the side sliding view is in dp, and it is not recommended to exceed 320dp (in order to always see some main content views)
- Set the side sliding event: mDrawerLayout.setDrawerListener(DrawerLayout.DrawerListener);
- One thing to say: it can be used in combination with Actionbar. When the user clicks the application icon on the Actionbar, the side sliding menu will pop up! Here we need to pass ActionBarDrawerToggle, which is the specific implementation class of DrawerLayout.DrawerListener. We can override ActionBarDrawerToggle's onDrawerOpened() and onDrawerClosed() to listen for drawer pull-out Or hide events! But we won’t talk about it here, because after 5.0 we use Toolbar! If you are interested, you can check the relevant information by yourself document!
2. Using code examples
Example 1: Implementation of a single side-sliding menu
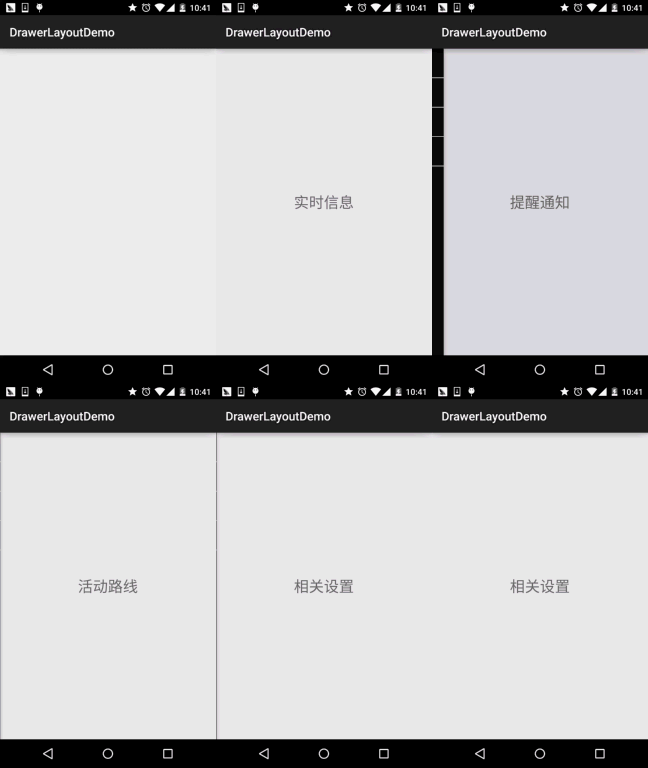
Running renderings :

Implement key code:
First is our main layout. Note: The outermost layer should be DrawerLayout. ! ! ! !
activity_main.xml:
android:id="@+id/drawer_layout"
android:layout_width="match_parent"
android:layout_height="match_parent">
<FrameLayout
android:id="@+id/ly_content"
android:layout_width="match_parent"
android:layout_height="match_parent" />
<ListView
android:id="@+id/list_left_drawer"
android:layout_width="180dp"
android:layout_height="match_parent"
android:layout_gravity="start"
android:background="../style/images/android-tutorial-drawerlayout.html"
android:choiceMode="singleChoice"
android:divider="#FFFFFF"
android:dividerHeight="1dp" />
</android.support.v4.widget.DrawerLayout>
接着ListView的布局代码和domain类:Item比较简单,就不给出了,直接上中间Fragment的 布局以及代码吧!另外Adapter直接复用我们之前写的那个可复用的MyAdapter!
fg_content.xml:
<RelativeLayout xmlns:android="http://schemas.android.com/apk/res/android"
android:layout_width="match_parent"
android:layout_height="match_parent"
android:orientation="vertical">
<TextView
android:id="@+id/tv_content"
android:layout_width="wrap_content"
android:layout_height="wrap_content"
android:layout_centerInParent="true"
android:textSize="25sp" />
</RelativeLayout>
ContentFragment.java:
* Created by Jay on 2015/10/8 0008.
*/
public class ContentFragment extends Fragment {
private TextView tv_content;
@Override
public View onCreateView(LayoutInflater inflater, ViewGroup container, Bundle savedInstanceState) {
View view = inflater.inflate(R.layout.fg_content, container, false);
tv_content = (TextView) view.findViewById(R.id.tv_content);
String text = getArguments().getString("text");
tv_content.setText(text);
return view;
}
}
Finally our Activity class
MainActivity.java:
private DrawerLayout drawer_layout;
private ListView list_left_drawer;
private ArrayList<Item> menuLists;
private MyAdapter<Item> myAdapter = null;
@Override
protected void onCreate(Bundle savedInstanceState) {
super.onCreate(savedInstanceState);
setContentView(R.layout.activity_main);
drawer_layout = (DrawerLayout) findViewById(R.id.drawer_layout);
list_left_drawer = (ListView) findViewById(R.id.list_left_drawer);
menuLists = new ArrayList<Item>();
menuLists.add(new Item(R.mipmap.iv_menu_realtime,"实时信息"));
menuLists.add(new Item(R.mipmap.iv_menu_alert,"提醒通知"));
menuLists.add(new Item(R.mipmap.iv_menu_trace,"活动路线"));
menuLists.add(new Item(R.mipmap.iv_menu_settings,"相关设置"));
myAdapter = new MyAdapter<Item>(menuLists,R.layout.item_list) {
@Override
public void bindView(ViewHolder holder, Item obj) {
holder.setImageResource(R.id.img_icon,obj.getIconId());
holder.setText(R.id.txt_content, obj.getIconName());
}
};
list_left_drawer.setAdapter(myAdapter);
list_left_drawer.setOnItemClickListener(this);
}
@Override
public void onItemClick(AdapterView<?> parent, View view, int position, long id) {
ContentFragment contentFragment = new ContentFragment();
Bundle args = new Bundle();
args.putString( "text", menuLists.get(position).getIconName());
contentFragment.setArguments(args);
FragmentManager fm = getSupportFragmentManager();
fm.beginTransaction().replace(R.id .ly_content,contentFragment).commit();
drawer_layout.closeDrawer(list_left_drawer);
}
}
The code is very simple, so I won’t say much~
Example 2. Implementation of two left and right side sliding menus
Well, I don’t know if you have noticed that from the layout of DrawerLayout above, we can probably guess that DrawerLayout It consists of up to three parts, the content part in the middle, the side-sliding menu part on the left, and the side-sliding menu part on the right! Let’s write an example with two side-sliding menus!
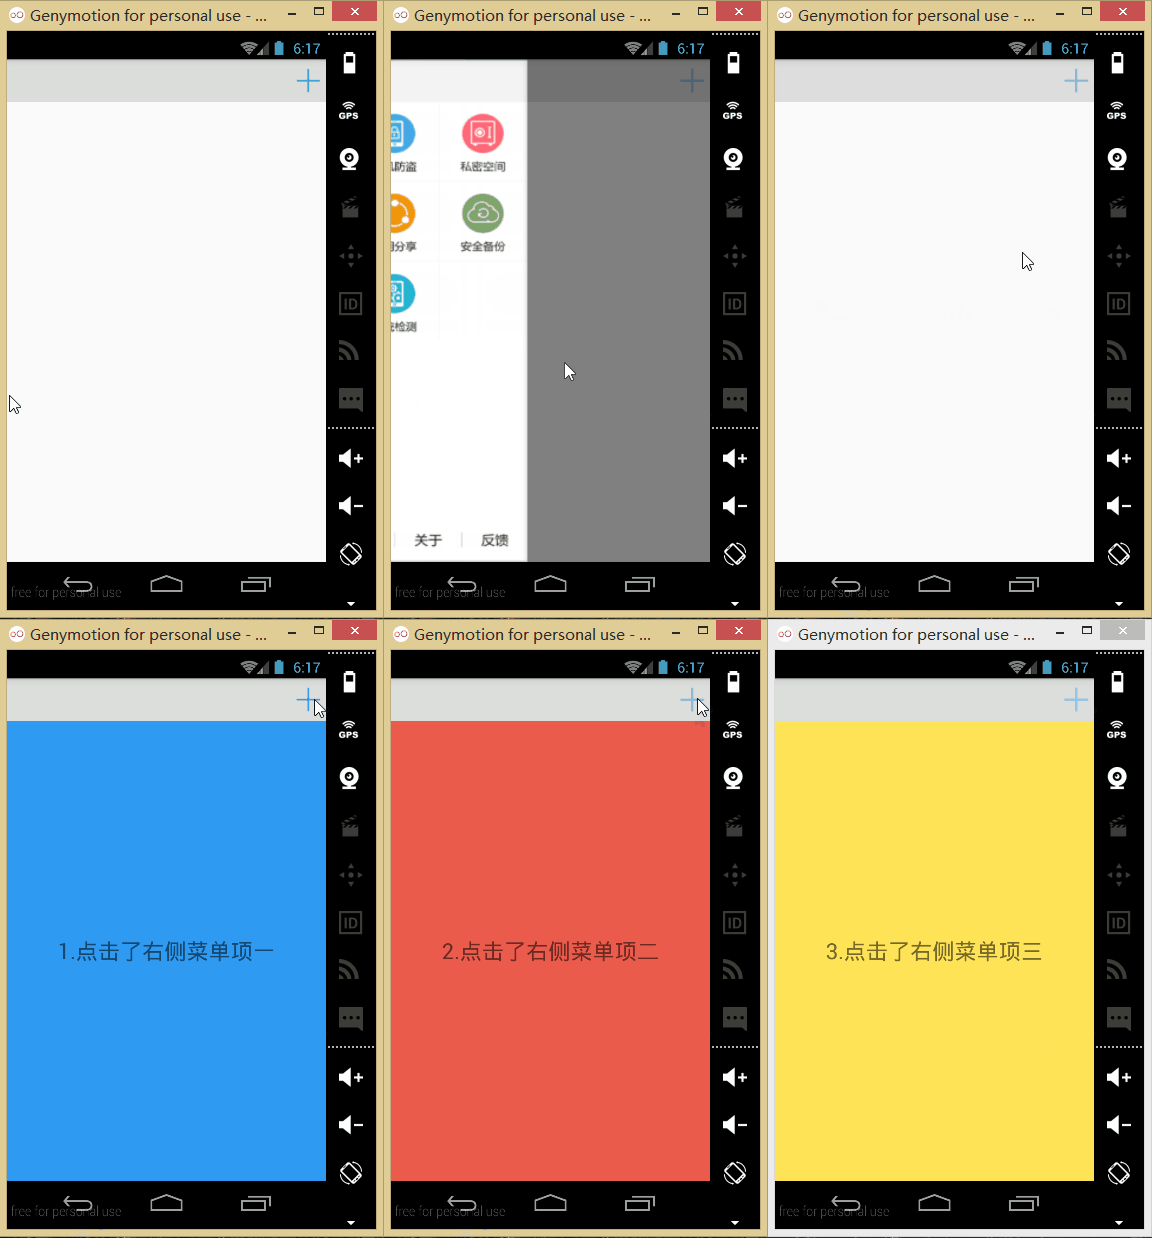
Running renderings:

##Code implementation:
First We create two Fragments and corresponding layouts. They are the left and right side sliding menus!Left Fragment:
Layout:fg_left.xml, a picture is used here, and a new Activity will pop up after clicking; Of course you can expand it according to your needs!
android:orientation="vertical" android:layout_width="match_parent"
android:layout_height="match_parent">
<ImageView
android:id= "@+id/img_bg"
;
</LinearLayout>
对应的LeftFragment.java:
* Created by Jay on 2015/10/9 0009.
*/
public class LeftFragment extends Fragment{
private DrawerLayout drawer_layout;
@Override
public View onCreateView(LayoutInflater inflater, ViewGroup container, Bundle savedInstanceState) {
View view = inflater.inflate(R.layout.fg_left, container, false);
ImageView img_bg = (ImageView) view.findViewById(R.id.img_bg);
img_bg.setOnClickListener(new View.OnClickListener() {
@Override
public void onClick(View v) {
getActivity().startActivity(new Intent(getActivity(),OtherActivity.class));
drawer_layout.closeDrawer(Gravity.START);
}
});
return view;
}
//暴露给Activity,用于传入DrawerLayout,因为点击后想关掉DrawerLayout
public void setDrawerLayout(DrawerLayout drawer_layout){
this.drawer_layout = drawer_layout;
}
}
Fragment on the right:
The layout is just three buttons. After clicking, replace the Fragment in the middle part. The layoutfg_right.xmlcode is as follows:
<LinearLayout xmlns:android="http://schemas.android.com/apk/res/android "
android:layout_width="match_parent"
android:layout_height="match_parent"
android:background="../style/images/android-tutorial-drawerlayout.html"
android:gravity ="center"
android:orientation="vertical">
<Button
android:id="@+id/btn_one"
android:layout_width="wrap_content"
android: layout_height = "wrap_content"
android: Text = "Menu item one"/& gt "/& gt; Android: layout_width = "wrap_content"
android: layout_height = "wrap_content"
android: text = "Menu item two"/& & & & lt; ## android: ID = "@ +id/btn_three"
android:layout_width="wrap_content"
android:layout_height="wrap_content"
android:text="Menu item three" />
</LinearLayout> ;
Then the corresponding one is RightFragment.java:
* Created by Jay on 2015/10/9 0009.
*/
public class RightFragment extends Fragment implements View.OnClickListener{
private DrawerLayout drawer_layout;
private FragmentManager fManager;
@Override
public View onCreateView(LayoutInflater inflater, ViewGroup container, Bundle savedInstanceState) {
View view = inflater.inflate(R.layout.fg_right, container, false);
view.findViewById(R.id.btn_one).setOnClickListener(this);
view.findViewById(R.id.btn_two).setOnClickListener(this);
view.findViewById(R.id.btn_three).setOnClickListener(this);
fManager = getActivity().getSupportFragmentManager();
return view;
}
@Override
public void onClick(View v) {
switch (v.getId()){
case R.id.btn_one:
ContentFragment cFragment1 = new ContentFragment("1.点击了右侧菜单项一",R.color.blue);
fManager.beginTransaction().replace(R.id.fly_content,cFragment1).commit();
drawer_layout.closeDrawer(Gravity.END);
break;
case R.id.btn_two:
ContentFragment cFragment2 = new ContentFragment("2.点击了右侧菜单项二",R.color.red);
fManager.beginTransaction().replace(R.id.fly_content,cFragment2).commit();
drawer_layout.closeDrawer(Gravity.END);
break;
case R.id.btn_three:
ContentFragment cFragment3 = new ContentFragment("3. Clicked on the right menu item three", R.color.yellow);
fManager.beginTransaction().replace(R.id. fly_content,cFragment3).commit (); out drawer_layout){
This.drawer_layout = drawer_layout;
}
}
There is also a ContentFragment filled in the middle part, the layout:
fg_content.xml
is as follows:
<RelativeLayout xmlns:android="http://schemas.android.com/apk /res/android" android:layout_width="match_parent" android:layout_height="match_parent"
android:orientation="vertical">android :id="@+id/tv_content"
android:layout_width="wrap_content"
android:layout_height="wrap_content"
android:layout_centerInParent="true"
android:textSize="25sp" />
</RelativeLayout>
ContentFragment.java:
private TextView tv_content;
private String strContent;
private int bgColor;
public ContentFragment(String strContent,int bgColor) {
this.strContent = strContent;
this.bgColor = bgColor;
}
@Override
public View onCreateView(LayoutInflater inflater, ViewGroup container, Bundle savedInstanceState) {
View view = inflater.inflate(R.layout.fg_content, container, false);
view.setBackgroundColor(getResources().get Color(bgColor ));
tv_content = (TextView) view.findViewById(R.id.tv_content);
tv_content.setText(strContent);
return view;
}
}
After writing it, it’s time for the layout of our Activity and the code of the Activity: Before that, we also need some layout of the top bar:
view_topbar.xml:
<RelativeLayout xmlns:android="http://schemas.android.com/apk/res/android"
android:layout_width="match_parent"
android :layout_height="wrap_content"
android:background="../style/images/android-tutorial-drawerlayout.html">
<Button
android:id="@+ id/btn_right"
android:layout_width="40dp"
android:layout_height="40dp"
android:layout_centerVertical="true"
android:layout_alignParentRight="true"
and roid:background ="../style/images/btn_selctor"/>
</RelativeLayout>
Then activity_main.xml:
xmlns:tools="http://schemas.android.com/tools"
android:id="@+id/drawer_layout"
android:layout_width="match_parent"
android:layout_height="match_parent">
<LinearLayout
android:layout_width="match_parent"
android:layout_height="match_parent"
android:orientation="vertical">
<include
android:id="@+id/topbar"
layout="@layout/view_topbar"
android:layout_width="wrap_content"
android:layout_height="48dp" />
<FrameLayout
android:id="@+id/fly_content"
android:layout_width="match_parent"
android:layout_height="match_parent" />
</LinearLayout>
<fragment
android:id="@+id/fg_left_menu"
android:name="jay.com.drawerlayoutdemo2.LeftFragment"
android:layout_width="300dp"
android:layout_height="match_parent"
android:layout_gravity="start"
android:tag="LEFT"
tools:layout="@layout/fg_left" />
<fragment
android:id="@+id/fg_right_menu"
android:name="jay.com.drawerlayoutdemo2.RightFragment"
android:layout_width="100dp"
android:layout_height="match_parent"
android:layout_gravity="end"
android:tag="RIGHT"
tools:layout="@layout/fg_right" />
</android.support.v4.widget.DrawerLayout>
Finally MainActivity.java:
private DrawerLayout drawer_layout;
private FrameLayout fly_content;
private View topbar;
private Button btn_right;
private RightFragment fg_right_menu;
private LeftFragment fg_left_menu;
private FragmentManager fManager;
@Override
protected void onCreate(Bundle savedInstanceState) {
super.onCreate(savedInstanceState);
setContentView(R.layout.activity_main);
fManager = getSupportFragmentManager();
fg_right_menu = (RightFragment) fManager.findFragmentById(R.id.fg_right_menu);
fg_left_menu = (LeftFragment) fManager.findFragmentById(R.id.fg_left_menu);
initViews();
}
private void initViews() {
drawer_layout = (DrawerLayout) findViewById(R.id.drawer_layout);
fly_content = (FrameLayout) findViewById(R.id.fly_content);
topbar = findViewById(R.id.topbar);
btn_right = (Button) topbar.findViewById(R.id.btn_right);
btn_right.setOnClickListener(this);
//设置右面的侧滑菜单只能通过编程来打开
drawer_layout.setDrawerLockMode(DrawerLayout.LOCK_MODE_LOCKED_CLOSED,
Gravity.END);
drawer_layout.setDrawerListener(new DrawerLayout.DrawerListener() {
@Override
public void onDrawerSlide(View view, float v) {
}
@Override
public void onDrawerOpened(View view) {
}
@Override
public void onDrawerClosed(View view) {
drawer_layout.setDrawerLockMode(
DrawerLayout.LOCK_MODE_LOCKED_CLOSED, Gravity.END);
}
@Override
public void onDrawerStateChanged(int i) {
}
});
fg_right_menu.setDrawerLayout(drawer_layout);
fg_left_menu.setDrawerLayout(drawer_layout);
}
@Override
public void onClick(View v) {
drawer_layout.openDrawer(Gravity.RIGHT);
drawer_layout.setDrawerLockMode(DrawerLayout.LOCK_MODE_UNLOCKED,
Gravity.END); //解除锁定
}
}
Okay, you’re done now~ Hehe, let’s talk about the doubts you may have when reading the code:
- 1. drawer_layout.openDrawer(Gravity.END);
This sentence is to set which menu to open. START represents the left and END represents the right.- 2. drawer_layout.setDrawerLockMode (DrawerLayout.LOCK_MODE_LOCKED_CLOSED,Gravity.END); The side sliding menu on the right is locked and cannot be closed or opened through gestures. It can only be opened through codes! That is, call the openDrawer method! Then drawer_layout.setDrawerLockMode(DrawerLayout.LOCK_MODE_UNLOCKED,Gravity.END); Unlock the lock state, that is, you can close the side sliding menu through gestures Finally, it is called when the drawer is closed: drawer_layout.setDrawerLockMode(DrawerLayout.LOCK_MODE_LOCKED_CLOSED, Gravity.END); Lock the sliding menu on the right again!
- 3. What is the role of the Tag attribute in the layout code? Answer: It is not used here. When overriding the onDrawerSlide method of DrawerListener, we can pass its first Parameter drawerView, call drawerView.getTag().equals("START") to determine which one triggered the menu event menu! Then you can perform the corresponding operations!
3. Code sample download
DrawerLayoutDemo.zip
DrawerLayoutDemo2.zip
Summary of this section :
Okay, this section introduces you to the basic usage of the official side-sliding control DrawerLayout, which is very convenient to use! Of course, this is just a simple usage demonstration. In addition, I saw the great master Zhang Yang wrote an article: Android DrawerLayout high imitation QQ5.2 two-way side sliding menu. If you are interested, you can take a look. If you read the content of this section, I believe you will not understand. How hard it is~ Okay!
That’s it for this section, say goodbye to the chapter of UI controls~ We will start drawing and animation in the next chapter. Laying the foundation for our advanced series of custom controls!


