Summary of 13 Drawables in Android Part 1
Introduction to this section:
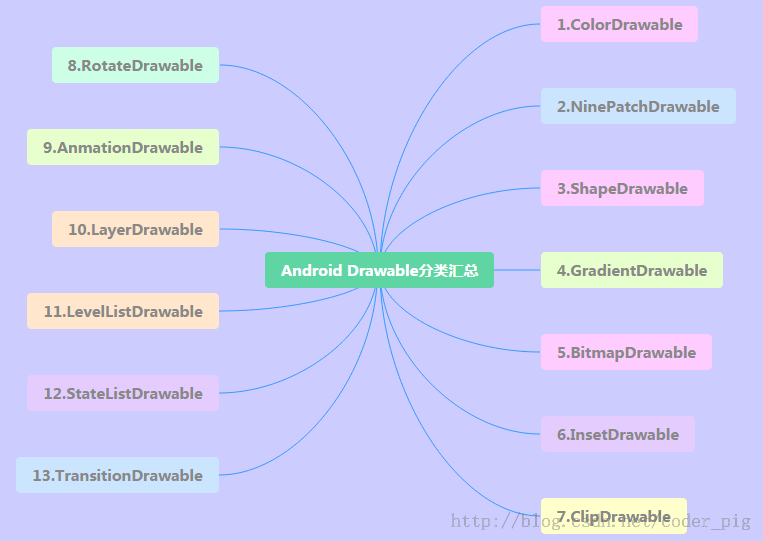
Starting from this section, we will learn some basic knowledge of drawing and animation in Android, and customize the advanced parts for us. lay the foundation! In the first section, let’s take a look at Drawable in Android! Android provides us with as many as 13 kinds of Drawable, in this section we will draw it one by one!
Notes on using Drawable resources
- Drawable is divided into two types: One is our ordinary image resources. In Android Studio, we usually put them in the res/mipmap directory. It’s different from the previous Eclipse! In addition, if we switch the project to Android project mode, we can directly Just drop the image into the mipmap directory, and AS will automatically classify it into hdpi, xhdpi...! The other is Drawable resources in the form of XML written by us. We usually put them in the res/drawable directory. Next, such as the most common button click background switching Selctor!
- In XML, we can directly set Drawable through @mipmap or @drawable For example: android:background = "@mipmap/iv_icon_zhu" / "@drawable/btn_back_selctor" In Java code, we can obtain drawable resources through Resource's getDrawable(R.mipmap.xxx) If we are setting the background for a certain control, such as ImageView, we can directly call the control.getDrawale() in the same way Drawable objects can be obtained!
- The resource name in the drawable in Android has restrictions and must be: [a-z0-9_.] (that is, it can only be alphanumeric and and .), And it cannot start with a number, otherwise the compilation will report an error: Invalid file name: must contain only [a-z0-9.]! Lower case! ! ! ! lower case! ! ! lower case! ——Say important things three times~
Okay, these are the things to pay attention to. Now let’s learn about the 13 types of Drawables provided to us in Android!
1.ColorDrawable
The simplest kind of Drawable, when we draw ColorDrawable to Canvas (canvas), A fixed color will be used to fill the Paint, and then a single-color area will be drawn on the canvas!
1). ColorDrawable is defined in Java:
ColorDrawable drawable = new ColorDrawable(0xffff2200);
txtShow.setBackground(drawable);
2). Define ColorDrawable in xml:
  <?xml version="1.0" encoding="utf-8"?>  <color
    xmlns:android="http://schemas.android.com/apk/res/android"
    android:color="#FF0000"/>
Of course, the above usage is not very useful. More often, we create a color.xml in the res/values directory. file, and then write the color values to be used into it, and obtain the corresponding value through @color when needed, such as:
3). Create a color.xml file
For example:
 <?xml version="1.0" encoding="utf-8"?>  <resources>
    <color name="material_grey_100">#fff5f5f5</color>
    <color name="material_grey_300">#ffe0e0e0</color>
    <color name="material_grey_50">#fffafafa</color>
    <color name="material_grey_600">#ff757575</color>
    <color name="material_grey_800">#ff424242</color>
    <color name="material_grey_850">#ff303030</color>
    <color name="material_grey_900">#ff212121</color></resources>
Then if it is in an xml file, we can get the corresponding color value through @color/xxx If it is in Java:
int mycolor = getResources().getColor(R.color.mycolor);
btn.setBackgroundColor(mycolor);
ps: Another thing to note is that if we directly define the color value in Java, we must add 0x, and the transparency cannot be missed:
int mycolor = 0xff123456;
btn.setBackgroundColor(mycolor);
4). Use the color defined by the system:
For example: BLACK (black), BLUE (blue), CYAN (cyan), GRAY (gray), GREEN (green), RED ( red), WRITE (white), YELLOW (yellow)! Usage: btn.setBackgroundColor(Color.BLUE);You can also get the system color and then set it:
int getcolor = Resources.getSystem().getColor(android.R.color.holo_green_light);
btn.setBackgroundColor(getcolor);
Use in xml: android:background="../style/images /black"
5). Use the static method argb to set the color:
Android uses an int type data to represent the color value, usually hexadecimal, That is, starting with 0x, The definition of color value is defined by the transparency alpha and the three primary colors of RGB (red, green and blue), starting with "#", followed by:
Transparency-Red-Green-Blue;eg:# RGB #ARGB #RRGGBB #AARRGGBB
Each element is represented by a byte (8 bit), so the value range is 0~255. When setting the color in xml, you can ignore the transparency. But if you are in Java code, you need to clearly indicate the value of transparency. If you omit it, it means complete transparency. At this time It will have no effect~ For example: Although 0xFF0000 means red, if you write it directly like this, there will be nothing else. Instead, you should write it like this: 0xFFFF0000, remember the Java code to set the color value, you need to add transparency in front~ Example: (The parameters are: transparency, red value, green value, blue value)txtShow.setBackgroundColor(Color.argb(0xff, 0x00, 0x00, 0x00));
2.NiewPatchDrawable
It’s the .9 picture. We have detailed how to play the 1.6.9 (Nine Sisters) picture in the previous section. Let me explain to you how to make .9 pictures! Android FrameWork uses efficient methods when displaying point nine images. Graphics optimization algorithm, we can achieve adaptive image stretching without any special processing~ In addition, when using AS, please pay attention to the following points:
- 1. The point 9 picture cannot be placed in the mipmap directory, but needs to be placed in the drawable directory!
- 2. The .9 picture in AS must have black lines, otherwise the compilation will not pass. This morning my cousin Ajun said in the group The artist of his company gave him a .9 picture without black lines, saying that it was made using a certain software, and then printed it on Eclipse. It can be used. Yes, there is no black line. 9. Damn it. However, when I switched to AS, the direct compilation failed! It feels like it is AS identification. The standard in the 9th picture is that there needs to be a black shop or a black line! In addition, my cousin gave me a method to remove black lines: 9patch (.9) How to remove black dots/black lines on your own drawings. I haven’t tried it specifically. If you are interested, you can try it yourself, but are the black lines really that annoying? .I don’t feel obsessive-compulsive disorder! Another point is to decompress other people's apk. When you take the .9 material, you will find that there is no black line, and you will also get an error! If you want to take out the .9 material with black lines, you need to decompile the apk instead of decompressing it directly! ! ! Decompile the front also I have already introduced it, so I won’t go into details here!
Then introduce two useless things:
xml definition NinePatchDrawable:
  <!--pic9.xml-->  <!--参数依次为:引用的.9图片,是否对位图进行抖动处理-->  <?xml version="1.0" encoding="utf-8"?>  <nine-patch
    xmlns:android="http://schemas.android.com/apk/res/android"
    android:src="@drawable/dule_pic"
    android:dither="true"/>
Use Bitmap packaging.9 pictures:
<!--pic9.xml-->  <!--参数依次为:引用的.9图片,是否对位图进行抖动处理-->  <?xml version="1.0" encoding="utf-8"?>  <bitmap
    xmlns:android="http://schemas.android.com/apk/res/android"
    android:src="@drawable/dule_pic"
    android:dither="true"/>
3.ShapeDrawable
Shape Drawable, define basic geometric shapes, such as (rectangle, circle, line, etc.), the root element is
and has more nodes , the relevant nodes are as follows:
- ① <shape>:
- ~ visible:Set whether it is visible
- ~ shape: Shape, optional: rectangle (rectangle, including square), oval (ellipse, including circle), line (line segment), ring (ring)
- ~ innerRadiusRatio: Valid when shape is ring, indicating the ratio of the inner radius of the ring to the radius. If innerRadius is set, He will be ignored
- ~ innerRadius: It is only valid when shape is ring, indicating the size of the inner radius of the ring
- ~ thicknessRatio: When shape It is only valid when the shape is ring, the ratio of the thickness of the table ring to the radius
- ~ thickness: It is valid when the shape is ring, indicating the thickness of the ring, that is, the difference between the outer radius and the inner radius
- ~ useLevel: Valid only when shape is ring, indicating whether to allow a part of the ring to be displayed based on level
- ②<size>:
- ~ width: Graphic shape width
- ~ height: Graphic shape height
- ③<gradient> : Let’s talk about GradientDrawable later~
- ④<solid>
- ~ color: Background fill color, setting solid will overwrite the gradient setting All effects!!!!!!
- ⑤<stroke>
- ~ width:The width of the border
- ~ color: The color of the border
- ~ dashWidth: The length of the dashed line segment of the border
- ~ dashGap: The dashed line segment of the border Spacing
- ⑥<conner>
- ~ radius: Corner radius, applicable to the top, bottom, left and right corners
- ~ topLeftRadius,topRightRadius,BottomLeftRadius,tBottomRightRadius: The rounded corner values of the upper left, upper right, lower left, and lower right are set according to your needs!
- ⑦<padding>
- left,top,right,bottm :The margins in the upper left, right and lower directions in order!
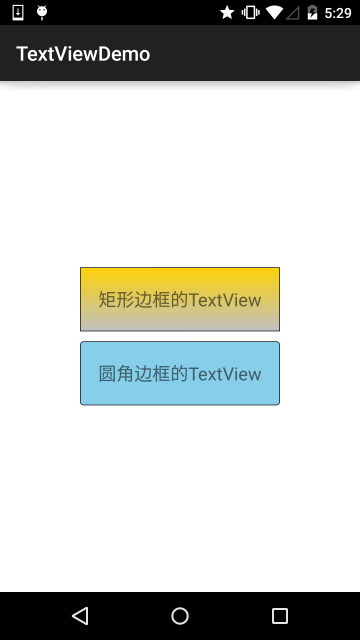
Usage example: 2.3.1 TextView (text box) detailed explanation

4.GradientDrawable
A Drawable with a gradient area that can achieve linear gradient, divergent gradient and flat gradient effects Core node: <gradient/>, with the following optional attributes:
- startColor: The starting color of the gradient
- centerColor: The middle color of the gradient
- endColor :End color of gradient
- type:Gradient type, optional (linear,radial,sweep), Linear gradient(gradient angle can be set), divergent gradient (divergent from the middle to all sides), tiled gradient
- centerX: the x coordinate of Arthur in the middle of the gradient, take The value range is: 0~1
- centerY: Y coordinate of the middle color of the gradient, the value range is: 0~1
- angle: Only linear type gradients are valid, indicating the gradient angle, which must be a multiple of 45
- gradientRadius: Only radial and sweep type gradients are valid, radial must be set, indicating the gradient effect Radius
- useLevel: Determine whether to draw a gradient effect based on level
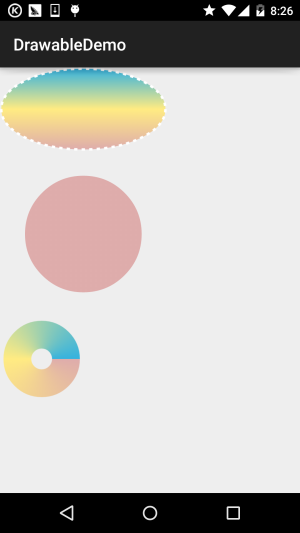
Code example: (Demonstration of three gradient effects ):
Running renderings:

First create three gradient xml files under drawable:
(linear gradient)gradient_linear.xml:
<?xml version="1.0" encoding="utf-8"?><shape
    xmlns:android="http://schemas.android.com/apk/res/android"
    android:shape="oval" >
    <gradient
        android:angle="90"
        android:centerColor="#FFEB82"
        android:endColor="#35B2DE"
        android:startColor="#DEACAB" />

    <stroke
        android:dashGap="5dip"
        android:dashWidth="4dip"
        android:width="3dip"
        android:color="#fff" /></shape>
(divergent gradient)gradient_radial.xml:
<?xml version="1.0" encoding="utf-8"?><shape xmlns:android="http://schemas.android.com/apk/res/android"
    android:innerRadius="0dip"
    android:shape="ring"
    android:thickness="70dip"
    android:useLevel="false" >

    <gradient
        android:centerColor="#FFEB82"
        android:endColor="#35B2DE"
        android:gradientRadius="70"
        android:startColor="#DEACAB"
        android:type="radial"
        android:useLevel="false" /></shape>
(tiled gradient) gradient_sweep.xml:
<?xml version="1.0" encoding="utf-8"?><shape xmlns:android="http://schemas.android.com/apk/res/android"
    android:innerRadiusRatio="8"
    android:shape="ring"
    android:thicknessRatio="3"
    android:useLevel="false" >

    <gradient
        android:centerColor="#FFEB82"
        android:endColor="#35B2DE"
        android:startColor="#DEACAB"
        android:type="sweep"
        android:useLevel="false" /></shape>
Calling three drawablesactivity_main.xml:
 <LinearLayout xmlns:android="http://schemas.android.com/apk/res/android"
    xmlns:tools="http://schemas.android.com/tools"
    android:layout_width="match_parent"
    android:layout_height="match_parent"
    android:orientation="vertical">

    <TextView
        android:id="@+id/txtShow1"
        android:layout_width="200dp"
        android:layout_height="100dp"
        android:background="@drawable/gradient_linear" />

    <TextView
        android:id="@+id/txtShow2"
        android:layout_width="200dp"
        android:layout_height="200dp"
        android:background="@drawable/gradient_radial" />

    <TextView
        android:id="@+id/txtShow3"
        android:layout_width="100dp"
        android:layout_height="100dp"
        android:background="@drawable/gradient_sweep" /></LinearLayout>
Okay, it’s that simple~Of course, if you want to draw more complicated For graphics, just using xml files is not enough. More complex effects need to be completed through Java code. The following demonstration is a source code taken from the Internet:
Running effect diagram:
Implementation code:
MainActivity.java:
public class MainActivity extends AppCompatActivity {
    @Override
    protected void onCreate(Bundle savedInstanceState) {
        super.onCreate(savedInstanceState);
        setContentView(new SampleView(this));
    }

    private static class SampleView extends View {
        private ShapeDrawable[] mDrawables;

        private static Shader makeSweep() {
            return new SweepGradient(150, 25,
                    new int[] { 0xFFFF0000, 0xFF00FF00, 0xFF0000FF, 0xFFFF0000 },
                    null);
        }

        private static Shader makeLinear() {
            return new LinearGradient(0, 0, 50, 50,
                    new int[] { 0xFFFF0000, 0xFF00FF00, 0xFF0000FF },
                    null, Shader.TileMode.MIRROR);
        }

        private static Shader makeTiling() {
            int[] pixels = new int[] { 0xFFFF0000, 0xFF00FF00, 0xFF0000FF, 0};
            Bitmap bm = Bitmap.createBitmap(pixels, 2, 2,
                    Bitmap.Config.ARGB_8888);

            return new BitmapShader(bm, Shader.TileMode.REPEAT,
                    Shader.TileMode.REPEAT);
        }

        private static class MyShapeDrawable extends ShapeDrawable {
            private Paint mStrokePaint = new Paint(Paint.ANTI_ALIAS_FLAG);

            public MyShapeDrawable(Shape s) {
                super(s);
                mStrokePaint.setStyle(Paint.Style.STROKE);
            }

            public Paint getStrokePaint() {
                return mStrokePaint;
            }

            @Override protected void onDraw(Shape s, Canvas c, Paint p) {
                s.draw(c, p);
                s.draw(c, mStrokePaint);
            }
        }

        public SampleView(Context context) {
            super(context);
            setFocusable(true);

            float[] outerR = new float[] { 12, 12, 12, 12, 0, 0, 0, 0 };
            RectF inset = new RectF(6, 6, 6, 6);
            float[] innerR = new float[] { 12, 12, 0, 0, 12, 12, 0, 0 };

            Path path = new Path();
            path.moveTo(50, 0);
            path.lineTo(0, 50);
            path.lineTo(50, 100);
            path.lineTo(100, 50);
            path.close();

            mDrawables = new ShapeDrawable[7];
            mDrawables[0] = new ShapeDrawable(new RectShape());
            mDrawables[1] = new ShapeDrawable(new OvalShape());
            mDrawables[2] = new ShapeDrawable(new RoundRectShape(outerR, null,
                    null));
            mDrawables[3] = new ShapeDrawable(new RoundRectShape(outerR, inset,
                    null));
            mDrawables[4] = new ShapeDrawable(new RoundRectShape(outerR, inset,
                    innerR));
            mDrawables[5] = new ShapeDrawable(new PathShape(path, 100, 100));
            mDrawables[6] = new MyShapeDrawable(new ArcShape(45, -270));

            mDrawables[0].getPaint().setColor(0xFFFF0000);
            mDrawables[1].getPaint().setColor(0xFF00FF00);
            mDrawables[2].getPaint().setColor(0xFF0000FF);
            mDrawables[3].getPaint().setShader(makeSweep());
            mDrawables[4].getPaint().setShader(makeLinear());
            mDrawables[5].getPaint().setShader(makeTiling());
            mDrawables[6].getPaint().setColor(0x88FF8844);

            PathEffect pe = new DiscretePathEffect(10, 4);
            PathEffect pe2 = new CornerPathEffect(4);
            mDrawables[3].getPaint().setPathEffect(
                    new ComposePathEffect(pe2, pe));

            MyShapeDrawable msd = (MyShapeDrawable)mDrawables[6];
            msd.getStrokePaint().setStrokeWidth(4);
        }

        @Override protected void onDraw(Canvas canvas) {

            int x = 10;
            int y = 10;
            int width = 400;
            int height = 100;

            for (Drawable dr : mDrawables) {
                dr.setBounds(x, y, x + width, y + height);
                dr.draw(canvas);
                y += height + 5;
            }
        }
    }
}
The code uses ShapeDrawable and PathEffect. The former is a wrapper for ordinary graphics; including: ArcShape, OvalShape, PathShape, RectShape, RoundRectShape!
And PathEffect is a path effect, including: CornerPathEffect, DashPathEffect and DiscretePathEffect You can make complex graphic borders...
This is about the GradoemtDrawable gradient. If you are interested in the last thing, you can go to: appium/android-apidemos
Summary of this section:
Okay, in this section we will first learn ColorDrawable, NiewPatchDrawable, ShapeDrawable, GradientDrawable
Four Drawables first, of course these are all fried rice, they have been written before Passed, but for the completeness of the tutorial, I decided to Write it again~ In addition, after writing the basic tutorial, some blogs I wrote before will be deleted!


