Basic explanation of Adapter
Introduction to this section
The UI controls we are going to talk about from the beginning of this section all deal with the Adapter. It is important to understand and learn to use this Adapter. Adapter is an intermediate bridge used to help fill in data. To put it simply: display various data on the view in an appropriate form, providing Show it to users!
1. A simple understanding of the MVC pattern
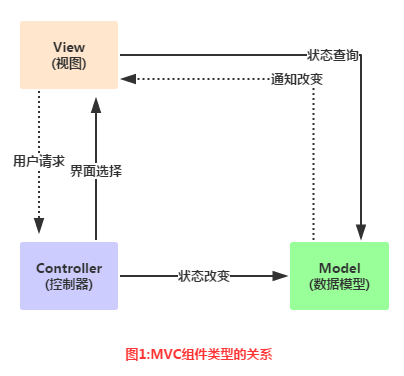
Before we start learning Adapter, we need to understand the concept of the MVC pattern: For example: Large-scale commercial programs are usually developed by multiple people. For example, someone is responsible for the planning and design of the operating interface. Someone is responsible for writing the program code. If you want to be able to divide the work of the program project, you must make appropriate arrangements in the structure of the program. ,If ,interface design and modification both involve changes in ,program code, then the division of labor between the two ,will cause implementation difficulties. A good program architect divides the entire program project into three parts as shown in the figure:
##Relationship diagram analysis:
And this Adapter is part of the Controller in the middle:
- Model: usually can be understood as data, responsible for executing the core operations and judgment logic of the program, and obtaining users through views The input data is then queried from the database for relevant information, and finally calculations and judgments are made, and then the results are given to the view for display
- view: The user's operation interface, to put it bluntly It is the GUI. Which interface components should be used? The arrangement and order of the components need to be designed.
- Controller: The controller, as the hub between the model and the view, is responsible for controlling the program. An interaction between execution process and objects
Model(data) ---> Controller(How to display it)---> View(User interface) This is a simple understanding of simple MVC components!
2.Adapter Concept AnalysisOfficial Document: AdapterFirst let’s take a look at his inheritance structure diagram:
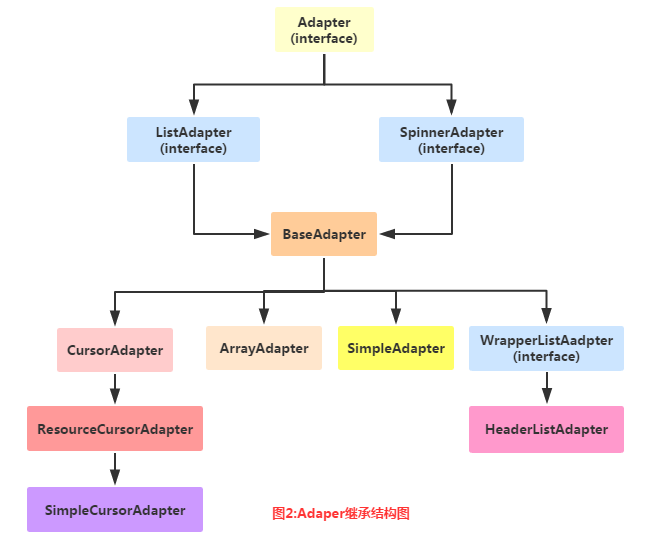
- BaseAdapter: Abstract class. In actual development, we will inherit this class and rewrite related methods. It is the most used Adapter!
- ArrayAdapter
: Supports generic operations. The simplest Adapter can only display one line of text~ - SimpleAdapter : An Adapter that also has good scalability and can customize a variety of effects!
- SimpleCursorAdapter: A listView used to display simple text types. It is generally used in databases, but it is a bit outdated. Not recommended!
In fact, one BaseAdapter is enough for fun. As for the others, they are not used much in actual development. They will be explained later~
3. Code example:
Okay, it’s useless to say more. Writing code is the most practical. Next, let’s write a few simple Adapter instances. Help us understand the convenience that Adapter brings to us. In addition, because Adapter needs to be combined with ListView, GridView and other controls are explained, and some more advanced usages are explained in ListView! Here is a simple demonstration of the effect. In addition, the control used here is ListView, which will be explained in the next section. It doesn’t matter if you can’t understand it now!
1) ArrayAdapter usage example:
Running rendering:
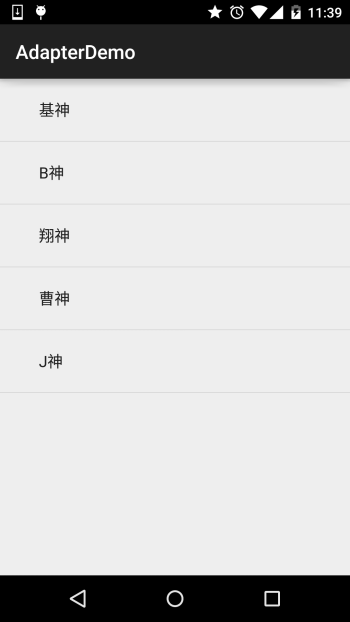
Code implementation:
@Override
protected void onCreate(Bundle savedInstanceState) {
super. Oncreate (Savedinstancestate);
SetContentView (R.Layout.Activity_main);
// The data to be displayed
string [] strs = {"Bid God", "B God", "Xiangshen", "Xiangshen", "Xiangshen", "Cao Shen", "J God"};
//Create ArrayAdapter
ArrayAdapter<String> adapter = new ArrayAdapter<String>
(this,android.R.layout.simple_expandable_list_item_1,strs );
// Get the ListView object, set the Adapter for the ListView by calling the setAdapter method
ListView list_test = (ListView) findViewById(R.id.list_test);
list_test.setAdapter(adapter);
}
Some related things:
1.In addition to passing the array, we can also write to an array resource file:
For example: Create an xml file of array resources under res\value: arrays.xml:
<?xml version="1.0" encoding="utf -8"?>
<resources>
<string-array name="myarray">
;/item>
<item>English</item>
</string-array> Download this list item:
android:layout_height="match_parent"
android:layout_width="match_parent"That’s it~
Of course we can also write like this in Java code:
ArrayAdapter<CharSequence> adapter = ArrayAdapter.createFromResource(this,
R.array.myarray,android.R.layout.simple_list_item_multiple_choice);List<String> data = new ArrayList<String>();data.add("base神");data.add("B神");
ArrayAdapter<String> adapter = new ArrayAdapter<String>That’s it~
3.We saw the second parameter in instantiating the ArrayAdapter: android.R.layout.simple_expandable_list_item_1In fact, these are The system provides us with some good ListView templates, including the following:
simple_list_item_1: a single line text box
simple_list_item_2 : Composed of two text boxes
simple_list_item_checked : Each item is composed of a Selected list items
##simple_list_item_multiple_choice: All have a checkbox
simple_list_item_single_choice: All have a radio button
2) SimpleAdapter usage example: SimpleAdapter: Simple Adapter , seemingly simple and powerful, let’s write a slightly more complex list below. Lay it out!
Running renderings:
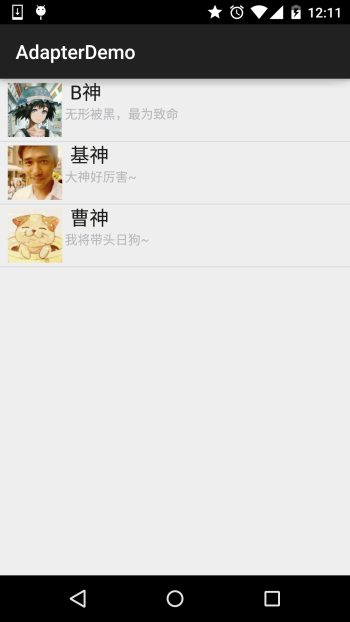
First write the layout of each item in a list:
list_item.xmlNext is MainActivity.java: Okay, the above is the simple usage of SimpleAdapter, which is a bit interesting~ Although this thing is outdated, it is not suitable for Why is it that for beginners of SQLite, it is quite convenient to use!
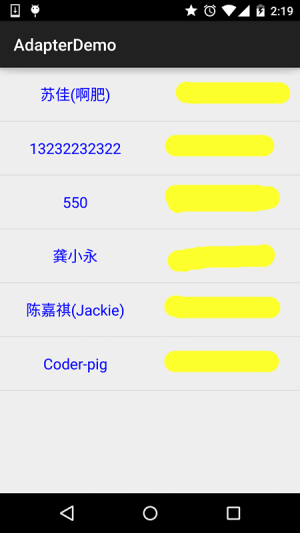
Remember the example of reading contacts written by ContentProivder before? Previously, it was done by printing Log
method to display it, now we display it on the ListView through this SimpleCursorAdapter! Implementation renderings: Code implementation: First write the listView The layout of each item: list_item.xml: Then the activity_main layout is the same as before, which is a simple ListView, and then MainActivity.java: Click the "Run instance" button to view the online instance Finally, just add the permission to read contacts in AndroidManifest.xml Got it! One question and one answer: Q: Is it that simple? Okay, that’s it for the basic explanation of Adapter. Of course, the three Adapters we explain here , we are actually developing...
Basically not used, haha, except for the occasional use of SimpleAdapter, generally we rewrite BaseAdapter!
<LinearLayout xmlns:android="http://schemas.android.com/apk/res/ android"
android:layout_width="match_parent"
android:layout_height="match_parent"
android:orientation="horizontal">
<!-- Define a display for ImageView of the avatar -->
<ImageView
android:id="@+id/imgtou"
android:layout_width="64dp"
android:layout_height="64dp"
android:baselineAlignBottom="true"
android:paddingLeft="8dp" />
Come out -->
<LinearLayout
android:layout_width="match_parent"
android:layout_height="wrap_content"
android:orientation="vertical">
< ;TextView
android:layout_width="wrap_content" android :textColor="#1D1D1C"
android:textSize="20sp" />
android:layout_width= "wrap_content"
android:layout_height="wrap_content"
android:paddingLeft="8px"
android:textColor="#B4B4B9"
android:textSize="14sp" />
</LinearLayout>
</LinearLayout>
private String[] names = new String[]{"B God", "Bashen", "Cao Shen"};
private String[] says = new String[]{"Invisible being hacked, the most deadly", "The great god is so powerful~", "I will lead the Japanese dog ~"};
private int[] imgIds = new int[]{R.mipmap.head_icon1, R.mipmap.head_icon2, R.mipmap.head_icon3};
@Override
protected void onCreate(Bundle savedInstanceState) {
super.onCreate(savedInstanceState);
setContentView(R.layout.activity_main);
List<Map<String, Object>> listitem = new ArrayList<Map < ;String, Object>>();
for (int i = 0; i < names.length; i++) {
Map<String, Object> showitem = new HashMap<String, Object>() ;
showitem.put("touxiang", imgIds[i]);
showitem.put("name", names[i]);
showitem.put("says", says[i] );
listitem.add(showitem);
}
//Create a simpleAdapter
SimpleAdapter myAdapter = new SimpleAdapter(getApplicationContext(), listitem, R.layout.list_item, new String []{"touxiang", "name", "says"}, new int[]{R.id.imgtou, R.id.name, R.id.says});
ListView listView = (ListView) findViewById(R.id.list_test);
listView.setAdapter(myAdapter);
}
}
3) SimpleCursorAdapter usage example:
<LinearLayout xmlns:android="http://schemas.android.com/apk/res/android"
android:layout_width="match_parent"
android:layout_height="match_parent"
android:orientation="horizontal">
android: layout_height="64dp"
android:layout_weight="1"
android:gravity="center"
android:text="Little Pig"
android:textColor="#0000FF"
android:textSize="18sp" /> "64dp"
android:layout_weight="1"
android:gravity="center"
android:text="13798989898"
android:textColor="#EA5C4D"
android:textSize ="18sp" />
</LinearLayout>Instance
public class MainActivity extends AppCompatActivity {

    @Override
    protected void onCreate(Bundle savedInstanceState) {
        super.onCreate(savedInstanceState);
        setContentView(R.layout.activity_main);
        ListView list_test = (ListView) findViewById(R.id.list_test);
        //读取联系人
        Cursor cursor = getContentResolver()
                .query(ContactsContract.CommonDataKinds.Phone.CONTENT_URI, null, null, null, null);
        SimpleCursorAdapter spcAdapter = new SimpleCursorAdapter(this,R.layout.list_item,cursor,
                new String[]{ContactsContract.CommonDataKinds.Phone.DISPLAY_NAME,ContactsContract.CommonDataKinds.Phone.NUMBER},
                new int[]{R.id.list_name,R.id.list_phone});
        list_test.setAdapter(spcAdapter);
    }
}
Run instance»
——Answer: Yes, just get the Cursor directly and then bind it. There is no need to write any SQL statements yourself!
Question: You said this thing is outdated, what should you use to replace it?
——Answer: The general approach is to rewrite the BaseAdapter yourself, obtain the data collection and then bind it to the corresponding control!
Question: Is there anything else we should pay attention to with this SimpleCursorAdapter?
——Answer: Yes, if you use SimpleCursorAdapter, the bound database table must have the field id.
Or as id; and the data retrieved during binding must contain this id item, otherwise the following error will be reported! java.lang.IllegalArgumentException: column 'id' does not exist**Summary of this section:
In addition, there are many things to explain about BaseAdapter, so I will throw it into ListView and talk about it together. After all, Adapter
It is always related to View, and ListView is the space we use the most~ Well, that’s it for this section, thank you~
