Rumah >Peranti teknologi >AI >Python Deep Learning 18-DeepDream of Generative Deep Learning
Python Deep Learning 18-DeepDream of Generative Deep Learning
- WBOYWBOYWBOYWBOYWBOYWBOYWBOYWBOYWBOYWBOYWBOYWBOYWBke hadapan
- 2023-04-16 21:34:011787semak imbas
Pengenalan kepada DeepDream
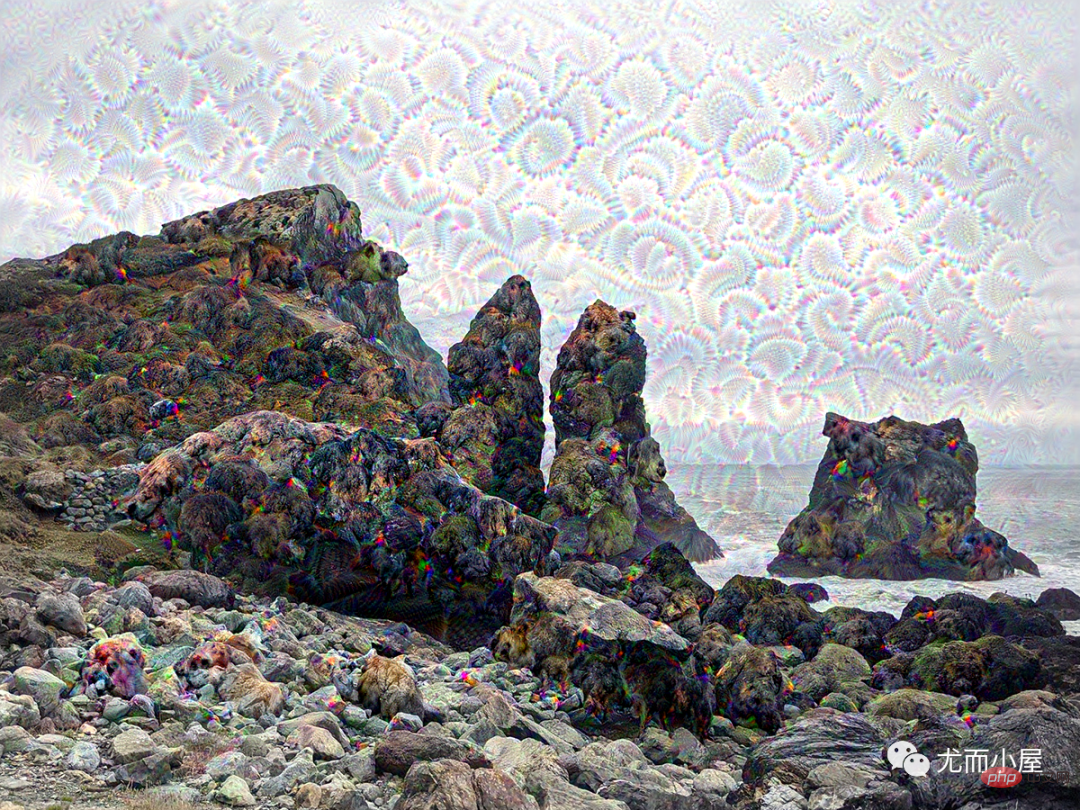
DeepDream ialah teknologi pengubahsuaian imej artistik, yang terutamanya berdasarkan rangkaian neural convolutional terlatih CNN untuk menjana imej.
Apabila menjana imej, rangkaian saraf dibekukan, iaitu berat rangkaian tidak lagi dikemas kini, hanya imej input sahaja yang perlu dikemas kini. Rangkaian konvolusi terlatih yang biasa digunakan termasuk Google's Inception, rangkaian VGG dan rangkaian ResNet, dsb.
Langkah asas DeePDream:
- Dapatkan imej input
- Masukkan imej ke dalam rangkaian dan dapatkan nilai output neuron yang anda ingin gambarkan
- Kira kecerunan nilai output neuron kepada setiap piksel imej
- Gunakan penurunan kecerunan untuk mengemas kini imej secara berterusan
Ulang langkah 2, 3 dan 4 sehingga syarat yang ditetapkan dipenuhi
Berikut ialah proses umum menggunakan Keras untuk melaksanakan DeepDream:
Menggunakan Keras untuk melaksanakan DeepDream
Mendapatkan imej ujian
Dalam [1]:
# ---------------
from tensorflow import keras
import matplotlib.pyplot as plt
%matplotlib inline

base_image_path = keras.utils.get_file(
"coast.jpg",
origin="https://img-datasets.s3.amazonaws.com/coast.jpg")

plt.axis("off")
plt.imshow(keras.utils.load_img(base_image_path))
plt.show()

Di atas adalah gambar garis pantai yang datang bersama Keras. Berikut adalah perubahan pada gambar ini.
Sediakan model terlatih InceptionV3
Dalam [2]:
# 使用Inception V3实现
from keras.applications import inception_v3

# 使用预训练的ImageNet权重来加载模型
model = inception_v3.InceptionV3(weights="imagenet", # 构建不包含全连接层的Inceptino
 include_top=False)
Downloading data from https://storage.googleapis.com/tensorflow/keras-applications/inception_v3/inception_v3_weights_tf_dim_ordering_tf_kernels_notop.h5
87916544/87910968 [==============================] - 74s 1us/step
87924736/87910968 [==============================] - 74s 1us/step
Dalam [3]:
model.summary()

Tetapkan konfigurasi DeepDream
Dalam [4]:
# 层的名称 + 系数:该层对需要最大化的损失的贡献大小

layer_settings = {"mixed4":1.0,
"mixed5":1.5,
"mixed6":2.0,
"mixed7":2.5}

outputs_dict = dict(
[
(layer.name, layer.output) # 层的名字 + 该层的输出
for layer in [model.get_layer(name) for name in layer_settings.keys()]
]
)

outputs_dict
Keluar[4]:
{'mixed4': <KerasTensor: shape=(None, None, None, 768) dtype=float32 (created by layer 'mixed4')>,
 'mixed5': <KerasTensor: shape=(None, None, None, 768) dtype=float32 (created by layer 'mixed5')>,
 'mixed6': <KerasTensor: shape=(None, None, None, 768) dtype=float32 (created by layer 'mixed6')>,
 'mixed7': <KerasTensor: shape=(None, None, None, 768) dtype=float32 (created by layer 'mixed7')>}
Dalam [5 ]:
# 特征提取

feature_extractor = keras.Model(inputs=model.inputs, outputs=outputs_dict)
feature_extractor
Keluar[5]:
<keras.engine.functional.Functional at 0x15b5ff0d0>
Kira kerugian
Dalam [6]:
def compute_loss(image):
features = feature_extractor(image)# 特征提取
loss = tf.zeros(shape=())# 损失初始化

for name in features.keys():# 遍历层
coeff = layer_settings[name] # 某个层的系数
activation = features[name]# 某个层的激活函数
#为了避免出现边界伪影,损失中仅包含非边界的像素
loss += coeff * tf.reduce_mean(tf.square(activation[:, 2:-2, 2:-2, :])) # 将该层的L2范数添加到loss中;
return loss
Kecerunan proses pendakian
Dalam [7]:
import tensorflow as tf

@tf.function
def gradient_ascent_step(image, lr): # lr--->learning_rate学习率
with tf.GradientTape() as tape:
tape.watch(image)
loss = compute_loss(image)# 调用计算损失方法
grads = tape.gradient(loss, image)# 梯度更新
grads = tf.math.l2_normalize(grads)
image += lr * grads
return loss, image

def gradient_ascent_loop(image, iterations, lr, max_loss=None):
for i in range(iterations):
loss, image = gradient_ascent_step(image, lr)
if max_loss is not None and loss > max_loss:
break
print(f"第{i}步的损失值是{loss:.2f}")

return image
Penjanaan imej
penggunaan np.expand_dims (tambahan peribadi)
Dalam [8]:
import numpy as np

array = np.array([[1,2,3],
[4,5,6]]
)
array
Keluar[8]:
array([[1, 2, 3],
 [4, 5, 6]])
Dalam [9]:
array.shape
Keluar[9]:
(2, 3)
Dalam [ 10]:
array1 = np.expand_dims(array,axis=0)
array1
Keluar[10]:
array([[[1, 2, 3],
[4, 5, 6]]])
Dalam [11]:
array1.shape
Keluar[11]:
(1, 2, 3)
Dalam [12]:
array2 = np.expand_dims(array,axis=1)
array2
Keluar[12]:
array([[[1, 2, 3]],

 [[4, 5, 6]]])
Dalam [13]:
array2.shape
Keluar[ 13] :
(2, 1, 3)
Dalam [14]:
array3 = np.expand_dims(array,axis=-1)
array3
Keluar[14]:
array([[[1],
[2],
[3]],

 [[4],
[5],
[6]]])
Dalam [15]:
array3.shape
Keluar[15]:
(2, 3, 1)
fungsi np.clip (ditambah secara peribadi)
np.clip(
array,
min(array),
max(array),
out=None):
Dalam [16]:
array = np.array([1,2,3,4,5,6])

np.clip(array, 2, 5)# 输出长度和原数组相同
Keluar [16 ]:
array([2, 2, 3, 4, 5, 5])
Dalam [17]:
array = np.arange(18).reshape((6,3))
array
Keluar[17]:
array([[ 0,1,2],
 [ 3,4,5],
 [ 6,7,8],
 [ 9, 10, 11],
 [12, 13, 14],
 [15, 16, 17]])
Dalam [18]:
np.clip(array, 5, 15)
Keluar[18]:
array([[ 5,5,5],
 [ 5,5,5],
 [ 6,7,8],
 [ 9, 10, 11],
 [12, 13, 14],
 [15, 15, 15]])
Tetapan parameter
Dalam [19]:
step = 20.#梯度上升的步长
num_octave = 3# 运行梯度上升的尺度个数
octave_scale = 1.4# 两个尺度间的比例大小
iterations = 30# 在每个尺度上运行梯度上升的步数
max_loss = 15.# 损失值若大于15,则中断梯度上升过程
prapemprosesan imej
Dalam [ 20]:
import numpy as np

def preprocess_image(image_path):# 预处理
img = keras.utils.load_img(image_path)# 导入图片
img = keras.utils.img_to_array(img)# 转成数组
img = np.expand_dims(img, axis=0)# 增加数组维度;见上面解释(x,y) ---->(1,x,y)
img = keras.applications.inception_v3.preprocess_input(img)
return img


def deprocess_image(img):# 图片压缩处理
img = img.reshape((img.shape[1], img.shape[2], 3))
img /= 2.0
img += 0.5
img *= 255.
# np.clip:截断功能,保证数组中的取值在0-255之间
img = np.clip(img, 0, 255).astype("uint8")
return img
Jana imej
Dalam [21]:
# step = 20.#梯度上升的步长
# num_octave = 3# 运行梯度上升的尺度个数
# octave_scale = 1.4# 两个尺度间的比例大小
# iterations = 30# 在每个尺度上运行梯度上升的步数
# max_loss = 15.0# 损失值若大于15,则中断梯度上升过程

original_img = preprocess_image(base_image_path)# 预处理函数
original_shape = original_img.shape[1:3]

print(original_img.shape)# 四维图像
print(original_shape)# 第2和3维度的值
(1, 900, 1200, 3)
(900, 1200)
Dalam [22]:
successive_shapes = [original_shape]

for i in range(1, num_octave):
shape = tuple([int(dim / (octave_scale ** i)) for dim in original_shape])
successive_shapes.append(shape)
successive_shapes = successive_shapes[::-1]# 翻转

shrunk_original_img = tf.image.resize(original_img, successive_shapes[0])

img = tf.identity(original_img)
for i, shape in enumerate(successive_shapes):
print(f"Processing octave {i} with shape {shape}")
# resize
img = tf.image.resize(img, shape)
img = gradient_ascent_loop(# 梯度上升函数调用
img,
iteratinotallow=iterations,
lr=step,
max_loss=max_loss
)
# resize
upscaled_shrunk_original_img = tf.image.resize(shrunk_original_img, shape)
same_size_original = tf.image.resize(original_img, shape)

lost_detail = same_size_original - upscaled_shrunk_original_img
img += lost_detail
shrunk_original_img = tf.image.resize(original_img, shape)

keras.utils.save_img("dream.png", deprocess_image(img.numpy()))
The keputusannya ialah :
Processing octave 0 with shape (459, 612)
第0步的损失值是0.80
第1步的损失值是1.07
第2步的损失值是1.44
第3步的损失值是1.82
......
第26步的损失值是11.44
第27步的损失值是11.72
第28步的损失值是12.03
第29步的损失值是12.49
Pada masa yang sama, imej baharu dijana secara setempat Lihat kesannya:


Atas ialah kandungan terperinci Python Deep Learning 18-DeepDream of Generative Deep Learning. Untuk maklumat lanjut, sila ikut artikel berkaitan lain di laman web China PHP!
Artikel berkaitan
Lihat lagi- Aliran teknologi untuk ditonton pada tahun 2023
- Cara Kecerdasan Buatan Membawa Kerja Baharu Setiap Hari kepada Pasukan Pusat Data
- Bolehkah kecerdasan buatan atau automasi menyelesaikan masalah kecekapan tenaga yang rendah dalam bangunan?
- Pengasas bersama OpenAI ditemu bual oleh Huang Renxun: Keupayaan penaakulan GPT-4 belum mencapai jangkaan
- Bing Microsoft mengatasi Google dalam trafik carian terima kasih kepada teknologi OpenAI

