Rumah >hujung hadapan web >View.js >Mari kita bincangkan tentang cara menulis komponen pop timbul dengan lebih pantas dan lebih cekap dengan Vue3+hook
Mari kita bincangkan tentang cara menulis komponen pop timbul dengan lebih pantas dan lebih cekap dengan Vue3+hook
- 青灯夜游ke hadapan
- 2022-12-28 20:55:273298semak imbas

Mengapa anda mempunyai idea ini
Semasa proses pembangunan bahagian belakang pengurusan, terdapat terlalu banyak pop timbul perniagaan yang terlibat, yang paling biasa? ialah "Tambah data XX", "Edit data XX", "Lihat data terperinci XX" dan jenis tetingkap pop timbul lain adalah yang paling biasa. [Cadangan berkaitan: tutorial video vuejs, pembangunan bahagian hadapan web]
Banyak kod untuk komponen pop timbul ini adalah sama, seperti status komponen dan membentuk komponen berkaitan Kaedahnya...
Jadi, saya hanya merangkum semula komponen Dialog dan hooks, mengurangkan beberapa kod berulang
Apa yang perlu dirangkumkan
Jika ia digunakan untuk tetingkap pop timbul biasa, ia cukup untuk menggunakan komponen el-dialog secara langsung
Tetapi saya masih seorang yang suka mengacau 🎜> dokumen untuk melihat fungsi yang boleh ditambah dialog
- Sediakan skrin penuh. butang operasi (penjuru kanan sebelah atas)
- Disediakan secara lalai butang "Sahkan", "Tutup"
- Tambah
- kesan di dalam
Loading
Setelah menentukan fungsi yang hendak dikapsulkan, mari kita lakukan
Komponen yang mudah. dialog
. v-model
<template>
    <el-dialog :model-value="props.modelValue"></el-dialog>
</template>
<script setup>
interface PropsType {
  modelValue?: boolean;
}

const props = withDefaults(defineProps<PropsType>(), {
  modelValue: false,
});

const emits = defineEmits<{
  (e: "update:modelValue"): void;
}>();
</script>
header
Pustaka ikon @element-plus/icons-vue digunakan di sini
Jika ia tidak dipasang , sila laksana npm install @element-plus/icons-vueGunakan slot
yang disediakan oleh el-dialog untuk meletakkan carta skrin penuh dan ikon tutup di penjuru kanan sebelah atas. Hantar atribut header kepada el-dialog untuk mematikan ikon lalai. show-close
<template>
  <el-dialog :model-value="props.modelValue" :show-close="false">
    <template #header>
      <div>
        <span>{{ props.title }}</span>
      </div>
      <div>
        <el-icon><FullScreen /></el-icon>
        <el-icon><Close /></el-icon>
      </div>
    </template>
  </el-dialog>
</template>
<script setup>
import { FullScreen, Close } from "@element-plus/icons-vue";
</script>
<style scoped>
// 处理样式
:deep(.el-dialog__header) {
  border-bottom: 1px solid #eee;
  display: flex;
  padding: 12px 16px;
  align-items: center;
  justify-content: space-between;
  margin: 0;
}
.dialog-title {
  line-height: 24px;
  font-size: 18px;
  color: #303133;
}
.btns {
  display: flex;
  align-items: center;
  i {
    margin-right: 8px;

    font-size: 16px;
    cursor: pointer;
  }
  i:last-child {
    margin-right: 0;
  }
}
</style>
Kandungan teks tajuk tetingkap timbul dilalui dan lalainya kosong (props) ''
<script lang="ts" setup>
interface PropsType {
  // 忽略之前的代码
  title?: string;
}

const props = withDefaults(defineProps<PropsType>(), {
  title: "",
});

</script>
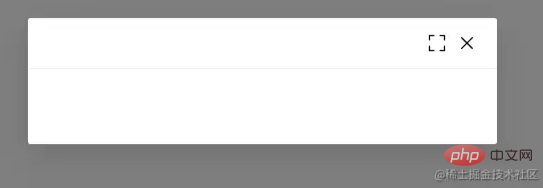
Mari kita lihat kesan kepala sekarang (bukan di sini Lulus dalam tajuk, lalai ialah ) ''
<template>
    <el-dialog
    :model-value="props.modelValue"
    :show-close="false"
    :fullscreen="attrs?.fullscreen ?? isFullscreen"
    >
        <template #header>
        <div>
            <span class="dialog-title">{{ props.title }}</span>
        </div>
        <div class="btns">
            <el-icon v-if="isFullScreenBtn" @click="handleFullscreen"
            ><FullScreen
            /></el-icon>
            <el-icon @click="handleClose"><Close /></el-icon>
        </div>
        </template>
    </el-dialog>
</template>
<script setup lang="ts">
import { FullScreen, Close } from "@element-plus/icons-vue";

interface PropsType {
  title?: string;
  modelValue?: boolean;
  hiddenFullBtn?: boolean;
}

const props = withDefaults(defineProps<PropsType>(), {
  title: "",
  modelValue: false,
  hiddenFullBtn: false,
});

const emits = defineEmits<{
  (e: "update:modelValue"): void;
  (e: "close"): void;
}>();

// 当前是否处于全屏状态
const isFullscreen = ref(false);
// 是否显示全屏效果图标
const isFullScreenBtn = computed(() => {
  if (props.hiddenFullBtn) return false;
  if (attrs?.fullscreen) return false;
  return true;
});

// 开启、关闭全屏效果
const handleFullscreen = () => {
  if (attrs?.fullscreen) return;
  isFullscreen.value = !isFullscreen.value;
};

// 关闭弹窗时向外部发送close事件
const handleClose = () => {
  emits("close");
};
</script>
dan kemudian klik ikon skrin penuh untuk melihat kesan

. props
<template>
  <div class="">
    <el-dialog
      v-bind="attrs"
      :model-value="props.modelValue"
      :show-close="false"
      :fullscreen="attrs?.fullscreen ?? isFullscreen"
    >
      <template #footer>
        <!-- 如果没有提供其他footer插槽,就使用默认的 -->
        <span v-if="!slots.footer" class="dialog-footer">
          <el-button type="primary" @click="handleConfirm">{{
            props.confirmText
          }}</el-button>
          <el-button @click="handleClose">{{ props.cancelText }}</el-button>
        </span>
        <!-- 使用传入进来的插槽 -->
        <slot v-else name="footer"></slot>
      </template>
    </el-dialog>
  </div>
</template>
<script setup lang="ts">
import { useSlots } from "vue";
// 获取插槽
const slots = useSlots();
interface PropsType {
    title?: string;
    width?: string | number;
    isDraggable?: boolean;
    modelValue?: boolean;
    hiddenFullBtn?: boolean;
    confirmText?: string;
    cancelText?: string;
}

const props = withDefaults(defineProps<PropsType>(), {
    title: "",
    isDraggable: false,
    modelValue: false,
    hiddenFullBtn: false,
    confirmText: "确认",
    cancelText: "关闭",
});
const handleClose = () => {
    emits("close");
};
const handleConfirm = () => {
    emits("confirm");
};
</script>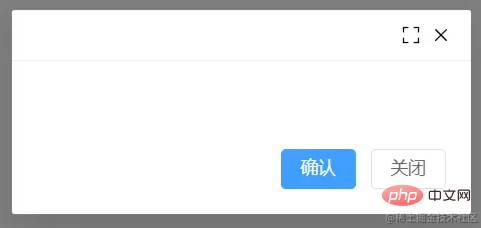
pada elemen div luar untuk mencapai keadaan pemuatan. v-loading
Jika anda mahu keseluruhan tetingkap pop timbul mencapai kesan pemuatan, sila alihkan pemuatan v ke elemen paling luar. Ambil perhatian bahawa ia tidak boleh pada elemen el-dialog, jika tidak, ia tidak boleh dilaksanakan. Mungkin el-dialog menggunakan komponen teleport, menyebabkan pemuatan v tidak berfungsi dengan betul. Saya akan kaji bila ada masa~
<template>
  <div class="">
    <el-dialog
      v-bind="attrs"
      :model-value="props.modelValue"
      :show-close="false"
      :fullscreen="attrs?.fullscreen ?? isFullscreen"
    >
        <div class="content" v-loading="props.loading">
            <slot></slot>
        </div>
    </el-dialog>
  </div>
</template>
<script lang="ts" setup>
interface PropsType {
  loading?: boolean;
}

const props = withDefaults(defineProps<PropsType>(), {
  loading: false,
});

</script>
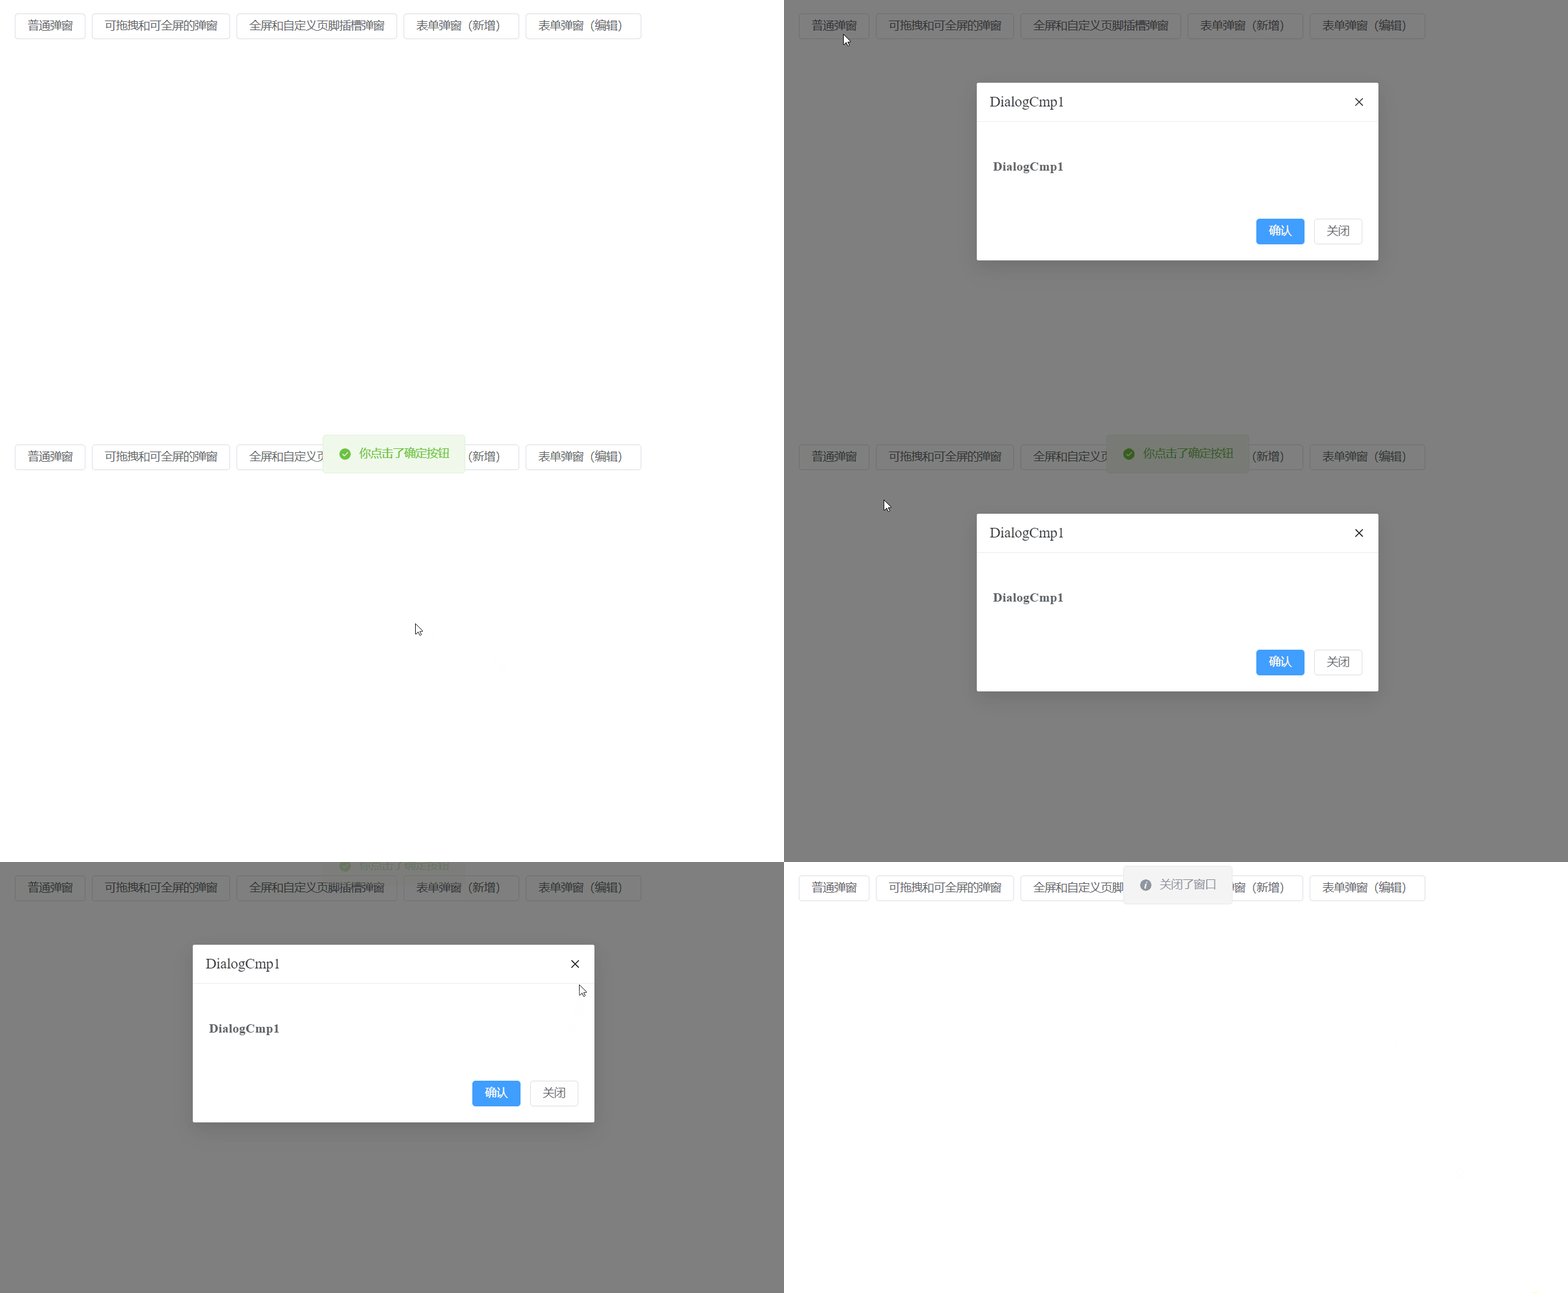
Cuba dan lihat kesan di tengahloading
menyediakan banyak atribut el-dialog untuk dipilih oleh pengguna, tetapi komponen props yang kami rangkumkan sekarang hanya menggunakan sebahagian kecil daripada dialog sifat-sifat. Apakah yang perlu dilakukan oleh pengguna apabila mereka mahu menggunakan atribut props lain? props
dalam komponen terkapsul kami dan kemudian menghantarnya ke komponen props.width <el-dialog :width="props.width"></el-dialog>
yang baru anda gunakan semasa melakukan operasi skrin penuh? Dengan kaedah ini, anda kemudiannya boleh bekerjasama dan menghantar fungsi yang dihantar dari luar ke komponen useAttrs
el-dialog
<el-dialog
    v-bind="attrs"
    :model-value="props.modelValue"
    :show-close="false"
    :fullscreen="attrs?.fullscreen ?? isFullscreen"
    :before-close="handleClose"
>
    <!-- 忽略其他代码 -->
</el-dialog>
Apabila digunakan, fungsi mungkin dihantar ke atribut
dalaman kemudian.v-bind="attrs", tetapi ia akan ditimpa oleh kaedah
解决方案是在handleClose函数中,获取attrs.['before-close']属性,如果类型是函数函数,先执行它。
const handleClose = () => {
  if (
    Reflect.has(attrs, "before-close") &&
    typeof attrs["before-close"] === "function"
  ) {
    attrs["before-close"]();
  }
  emits("close");
};有关于el-dialog组件的封装就到这里了
封装hooks
利用Vue composition Api再封装一下在使用el-dialog组件状态的管理hook
useDialog
简单处理显示和加载态开关的hook
import { ref } from "vue";

export default function useDialog() {
  const visible = ref(false);
  const loading = ref(false);
  const openDialog = () => (visible.value = true);
  const closeDialog = () => (visible.value = false);
  const openLoading = () => (loading.value = true);
  const closeLoading = () => (loading.value = false);
  return {
    visible,
    loading,
    openDialog,
    closeDialog,
    openLoading,
    closeLoading,
  };
}
useDialog Demo

<template>
<el-button @click="openDialog1">普通弹窗</el-button>
<DialogCmp
  title="DialogCmp1"
  :hiddenFullBtn="true"
  v-model="visible1"
  @confirm="handleConfirm"
  @close="handleClose"
>
  <h3>DialogCmp1</h3>
</DialogCmp>
</template>
<script setup lang="ts">
import useDialog from "./components/useDialog";
import DialogCmp from "./components/Dialog.vue";

const {
  visible: visible1,
  openDialog: openDialog1,
  closeDialog: closeDialog1,
} = useDialog();
</script>
useDialogState 和 useDialogWithForm
useDialogState
针对开发管理后台弹窗状态封装的一个hook,搭配下面的useDialogWithForm使用。
export enum MODE {
  ADD,  EDIT,
}
import { ref } from "vue";
import { MODE } from "./types";
export default function useDialogState() {
const mode = ref<MODE>(MODE.ADD);
const visible = ref(false);
const updateMode = (target: MODE) => {
mode.value = target;
};
return { mode, visible, updateMode };
}useDialogWithForm
针对表单弹窗组件封装的hooks,接收一个formRef实例,负责控制弹窗内标题及清空表单中的校验结果,减少多余的代码 ~
import { FormInstance } from "element-plus";
import { Ref, ref } from "vue";
import { MODE } from "./types";
import useDialogState from "./useDialogState";

export default function useDialogFn(
  formInstance: Ref<FormInstance>
) {
  const { visible, mode, updateMode } = useDialogState();

  const closeDialog = () => {
    formInstance.value.resetFields();
    visible.value = false;
  };
  const openDialog = (target: MODE) => {
    updateMode(target);
    visible.value = true;
  };
  return { visible, mode, openDialog, closeDialog };
}
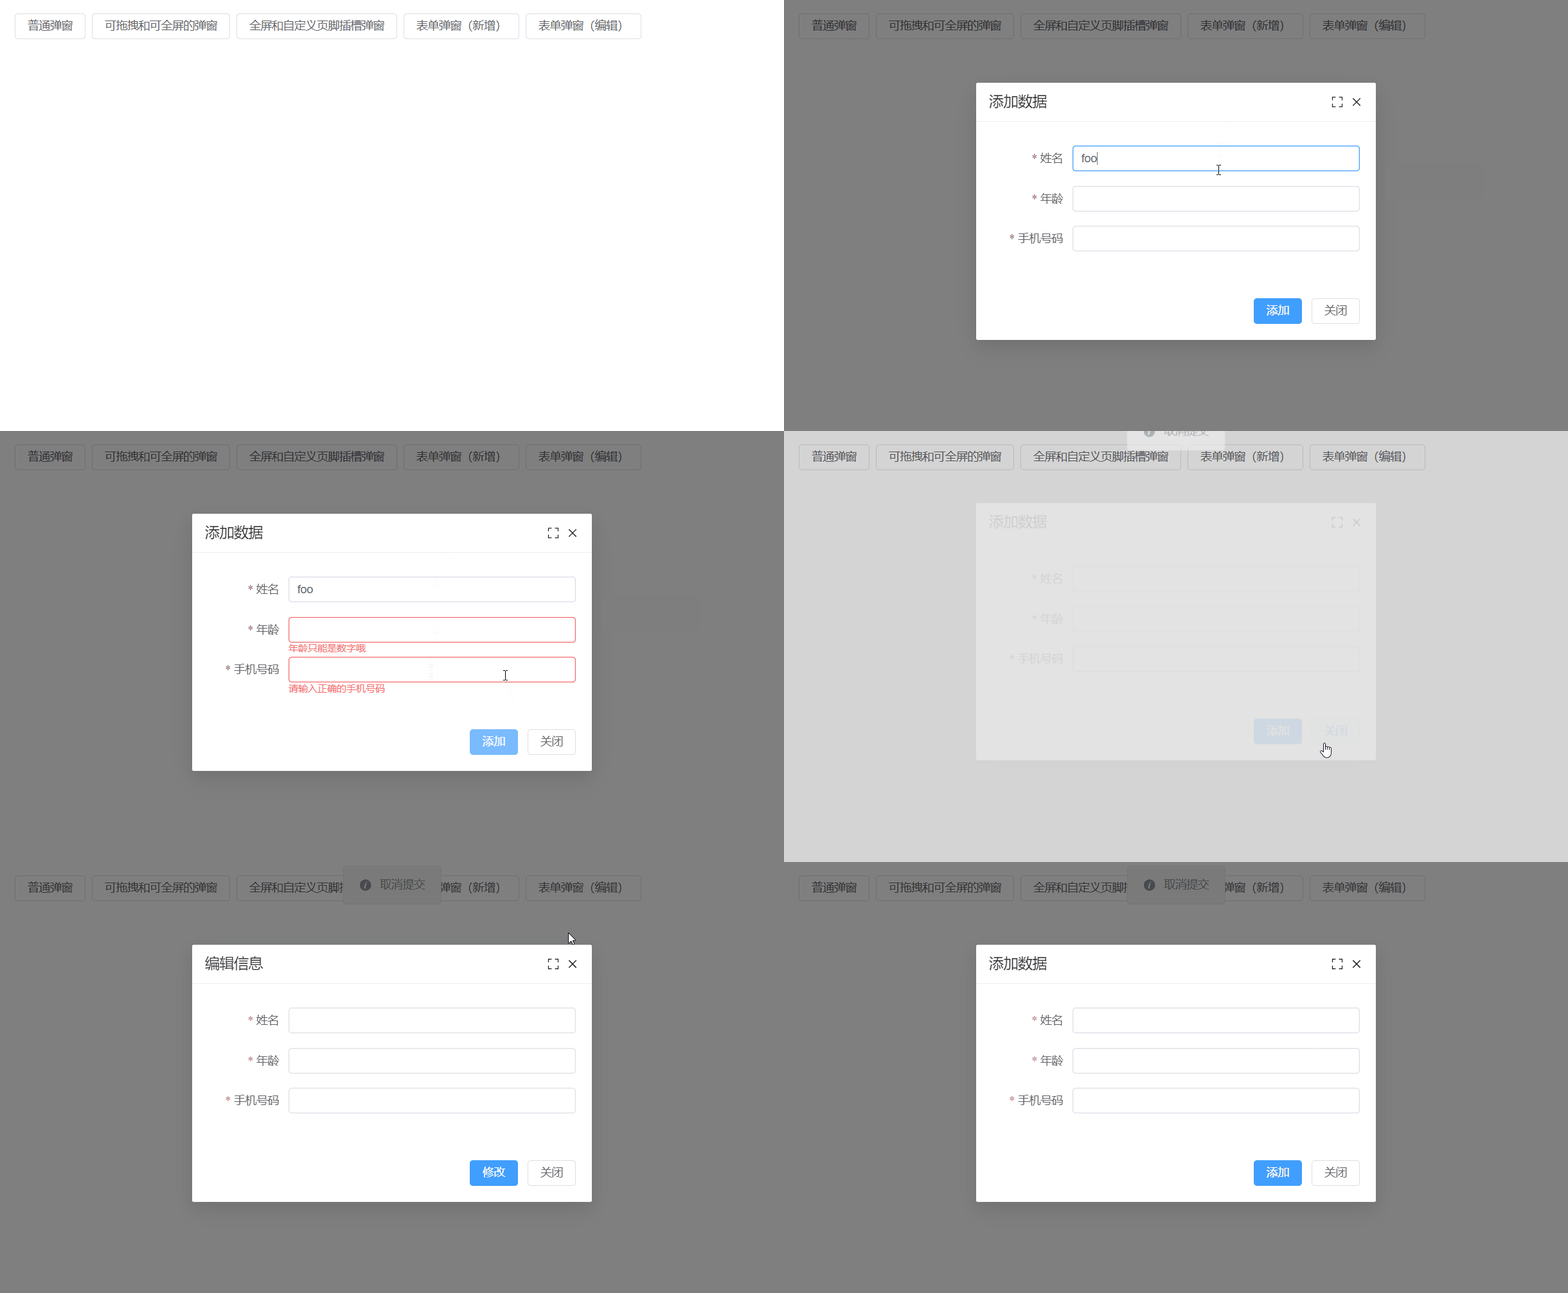
useDialogWithForm Demo
<template>
<Dialog
:before-close="customClose"
@confirm="confirm"
v-model="visible"
:title="mode == MODE.ADD ? '添加数据' : '编辑信息'"
:confirm-text="mode == MODE.ADD ? '添加' : '修改'"
>
<el-form
label-width="100px"
:model="formData"
ref="formDataRef"
style="max-width: 460px"
:rules="rules"
>
<el-form-item label="姓名" prop="name">
<el-input v-model="formData.name" />
</el-form-item>
<el-form-item label="年龄" prop="age">
<el-input v-model="formData.age" />
</el-form-item>
<el-form-item label="手机号码" prop="mobile">
<el-input v-model="formData.mobile" />
</el-form-item>
</el-form>
</Dialog>
</template>
<script setup>
import { ElMessage, FormInstance } from "element-plus";
import { Ref, ref } from "vue";
import Dialog from "./Dialog.vue";
import { MODE } from "./types";
import useDialogWithForm from "./useDialogWithForm";
const rules = {
name: {
type: "string",
required: true,
pattern: /^[a-z]+$/,
trigger: "change",
message: "只能是英文名称哦",
transform(value: string) {
return value.trim();
},
},
age: {
type: "string",
required: true,
pattern: /^[0-9]+$/,
trigger: "change",
message: "年龄只能是数字哦",
transform(value: string) {
return value.trim();
},
},
mobile: {
type: "string",
required: true,
pattern:
/^(?:(?:\+|00)86)?1(?:(?:3[\d])|(?:4[5-79])|(?:5[0-35-9])|(?:6[5-7])|(?:7[0-8])|(?:8[\d])|(?:9[189]))\d{8}$/,
trigger: "change",
message: "请输入正确的手机号码",
transform(value: string) {
return value.trim();
},
},
};
interface FromDataType {
name: string;
age: string;
mobile: string;
}
const formDataRef = ref<FormInstance | null>(null);
let formData = ref<FromDataType>({
name: "",
age: "",
mobile: "",
});
const { visible, closeDialog, openDialog, mode } = useDialogWithForm(
formDataRef as Ref<FormInstance>
);
const confirm = () => {
if (!formDataRef.value) return;
formDataRef.value.validate((valid) => {
if (valid) {
console.log("confirm");
ElMessage({
message: "提交成功",
type: "success",
});
closeDialog();
}
});
};
const customClose = () => {
ElMessage({
message: "取消提交",
type: "info",
});
closeDialog();
};
defineExpose({
closeDialog,
openDialog,
});
</script>
<style scoped></style>仓库地址
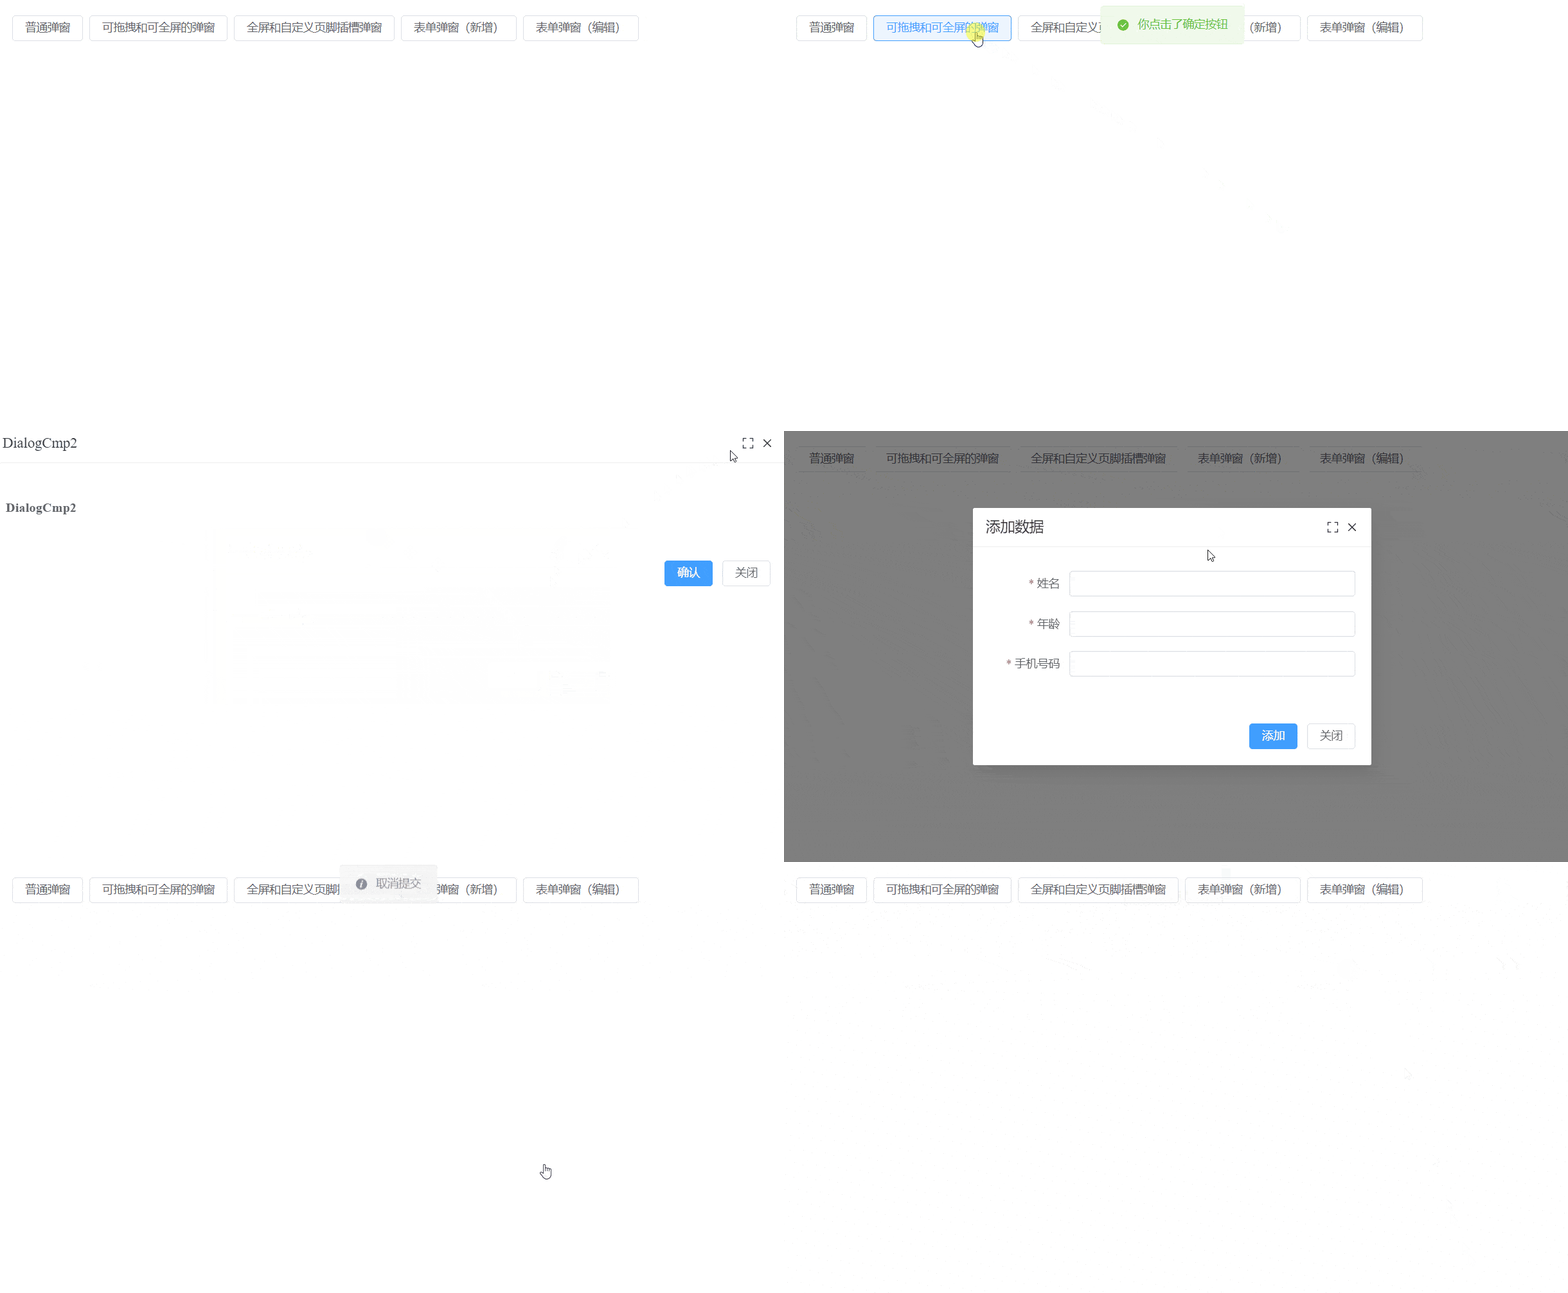
如果您觉得本文对您有帮助,请帮帮忙点个star
您的反馈 是我更新的动力!
Atas ialah kandungan terperinci Mari kita bincangkan tentang cara menulis komponen pop timbul dengan lebih pantas dan lebih cekap dengan Vue3+hook. Untuk maklumat lanjut, sila ikut artikel berkaitan lain di laman web China PHP!
Artikel berkaitan
Lihat lagi- Apakah perbezaan antara komponen global vue dan komponen tempatan
- Mengapakah pemaparan tak segerak vue?
- Apakah yang dimaksudkan dengan domain silang vue?
- Perkara yang perlu digunakan untuk pemantauan dalam keadaan vue
- Satu artikel menerangkan secara terperinci cara membezakan projek mengikut versi vue
- [Dari yang cetek kepada yang lebih dalam] Ringkasan dan perkongsian pembangunan praktikal perpustakaan komponen vue

