Rumah >rangka kerja php >ThinkPHP >fastadmin入门必备教程
fastadmin入门必备教程
- 咔咔asal
- 2021-06-22 23:41:375459semak imbas
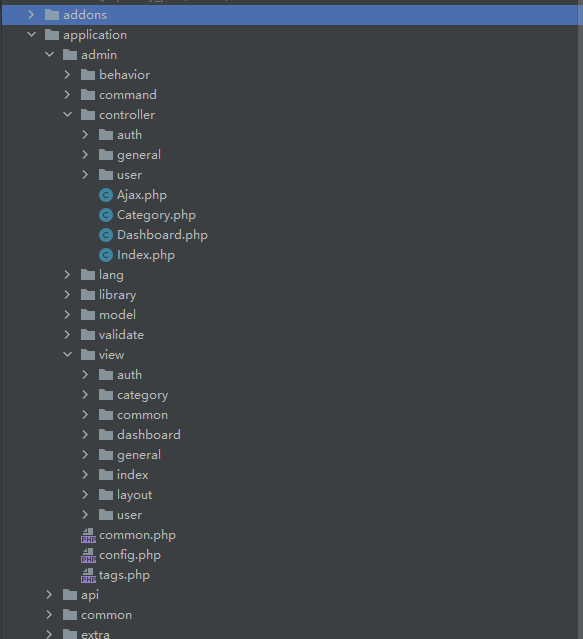
目录结构
前言
一、安装
二、配置成可以自己使用的后台模板
三、添加自己的后台模块
四、关于数据库设计
五、请求接口返回403
六、解决列表页显示的是分类ID而不是分类名称
七、为什么添加和修改都不管用了?
八、列表字段显示的为英文
九、如何在一个模板上设置按钮,然后显示设置的表格
十、关于数据库字段设置为state查询条件没用
十一、设置的enum类型页面怎么是下拉框,不是单选框
十二、发起ajax成功后如何实现刷新数据
前言
本文会对fastadmin进行简单安装和配置,并且对fastadmin在使用过程中遇到的问题全程记录。
如你也有相关的问题,那么就评论区见
一、安装
下载地址:https://www.fastadmin.net/download.html?ref=docs
咔咔这里使用的使用源码安装方式,比较方便。
点击上边的下载地址,然后下载源码包,进行解压。
然后将解压的文件放置到PHP环境目录中。
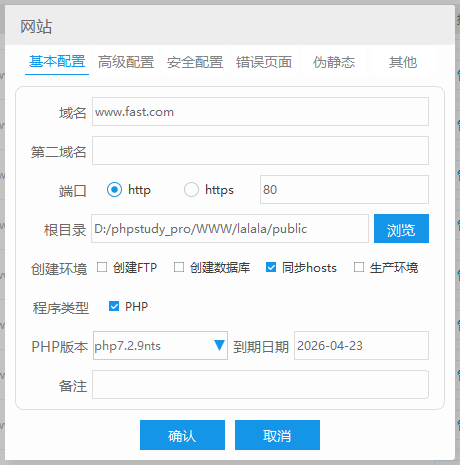
配置phpstudy虚拟域名。
这里一定要注意你的PHP环境。
“PHP >= 7.1 且 7ff7bf0e4eb5bf2c5fd615f9ddbe60f5= 5.5.0 (需支持innodb引擎) Apache 或 Nginx PDO PHP Extension MBstring PHP Extension CURL PHP Extension Node.js (可选,用于安装Bower和LESS,同时打包压缩也需要使用到) Composer (可选,用于管理第三方扩展包) Bower (可选,用于管理前端资源) Less (可选,用于编辑less文件,如果你需要增改css样式,最好安装上)
”
这里咔咔配置的地址是www.fast.com。
然后直接访问www.fast.com/install.php即可
接下来就是填写一些数据库信息即可。
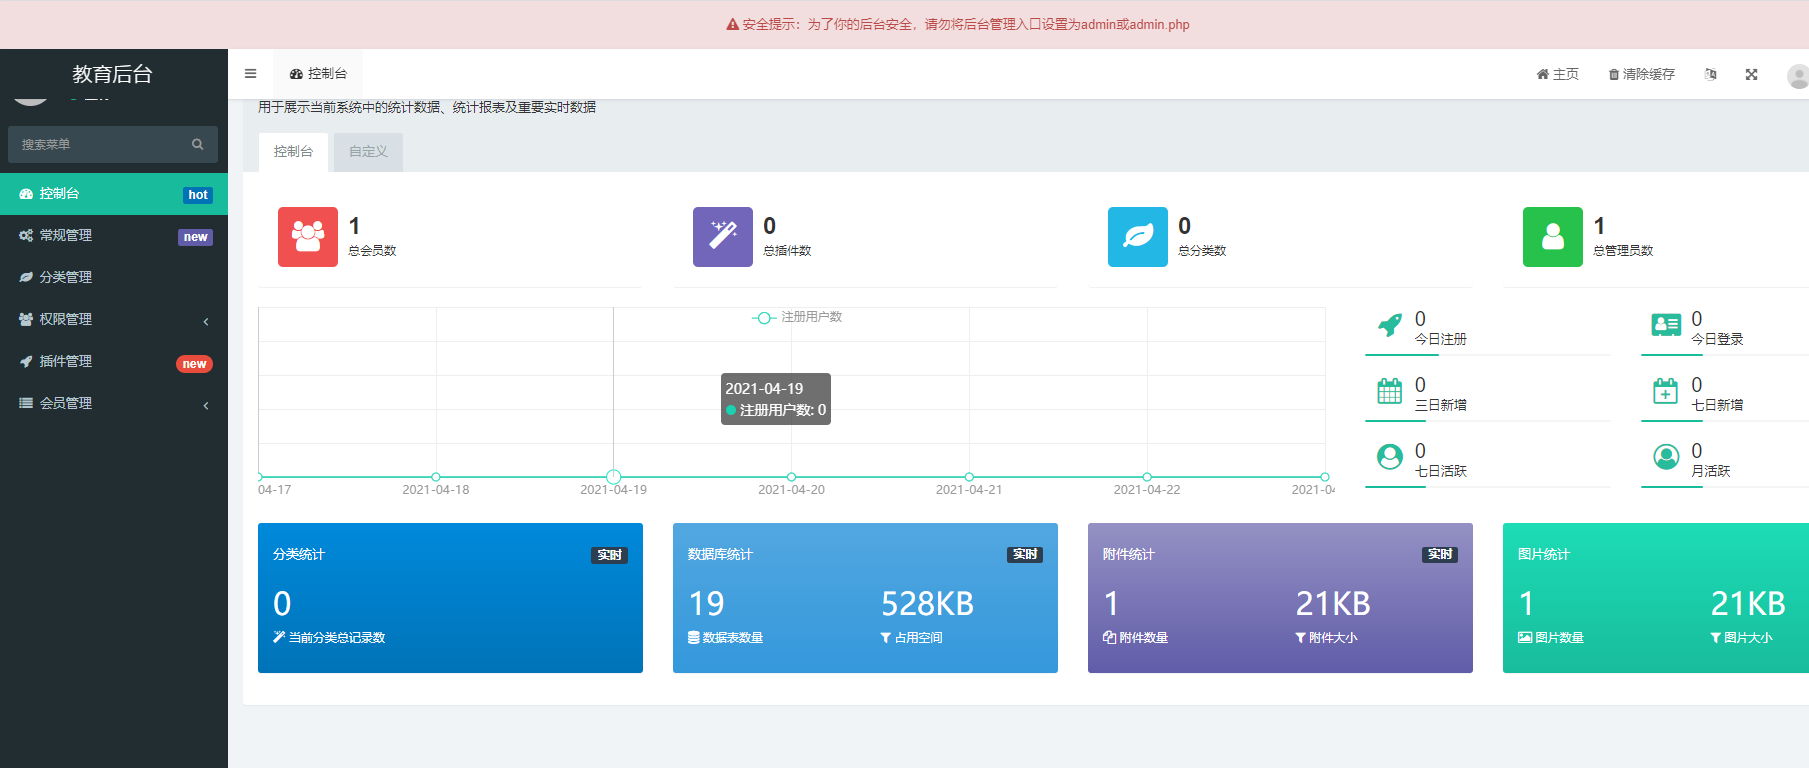
安装成功的后台样子。
这里你可以看到上边有一个小提示,这个提示在安装成功后的后台访问目录是一串自动生成的目录。
就是因为咔咔将目录地址改为了admin然后给的提示。
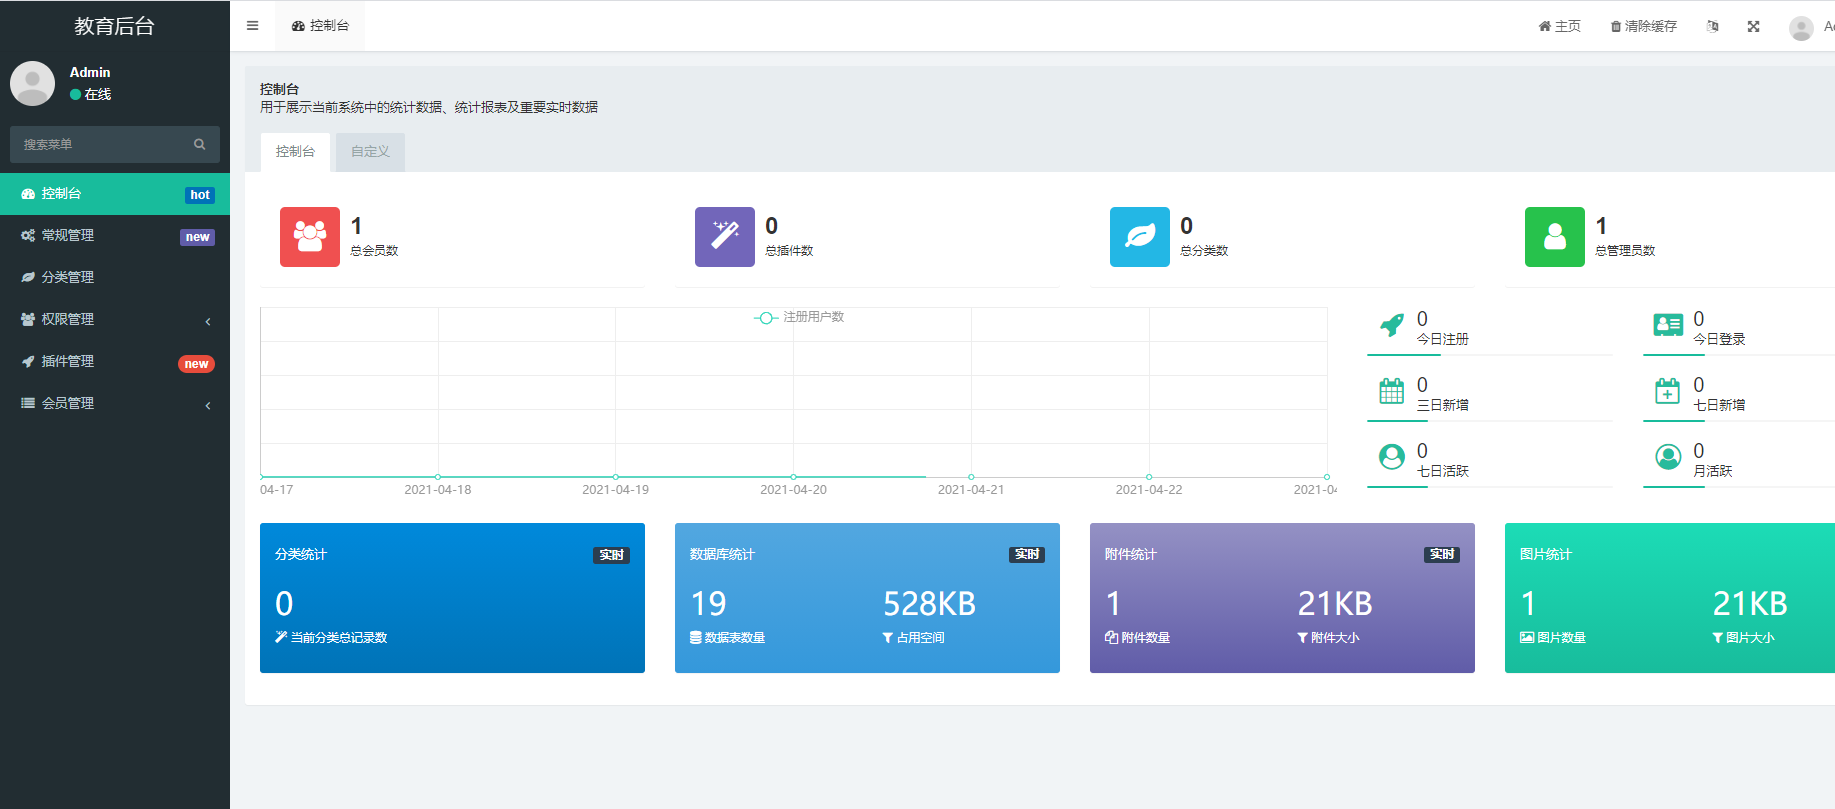
这里将admin改为fastadmin,在来看一下。
这样就可以正常的使用了。
二、配置成可以自己使用的后台模板
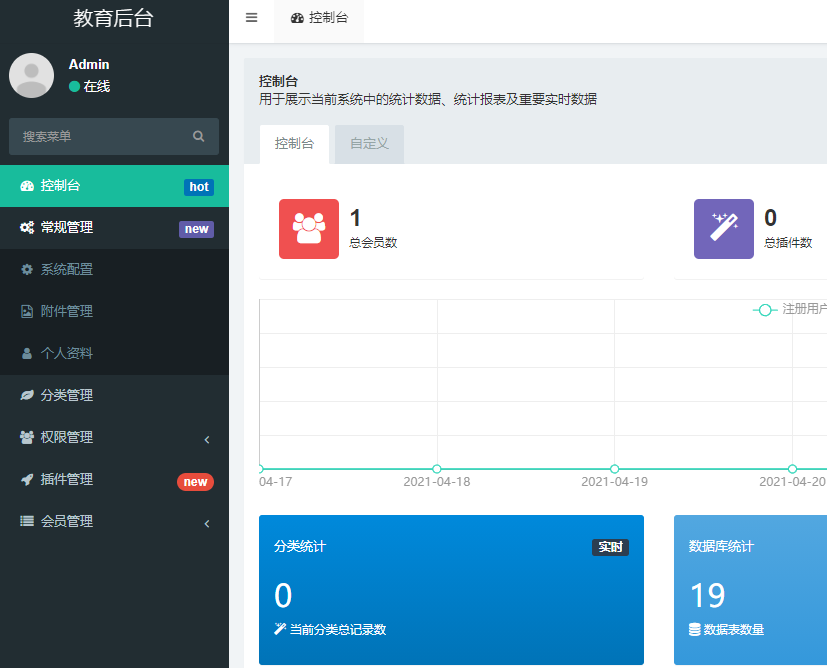
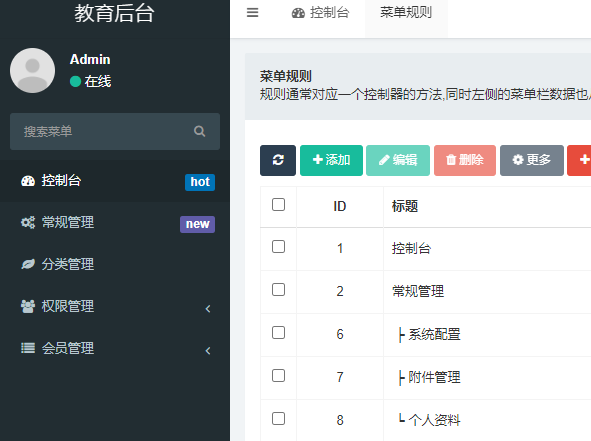
可以根据上边的这个图来看,菜单中有很多都是不需要的,接下来就进行删除。
举个例子删除插件管理的这一个菜单。
删除代码里边所有关于插件的代码,这里的地址可以在浏览器中看到
然后在后台的菜单管理中,将插件的这个选项删除掉即可。
其余的菜单都是一样的,由于这个插件的是没有表的,所以就没有涉及到表结构删除。
三、添加自己的后台模块
创建一级文件:php think crud -t picture -u 1
创建一个二级文件夹:php think crud -t video -c video/video -u 1
创建驼峰的文件:php think crud -t video_subject -c video/videoSubject -u 1
删除二级文件目录:php think crud -t picture -d picture/picture -u 1
四、关于数据库设计
使用图片上传功能
image smallimage varchar 识别为图片文件,自动生成可上传图片的组件,单图
images smallimages varchar 识别为图片文件,自动生成可上传图片的组件,多图
createtime 创建时间 int 记录添加时间字段,不需要手动维护
updatetime 更新时间 int 记录更新时间的字段,不需要手动维护
text 文本型 自动生成textarea文本框
weigh 权重 int 后台的排序字段,如果存在该字段将出现排序按钮,可上下拖动进行排序
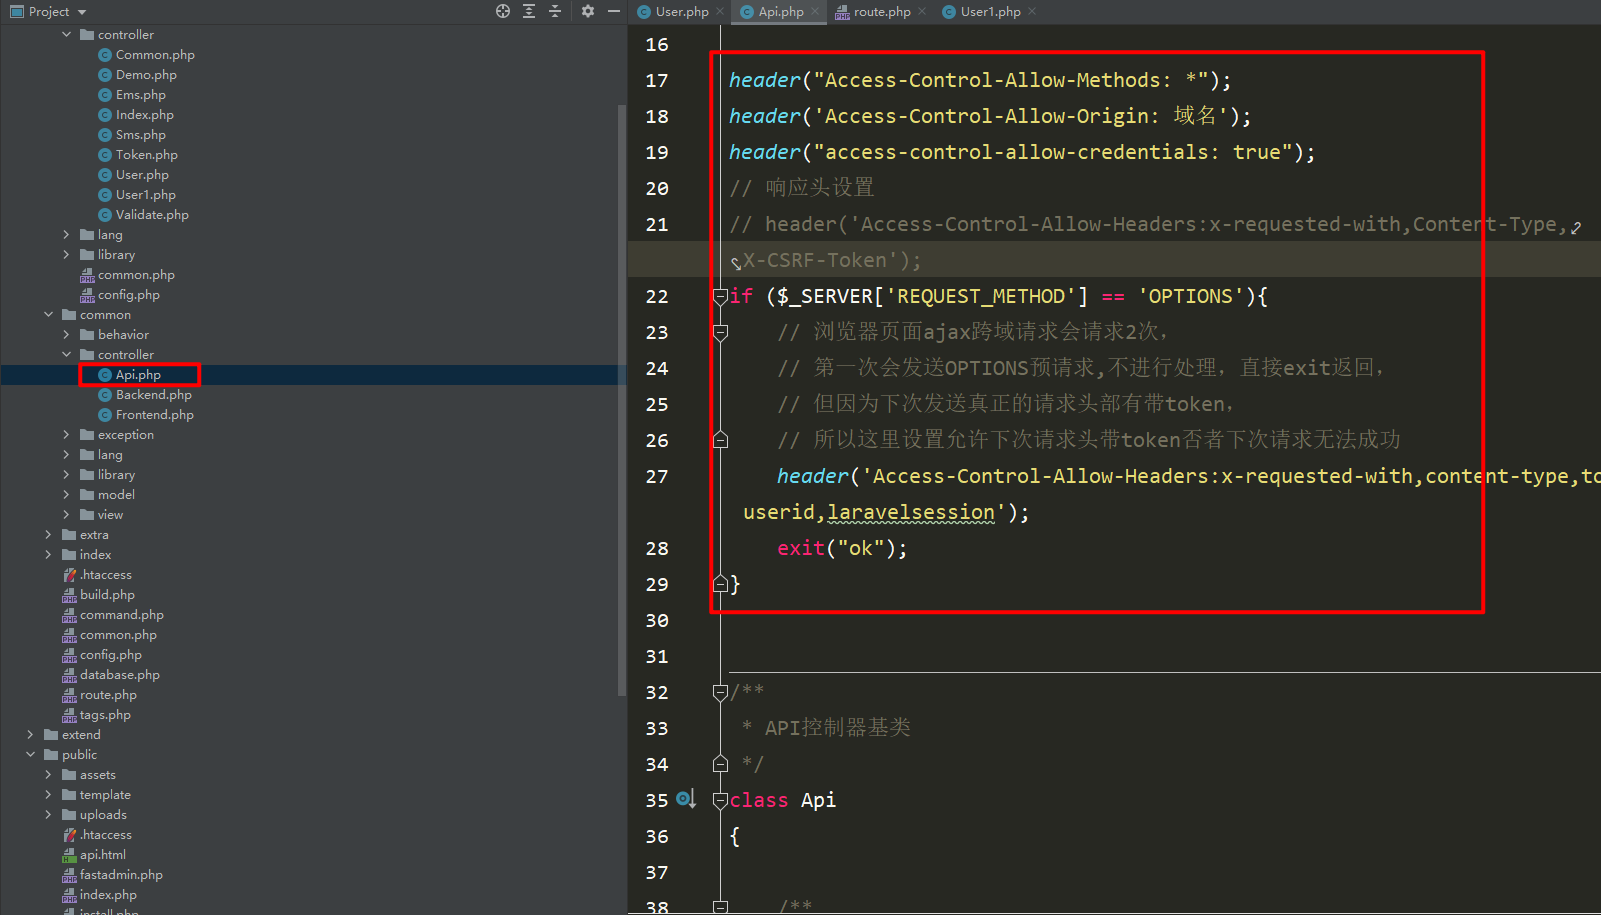
五、请求接口返回403
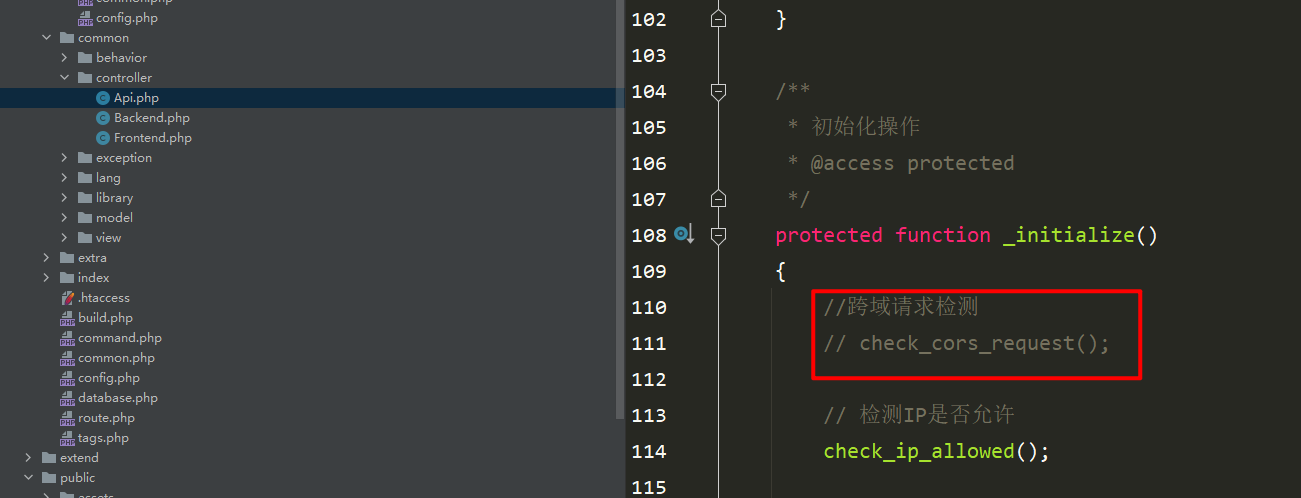
将以下代码添加到api基类即可
<span style="display: block; background: url(https://files.mdnice.com/user/3441/876cad08-0422-409d-bb5a-08afec5da8ee.svg); height: 30px; width: 100%; background-size: 40px; background-repeat: no-repeat; background-color: #282c34; margin-bottom: -7px; border-radius: 5px; background-position: 10px 10px;"></span><code class="hljs" style="overflow-x: auto; padding: 16px; color: #abb2bf; display: -webkit-box; font-family: Operator Mono, Consolas, Monaco, Menlo, monospace; font-size: 12px; -webkit-overflow-scrolling: touch; padding-top: 15px; background: #282c34; border-radius: 5px;">header(<span class="hljs-string" style="color: #98c379; line-height: 26px;">"Access-Control-Allow-Methods: *"</span>);<br/>header(<span class="hljs-string" style="color: #98c379; line-height: 26px;">'Access-Control-Allow-Origin: 域名'</span>);<br/>header(<span class="hljs-string" style="color: #98c379; line-height: 26px;">"access-control-allow-credentials: true"</span>);<br/><span class="hljs-comment" style="color: #5c6370; font-style: italic; line-height: 26px;">// 响应头设置</span><br/><span class="hljs-comment" style="color: #5c6370; font-style: italic; line-height: 26px;">// header('Access-Control-Allow-Headers:x-requested-with,Content-Type,X-CSRF-Token');</span><br/><span class="hljs-keyword" style="color: #c678dd; line-height: 26px;">if</span> ($_SERVER[<span class="hljs-string" style="color: #98c379; line-height: 26px;">'REQUEST_METHOD'</span>] == <span class="hljs-string" style="color: #98c379; line-height: 26px;">'OPTIONS'</span>){<br/> <span class="hljs-comment" style="color: #5c6370; font-style: italic; line-height: 26px;">// 浏览器页面ajax跨域请求会请求2次,</span><br/> <span class="hljs-comment" style="color: #5c6370; font-style: italic; line-height: 26px;">// 第一次会发送OPTIONS预请求,不进行处理,直接exit返回,</span><br/> <span class="hljs-comment" style="color: #5c6370; font-style: italic; line-height: 26px;">// 但因为下次发送真正的请求头部有带token,</span><br/> <span class="hljs-comment" style="color: #5c6370; font-style: italic; line-height: 26px;">// 所以这里设置允许下次请求头带token否者下次请求无法成功</span><br/> header(<span class="hljs-string" style="color: #98c379; line-height: 26px;">'Access-Control-Allow-Headers:x-requested-with,content-type,token,userid,laravelsession'</span>);<br/> <span class="hljs-keyword" style="color: #c678dd; line-height: 26px;">exit</span>(<span class="hljs-string" style="color: #98c379; line-height: 26px;">"ok"</span>);<br/>}<br/></code>然后将跨域检测注释掉
六、解决列表页显示的是分类ID而不是分类名称
其实这个问题很好解决,不要想的太过复杂。
你可以试想一下在thinkphp框架是怎么解决这个问题的。
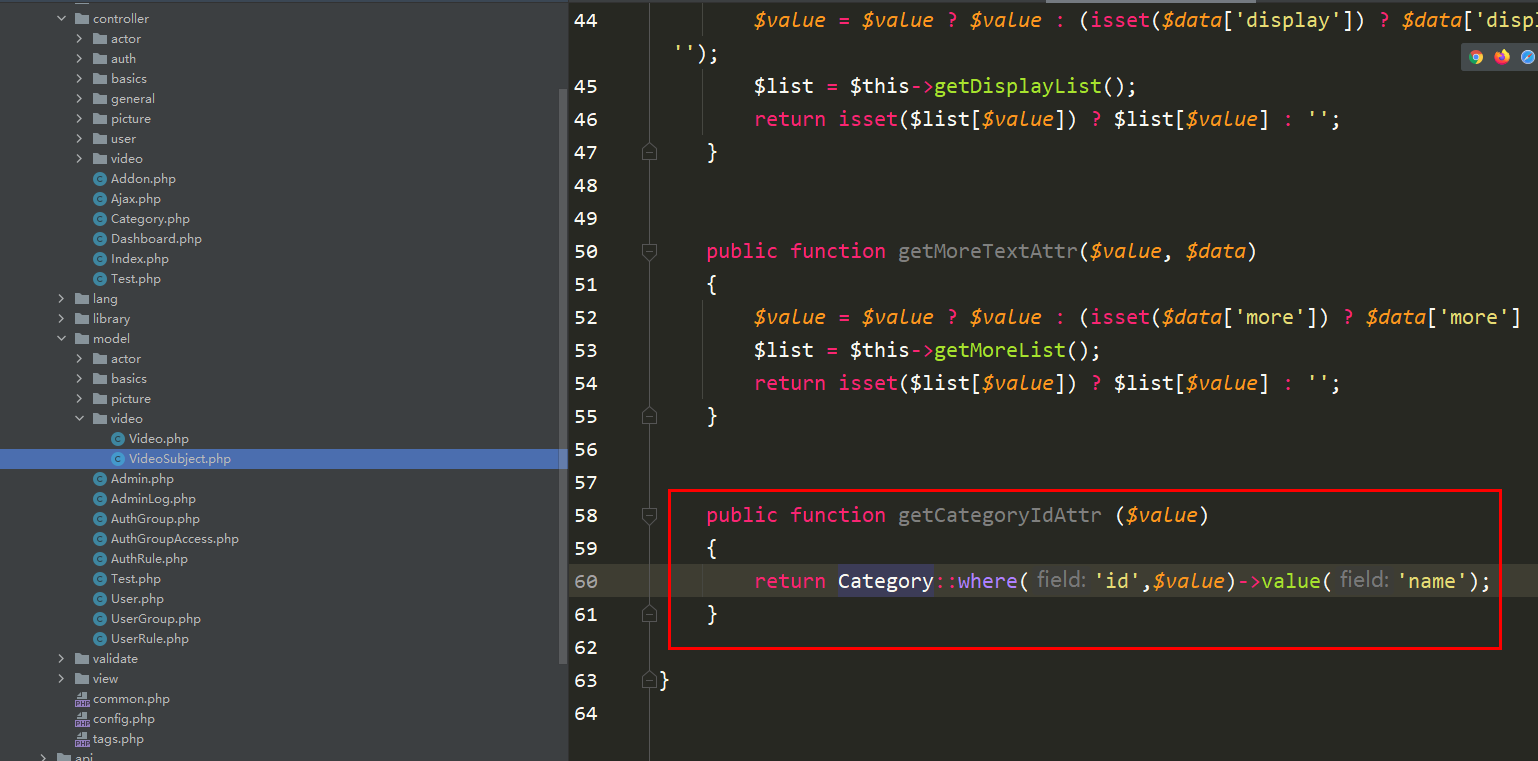
在thinkphp中解决这个问题就是使用获取器来处理的。
只需要在对应的模型中设置获取器即可。
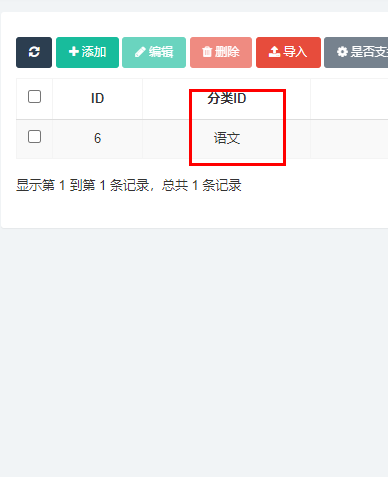
页面显示
但是真的是这样处理的吗?不要一看数据出来了,就万事大吉了。
你可以思考一下,在index页面没有显示出分类的名字,但是在修改时却出现了名字。
那么是不是可以得出的结论为首页没有使用获取器,而add、edit页面使用了获取器。
若按照上边的方法,直接暴力的在模型中添加获取器,会造成一个非常严重的问题,那就是修改会无法显示数据。不信你可以试一下。
就跟下图一样,这不是闹玩呢木。
所以说这种方案肯定不行。
试想一下,在thinkphp框架中,除了获取器可以表字段处理外,同样使用模型关联也可以。当然用最原始的json方法也是可以的。
在fastadmin中,控制器的方法都继承于application/admin/library/traits/Backend.php这个文件中。
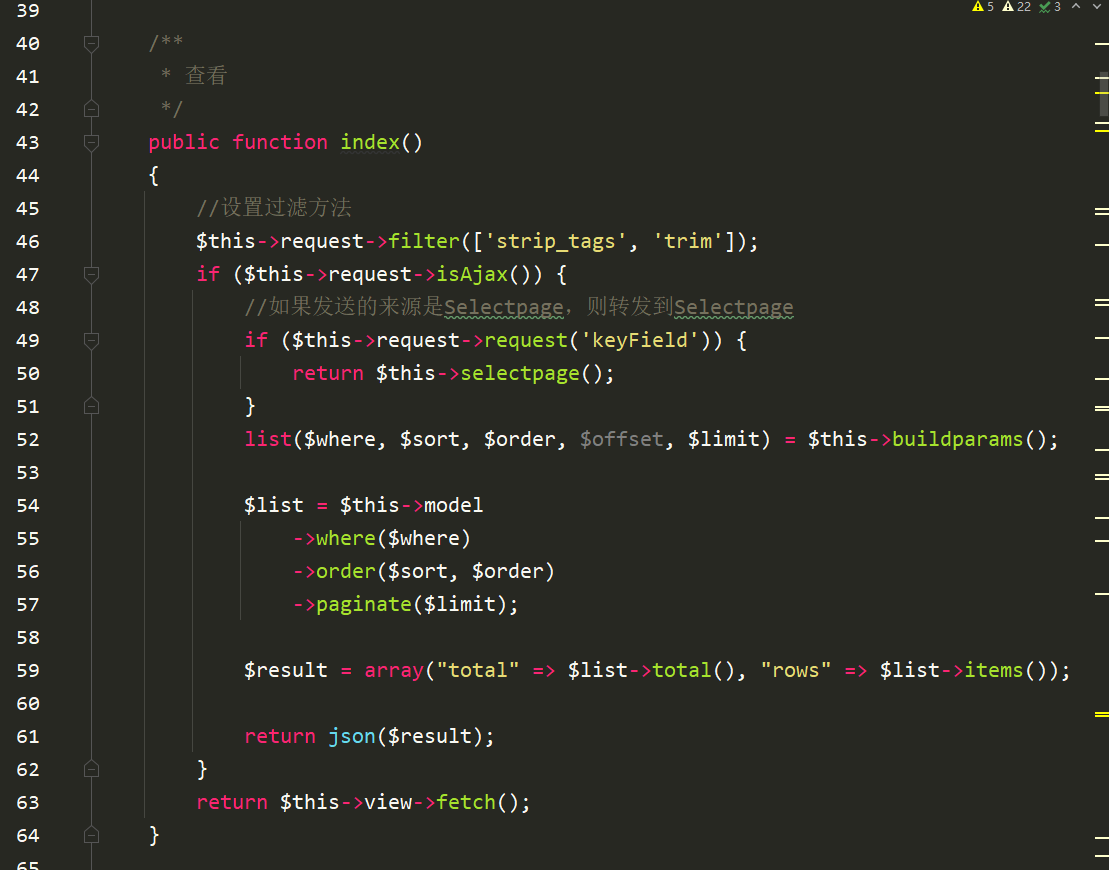
在这个文件中可以看到index方法
那只能做的一件事情就是在需要显示分类名称的控制器中重写这个方法index呗!
在重写之前需要做的一件事情就是需要在对应的模型中写上模型关联
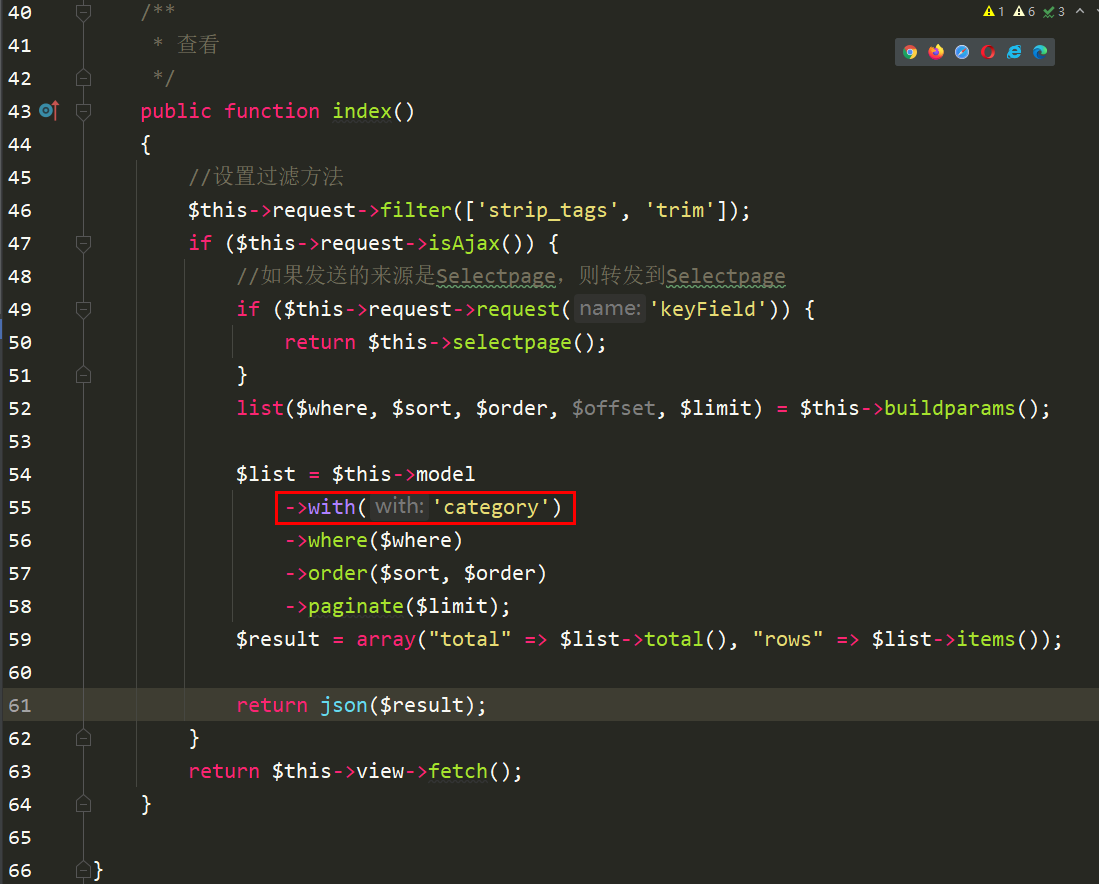
然后在你需要的控制器上重写index代码
源码
<span style="display: block; background: url(https://files.mdnice.com/user/3441/876cad08-0422-409d-bb5a-08afec5da8ee.svg); height: 30px; width: 100%; background-size: 40px; background-repeat: no-repeat; background-color: #282c34; margin-bottom: -7px; border-radius: 5px; background-position: 10px 10px;"></span><code class="hljs" style="overflow-x: auto; padding: 16px; color: #abb2bf; display: -webkit-box; font-family: Operator Mono, Consolas, Monaco, Menlo, monospace; font-size: 12px; -webkit-overflow-scrolling: touch; padding-top: 15px; background: #282c34; border-radius: 5px;"> <span class="hljs-comment" style="color: #5c6370; font-style: italic; line-height: 26px;">/**<br/> * 查看<br/> */</span><br/> <span class="hljs-keyword" style="color: #c678dd; line-height: 26px;">public</span> <span class="hljs-function" style="line-height: 26px;"><span class="hljs-keyword" style="color: #c678dd; line-height: 26px;">function</span> <span class="hljs-title" style="color: #61aeee; line-height: 26px;">index</span><span class="hljs-params" style="line-height: 26px;">()</span><br/> </span>{<br/> <span class="hljs-comment" style="color: #5c6370; font-style: italic; line-height: 26px;">//设置过滤方法</span><br/> <span class="hljs-keyword" style="color: #c678dd; line-height: 26px;">$this</span>->request->filter([<span class="hljs-string" style="color: #98c379; line-height: 26px;">'strip_tags'</span>, <span class="hljs-string" style="color: #98c379; line-height: 26px;">'trim'</span>]);<br/> <span class="hljs-keyword" style="color: #c678dd; line-height: 26px;">if</span> (<span class="hljs-keyword" style="color: #c678dd; line-height: 26px;">$this</span>->request->isAjax()) {<br/> <span class="hljs-comment" style="color: #5c6370; font-style: italic; line-height: 26px;">//如果发送的来源是Selectpage,则转发到Selectpage</span><br/> <span class="hljs-keyword" style="color: #c678dd; line-height: 26px;">if</span> (<span class="hljs-keyword" style="color: #c678dd; line-height: 26px;">$this</span>->request->request(<span class="hljs-string" style="color: #98c379; line-height: 26px;">'keyField'</span>)) {<br/> <span class="hljs-keyword" style="color: #c678dd; line-height: 26px;">return</span> <span class="hljs-keyword" style="color: #c678dd; line-height: 26px;">$this</span>->selectpage();<br/> }<br/> <span class="hljs-keyword" style="color: #c678dd; line-height: 26px;">list</span>($where, $sort, $order, $offset, $limit) = <span class="hljs-keyword" style="color: #c678dd; line-height: 26px;">$this</span>->buildparams();<br/><br/> $list = <span class="hljs-keyword" style="color: #c678dd; line-height: 26px;">$this</span>->model<br/> ->with(<span class="hljs-string" style="color: #98c379; line-height: 26px;">'category'</span>)<br/> ->where($where)<br/> ->order($sort, $order)<br/> ->paginate($limit);<br/> $result = <span class="hljs-keyword" style="color: #c678dd; line-height: 26px;">array</span>(<span class="hljs-string" style="color: #98c379; line-height: 26px;">"total"</span> => $list->total(), <span class="hljs-string" style="color: #98c379; line-height: 26px;">"rows"</span> => $list->items());<br/><br/> <span class="hljs-keyword" style="color: #c678dd; line-height: 26px;">return</span> json($result);<br/> }<br/> <span class="hljs-keyword" style="color: #c678dd; line-height: 26px;">return</span> <span class="hljs-keyword" style="color: #c678dd; line-height: 26px;">$this</span>->view->fetch();<br/> }<br/></code>到这里可并没有万事大吉啊!还需要修改模板,在对应的js文件中添加即可
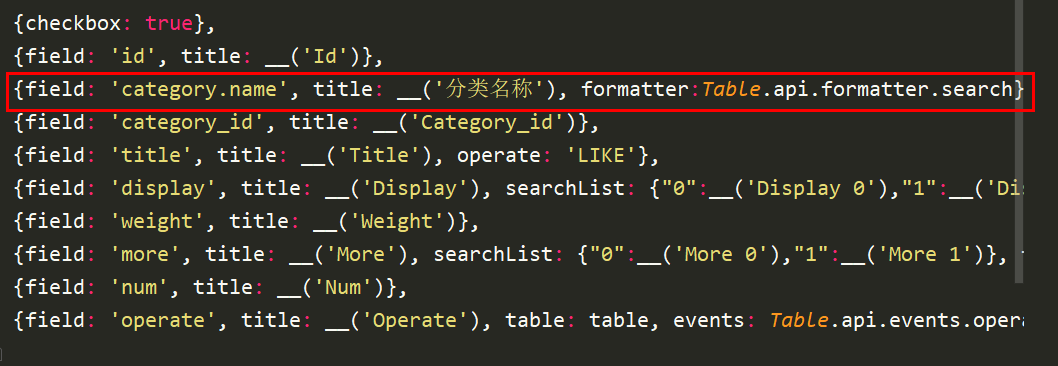
<span style="display: block; background: url(https://files.mdnice.com/user/3441/876cad08-0422-409d-bb5a-08afec5da8ee.svg); height: 30px; width: 100%; background-size: 40px; background-repeat: no-repeat; background-color: #282c34; margin-bottom: -7px; border-radius: 5px; background-position: 10px 10px;"></span><code class="hljs" style="overflow-x: auto; padding: 16px; color: #abb2bf; display: -webkit-box; font-family: Operator Mono, Consolas, Monaco, Menlo, monospace; font-size: 12px; -webkit-overflow-scrolling: touch; padding-top: 15px; background: #282c34; border-radius: 5px;">{field: <span class="hljs-string" style="color: #98c379; line-height: 26px;">'category.name'</span>, title: __(<span class="hljs-string" style="color: #98c379; line-height: 26px;">'分类名称'</span>), formatter:Table.api.formatter.search},<br/></code>文档中说是还需要设置属性设置属性protected $relationSearch = true;,反正咔咔测试设置不设置都一样,你们看着来,目前还没发现这个参数到底是控制什么的。官方文档说是控制开启关联查询,但是经测试,好像没什么大碍。
来看一下最终结果吧!
如果只是一对一那解决方案会有很多种。
你可以使用json来直接查询,同样你也可以循环查询出来的数据,然后根据每个分类ID进行查询出对应的分类名即可。
七、为什么添加和修改都不管用了?
这里的问题首先去看看数据库的表结构,看你的表结构是否有问题。
表结构不要设置为field_id结尾,这样的字段是不可以的。
直接暴力就是fieldId即可。
关于这块后期看一下fastadmin源码,看是不是后缀带id的都会做什么操作。
经过看源码得出的结论。
fastadmin在一键curd时会将后缀为_id的字段识别为表外键,在新增记录时无论填入任何值都和报错“xxx_id不能为空”,这是因为fastadmin将其识别为了外键在add.html语句中这个字段的input是这样的:
<span style="display: block; background: url(https://files.mdnice.com/user/3441/876cad08-0422-409d-bb5a-08afec5da8ee.svg); height: 30px; width: 100%; background-size: 40px; background-repeat: no-repeat; background-color: #282c34; margin-bottom: -7px; border-radius: 5px; background-position: 10px 10px;"></span><code class="hljs" style="overflow-x: auto; padding: 16px; color: #abb2bf; display: -webkit-box; font-family: Operator Mono, Consolas, Monaco, Menlo, monospace; font-size: 12px; -webkit-overflow-scrolling: touch; padding-top: 15px; background: #282c34; border-radius: 5px;"><input id=<span class="hljs-string" style="color: #98c379; line-height: 26px;">"c-xxx_id"</span> data-rule=<span class="hljs-string" style="color: #98c379; line-height: 26px;">"required"</span> data-source=<span class="hljs-string" style="color: #98c379; line-height: 26px;">"xxx/index"</span> <span class="hljs-class" style="line-height: 26px;"><span class="hljs-keyword" style="color: #c678dd; line-height: 26px;">class</span>="<span class="hljs-title" style="color: #e6c07b; line-height: 26px;">form</span>-<span class="hljs-title" style="color: #e6c07b; line-height: 26px;">control</span> <span class="hljs-title" style="color: #e6c07b; line-height: 26px;">selectpage</span>" <span class="hljs-title" style="color: #e6c07b; line-height: 26px;">data</span>-<span class="hljs-title" style="color: #e6c07b; line-height: 26px;">field</span>="<span class="hljs-title" style="color: #e6c07b; line-height: 26px;">name</span>" <span class="hljs-title" style="color: #e6c07b; line-height: 26px;">name</span>="<span class="hljs-title" style="color: #e6c07b; line-height: 26px;">row</span>[<span class="hljs-title" style="color: #e6c07b; line-height: 26px;">xxx_id</span>]" <span class="hljs-title" style="color: #e6c07b; line-height: 26px;">type</span>="<span class="hljs-title" style="color: #e6c07b; line-height: 26px;">text</span>" <span class="hljs-title" style="color: #e6c07b; line-height: 26px;">value</span>=""><br/><br/></span></code>
八、列表字段显示的为英文
这个问题就很简单了,咔咔没有看源码理解就是语言包没有你设置的这个字段名。
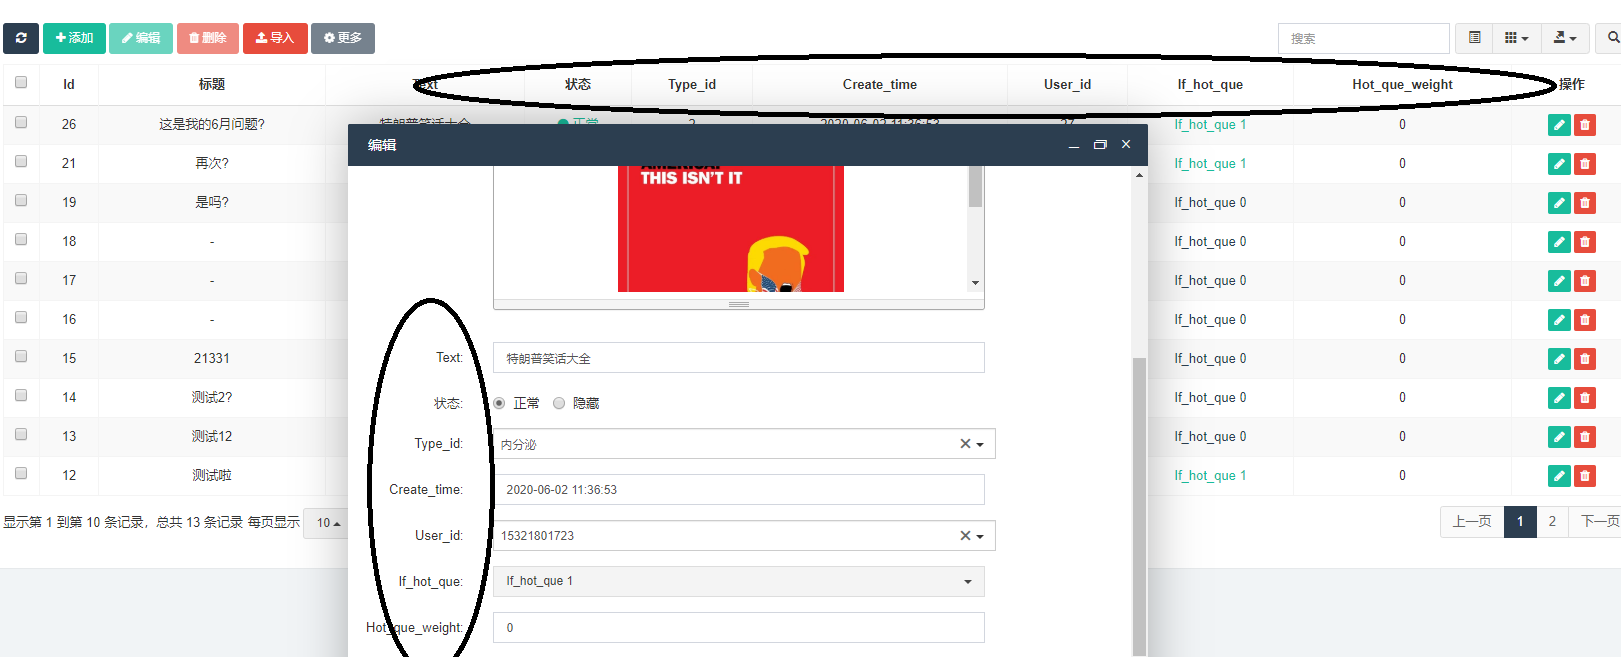
直接打开到对应的js文件,然后修改初始化表格中的title值即可。
修改完之后就可以看到中文名了。
九、如何在一个模板上设置按钮,然后显示设置的表格
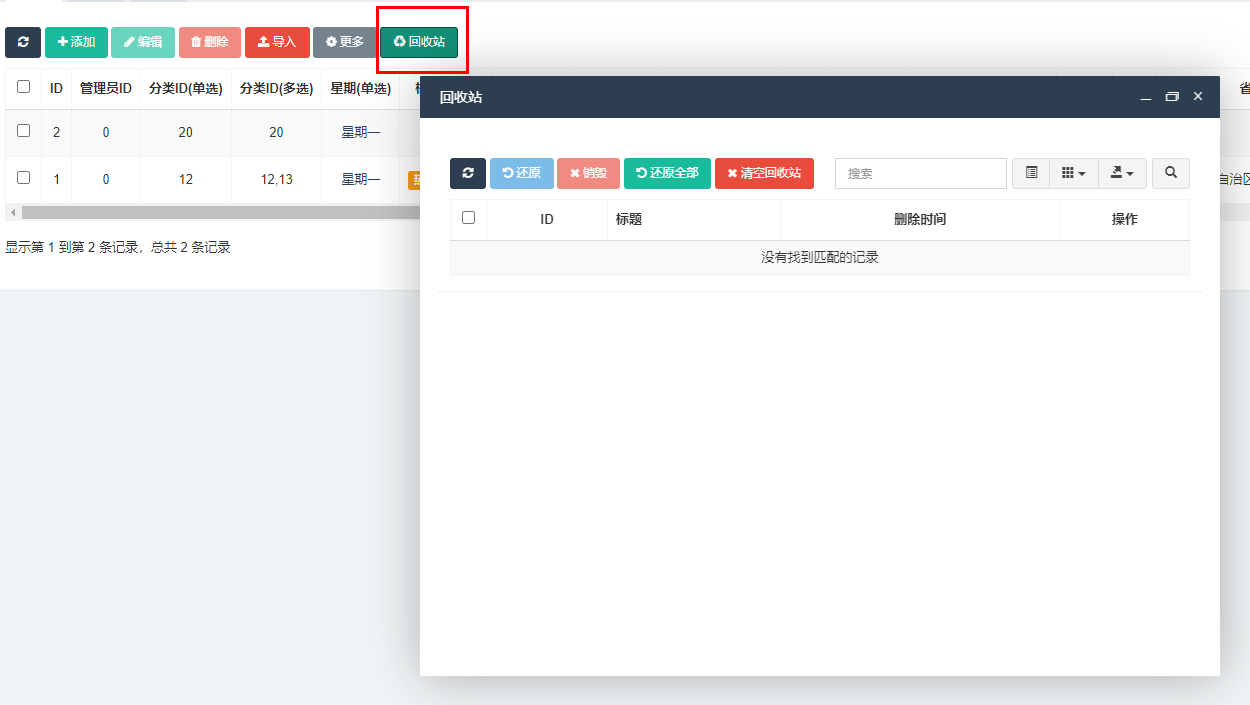
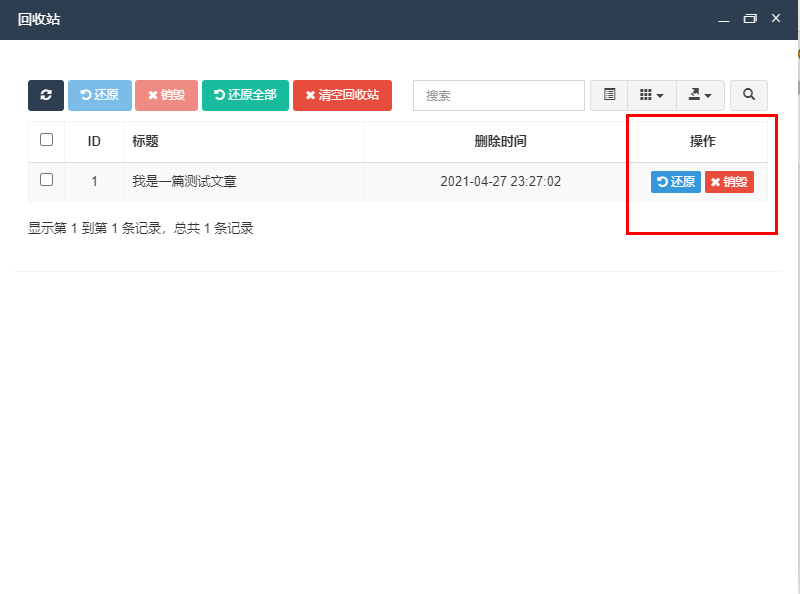
先看实现效果,点击回收站之后弹出一个表格。
那么如何给自己需要的模板设置同样的效果呢?
接下来就使用官方给的案例进行解读。
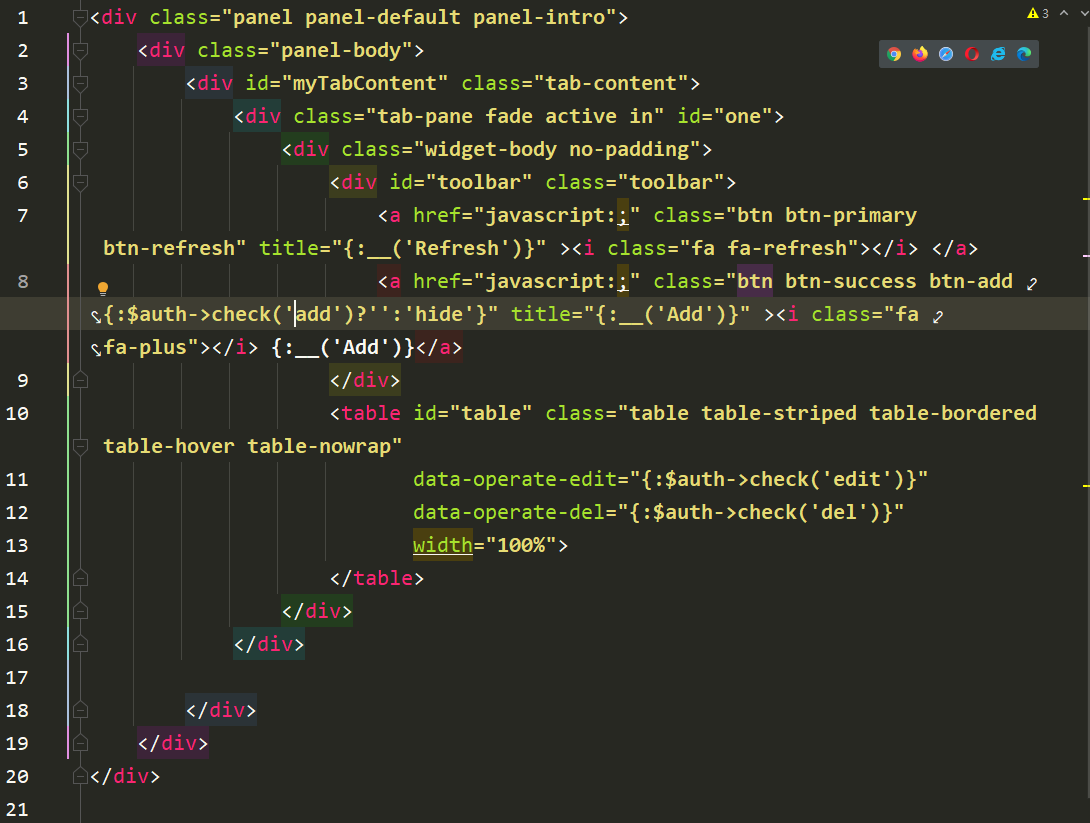
首先来到test的index模板中可以看到回收站的这个按钮。
这里需要注意这个herf的值,如果是自己自定义的按钮直接把title替换成自己设置的名字即可。
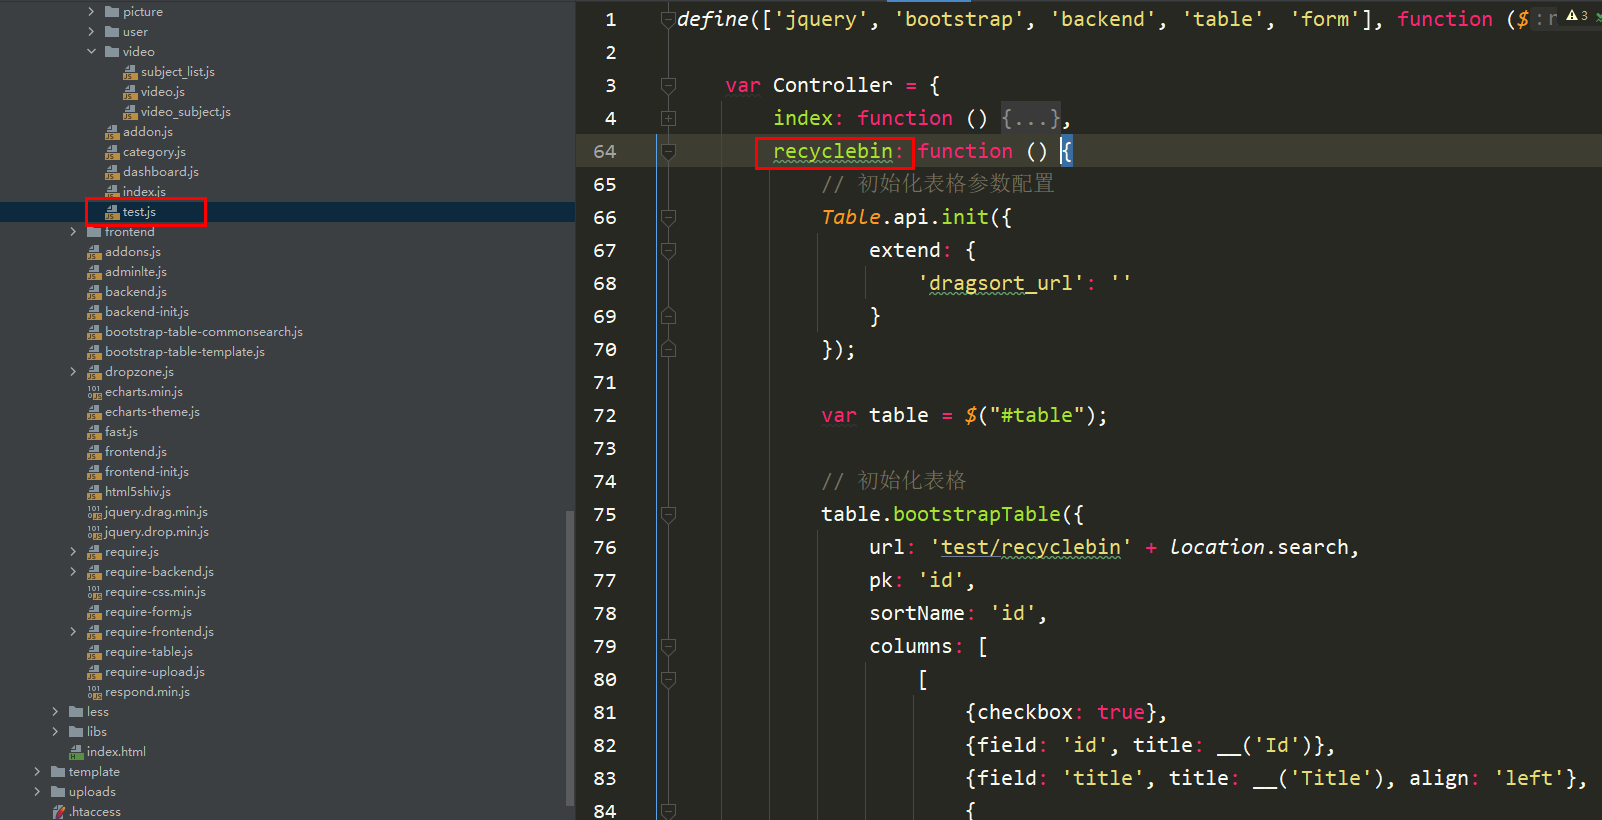
接着来到test的js模板,在这个js中你能看到出了index初始化表格外,还存在一个recyclebin这个方法。
如果你不想写直接把这个方法拿过去即可,但是一定要修改url地址哈!
但是此时做的这些修改远远还是不够的,还需要控制器,那么test的recyclebin的这个方法是在application/admin/library/traits/Backend.php这个文件里边。
如果你想设置你自己的方法,那么你需要在控制器新增加一个方法,然后把这个文件中的index方法代码复制过来即可。
既然有了控制器,有了js创建了表格,那么还缺什么呢!
还缺一个模板喽!创建一个跟你的方法名一样的html文件,然后随便复制一个index.html模板进去即可。
在复制的时候只留下这些代码,其余的就可以删除了,咔咔测试如果加上上边的代码会出现无法访问的情况。
html文件名的设置就跟下图一样
做完这些工作那就可以看到你想要的东西了。
实现步骤
在控制器Test中写需要显示列表的方法,例如display方法 创建了控制器就需要创建跟display方法对应的display.html模板文件 html模板文件的创建位置是在Test目录下 找到Test的js文件,然后添加display方法,这个方法不会写的话就直接使用案例中test.js中的 recyclebin然后就大功告成了
如果你还不会那么就只能私信咔咔了,哈哈
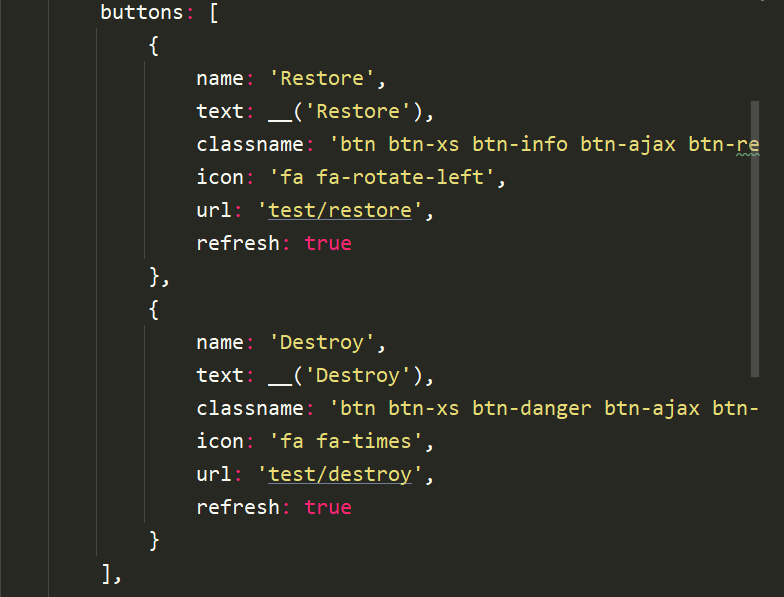
这里有个注意点就是如果你是用的test.js方法中的recyclebin,那么会存在一个问题就是操作的按钮问题。
这个按钮就是在recyclebin的初始化表格中设置的,自行设置即可。
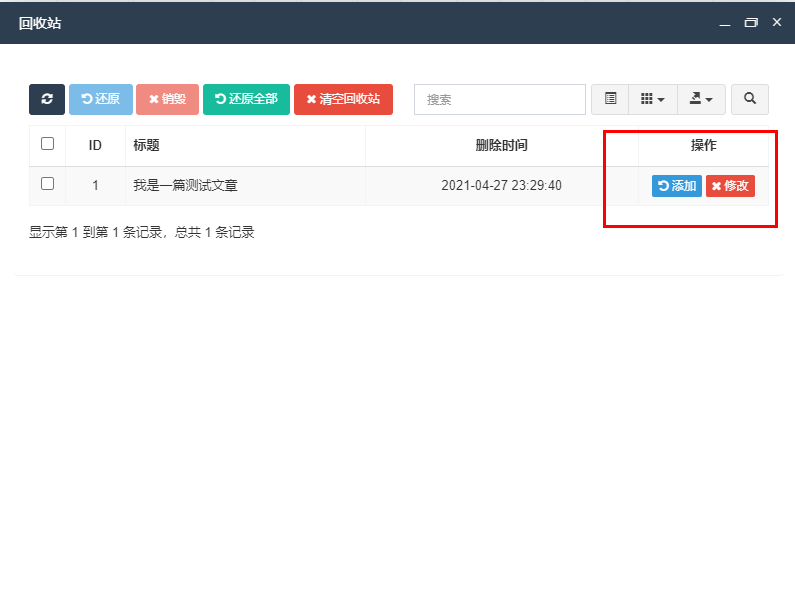
也就是换换classname和名字即可。
修改完后的图,只要细心这个框架使用起来还是非常顺手的。
十、关于数据库字段设置为state查询条件没用
如果你发现你对state这个字段设置where条件后没有效果时,试着查询一条数据,然后看一下这个state类型
<span style="display: block; background: url(https://files.mdnice.com/user/3441/876cad08-0422-409d-bb5a-08afec5da8ee.svg); height: 30px; width: 100%; background-size: 40px; background-repeat: no-repeat; background-color: #282c34; margin-bottom: -7px; border-radius: 5px; background-position: 10px 10px;"></span><code class="hljs" style="overflow-x: auto; padding: 16px; color: #abb2bf; display: -webkit-box; font-family: Operator Mono, Consolas, Monaco, Menlo, monospace; font-size: 12px; -webkit-overflow-scrolling: touch; padding-top: 15px; background: #282c34; border-radius: 5px;">string(<span class="hljs-number" style="color: #d19a66; line-height: 26px;">1</span>) <span class="hljs-string" style="color: #98c379; line-height: 26px;">"1"</span><br/></code>
如果类型是上边打印的结果,那么你就要注意了,在查询条件中需要写上"1" ,也就是字符串1,而非整型1。
看到这里是不是恍然大悟,赶紧去改你的查询条件吧!
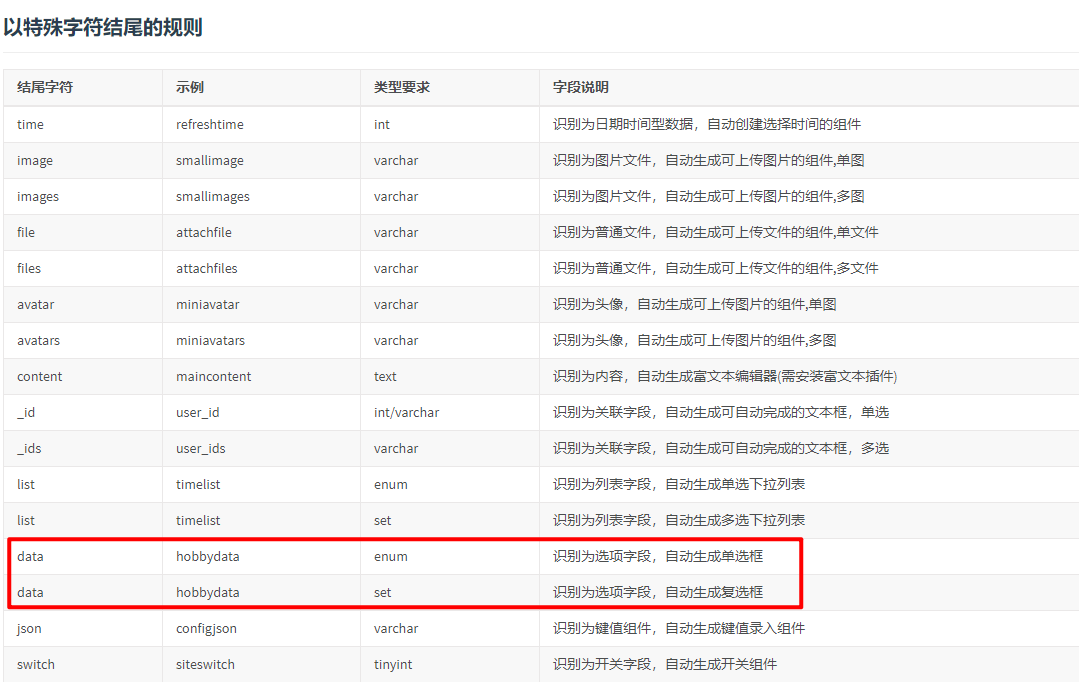
十一、设置的enum类型页面怎么是下拉框,不是单选框
如果你使用的enum类型,则会出现上的两种情况。
一种是下拉框,一种是单元框。
那么是什么原因造成的不一致呢?
请看上图,如果你想生成单元的形式,那就使用enum类型,字段名结尾使用data即可。
十二、发起ajax成功后如何实现刷新数据
这个过程你可以理解为用户上传了一个图片。
然后后台需要审核。
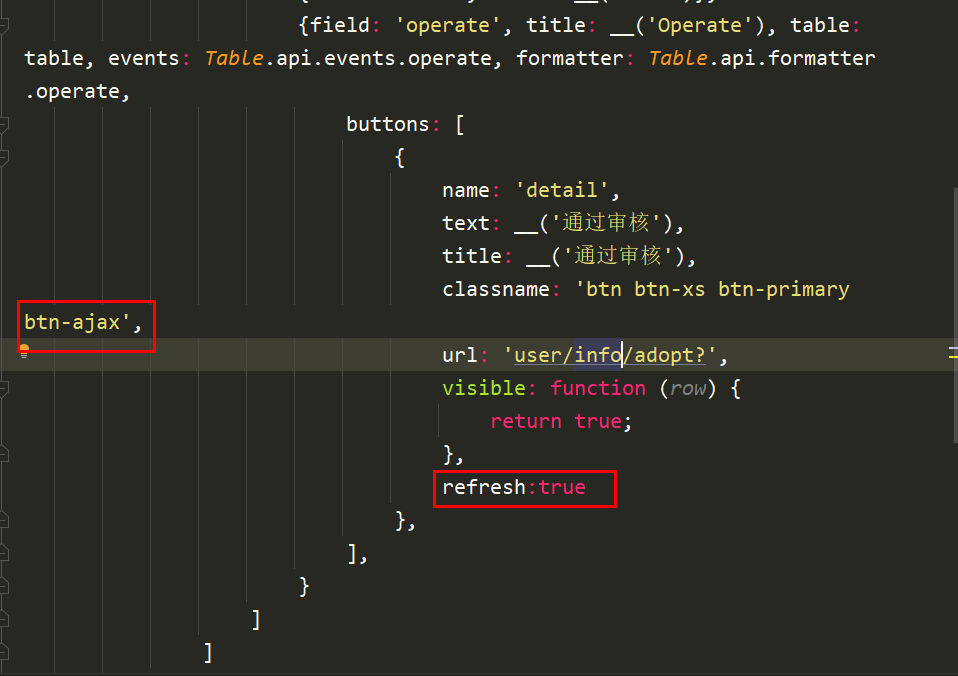
后台点击审核后,这条数据就需要移除,如果你发现数据未移除。
需要在对应的js文件上加上refresh:true即可。
在来说一下如何发起ajax请求,也是很简单将button的属性设置为btn-ajax即可。
本节关于fastadmin的实战问题到这里就结束了,如果你有其它的相关问题,可以私聊咔咔,也可以在评论区,咔咔看到会第一时间进行回复的。
“坚持学习、坚持写作、坚持分享是咔咔从业以来一直所秉持的信念。希望在偌大互联网中咔咔的文章能带给你一丝丝帮助。我是咔咔,下期见。
”
Atas ialah kandungan terperinci fastadmin入门必备教程. Untuk maklumat lanjut, sila ikut artikel berkaitan lain di laman web China PHP!


