Rumah >hujung hadapan web >tutorial css >css的背景图怎么加边框
css的背景图怎么加边框
- 藏色散人asal
- 2021-03-01 10:18:357777semak imbas
css背景图加边框的方法:首先创建一个HTML示例文件;然后通过“background-image”引入一张背景图;最后通过border属性设置边框即可。
本文操作环境:windows7系统、HTML5&&CSS3版、Dell G3电脑。
背景样式
常用的背景样式
- 背景色:background-color
background-color: gray;
background-color: #808080;
background-color: rgb(128,128,128);
- 背景图像:background-image
body{background-image: url("images/bg.jpg");}
- 背景图片重复:background-repeat
| 值 | 描述 |
|---|---|
| repeat | 默认。背景图像将在垂直方向和水平方向重复 |
| repeat-x | 背景图像将在水平方向重复 |
| repeat-y | 背景图像将在垂直方向重复 |
| no-repeat | 背景图像将仅显示一次 |
| inherit | 规定应该从父元素继承background-repeat属性的设置 |
- 背景图片定位:background-position
background-position属性值:
①使用关键字:background-position:center left
②使用百分数值:background-position: 50% 50%
③使用长度值:background-position:300px 100px
/*背景样式综合使用*/
background: #00ff00 url(image/bg.jpg)  no-repeat center;
- 背景图片固定:background-attachment
background-attachment属性设置背景图像是否固定或者随着页面的其余部分滚动。
- scroll:默认值。背景图像会随着页面的滚动而移动。
- fixed:当页面的其余部分滚动时,背景图像不会移动。
【推荐:css视频教程】
background-size
- 规定背景图片的尺寸
- 语法:
background-size: length| percentage| cover| contain;
| 值 | 描述 |
|---|---|
| length | 以浮点数字和单位组成的长度值来设置背景图像的宽度和高度,如果只设置第一个值,则第二个值会被设置为"auto" |
| percentage | 以父元素的百分比来设置背景图像的宽度和高度,如果只设置第一个值,则第二个值会被设置为"auto" |
| cover | 保持背景图像本身宽高比例,将图片缩放到正好完全覆盖所定义背景的区域 |
| contain | 保持背景图像本身宽高比例,将图片缩放到宽度或高度正好适应所定义背景的区域 |

cover和contain
<!DOCTYPE html>
<html>
<head>
    <meta charset="utf-8" />
    <title>背景</title>
    <style type="text/css">
        p{width: 700px;height: 400px;border: 2px solid plum;background-repeat: no-repeat;
            background-image: url(img/design.jpg);background-size: cover;}
    </style>
</head>
<body>
    <p>图片尺寸</p>
</body>
</html>
background-origin
- 规定背景图片的定位区域(background-position的参考位置)
- 语法:
background-origin: border-box | padding-box | content-box;
默认是padding-box
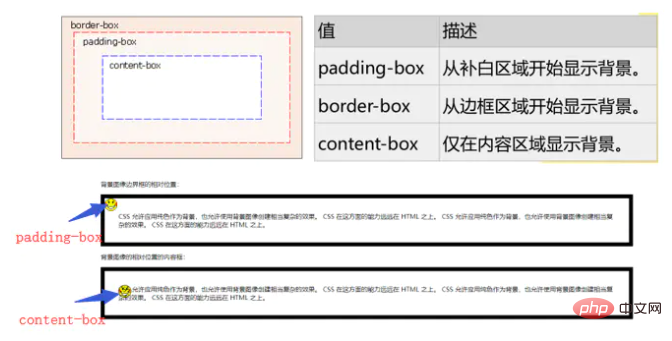
background-origin
<!DOCTYPE html>
<html>
<head>
    <meta charset="utf-8">
    <style>
        p{border:10px solid black;padding:35px;background-image:url(img/smiley.gif);
        background-repeat:no-repeat;background-position:0px 0px;}
        #p1{background-origin: padding-box;}
        #p2{background-origin:content-box;}
    </style>
</head>
<body>
    <p>背景图像边界框的相对位置:</p>
    <p id="p1">
      CSS 允许应用纯色作为背景,也允许使用背景图像创建相当复杂的效果。CSS 在这方面的能力远远在 HTML 之上。CSS 允许应用纯色作为背景,也允许使用背景图像创建相当复杂的效果。CSS 在这方面的能力远远在 HTML 之上。
    </p>
    <p>背景图像的相对位置的内容框:</p>
    <p id="p2">
      CSS 允许应用纯色作为背景,也允许使用背景图像创建相当复杂的效果。CSS 在这方面的能力远远在 HTML 之上。CSS 允许应用纯色作为背景,也允许使用背景图像创建相当复杂的效果。CSS 在这方面的能力远远在 HTML 之上。
    </p>
</body>
</html>
background-clip
- 规定背景的绘制区域(决定背景在哪些区域显示)。
- 语法:background-clip: border-box| padding-box| content-box;
| 值 | 描述 |
|---|---|
| border-box | 从边框区域向外裁剪背景 |
| padding-box | 从补白区域向外裁剪背景 |
| content-box | 从内容区域向外裁剪背景 |
background-clip与background-origin
-
background-clip:border| padding| content指定背景在哪些区域可以显示,但与背景开始绘制的位置无关。背景的绘制的位置可以出现在不显示背景的区域,这时就相当于背景图片被不显示背景的区域裁剪了一部分。 -
background-origin:padding| border| content指定背景从哪个区域(边框、补白或内容)开始绘制。可以用此属性在边框上绘制背景,但边框上的背景显不显示出来就要由background-clip来决定了。
<!DOCTYPE html>
<html>
<head>
    <meta charset="utf-8">
    <style>
        #example1 {
            width: 800px;
            height: 450px;
            border: 20px dotted black;
            padding: 50px;
            background-image: url(img/girl.jpg);
            background-size: 100% 100%;
            background-repeat: no-repeat;
            background-clip: padding-box;/*padding-box以外的都要剪辑掉*/
            background-origin: border-box;/*从border-box开始进行剪辑*/
        }
    </style>s
</head>
<body>
    <p id="example1"></p>
</body>
</html>
边框样式
常用的边框样式
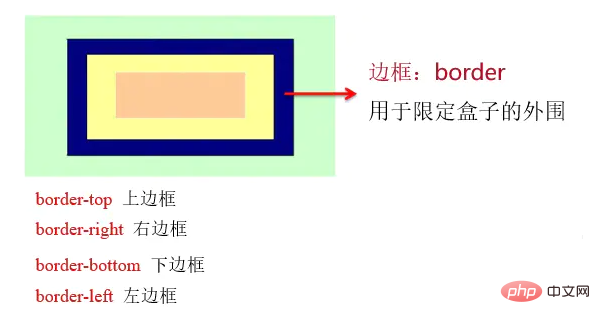
border
设置边框宽度:
border-width宽度值。示例:border-width:1px;设置边框颜色:
border-color颜色。示例:border-color:#cccccc;设置边框样式:
border-style样式关键字。示例:border-style: solid;
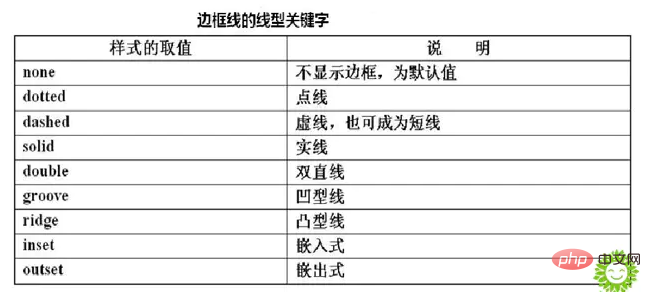
边框线类型
- 边框复合样式:
border: width / style / color示例:border: 3px dotted#ff9900
border-radius
圆角边框——border-radius 属性。
- 语法
border-radius: 1-4 length | %;
-
border-radius属性可包含两个参数值,第一个值表示圆角的水平半径,第二个值表示圆角的垂直半径,两个参数值通过斜线分隔。如果仅包含一个参数值,表示两个值相同,即1/4圆角。
| 单位 | 描述 |
|---|---|
| length | 定义圆角的形状。(圆角半径) |
| % | 比百分比定义圆角的形状 |
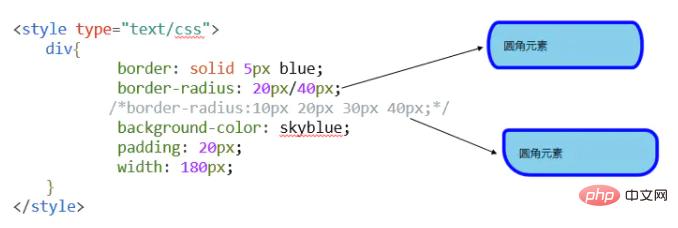
border-radius
如果要绘制的圆角边框4个角的半径各不相同时,需按左上角、右上角、右下角、左下角的顺序设置每个方向圆角半径的值。
-
border-top-left-radius、border-top-right-radius、border-bottom-right-radius、border-bottom-left-radius(绘制圆角边框的四个角的半径各不相同时,按照上述的顺序)
- 如果省略
bottom-right,则与top-left相同。如果省略top-right,则与top-left相同。
p{
    border-top-left-radius: 0px;
    border-top-right-radius: 10px;
    border-bottom-right-radius: 20px;
    border-bottom-left-radius: 30px;
    /*上述的四句代码等同于:border-radius:0px 10px 20px 30px;*/
}
border-image
图像边框——border-image 属性
- 可以让元素的长度或宽度处于随时变化的边框统一使用一个图像文件进行绘制。
- 语法:
border-image: url(图像文件的路径) A B C D
ABCD四个参数表示浏览器自动把图像分隔时的上边距、右边距、下边距以及左边距。
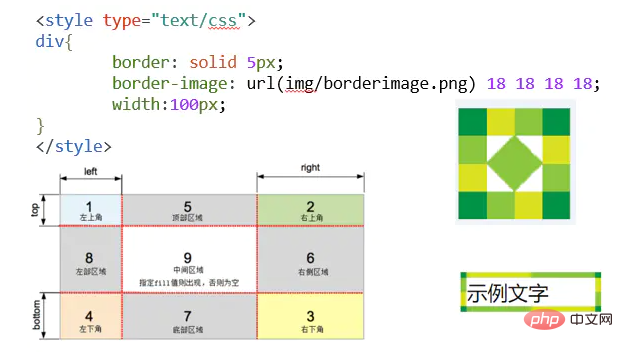
border-image 属性是一个简写属性,用于设置以下属性:
| 值 | 描述 |
|---|---|
| border-image-source | 定义用在边框的图片的路径 |
| border-image-slice | 定义如何裁切背景图像 |
| border-image-width | 图片边框的宽度 |
| border-image-outset | 边框图像区域超出边框的量 |
| border-image-repeat | 图像边框是否应平铺(repeated)、铺满(rounded)或拉伸(stretched) |
阴影
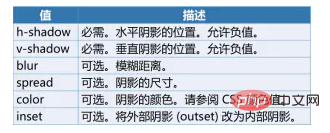
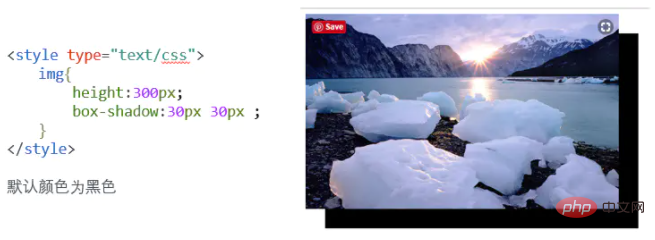
向框添加一个或多个阴影——box-shadow 属性
语法:box-shadow: h-shadow v-shadow blur spread color inset;
Atas ialah kandungan terperinci css的背景图怎么加边框. Untuk maklumat lanjut, sila ikut artikel berkaitan lain di laman web China PHP!

