Spring与策略模式
- 阿神asal
- 2016-11-07 17:45:482120semak imbas
一:策略模式的定义
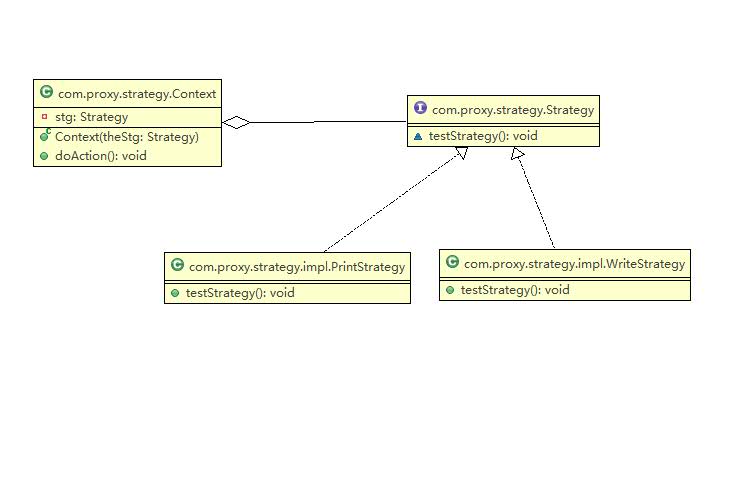
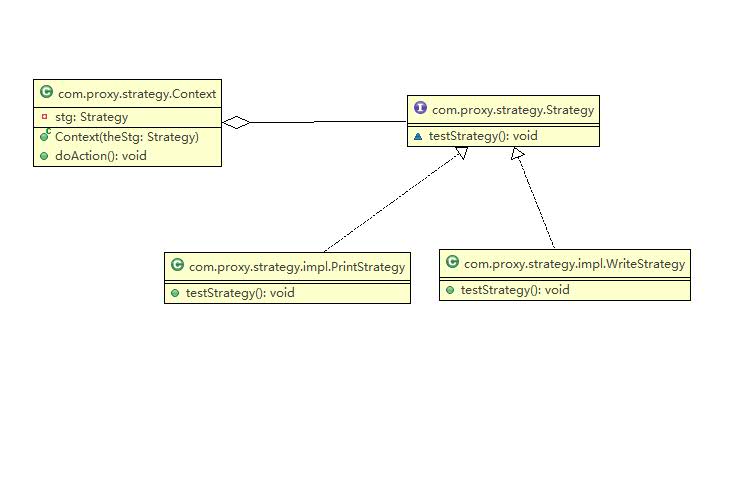
策略模式是对算法的包装,把使用算法的责任和算法本身分隔开,委派给不同的对象管理。策略模式通常把一系列的算法包装到一系列的策略类里面,作为一个抽象策略类的子类。
其类图如下:

如果是要用JAVA类来实现的策略模式,其源代码如下:
Java代码
/**
 *
 * 策略执行
 * @author weique.lqf
 * @version $Id: Context.java, v 0.1 2014-2-9 下午2:32:56 weique.lqf Exp $
 */
public class Context {
    private Strategy stg;

    public Context(Strategy theStg) {
        this.stg = theStg;
    }

    public void doAction() {
        this.stg.testStrategy();
    }
}
策略接口:
Java代码
/**
 *
 *
 * @author weique.lqf
 * @version $Id: Strategy.java, v 0.1 2014-2-9 下午2:32:17 weique.lqf Exp $
 */
public interface Strategy {

    void testStrategy();
}
实现类一:
Java代码
package com.proxy.strategy.impl;

import com.proxy.strategy.Strategy;

public class PrintStrategy implements Strategy {

    public void testStrategy() {
        System.out.print("我要打印!!");
    }

}
实现类二:
Java代码
package com.proxy.strategy.impl;

import com.proxy.strategy.Strategy;

public class WriteStrategy implements Strategy {

    public void testStrategy() {
        System.out.println("我要写字!!!");
    }

}
执行代码:
Java代码
package com.proxy.strategy;

import com.proxy.strategy.impl.PrintStrategy;

public class StrategyClient {

    public static void main(String[] args) {
        Strategy stgA = new PrintStrategy();
        Context ct = new Context(stgA);
        ct.doAction();
    }
}
二:spring实现策略模式
现在使用spring的系统可以说是多如牛毛,那么如何在spring模式下实现策略呢?
其实只需要稍微改造下就可以了,因为spring的核心之一就是IOC。
首先修改Contex类:
Java代码
package com.proxy.strategy;
public class ContextSpring {
    private Strategy stg;

    /**
     * Setter method for property <tt>stg</tt>.
     *
     * @param stg value to be assigned to property stg
     */
    public void setStg(Strategy stg) {
        this.stg = stg;
    }

    public void doAction() {
        this.stg.testStrategy();
    }
}
然后在spring配置文件里面配置,
Xml代码
<bean id="ct" class = "com.proxy.strategy.ContextSpring">
      <property name="stg" ref="writeStg"/>
   </bean>
   <bean id="writeStg" class = "com.proxy.strategy.impl.WriteStrategy"/>
   <bean id="printStg" class = "com.proxy.strategy.impl.PrintStrategy"/>
里面选择你将要注入的实现类,然后在执行的代码里面写这样:
Java代码
package com.proxy.strategy;
import org.springframework.context.ApplicationContext;
import org.springframework.context.support.ClassPathXmlApplicationContext;

public class StrategySpringClient {

    public static void main(String[] args) {
        ApplicationContext context = new ClassPathXmlApplicationContext("Beans.xml");
        ContextSpring ct = (ContextSpring) context.getBean("ct");
        ct.doAction();
    }
}
看,这样就将spring引入了。
但是这样有好处也有坏处,如果我要根据不同的类型,比如说:合同是需要打印的,而情书是需要手写的。假设合同为类型2,情书为类型1,那我们怎么来自动适配?
三:高级版的spring策略模式
首先要修改Context类:
Java代码
package com.proxy.strategy;
import java.util.HashMap;
import java.util.Map;
/**
 *
 *
 * @author weique.lqf
 * @version $Id: ContextSpringFactory.java, v 0.1 2014-2-9 下午3:46:09 weique.lqf Exp $
 */
public class ContextSpringFactory {
    private Map<String, Strategy> stgMap = new HashMap<String, Strategy>();
    /**
     * Getter method for property <tt>stgMap</tt>.
     *
     * @return property value of stgMap
     */
    public Map<String, Strategy> getStgMap() {
        return stgMap;
    }
    /**
     * Setter method for property <tt>stgMap</tt>.
     *
     * @param stgMap value to be assigned to property stgMap
     */
    public void setStgMap(Map<String, Strategy> stgMap) {
        this.stgMap = stgMap;
    }
    public void doAction(String strType) {
        this.stgMap.get(strType).testStrategy();
    }
}
然后修改spring的配置文件:
Xml代码
<bean id="ctf" class = "com.proxy.strategy.ContextSpringFactory">
      <property name="stgMap">
         <map>
              <entry key="1" value-ref="writeStg"/>
              <entry key="2" value-ref="printStg"/>
         </map>
      </property>
   </bean>
执行的入口类修改为:
Java代码
package com.proxy.strategy;
import org.springframework.context.ApplicationContext;
import org.springframework.context.support.ClassPathXmlApplicationContext;
public class StrategySpringClientFactory {
    public static void main(String[] args) {
        //外部参数
        String type = "1";
        ApplicationContext context = new ClassPathXmlApplicationContext("Beans.xml");
        ContextSpringFactory ctf = (ContextSpringFactory) context.getBean("ctf");
        ctf.doAction(type);
        //type 2
        type = "2";
        ctf.doAction(type);
    }
}
然后运行下,看看会有什么结果?

Kenyataan:
Kandungan artikel ini disumbangkan secara sukarela oleh netizen, dan hak cipta adalah milik pengarang asal. Laman web ini tidak memikul tanggungjawab undang-undang yang sepadan. Jika anda menemui sebarang kandungan yang disyaki plagiarisme atau pelanggaran, sila hubungi admin@php.cn
Artikel sebelumnya:Java.util包下BitSet的用法Artikel seterusnya:java各种排序算法及实现

