Rumah >pembangunan bahagian belakang >Tutorial Python >Membina kalkulator menggunakan Flet dengan python
Membina kalkulator menggunakan Flet dengan python
- WBOYWBOYWBOYWBOYWBOYWBOYWBOYWBOYWBOYWBOYWBOYWBOYWBasal
- 2024-08-29 20:30:501147semak imbas
pengenalan
Helo, Arsey di sini, penceramah Python, ini blog pertama saya dan saya akan membimbing anda untuk membina apl kalkulator mudah ini menggunakan Flet. Saya sangat teruja untuk berkongsi perkara ini dengan anda dan di sini kita pergi.
Dalam era digital hari ini, mencipta aplikasi merentas platform adalah satu keperluan. Dengan banyak rangka kerja yang tersedia, memilih yang betul boleh menjadi mencabar. Satu rangka kerja tersebut ialah Flet, perpustakaan Python yang membolehkan pembangun membina web, desktop dan aplikasi mudah alih dengan mudah menggunakan Flutter, tetapi untuk Python.
Dalam blog ini, kami akan meneroka cara mencipta apl kalkulator asas menggunakan Flet, menggambarkan betapa mudah dan cekap rangka kerja ini.
KENAPA FLET?
Apabila saya memulakan pengaturcaraan, matlamat saya adalah untuk membina aplikasi mudah alih. Tanpa panduan yang jelas, saya memilih Python sebagai bahasa pertama saya. Ia menyeronokkan untuk belajar tetapi apabila saya memperoleh lebih banyak pengalaman, saya menyedari bahawa Python secara tradisinya tidak sesuai untuk pembangunan aplikasi, ia lebih biasa digunakan untuk analisis data dan tugasan yang berkaitan.
Sekarang mempelajari pembangunan Android dengan Kotlin untuk pembangunan asli dan Dart dengan Flutter untuk platform merentas, matlamat saya semakin dekat berkat kumpulan perpustakaan ini.
Kesedaran ini mengecewakan sehingga saya menemui rangka kerja seperti Kivy, Tkinter, Flet, dll., yang membolehkan Python digunakan untuk membina apl. Tidak seperti Kivy atau Tkinter, rangka kerja ini bagus tetapi memerlukan banyak penyesuaian untuk membangunkan aplikasi mudah alih yang kelihatan baik yang berfungsi dengan baik untuk Android dan iOS. Dan di situlah flet bersinar.
Flet ialah rangka kerja Python yang diilhamkan oleh Flutter, kit alat UI yang popular oleh Google. Keputusan yang boleh anda capai dengan flet sangat mengagumkan dan saya teruja untuk berkongsi lebih banyak lagi.
APA itu flet?
Flet ialah pakej ular sawa yang membolehkan pembangun membina antara muka pengguna secara langsung menggunakan kit alat UI Flutter.
Kelebihan utama Flet ialah ia menggabungkan kesederhanaan Python dan keupayaan UI Flutter yang kaya, membolehkan pembangunan pesat aplikasi merentas platform tanpa memerlukan pengalaman bahagian hadapan yang luas.
Flet ialah perpustakaan yang disertakan dengan bateri, jadi tidak memerlukan SDK dan boleh dipanjangkan dengan mudah dengan SDK Flutter.
Nota: Pemahaman asas tentang beberapa konsep bahagian hadapan adalah berfaedah, seperti model kotak, struktur susun atur seperti Flexbox dan Grid serta kedudukan. Walaupun anda masih boleh mengikuti tanpa pengetahuan ini, saya amat mengesyorkan agar anda membiasakan diri dengan konsep ini.
Sekarang, dengan mengatasinya, mari kita menyelami membina kalkulator kami!
MENYEDIAKAN PERSEKITARAN
Sebelum mendalami pengekodan, pastikan anda telah memasang Python pada mesin anda. Kemudian, ikut langkah ini untuk menyediakan persekitaran anda untuk Flet.
- Pasang Flet: Anda boleh memasang Flet menggunakan pip. Anda hanya boleh membuka terminal atau command prompt anda, taipkan arahan ini dan jalankannya.
flet pemasangan pip
- Buat fail Python baharu: selepas pemasangan berjaya, buka editor kod kegemaran anda seperti VS-Code, Pycharm, dsb.) dan buat fail Python baharu, namakannya main.py atau yang paling anda suka. Rasa teruja? Saya yakin anda adalah! Mari mula-mula menguji pemasangan kami berfungsi dengan frasa yang paling disukai dalam komuniti pembangun, "Hello World!"
Dalam fail Python kami, taipkan kod ini
import flet as ft

def main(page: ft.Page):
    page.add(ft.Text(value="Hello, World!"))

ft.app(target=main)
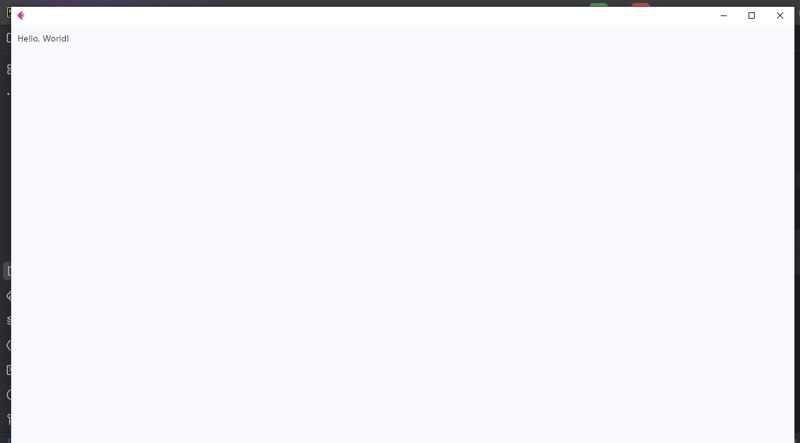
Jalankan kod untuk melihat sama ada semuanya berfungsi. Jika anda melihat "Hello, World!" dipaparkan, anda sudah bersedia untuk meneruskan membina kalkulator kami.
output

MENCIPTA SUSUN ATUR
Dalam bahagian ini, kami akan memfokuskan pada struktur kalkulator; di sini kami akan menggunakan widget lajur untuk menyusun paparan dan butang kami. Paparan akan menunjukkan input semasa, dan butang akan membenarkan interaksi pengguna. Itu aneh saya tidak pernah perasan bahawa UI boleh bermaksud Antara Muka Pengguna kepada Interaksi Pengguna.
Sekarang tulis kod di bawah seperti berikut.
from flet import (
    app, Page, Container, Column, Row,
    TextField, colors, border_radius, ElevatedButton, TextAlign, TextStyle
)


def main(page: Page):
    page.title = "Calculator"
    result = TextField(
        hint_text='0', text_size=20,
        color='white', text_align=TextAlign.RIGHT,
        hint_style=TextStyle(
            color=colors.WHITE, size=20
        ),
        read_only=True
    )

    def button_click(e):
        pass

    button_row0 = Row(
        [
            ElevatedButton(text='C',  on_click=button_click),
            ElevatedButton(text='^',  on_click=button_click),
            ElevatedButton(text='%',  on_click=button_click),
            ElevatedButton(text='/',  on_click=button_click),
        ]
    )
    button_row1 = Row(
        [
            ElevatedButton(text='7',  on_click=button_click),
            ElevatedButton(text='8',  on_click=button_click),
            ElevatedButton(text='9',  on_click=button_click),
            ElevatedButton(text='*',  on_click=button_click),
        ]
    )
    button_row2 = Row(
        [
            ElevatedButton(text='4',  on_click=button_click),
            ElevatedButton(text='5',  on_click=button_click),
            ElevatedButton(text='6',  on_click=button_click),
            ElevatedButton(text='-',  on_click=button_click),
        ]
    )
    button_row3 = Row(
        [
            ElevatedButton(text='1',  on_click=button_click),
            ElevatedButton(text='2',  on_click=button_click),
            ElevatedButton(text='3',  on_click=button_click),
            ElevatedButton(text='+',  on_click=button_click),
        ]
    )
    button_row4 = Row(
        [
            ElevatedButton(text='0',  on_click=button_click),
            ElevatedButton(text='.',  on_click=button_click),
            ElevatedButton(text='=',  on_click=button_click),
        ]
    )
    container = Container(
        width=350, padding=20,
        bgcolor=colors. BLACK,
        content=Column(
            [
                result,
                button_row0, button_row1, button_row2,
                button_row3, button_row4
            ]
        )
    )
    page.add(container)


if __name__ == '__main__':
    app(target=main)
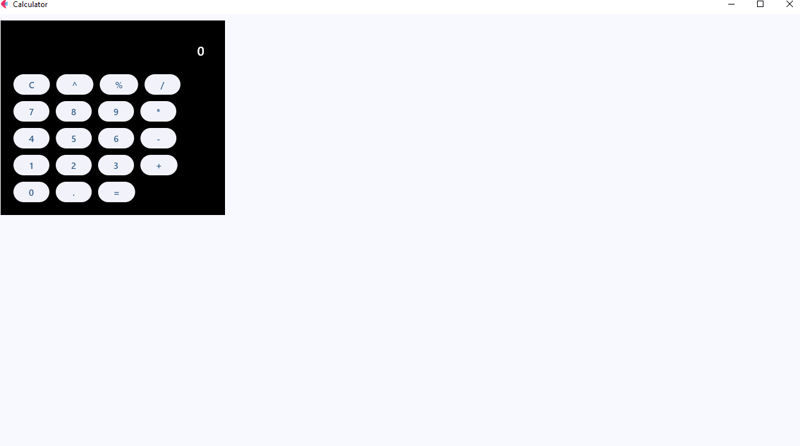
Selepas menjalankan kod di atas, anda akan melihat output susun atur kalkulator, ia mungkin tidak kelihatan bagus tetapi tidak mengapa! Kami akan meningkatkannya dengan menambahkan sedikit jarak, jejari pada bekas dan tema untuk menjadikan kalkulator kami kelihatan lebih berkilat.
Output

PENJELASAN KOD
Baiklah, kami telah membina susun atur, bukan? Nah, saya masih tahu sesetengah daripada anda di sana tidak memahami apa yang baru kami lakukan di sini. Duduk sahaja, tiada soalan, dan izinkan saya menerangkan fungsi kod itu.
In the first line, we import our controls. Flet controls are widgets used to lay out our application into a meaningful User Interface. But here we have imported app, Page, Container, Column, Row,
TextField, colors, border_radius, ElevatedButton, TextAlign, TextStyle.
Even though some of them are not entire widgets, like app, colors, border_radius, TextAlign, and TextStyle. These are classes and methods that provide us with extra functionalities of our application, for example
The app, allows us to launch our app in a standalone mode targeting to the main instance of our application.* colors* allow us to style our controls that support the color and bgcolor attribute without us struggling to define their names and border_radius allows us to curve the corners of our containers.
In line 7 we define the main app instance to Page; a page is a container for View Controls. So here I won’t go deep into views since it’s beyond the scope of this tutorial, but you reference here.
We now give the title to our page, with the page.titleattribute, the title on the title bar of our app.
In lines 9-16 is the result control with its required attributes, though it has many, we are gonna use these ones for this project, as you can see we have add a place holder of 0, giving it a size of 20, color to white, align text to right, and the read-only to true so we don’t allow external of soft keyboards to work directly in it.
Line 18 we defined our event handler, button_click this is where we will apply the logic to function our application, eventually making it a working calculator, but for now I just used a pass statement as a placeholder.
From lines 21 – 59, we defined our rows using the Row Widget, the row widget is a control that displays its children in a horizontal array or layout from left to right, similar to the linear layout in Android development, or inline elements in CSS the row controls works in the same way as them, it lays out controls in a horizontal axis or linearly.
Then the ElevatedButton_will represent buttons on the calculator’s UI, but notice we have given it the text and _onclick attributes, the text defines the data that will be displayed on the results when clicked using the onclick attribute that will call for the function button_click to handle events accordingly.
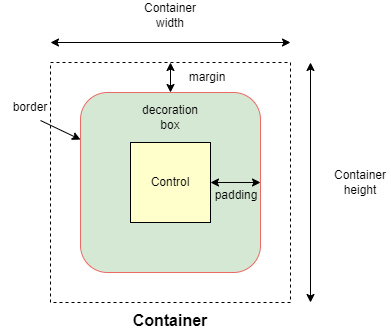
We have the container, the container is a control that will allow us to decorate a control with background color, spacing, applying borders and border radius, and position it with padding, margin, and alignment.
A container follows the box-model concept like the one for CSS as in the figure below,

The column control, like the Row control, this one displays its children in a vertical array or layout from top to bottom, this will allow us to vertically lay our buttons in the right order.
Now after defining our UI elements, we need to display them to our application and then call it. We do that by using the page.add() method which allows us to add and build our UI logically.
Then we have to call our app in the stand-alone mode, and that’s what lines 74-75 accomplished.
Adding functionality
Update your button click function to match this code below.
def button_click(e):
        if e.control.text == "=":
            try:
                result.value = str(eval(result.value))
            except Exception:
                result.value = "Error"
        elif e.control.text == "C":
            result.value = ""
        # elif e.control.text == "^":
        # logic for powers
        # pass
        else:
            result.value += e.control.text
        result.update()
CODE EXPLANATION
Okay, what does this code do under the hood; the button_click function is designed to handle various button click events within our calculator app.
Save to apply our current changes then run the calculator and see the results.
Here is a breakdown of how the code works
- Retrieving the button text: when a button is clicked, the function retrieves the button’s text (e.g., ‘1’, ‘2’, ‘+’, ‘-‘, ‘C’, ‘=’) through the e.control.text. this tells the functions which button the user has interacted with
- Clearing the display: when the user clicks the ‘C’ button, the calculator’s input is cleared. The result is set to an empty string (“”), and the display is reset to 0. This effectively clears the display making the calculator ready for a new input. Talk but a fresh number meal.
- Evaluating expressions: if the user clicks the “=” button, the calculator needs to evaluate the current mathematical expression, here we used the str() and eval() functions, and the str() function houses the eval() function so that the result is directly converted into a string and theeval() function will compute the result of the expression, then displayed as a string to our calculator’s display. Or else if the expression is invalid, an exception is caught, and the “Error” message will be displayed instead.
- For the rest of the buttons like numbers and operators: the function will append the button’s text to the display (which is initially “0” or when cleared), it replaces “0” with the button value, otherwise it adds button value to the end of the display.
- After processing the button click, the page is updated via page.update() method call to refresh the UI and show the updated input or result on the calculator's display. So every time you click the button and see the value on the display or a result, this is what the page.update() does.
NOTE: The eval() function is a quick way to evaluate expression but it can be risky with un-trusted input because it executes/evaluates any Python code. In a more secure app, you’d use a safer method for evaluating mathematical expressions.
Exercise: test your knowledge, of how would you handle the exponent ‘^’ expression so that if the user clicks the exponent button it returns the required output. For example, if the user inputs 2^2 the output will be 4, 5^5=25, and 3^4=81. You get the idea.
Let me know how you approached to this problem in the comments, okay, all done, let’s continue.
Improving our UI
Previously the user interface did not look that catchy and awesome, so let’s improve it, and update the buttons to match the following code.
button_row0 = Row(
    [
        ElevatedButton(text='C', expand=1, on_click=button_click,
                       bgcolor=colors.RED_ACCENT, color=colors.WHITE),
        ElevatedButton(text='^', expand=1, on_click=button_click,
                       bgcolor=colors.BLUE_ACCENT_100,
                       color=colors.RED_900
                       ),
        ElevatedButton(text='%', expand=1, on_click=button_click,
                       bgcolor=colors.BLUE_ACCENT_100,
                       color=colors.RED_900
                       ),
        ElevatedButton(text='/', expand=1, on_click=button_click,
                       bgcolor=colors.BLUE_ACCENT_100,
                       color=colors.RED_900
                       ),
    ]
)
button_row1 = Row(
    [
        ElevatedButton(text='7', expand=1, on_click=button_click),
        ElevatedButton(text='8', expand=1, on_click=button_click),
        ElevatedButton(text='9', expand=1, on_click=button_click),
        ElevatedButton(text='*', expand=1, on_click=button_click,
                       bgcolor=colors.BLUE_ACCENT_100,
                       color=colors.RED_900
                       ),
    ]
)
button_row2 = Row(
    [
        ElevatedButton(text='4', expand=1, on_click=button_click),
        ElevatedButton(text='5', expand=1, on_click=button_click),
        ElevatedButton(text='6', expand=1, on_click=button_click),
        ElevatedButton(text='-', expand=1, on_click=button_click,
                       bgcolor=colors.BLUE_ACCENT_100
                       ),
    ]
)
button_row3 = Row(
    [
        ElevatedButton(text='1', expand=1, on_click=button_click),
        ElevatedButton(text='2', expand=1, on_click=button_click),
        ElevatedButton(text='3', expand=1, on_click=button_click),
        ElevatedButton(text='+', expand=1, on_click=button_click,
                       bgcolor=colors.BLUE_ACCENT_100,
                       color=colors.RED_900),
    ]
)
button_row4 = Row(
    [
        ElevatedButton(text='0', expand=1, on_click=button_click),
        ElevatedButton(text='.', expand=1, on_click=button_click),
        ElevatedButton(
            text='=', expand=2, on_click=button_click,
            bgcolor=colors.GREEN_ACCENT, color=colors.AMBER
        ),
    ]
)
What have we changed exactly, hmm!
For the buttons, we could have used the width attribute but that won’t work as we want it would break the UI, feel free to test it.
But we have this expand attribute which allows only a Boolean and an int data type value.
For the normal buttons like the operators, numbers, and the clear button we expanded them to 1, and for the equals button, we expanded it by 2.
Now what does the expand attribute do, the expand attribute allows a control to fill the available space in a given container.
So the buttons with expand 1 will have an equal size of width and for the equals button it will expand 2, or in simple terms span two buttons or will equal two buttons in width.
Notice that we have added colors and background colors to some of our buttons to make them stand out from the numbers buttons.
Understand, great.
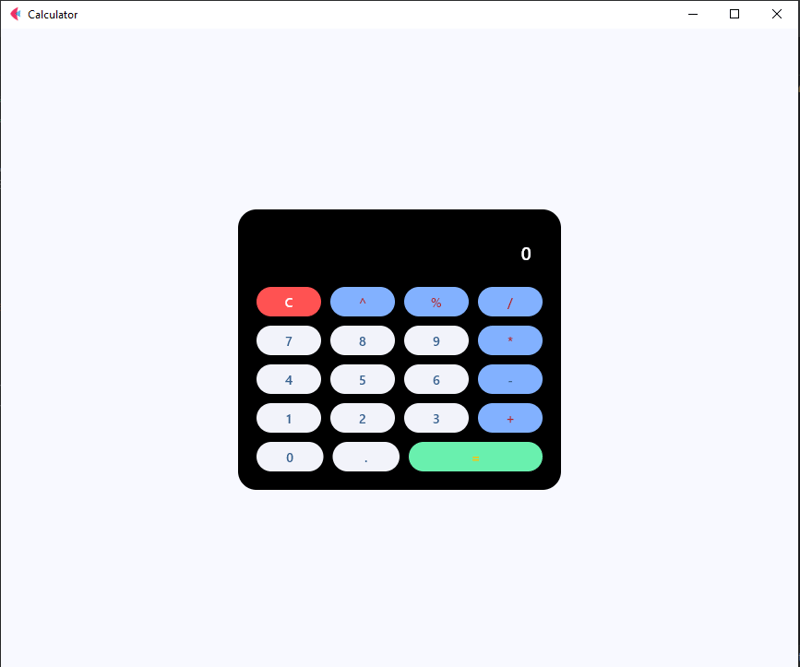
In the container add these attributes, just after the padding attribute to make it look more appealing and user friendly.
border_radius=border_radius.all(20),
Output

Now, you have a fully functional calculator built with Flet! Feel free to customize it to your liking or add more features. You can even package it as a standalone APK, AAB to launch on Google Play Store or Apple App Store
Here is the full code,
from flet import (
    app, Page, Container, Column, Row,
    TextField, colors, border_radius, ElevatedButton, TextAlign, TextStyle
)
from flet_core import ThemeMode


def main(page: Page):
    page.title = "Calculator"
    page.theme_mode = ThemeMode.DARK
    page.horizontal_alignment = page.vertical_alignment = 'center'
    result = TextField(
        hint_text='0', text_size=20,
        color='white', text_align=TextAlign.RIGHT,
        hint_style=TextStyle(
            color=colors.WHITE, size=20
        ),
        read_only=True
    )

    def button_click(e):
        if e.control.text == "=":
            try:
                result.value = str(eval(result.value))
            except Exception:
                result.value = "Error"
        elif e.control.text == "C":
            result.value = ""
        # elif e.control.text == "^":
        # logic for powers
        # pass
        else:
            result.value += e.control.text
        result.update()

    button_row0 = Row(
        [
            ElevatedButton(text='C', expand=1, on_click=button_click,
                           bgcolor=colors.RED_ACCENT, color=colors.WHITE),
            ElevatedButton(text='^', expand=1, on_click=button_click,
                           bgcolor=colors.BLUE_ACCENT_100,
                           color=colors.RED_900
                           ),
            ElevatedButton(text='%', expand=1, on_click=button_click,
                           bgcolor=colors.BLUE_ACCENT_100,
                           color=colors.RED_900
                           ),
            ElevatedButton(text='/', expand=1, on_click=button_click,
                           bgcolor=colors.BLUE_ACCENT_100,
                           color=colors.RED_900
                           ),
        ]
    )
    button_row1 = Row(
        [
            ElevatedButton(text='7', expand=1, on_click=button_click),
            ElevatedButton(text='8', expand=1, on_click=button_click),
            ElevatedButton(text='9', expand=1, on_click=button_click),
            ElevatedButton(text='*', expand=1, on_click=button_click,
                           bgcolor=colors.BLUE_ACCENT_100,
                           color=colors.RED_900
                           ),
        ]
    )
    button_row2 = Row(
        [
            ElevatedButton(text='4', expand=1, on_click=button_click),
            ElevatedButton(text='5', expand=1, on_click=button_click),
            ElevatedButton(text='6', expand=1, on_click=button_click),
            ElevatedButton(text='-', expand=1, on_click=button_click,
                           bgcolor=colors.BLUE_ACCENT_100
                           ),
        ]
    )
    button_row3 = Row(
        [
            ElevatedButton(text='1', expand=1, on_click=button_click),
            ElevatedButton(text='2', expand=1, on_click=button_click),
            ElevatedButton(text='3', expand=1, on_click=button_click),
            ElevatedButton(text='+', expand=1, on_click=button_click,
                           bgcolor=colors.BLUE_ACCENT_100,
                           color=colors.RED_900),
        ]
    )
    button_row4 = Row(
        [
            ElevatedButton(text='0', expand=1, on_click=button_click),
            ElevatedButton(text='.', expand=1, on_click=button_click),
            ElevatedButton(
                text='=', expand=2, on_click=button_click,
                bgcolor=colors.GREEN_ACCENT, color=colors.AMBER
            ),
        ]
    )
    container = Container(
        width=350, padding=20,
        bgcolor=colors.BLACK, border_radius=border_radius.all(20),
        content=Column(
            [
                result,
                button_row0, button_row1, button_row2,
                button_row3, button_row4
            ]
        )
    )
    page.add(container)


if __name__ == '__main__':
    app(target=main)
Conclusion
Building this calculator has been a fun experience for me and a learning experience for you, and I hope you enjoyed it too.
Let me know what kind of project you’d like to build using this framework or any other like PyQt, Kivy, or Tkinter. I’d be glad to make a tutorial on it. Or even web design and development tutorials, also are allowed.
Feel free to ask questions, I’ll do my best to answer them.
If you've read this far, thank you—I appreciate it!
Atas ialah kandungan terperinci Membina kalkulator menggunakan Flet dengan python. Untuk maklumat lanjut, sila ikut artikel berkaitan lain di laman web China PHP!

