Rumah >pembangunan bahagian belakang >Golang >Pengesahan dengan Golang dan AWS Cognito
Pengesahan dengan Golang dan AWS Cognito
- WBOYWBOYWBOYWBOYWBOYWBOYWBOYWBOYWBOYWBOYWBOYWBOYWBasal
- 2024-08-19 06:32:11547semak imbas
Apakah kognito?
Pengesahan aplikasi adalah sesuatu yang sangat penting dalam sistem, tetapi juga sangat sensitif, terdapat pelbagai pelaksanaan, keselamatan, pengesahan yang perlu dipertimbangkan.
Saya memutuskan untuk membuat siaran yang menunjukkan tentang Cognito, alat yang sangat bagus daripada AWS yang boleh membantu anda dalam pengesahan dan pengesahan pengguna untuk aplikasi Web dan mudah alih yang ramai orang tidak tahu.
Cognito ialah platform AWS yang bertanggungjawab untuk mencipta dan mengesahkan data akses pengguna, serta dapat mendaftarkan pengguna dan menyimpan maklumat mereka, selain menjana token OAuth, dan Cognito juga boleh menyediakan semua pengesahan pengguna.
Kami boleh mencipta beberapa data pengguna seperti: e-mel, nama, telefon, tarikh lahir, nama panggilan, jantina, tapak web dan banyak lagi, kami juga boleh meletakkan medan tersuai.
Cognito masih membenarkan kami bekerja dengan "penyedia bersekutu", yang dikenali sebagai log masuk sosial, seperti Google, Facebook dan GitHub, kami tidak akan menangani siaran ini, tetapi anda boleh melakukannya dengan kognito.
Apa yang akan kita lakukan?
Kami akan membuat beberapa titik akhir untuk menunjukkan cara kognito berfungsi, kami akan mencipta pengguna, mengesahkan e-mel, log masuk, mencari pengguna menggunakan token yang disediakan oleh kognito, mengemas kini maklumat.
Menyediakan projek
Kami akan melakukan sesuatu yang sangat mudah, kami tidak akan bimbang tentang bapa projek, kami ingin menangani hanya penggunaan pengetahuan.
Untuk mencipta titik akhir kita akan menggunakan gin.
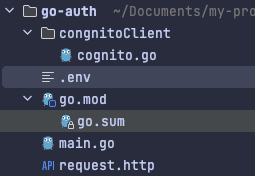
Mari kita buat fail berikut:
Titik masuk utama aplikasi kami.pergi di akar projek
.env Untuk menyimpan kelayakan kognitif
Tampalan dipanggil cognitoClient dan di dalam fail bernama cognito.go
Terdapat fail yang dipanggil request.http, untuk melengkapkan permintaan anda.
Strukturnya adalah seperti berikut:
Menyediakan Cognito pada AWS
Sebelum memulakan kod, kami akan mengkonfigurasi kognito dalam AWS, untuk mengakses panel dan mencari mengikut kognito, selepas kami membuat kumpulan kami, pilih pilihan Tambah direktori pengguna pada apl anda.
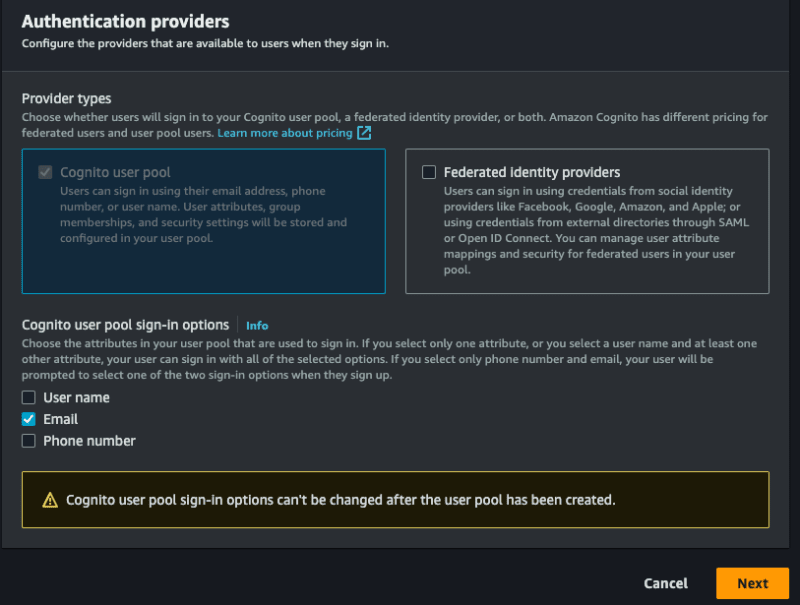
Untuk Jenis pembekal, pilih pilihan Kognito pengguna pilihan, anda boleh memilih untuk membenarkan log masuk menggunakan e-mel, nama pengguna dan telefon, anda hanya boleh memilih untuk e-mel, pilih apa yang anda lebih suka, pilih assim ke peringkat pertama:
Saya perlu mengkonfigurasi beberapa perkara lagi, mari pergi!
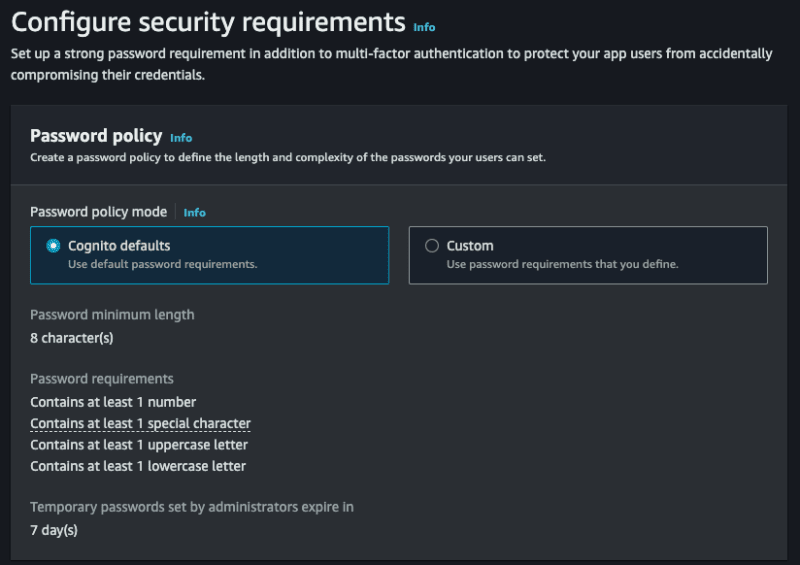
- Mod dasar kata laluan membolehkan anda memilih dasar tertentu, mari kita deixar Kognito lalai.
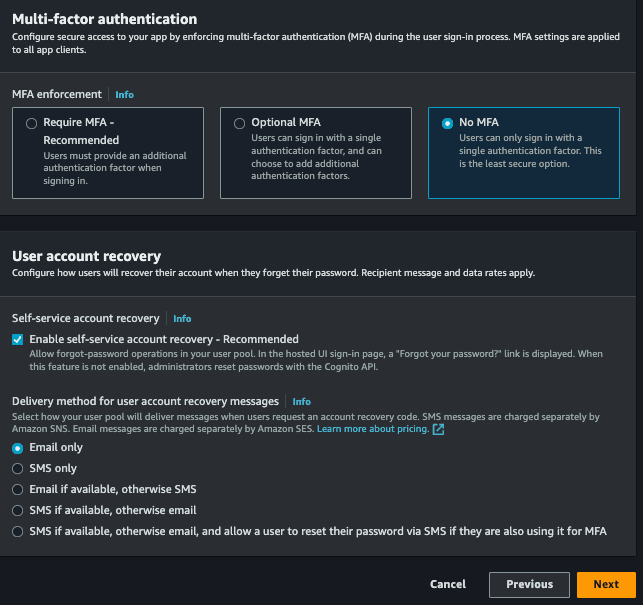
- Pengesahan berbilang faktor membolehkan log masuk kami mempunyai pengesahan dua faktor, mari kita pergi tanpa, tetapi anda boleh melaksanakannya jika mahu, anda boleh memilih Tiada MFA.
- Akhir sekali, atau Pemulihan akaun pengguna, anda boleh memilih cara untuk memulihkan akaun anda, anda hanya boleh memilih e-mel.
Langkah seterusnya:
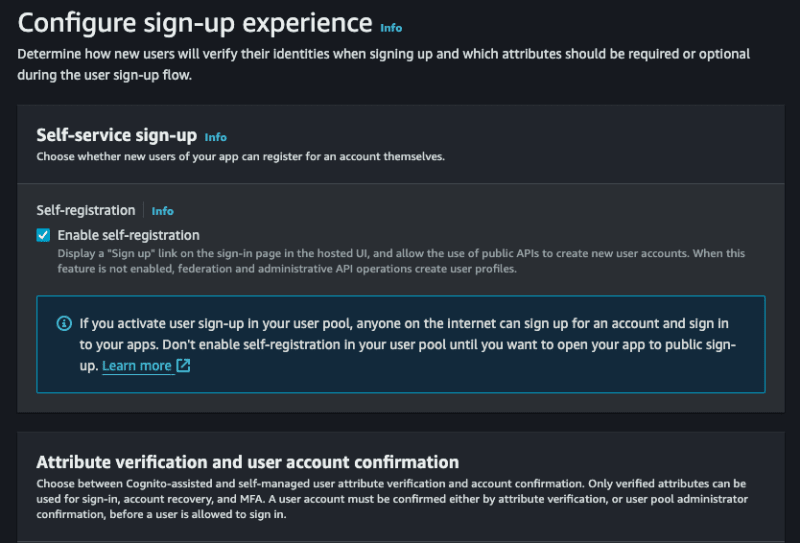
- Pendaftaran layan diri, kami akan membenarkan mana-mana orang berbuat demikian, biarkan terpilih.
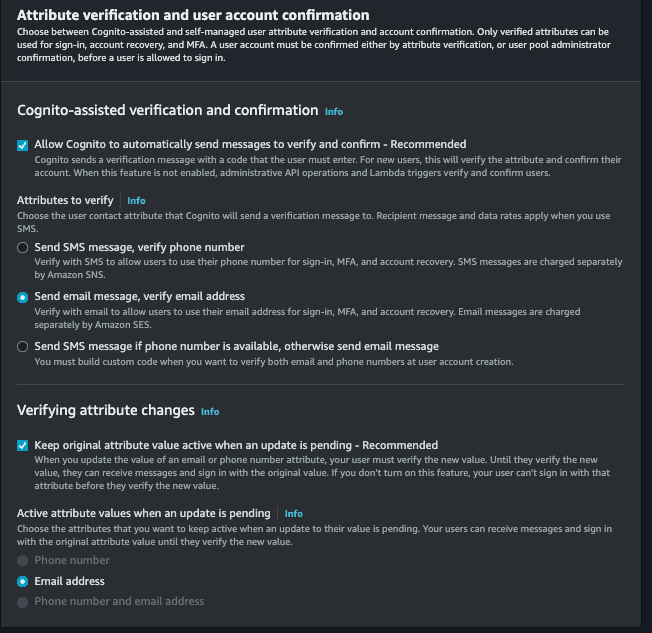
- Pengesahan dan pengesahan berbantukan kognito, benarkan kognito bertanggungjawab untuk mengesahkan identiti pengguna, semaknya dan juga pilih pilihan Hantar mesej e-mel, sahkan alamat e-mel.
- Mengesahkan perubahan atribut, semak pilihan ini, supaya pengemaskinian e-mel pengguna perlu disahkan semula.
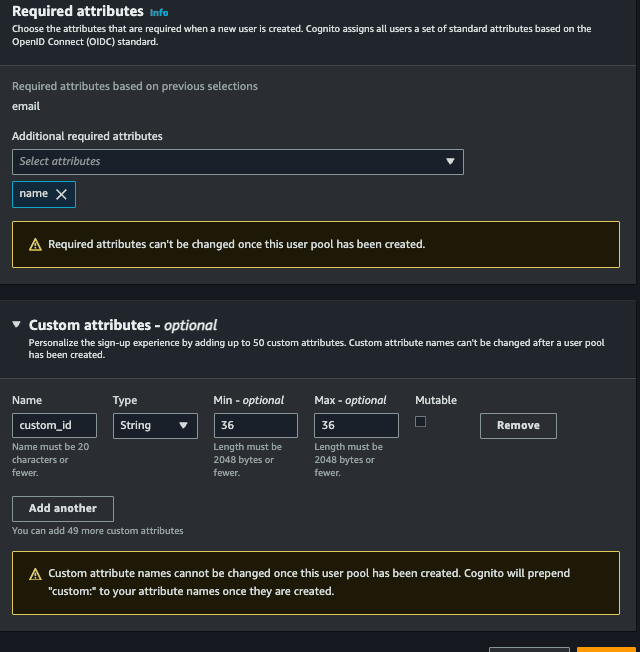
- Atribut yang diperlukan, pilih medan yang anda mahu wajibkan untuk mencipta pengguna baharu, anda akan memilih pilihan, e-mel (dan nama) dan nama itu juga akan diperlukan oleh bapa anda.
- Atribut tersuai, ia adalah pilihan, tetapi anda boleh menambah medan tersuai, sebagai contoh, anda akan mencipta medan yang dipanggil custom_id yang mana-mana uuid.
Peringkat ini juga berlaku:
Seterusnya, pilih pilihan Hantar e-mel dengan Cognito, jadi kami tidak perlu mengkonfigurasi apa-apa untuk mencetuskan e-mel.
Dalam langkah seterusnya, dalam Nama kumpulan pengguna letakkan nama yang anda mahu dalam Nama klien apl, letakkan juga nama yang anda mahu dan teruskan.
Pada peringkat terakhir kita tidak perlu mengubah apa-apa, cuma selesaikan dan buat kumpulan pengguna.
Dengan segala-galanya, akses atau kognito > Kumpulan pengguna, pilih kumpulan yang baru anda buat, bahagian ini akan menyenaraikan semua pengguna aplikasi anda dan adalah mungkin untuk membatalkan token pengguna, menyahaktifkan, mengesahkan antara fungsi lain.
Kami akan menentukan id kumpulan, untuk dapat menggunakan Go sdk untuk aws, untuk akses kepada kumpulan yang dibuat Penyatuan apl > Senarai klien apl dan lihat ID Pelanggan kami:

Jom simpan id ini dalam fail .env kami:
COGNITO_CLIENT_ID=client_id
Mengingat bahawa anda masih perlu mempunyai bukti kelayakan AWS, biasanya terdapat dalam direktori /Users/your-user/.aws, jika anda belum mengkonfigurasinya lagi, lihat di sini cara melakukannya.
Melaksanakan kognito
Mari kita pisahkan bahagian kognito ke dalam fail lain.
Mendaftar pengguna
Di dalam fail cognito.go, kami akan memulakan kognito kami dan mencipta antara muka kami:
  package congnitoClient

  import (
    "github.com/aws/aws-sdk-go/aws"
    "github.com/aws/aws-sdk-go/aws/session"
    cognito "github.com/aws/aws-sdk-go/service/cognitoidentityprovider"
    "github.com/google/uuid"
  )

  type User struct {
    Name     string `json:"name" binding:"required"`
    Email    string `json:"email" binding:"required,email"`
    Password string `json:"password" binding:"required"`
  }

  type CognitoInterface interface {
    SignUp(user *User) error
  }

  type cognitoClient struct {
    cognitoClient *cognito.CognitoIdentityProvider
    appClientID   string
  }

  func NewCognitoClient(appClientId string) CognitoInterface {
    config := &aws.Config{Region: aws.String("us-east-1")}
    sess, err := session.NewSession(config)
    if err != nil {
      panic(err)
    }
    client := cognito.New(sess)

    return &cognitoClient{
      cognitoClient: client,
      appClientID:   appClientId,
    }
  }

  func (c *cognitoClient) SignUp(user *User) error {
    return nil
  }
Mula-mula kita mencipta struct dipanggil Pengguna, struct ini akan mempunyai medan pengguna yang perlu kita simpan dalam kognito.
Kemudian kami mencipta antara muka yang dipanggil CognitoInterface, kami akan mempunyai kaedah yang akan kami gunakan, pertama kami hanya akan mempunyai SignUp yang akan menerima penunjuk kepada struct Pengguna.
Kemudian kami akan mempunyai satu lagi struct dipanggil cognitoClient yang akan mengandungi contoh kami untuk NewCognitoClient yang akan menjadi pembina kami.
Seperti yang dinyatakan, NewCognitoClient akan menjadi seperti pembina kami, di situlah kami akan membuat sesi dengan AWS dan mengembalikan sambungan ini. Sambungan ini boleh menjadi pembolehubah global, dalam kes kami, kami tidak akan melakukan ini, terpulang kepada anda untuk menyemak pendekatan terbaik untuk kes penggunaan anda.
Sekarang mari kita laksanakan SignUp:
  func (c *cognitoClient) SignUp(user *User) error {
    userCognito := &cognito.SignUpInput{
      ClientId: aws.String(c.appClientID),
      Username: aws.String(user.Email),
      Password: aws.String(user.Password),
      UserAttributes: []*cognito.AttributeType{
        {
          Name:  aws.String("name"),
          Value: aws.String(user.Name),
        },
        {
          Name:  aws.String("email"),
          Value: aws.String(user.Email),
        },
        {
          Name:  aws.String("custom:custom_id"),
          Value: aws.String(uuid.NewString()),
        },
      },
    }
    _, err := c.cognitoClient.SignUp(userCognito)
    if err != nil {
      return err
    }
    return nil
  }
Kami akan menggunakan AttributeType daripada Cognito untuk memasang parameter yang akan kami hantar ke Pendaftaran SDK AWS, ambil perhatian bahawa custom_id yang merupakan medan tersuai kami, perlu diletakkan tersuai sebelum ini, tanpa ini ia tidak akan diterima , kami baru sahaja mencipta uuid dengan pakej Google, medan ini hanyalah untuk menunjukkan cara menggunakan atribut tersuai.
Medan ClientId merujuk kepada COGNITO_CLIENT_ID env kami, kami akan menyampaikannya apabila memulakan main.go.
Ini yang kita perlukan untuk menyelamatkan pengguna, mudah bukan?
Jangan lupa mulakan projek dengan:
go mod init <your project name>
Dan pasang pakej yang diperlukan:
go mod tidy
Mengesahkan akaun
Mari kita cipta satu lagi fungsi untuk mengesahkan akaun pengguna melalui e-mel. Untuk mengesahkan akaun, pengguna perlu memasukkan kod yang dihantar melalui e-mel. Mari buat struct baharu dan tambah kaedah ConfirmAccount baharu pada antara muka:
  type UserConfirmation struct {
    Email string `json:"email" binding:"required,email"`
    Code  string `json:"code" binding:"required"`
  }
  type CognitoInterface interface {
    SignUp(user *User) error
    ConfirmAccount(user *UserConfirmation) error
  }
Sekarang mari kita laksanakan:
  func (c *cognitoClient) ConfirmAccount(user *UserConfirmation) error {
    confirmationInput := &cognito.ConfirmSignUpInput{
      Username:         aws.String(user.Email),
      ConfirmationCode: aws.String(user.Code),
      ClientId:         aws.String(c.appClientID),
    }
    _, err := c.cognitoClient.ConfirmSignUp(confirmationInput)
    if err != nil {
      return err
    }
    return nil
  }
Ia sangat mudah, kami akan menggunakan ConfirmSignUpInput daripada pakej kognito untuk memasang parameter, mengingati bahawa Nama Pengguna ialah e-mel pengguna. Akhir sekali, kami akan memanggil ConfirmSignUp dengan menghantar pengesahanInput.
Mengingati bahawa kami hanya mengembalikan ralat, anda boleh memperbaiki dan menyemak jenis mesej ralat.
Log masuk
Ini sepatutnya menjadi fungsi yang paling banyak digunakan, mari buat kaedah yang dipanggil Log Masuk dan struct:
  type UserLogin struct {
    Email    string `json:"email" binding:"required,email"`
    Password string `json:"password" binding:"required"`
  }
  type CognitoInterface interface {
    SignUp(user *User) error
    ConfirmAccount(user *UserConfirmation) error
    SignIn(user *UserLogin) (string, error)
  }
Log Masuk kami akan menerima Log Masuk Pengguna.
Mari kita laksanakan:
  func (c *cognitoClient) SignIn(user *UserLogin) (string, error) {
    authInput := &cognito.InitiateAuthInput{
      AuthFlow: aws.String("USER_PASSWORD_AUTH"),
      AuthParameters: aws.StringMap(map[string]string{
        "USERNAME": user.Email,
        "PASSWORD": user.Password,
      }),
      ClientId: aws.String(c.appClientID),
    }
    result, err := c.cognitoClient.InitiateAuth(authInput)
    if err != nil {
      return "", err
    }
    return *result.AuthenticationResult.AccessToken, nil
  }
Kami akan menggunakan fungsi InitiateAuth daripada pakej kognito aws, kami perlu menghantar nama pengguna (e-mel pengguna), kata laluan dan AuthFlow, medan ini merujuk kepada jenis akses yang akan kami benarkan, dalam kes kami USER_PASSWORD_AUTH.
Jika anda menerima ralat seperti ini:
Anda mempercayai semua proksi, ini TIDAK selamat. Kami mengesyorkan anda untuk menetapkan nilai
Adalah perlu untuk mendayakan aliran ALLOW_USER_PASSWORD_AUTH, untuk mengkonfigurasinya mengakses kognito pada panel aws, pergi ke:
Kolam pengguna > Selecione seu pool > Penyepaduan apl > Senarai pelanggan apl > Pilih pelanggan um, akan membuka skrin ini:
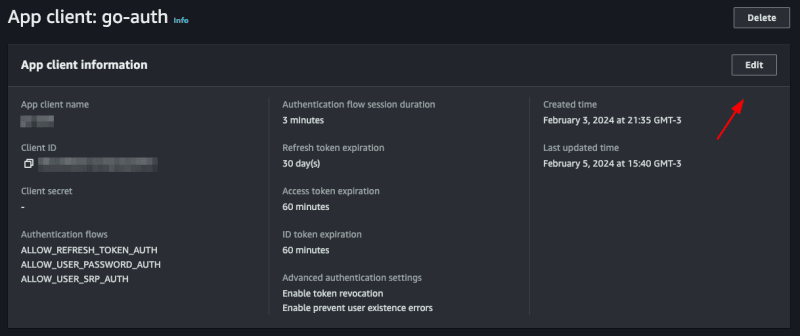
Click on edit and in Authentication flows select the option ALLOW_USER_PASSWORD_AUTH then save, with this you can now log in with the user's password and email.
Listando um usuário
Para mostrar como utilizar o token jwt fornecido pelo cognito vamos criar um endpoint que mostra os dados do usuário salvos no cognito apenas com o token.
Let's create another function called GetUserByToken that will receive a token and return a struct of type GetUserOutput that we will get from the cognito package.
  type CognitoInterface interface {
    SignUp(user *User) error
    ConfirmAccount(user *UserConfirmation) error
    SignIn(user *UserLogin) (string, error)
    GetUserByToken(token string) (*cognito.GetUserOutput, error)
  }
If you click on GetUserOutput you will see what is inside this struct
  type GetUserOutput struct {
    _ struct{} `type:"structure"`
    MFAOptions []*MFAOptionType `type:"list"`
    PreferredMfaSetting *string `type:"string"`
    UserAttributes []*AttributeType `type:"list" required:"true"`
    UserMFASettingList []*string `type:"list"`
    Username *string `min:"1" type:"string" required:"true" sensitive:"true"`
  }
inside the _ struct{} there are custom attributes that we created for our user, in our case the custom_id.
Let's implement:
  func (c *cognitoClient) GetUserByToken(token string) (*cognito.GetUserOutput, error) {
    input := &cognito.GetUserInput{
      AccessToken: aws.String(token),
    }
    result, err := c.cognitoClient.GetUser(input)
    if err != nil {
      return nil, err
    }
    return result, nil
  }
We use GetUser from the cognito package, it only needs an AccessToken which is the token provided by cognito itself.
Updating password
Finally, we will update the user's password. To do this, we will need the email address and the new password. We already have the UserLogin struct with the fields we need. We will reuse it. If you wish, create a new one just for this function. Let's create the UpdatePassword function:
  type CognitoInterface interface {
    SignUp(user *User) error
    ConfirmAccount(user *UserConfirmation) error
    SignIn(user *UserLogin) (string, error)
    GetUserByToken(token string) (*cognito.GetUserOutput, error)
    UpdatePassword(user *UserLogin) error
  }
Let's implement:
  func (c *cognitoClient) UpdatePassword(user *UserLogin) error {
    input := &cognito.AdminSetUserPasswordInput{
      UserPoolId: aws.String(os.Getenv("COGNITO_USER_POOL_ID")),
      Username:   aws.String(user.Email),
      Password:   aws.String(user.Password),
      Permanent:  aws.Bool(true),
    }
    _, err := c.cognitoClient.AdminSetUserPassword(input)
    if err != nil {
      return err
    }
    return nil
  }
We will use the AdminSetUserPassword function from the cognito package, we need to pass the user's email and the new password, in addition we have to pass the UserPoolId, we will put the COGNITO_USER_POOL_ID in the .env file, to search in aws just access your pool and copy the User pool ID

We will also pass Permanent, informing that it is a permanent password, you could pass false, so Cognito would create a temporary password for the user, this will depend on the strategy you will use in your application.
Creating the main
Let's create our main.go, this will be the file where we will start cognito and create our routes.
  func main() {
    err := godotenv.Load()
    if err != nil {
      panic(err)
    }
    cognitoClient := congnitoClient.NewCognitoClient(os.Getenv("COGNITO_CLIENT_ID"))
    r := gin.Default()

    fmt.Println("Server is running on port 8080")
    err = r.Run(":8080")
    if err != nil {
      panic(err)
    }
  }
First we will load our envs with the godotenv package, then we start our cognito client, passing the COGNITO_CLIENT_ID, which we got earlier, then we start gin and create a server, that's enough.
Creating the endpoints
Creating a user
Let's create a function inside the main.go file itself, let's call it CreateUser:
  func CreateUser(c *gin.Context, cognito congnitoClient.CognitoInterface) error {
    var user congnitoClient.User
    if err := c.ShouldBindJSON(&user); err != nil {
      return errors.New("invalid json")
    }
    err := cognito.SignUp(&user)
    if err != nil {
      return errors.New("could not create use")
    }
    return nil
  }
Something simple, we just convert what we receive in the body to our struct using gin's ShouldBindJSON, then we call the SignUp that we created in cognito.go.
Now let's create the endpoint inside the main.go function:
  r.POST("user", func(context *gin.Context) {
        err := CreateUser(context, cognitoClient)
        if err != nil {
            context.JSON(http.StatusBadRequest, gin.H{"error": err.Error()})
            return
        }
        context.JSON(http.StatusCreated, gin.H{"message": "user created"})
    })
We call the function we just created CreateUser, if there is an error we throw a StatusBadRequest, if it is successful a StatusCreated, let's test.
Let's do a go mod tidy downloading all the packages, then we'll run the application with go run main.go
Now we can create a call in the request.http file and execute:
POST http://localhost:8080/user HTTP/1.1
content-type: application/json

{
  "Name": "John Doe",
  "email": "wivobi1159@bitofee.com",
  "password": "Pass@1234"
}
If everything is correct we will receive the message:
{
  "message": "user created"
}
Now entering the Cognito panel on AWS, and accessing the pool then the users, we will have our user there:

Confirming a user
Note that the user we created above is not confirmed, let's confirm it!
Create a function called ConfirmAccount in the main.go file:
  func ConfirmAccount(c *gin.Context, cognito congnitoClient.CognitoInterface) error {
    var user congnitoClient.UserConfirmation
    if err := c.ShouldBindJSON(&user); err != nil {
      return errors.New("invalid json")
    }
    err := cognito.ConfirmAccount(&user)
    if err != nil {
      return errors.New("could not confirm user")
    }
    return nil
  }
Same concept we used before, let's convert the body to the UserConfirmation struct and pass it to ConfirmAccount in cognito.go.
Let's create the endpoint:
  r.POST("user/confirmation", func(context *gin.Context) {
        err := ConfirmAccount(context, cognitoClient)
        if err != nil {
            context.JSON(http.StatusBadRequest, gin.H{"error": err.Error()})
            return
        }
        context.JSON(http.StatusCreated, gin.H{"message": "user confirmed"})
    })
It's also simple, we just handle the error and return a message, let's create our call and test it:
POST http://localhost:8080/user/confirmation HTTP/1.1
content-type: application/json

{
  "email": "wivobi1159@bitofee.com",
  "code": "363284"
}
We will receive the message:
{
  "message": "user confirmed"
}
Now accessing Cognito again on the AWS panel, notice that the user is confirmed, remembering that you need to enter a valid email, you can use a temporary email to play around, but it needs to be valid, as Cognito will send the confirmation code and it needs to be a valid code to confirm successfully.

Login
Now let's create our token, to do this in the main.go file create a function called SignIn, this function will return an error and a token.
  func SignIn(c *gin.Context, cognito congnitoClient.CognitoInterface) (string, error) {
    var user congnitoClient.UserLogin
    if err := c.ShouldBindJSON(&user); err != nil {
      return "", errors.New("invalid json")
    }
    token, err := cognito.SignIn(&user)
    if err != nil {
      return "", errors.New("could not sign in")
    }
    return token, nil
  }
Same pattern as the other functions, we convert the body to the UserLogin struct and pass it to SignIn of cognito.go.
Let's create the endpoint:
  r.POST("user/login", func(context *gin.Context) {
        token, err := SignIn(context, cognitoClient)
        if err != nil {
            context.JSON(http.StatusBadRequest, gin.H{"error": err.Error()})
            return
        }
        context.JSON(http.StatusCreated, gin.H{"token": token})
    })
Now we return a token to the user, let's create the call and test:
POST http://localhost:8080/user/login HTTP/1.1
content-type: application/json

{
  "email": "wivobi1159@bitofee.com",
  "password": "Pass@1234"
}
When making the call we will receive our jwt token:
{
  "token": "token_here"
}
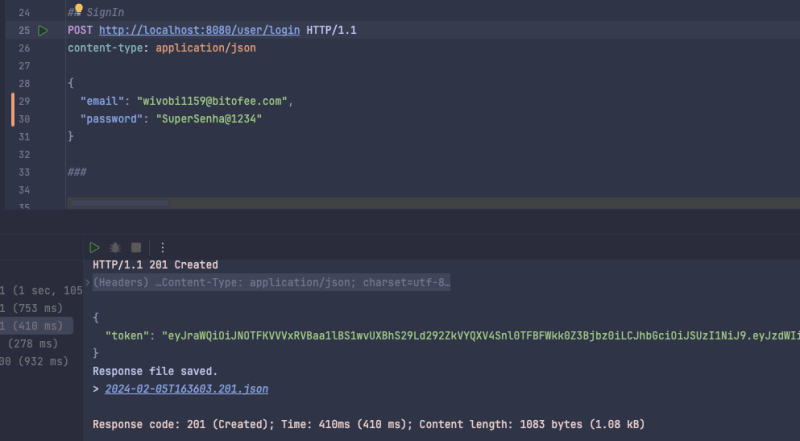
If we get the jwt token we can see what's inside, using the website jwt.io.
Listing a user
Now we will list the user data saved in cognito using only the token, to do this create a function called GetUserByToken in main.go and we will need a struct to represent the response that we will return to the user, we will create it in main as well:
  type UserResponse struct {
    ID            string `json:"id"`
    Name          string `json:"name"`
    Email         string `json:"email"`
    CustomID      string `json:"custom_id"`
    EmailVerified bool   `json:"email_verified"`
  }

  func main() {}
Now the function:
  func GetUserByToken(c *gin.Context, cognito congnitoClient.CognitoInterface) (*UserResponse, error) {
    token := strings.TrimPrefix(c.GetHeader("Authorization"), "Bearer ")
    if token == "" {
      return nil, errors.New("token not found")
    }
    cognitoUser, err := cognito.GetUserByToken(token)
    if err != nil {
      return nil, errors.New("could not get user")
    }
    user := &UserResponse{}
    for _, attribute := range cognitoUser.UserAttributes {
      switch *attribute.Name {
      case "sub":
        user.ID = *attribute.Value
      case "name":
        user.Name = *attribute.Value
      case "email":
        user.Email = *attribute.Value
      case "custom:custom_id":
        user.CustomID = *attribute.Value
      case "email_verified":
        emailVerified, err := strconv.ParseBool(*attribute.Value)
        if err == nil {
          user.EmailVerified = emailVerified
        }
      }
    }
    return user, nil
  }
This will be the biggest function, we need to map what we receive from Cognito to our UserResponse struct, we do this with a for and a switch, of course we could improve it, but for the sake of example we will keep it like this. Also to map custom attributes we need to put custom before, like custom:custom_id.
We also check if the user passed the token in the header, if not we return an error.
Let's create the endpoint:
  r.GET("user", func(context *gin.Context) {
        user, err := GetUserByToken(context, cognitoClient)
        if err != nil {
            if err.Error() == "token not found" {
                context.JSON(http.StatusUnauthorized, gin.H{"error": "token not found"})
                return
            }
            context.JSON(http.StatusBadRequest, gin.H{"error": err.Error()})
            return
        }
        context.JSON(http.StatusOK, gin.H{"user": user})
    })
We perform the same validation as the other endpoints, but now we check the error type and if it is of the token not found type we return a StatusUnauthorized.
Let's test:
GET http://localhost:8080/user HTTP/1.1
content-type: application/json
Authorization: Bearer token_jwt
Let's receive the user:
{
  "user": {
    "id": "50601dc9-7234-419a-8427-2a4bda92d33f",
    "name": "John Doe",
    "email": "wivobi1159@bitofee.com",
    "custom_id": "cb748d09-40de-457a-af23-ed9483d69f8d",
    "email_verified": true
  }
}
Updating password
Finally, let's create the UpdatePassword function that will update the user's password:
  func UpdatePassword(c *gin.Context, cognito congnitoClient.CognitoInterface) error {
    token := strings.TrimPrefix(c.GetHeader("Authorization"), "Bearer ")
    if token == "" {
      return errors.New("token not found")
    }
    var user congnitoClient.UserLogin
    if err := c.ShouldBindJSON(&user); err != nil {
      return errors.New("invalid json")
    }
    err := cognito.UpdatePassword(&user)
    if err != nil {
      return errors.New("could not update password")
    }
    return nil
  }
We also make it mandatory to inform the token in the header, the rest of the function is what we have already done previously.
Let's create the last endpoint:
  r.PATCH("user/password", func(context *gin.Context) {
        err := UpdatePassword(context, cognitoClient)
        if err != nil {
            if err.Error() == "token not found" {
                context.JSON(http.StatusUnauthorized, gin.H{"error": "token not found"})
                return
            }
            context.JSON(http.StatusBadRequest, gin.H{"error": err.Error()})
            return
        }
        context.JSON(http.StatusOK, gin.H{"message": "password updated"})
    })
Let's make the call:
PATCH http://localhost:8080/user/password HTTP/1.1
content-type: application/json
Authorization: Bearer token_jwt

{
  "email": "wivobi1159@bitofee.com",
  "password": "NovaSenha2@2222"
}
Now when you update your password and try to log in you will receive an error, and if you use the new password, everything will work.
Final considerations
In this post we talk a little about Cognito, one of the many AWS services that many people don't know about but that helps a lot in the evolution of your system.
Cognito's practicality goes beyond what I've discussed. Making a basic login is simple, but Cognito stands out for already providing you with an account verification system "ready", a login option with social networks (which can be quite annoying to implement without Coginito), two-factor authentication, among others, and it also has AWS security to protect user data.
Cognito has more functionality, it's worth seeing all of them in the documentation.
Repository link
Project repository
See the post on my blog here
Subscribe and receive notification of new posts, participate
Atas ialah kandungan terperinci Pengesahan dengan Golang dan AWS Cognito. Untuk maklumat lanjut, sila ikut artikel berkaitan lain di laman web China PHP!
Artikel berkaitan
Lihat lagi- Bagaimana anda menulis ujian integrasi di GO?
- Bagaimana anda menanda aras kod menggunakan pakej ujian?
- Apakah pengesan perlumbaan di GO? Bagaimanakah mereka dapat membantu anda mencari keadaan kaum?
- Apakah amalan terbaik untuk menulis kod Go yang boleh diuji?
- Apa itu Microservices? Apakah kelebihan dan kekurangan menggunakan seni bina mikroservis?

