Rumah > Artikel > Tutorial sistem > Cara Membaiki Ralat Tong Kitar Semula pada Windows 10 & 11
Cara Membaiki Ralat Tong Kitar Semula pada Windows 10 & 11

- WBOYasal
- 2024-06-14 12:51:56807semak imbas
Is your Windows PC bugging you with a "The Recycle Bin on C:\ is corrupted. Do you want to empty the Recycle Bin for this drive" error message? Such errors can occur with any drive, including internal and external ones, effectively preventing you from accessing the drive.
Fortunately, it is possible to resolve this error message without formatting your drive and losing critical data. Here, we show you how to fix the Windows 10 or 11 error.
1. Reset Recycle Bin Using the Command Prompt
Resetting the Recycle Bin is one of the most effective ways to fix issues with it. Doing so allows Windows to empty the Recycle Bin and restore it to its default settings, resolving any issues.
Several users on a Microsoft Community post reported fixing the Recycle Bin corrupted error on Windows with this tip.
To reset the Recycle Bin on Windows:
- Press Win + X to open the Power User menu.
- Select Terminal (Admin) from the list.
- Select Yes when the User Account Control (UAC) prompt appears.
- Type the following command and press Enter.
<code class="hljs php">rd /s /q C:\$Recycle.bin</code>

This command deletes all the files and folders in the Recycle Bin, including subdirectories, without prompting the user for confirmation. The two switches have the following functions:
/s - Recursively deletes all the files and folders in the Recycle Bin, including subdirectories.
/q - Stands for Quiet mode as it suppresses all confirmation prompts.
If you are getting the Recycle Bin corrupted error for a drive other than the C drive, replace the letter "C:" in the above command with the letter of the drive causing the error.
Once you run the above command, Windows will reset the Recycle Bin for the specified drive, and you should not see any more errors.
2. Run a CHKDSK Scan
If resetting the Recycle Bin proves ineffective, there may be an issue with the drive itself. You can try running a CHKDSK scan to check and repair your drive for bad sectors and file system errors.
For instance, if you see a "The Recycle Bin on E:\ is corrupted" error, you will need to scan the E: drive using these steps:
- Press Win + S to open the search menu.
- Type cmd in the text box and select Run as administrator.
- Select Yes when the User Account Control (UAC) prompt appears.
- Type the following command and press Enter.
<code class="hljs ">chkdsk /r e:</code>
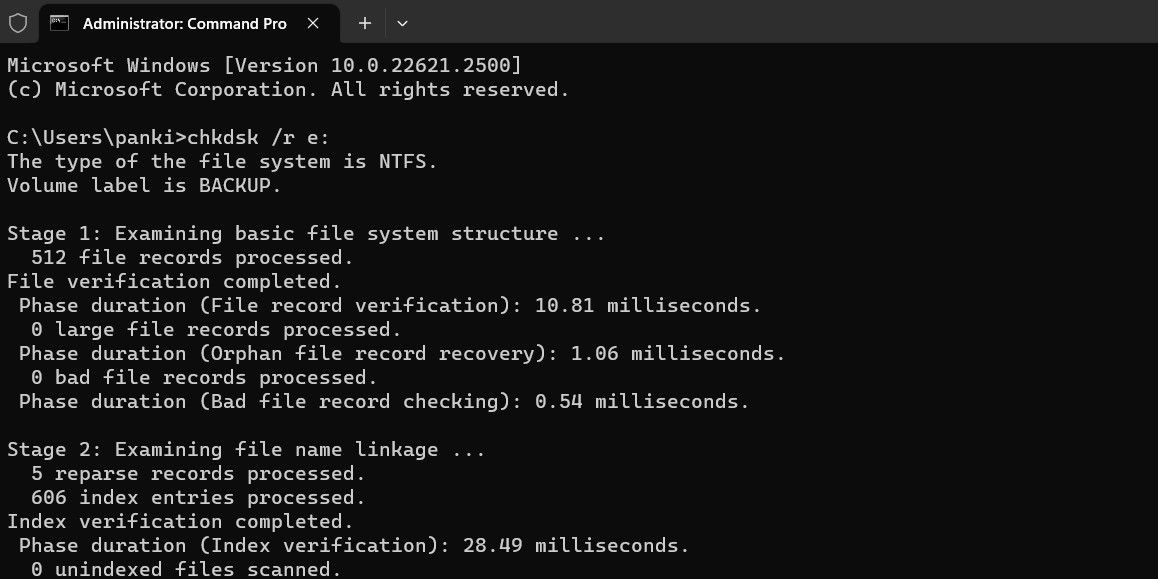
The r switch in a CHKDSK scan tells CHKDSK to locate bad sectors on the target disk and recover the readable information from the bad sectors. This can take some time as it scans and repairs the bad sectors on the drive.
Restart your PC after running the CHKDSK scan, then check if the error still occurs.
3. Run the SFC and DISM Scans
Problems with your PC's system files can also give rise to such Recycle Bin errors. Thankfully, Windows includes helpful tools called SFC (System File Checker) and DISM (Deployment Image Servicing and Management) scans, which can automatically detect and repair any corrupted system files.
For more information, check our guide on repairing corrupt Windows files with Windows' built-in tools and follow the steps outlined.
4. Scan for Malware
If you continue to see the Recycle Bin corrupted error, there is a chance that your PC is infected with malware. To rule out this possibility, you can use the built-in Windows Defender or PowerShell to scan your computer for malware. You can also use a reliable third-party antivirus program for this.
If the scan detects anything suspicious, take the recommended steps to eliminate the threat.
5. Perform a System Restore
Recent changes made to your system may have led to the Recycle Bin corrupted error on your Windows 10 or 11 PC. If the error message has only started appearing recently, you can consider using system restore to revert Windows to its earlier state when it worked fine.
Once you restore Windows to its previous state, the errors shouldn't persist.
Hilangkan Ralat Tong Kitar Semula Yang Menjengkelkan
Ralat Tong Kitar Semula boleh menjengkelkan tetapi biasanya mudah untuk diperbaiki. Dalam kebanyakan kes, menetapkan semula Tong Kitar Semula harus menyelesaikan ralat yang rosak. Jika tidak, anda mungkin perlu mencuba penyelesaian yang dinyatakan di atas untuk menyelesaikan masalah yang mendasari.
Atas ialah kandungan terperinci Cara Membaiki Ralat Tong Kitar Semula pada Windows 10 & 11. Untuk maklumat lanjut, sila ikut artikel berkaitan lain di laman web China PHP!
Artikel berkaitan
Lihat lagi- Cara Melihat Garisan Lot dalam Google Earth
- Apakah yang perlu saya lakukan jika penunjuk tetikus terus berkelip dalam Win10 Apakah yang perlu saya lakukan jika penunjuk tetikus terus berkelip dalam Win10?
- Bagaimanakah orang baru memasang semula sistem Kaedah yang sesuai untuk orang baru memasang semula sistem Win11
- Bagaimana untuk menyelesaikan kelajuan muat turun perlahan kedai aplikasi sistem Win10_Cara menyelesaikan kelajuan muat turun perlahan kedai aplikasi sistem Win10
- Bagaimana dengan cepat menyemak model papan induk dalam win7 Tutorial menyemak model papan induk dalam sistem win7?