스피너의 기본 사용(목록 옵션 상자)
이 섹션 소개:
원래 이 섹션에서는 갤러리 컨트롤을 소개하려고 했는데 생각한 후에 잊어버렸습니다. Android 4.1 이후에는 더 이상 사용되지 않습니다. 호환성을 통해 갤러리를 사용할 수 있지만 생각해 보세요. 잊어버리세요. 갤러리는 사진을 전환할 때마다 보기를 다시 생성해야 하기 때문에 의심할 여지 없이 얼마나 자원 낭비입니까! HorizonScrollView와 같은 다른 방법을 통해 갤러리 효과를 얻을 수 있습니다. 가로 스크롤 효과를 얻으려면 가로 ListView를 작성하세요. 관심이 있으시면 직접 Google에 검색해 보세요!
이 섹션은 Spinner라는 어댑터 컨트롤에 관한 것입니다! 애플리케이션 시나리오: 앱에서 사용자가 데이터를 입력하도록 요구하는 경우 사용자가 직접 입력할 수 있도록 하는 것 외에 더 사려 깊은 디자인도 있습니다. 사용자가 선택할 수 있는 옵션 세트를 나열하여 사용자가 더 쉽게 사용할 수 있도록 합니다! 더 이상 고민하지 말고 Spinner의 기본 사용법을 배워봅시다~
1. 관련 속성
- android:dropDownHorizontalOffset: 목록 상자의 수평 오프셋 거리를 설정합니다
- android:dropDownVerticalOffset: 목록 상자의 수평 오프셋 거리 수평 및 수직 거리
- android:dropDownSelector: 목록 상자가 선택되었을 때의 배경
- android:dropDownWidth: 드롭다운 목록 상자의 너비를 설정합니다
- android:gravity : 내부 구성 요소 정렬 설정
- android:popupBackground: 목록 상자의 배경 설정
- android:prompt: 대화 상자 모드에서 목록 상자의 프롬프트 정보(제목) 설정, string.xml만 설정 인용될 수 있다 리소스 ID의 리소스 ID는 문자열로 직접 쓸 수 없습니다.
- android:spinnerMode: 목록 상자의 모드, 두 가지 선택 값이 있습니다: dialog: 대화상자 스타일 창 dropdown: 드롭다운 메뉴 스타일 창(기본값)
- 선택 속성: android:entries: 배열 리소스를 사용하여 드롭다운 목록 상자의 목록 항목을 설정합니다
2. 사용 예:
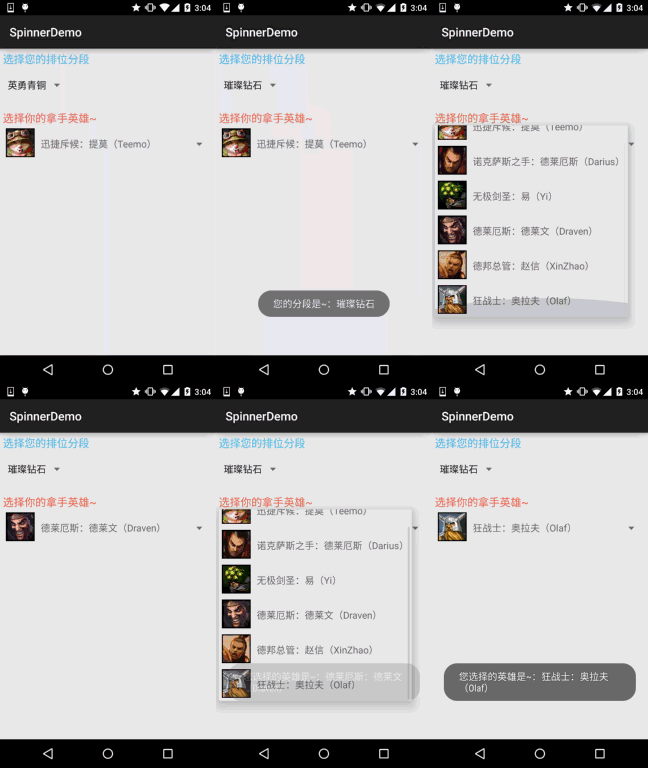
그런데 Spinner 기본적으로 Spinner.setSection(0) 이 호출되는 첫 번째 값을 선택합니다. 이를 통해 기본 선택 값을 설정할 수 있습니다. 또한 OnItemSelectedListener가 한 번만 트리거됩니다. 이벤트, 아직 해결책을 찾지 못했습니다. 다음 절충안은 부울 값을 추가한 다음 설정하는 것입니다. false인 경우 onItemSelected 시 판단됩니다. false인 경우 기본적으로 트리거되며 아무런 작업도 수행되지 않습니다. 부울 값을 true로 설정하십시오. true이면 이벤트가 정상적으로 트리거됩니다! 예제에서는 두 개의 서로 다른 Spinner를 작성하여 데이터 소스, 목록 상자 스타일 등을 비교합니다.~ 다음으로
렌더링을 살펴보겠습니다. :

코드 구현 :
이전의 재사용 가능한 BaseAdapter가 여기에서 여전히 사용됩니다.
첫 번째 Spinner의 데이터 소스 작성:
다음 내용을 포함하여 res/values: myarrays.xml 아래에 파일을 작성하세요.
<resources>
<string-array name="data">
<< ;item>럭셔리 플래티넘</item> ㅋㅋㅋ
</resources>
그런 다음 두 번째 스피너:
item_spin_hero.xml
:
android:layout_width="match_parent" android:layout_height="match_parent" android:orientation="horizontal"
android:padding="5dp">android:id= "@+id/img_icon"
android:layout_width="48dp"
android:layout_height="48dp"
android:src="@ mipmap/iv_lol_icon1" /> android:layout_marginLeft="10dp"
android :layout_marginTop = "15dp "
再接着编写一个Entitiy实体类:Hero.java:
* 2015년 9월 24일 0024에 Jay가 작성함.
*/
public class Hero {
private int hIcon;
private String hName;
공개 영웅() {
}
public Hero(int hIcon, String hName) {
this.hIcon = hIcon;
this.hName = hName;
}
public int gethIcon() {
return hIcon;
}
공용 문자열 gethName() {
return hName;
}
public void sethIcon(int hIcon) {
this.hIcon = hIcon;
}
public void sethName(String hName) {
this.hName = hName;
}
}
最后是MainActivity의 布局与Java代码part分:
布局文件:activity_main.xml:
xmlns:tools="http://schemas.android.com/tools"
android:layout_width="match_parent"
android:layout_height="match_parent"
android:orientation="vertical"
android:padding="5dp"
tools:context=".MainActivity">
<TextView
android:layout_width="wrap_content"
android:layout_height="wrap_content"
android:text="选择您的排分段"
android:textColor= "#44BDED"
android:textSize="18sp" />
<Spinner
android:id="@+id/spin_one"
android:layout_width="100dp"
android:layout _height="64dp"
안드로이드 :entries="@array/data"
android:prompt="@string/spin_title"
android:spinnerMode="dialog" />
<TextView
android:layout_width="wrap_content"
android:lay out_height=" Wrap_content"
android:layout_marginTop="10dp"
android:text="选择你的拿手英雄~"
android:textColor="#F5684A"
android:textSize="18sp" /> ;
<스피너
android :id="@+id/spin_two"
android:layout_width="wrap_content"
android:layout_height="64dp" />
</LinearLayout>
MainActivity.java:
private boolean one_selected = false;
private 부울 two_selected = false;
비공개 ArrayList<Hero> mData = null;
private BaseAdapter myAdadpter = null;
@Override
protected void onCreate(Bundle savedInstanceState) {
super.onCreate(savedInstanceState);
setContentView(R.layout .activity_main);
mContext = MainActivity.this;
mData = new ArrayList<Hero>();
bindViews();
}
private void bindViews() {
spin_one = (Spinner) findViewById(R.id.spin_one);
spin_two = (스피너) findViewById(R .id.spin_two);
mData.add(new Hero(R.mipmap.iv_lol_icon1,"迅捷斥候:提莫(Teemo)"));
mData.add(new Hero(R.mipmap.iv_lol_icon2,"诺克萨斯之手:德莱厄斯(Darius)"));
mData.add(new Hero(R.mipmap.iv_lol_icon3,"无极剑圣:易(Yi)"));
mData.add(new Hero(R.mipmap.iv_lol_icon4,"德莱厄斯:德莱文(Draven)"));
mData.add(new Hero(R.mipmap.iv_lol_icon5,"德邦总管:赵信(XinZhao)") );
mData.add(new Hero(R.mipmap.iv_lol_icon6,"狂战士:奥拉夫(Olaf)"));
myAdadpter = new MyAdapter<Hero>(mData,R.layout.item_spin_hero ) {
@ 재정의
public void bindView(ViewHolder holder, Hero obj) {
holder.setImageResource(R.id.img_icon,obj.gethIcon());
holder.setText(R.id.txt_name, obj.gethName());
}
};
spin_two.setAdapter(myAdadpter);
spin_one.setOnItemSelectedListener(this);
spin_two.setOnItemSelectedListener(this);
}
@Override
public void onItemSelected(AdapterView<?> parent, View view, int 위치, 긴 ID) {
스위치(parent.getId()){
case R.id.spin_one:
if(one_selected){
Toast.makeText(mContext,"您的分段是~:" + parent.getItemAtPosition (position).toString(),
Toast.LENGTH_SHORT).show();
}else one_selected = true;
break;
case R.id.spin_two:
if(two_selected){
TextView txt_name =(TextView) view .findViewById(R.id.txt_name);
Toast.makeText(mContext,"您选择的英雄是~:" + txt_name.getText().toString(),
Toast.LENGTH_SHORT).show();
} else two_selected = true;
}
그리고 Spinner의 OnItemSelectedListener 및 선택한 항목을 가져오는 방법에 대해 알아보겠습니다. 코드~
3. 코드 샘플 다운로드:
SpinnerDemo.zip
이 섹션 요약


