Paint API - 셰이더(이미지 렌더링)
1. 구성 방법에 대한 자세한 설명
1)BitmapShader(이미지 렌더링)
BitmapShader(Bitmap bitmap, Shader.TileMode TileX, Shader.TileMode TileY)
비트맵을 텍스처로 사용하여 렌더링합니다. a 특정 영역이 채워지며 매개변수는 다음과 같습니다.
CLAMP
- bitmap: 채우기로 사용되는 비트맵
- tileX: X축 방향의 비트맵 연결 형태; TileY
: Y축 방향의 비트맵 연결 양식- 그리고 이 Shader.TileMode에는 세 가지 유형이 있습니다.
은 렌더러가 원래 경계 범위를 초과하면 가장자리를 복사한다는 의미입니다. 범위 밖의 영역을 색칠하는 색상
2) ComposeShader(혼합 렌더링)- REPEAT
은 타일 형태입니다. 반복 렌더링- MIRROR
은 비트맵을 수평 및 수직으로 미러링하여 반복적으로 렌더링하는 것입니다.
ComposeShader(Shader ShaderA, Shader ShaderB, PorterDuff.Mode 모드)
렌더링 효과의 중첩, PorterDuff를 보시면 아시겠죠? 예를 들어 BitmapShader와 LinearGradient의 혼합 렌더링 효과 등 매개변수는 순서대로입니다.
shaderA: 첫 번째 렌더링 효과
3) LinearGradient( 선형 렌더링)- shaderB
: 두 번째 렌더링 효과- mode
: 두 렌더링 효과의 오버레이 모드
LinearGradient(float x0, float y0, float x1, float y1, int[] colors, float[] position, Shader.TileMode 타일);
은 특정 색상의 선형 그라데이션 효과를 얻습니다. 영역, 매개변수 순서:
x0: 그라디언트 시작점의 x 좌표
4) RadialGradient(링 렌더링)- y0
: 그라디언트 시작점의 y 좌표- x1
: 그라디언트의 x 좌표 그라디언트의 끝점- y1
: 그라디언트 끝점의 y 좌표- colors
: 그라디언트의 색상 배열- positions
: 색상 배열의 상대 위치- tile
: 타일링 방법
public RadialGradient(float x , float y, float radius, int[] 색상, float[] 위치, Shader.TileMode 타일);
특정 영역에서 색상의 원형 그라데이션 효과를 얻습니다. 매개변수 순서는 다음과 같습니다.
x: 원형 원 중심의 x 좌표
5) SweepGradient(그라디언트 렌더링)- y
: 원 중심의 y 좌표 the ring- radius
: 링의 반경- colors
: 링 그라데이션의 색상 배열- positions
: 색상 배열의 상대적 위치 지정- Tile
: 타일링 방법
public SweepGradient(float cx, float cy, int[] colors, float[] position)
스캔 렌더링은 특정 한 회전에 의해 형성된 효과를 사용하는 것입니다. 포인트의 중심! 매개변수는 다음과 같습니다:
- cx: 스캔의 중심 x 좌표
- cy: 스캔의 중심 y 좌표
- colors: 그라데이션 그라데이션의 색상 배열
- positions: 스캔의 상대 위치 지정 색상 배열
아마도 텍스트를 통해 해당하는 대략적인 기능을 간단히 알 수 있지만 여전히 코드를 작성합니다. 결국, 코드(그림)가 진실인지 확인하세요~
2. 코드 예제 사용:
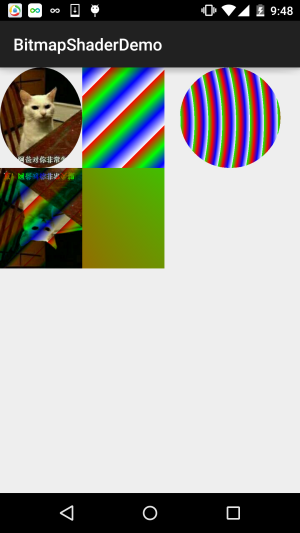
렌더링 실행:

코드 구현:
BitmapShaderView .java:
/**
 * Created by Jay on 2015/11/4 0030.
 */
public class BitmapShaderView extends View {


    private Bitmap mBitmap = null;
    private ShapeDrawable sDrawable = null;
    private Paint mPaint = null;
    private int bitW = 0, bitH = 0;     //Bitmap宽高

    private Shader mBitmapShader = null;   //Bitmap渲染
    private Shader mLinearGradient = null; //线性渐变渲染
    private Shader mComposeShader = null; //混合渲染
    private Shader mRadialGradient = null; //环形渐变渲染
    private Shader mSweepGradient = null; //梯度渲染


    public BitmapShaderView(Context context) {
        this(context, null);
    }

    public BitmapShaderView(Context context, AttributeSet attrs) {
        super(context, attrs);
        init();
    }

    public BitmapShaderView(Context context, AttributeSet attrs, int defStyleAttr) {
        super(context, attrs, defStyleAttr);
    }


    private void init() {

        mBitmap = BitmapFactory.decodeResource(getResources(), R.mipmap.img_cat);
        bitW = mBitmap.getWidth();
        bitH = mBitmap.getHeight();
        mPaint = new Paint();

        //创建BitmapShader
        mBitmapShader = new BitmapShader(mBitmap, Shader.TileMode.MIRROR, Shader.TileMode.MIRROR);

        //创建LinearGradient并设置渐变的颜色数组
        mLinearGradient = new LinearGradient(0, 0, 100, 100,
                new int[]{Color.RED, Color.GREEN, Color.BLUE, Color.WHITE},
                null, Shader.TileMode.REPEAT);

        //混合渲染,这里使用了BitmapShader和LinearGradient进行混合,可以试试其他~
        mComposeShader = new ComposeShader(mBitmapShader, mLinearGradient, PorterDuff.Mode.DARKEN);

        //环形渐变渲染
        mRadialGradient = new RadialGradient(50, 200, 50,
                new int[]{Color.GREEN, Color.RED, Color.BLUE, Color.WHITE},
                null, Shader.TileMode.REPEAT);

        //梯度渲染
        mSweepGradient = new SweepGradient(30, 30, new int[]{Color.GREEN, Color.RED,
                Color.BLUE, Color.WHITE}, null);

    }

    @Override
    protected void onDraw(Canvas canvas) {
        super.onDraw(canvas);

        //将图片裁剪为椭圆形
        sDrawable = new ShapeDrawable(new OvalShape());
        sDrawable.getPaint().setShader(mBitmapShader);
        sDrawable.setBounds(0, 0, bitW, bitH);
        sDrawable.draw(canvas);

        //绘制线性渐变的矩形
        mPaint.setShader(mLinearGradient);
        canvas.drawRect(bitW, 0, bitW * 2, bitH, mPaint);

        //绘制混合渲染效果
        mPaint.setShader(mComposeShader);
        canvas.drawRect(0, bitH, bitW , bitH * 2, mPaint);

        //绘制环形渐变
        mPaint.setShader(mRadialGradient);
        canvas.drawCircle(bitW * 2.8f, bitH / 2, bitH / 2, mPaint);

        //绘制梯度渐变
        mPaint.setShader(mSweepGradient);
        canvas.drawRect(bitW, bitH, bitW * 2, bitH * 2, mPaint);


    }
}
코드가 100줄이므로 설명할 필요가 없습니다. 헷갈린다면 시도해 보세요~3 이 섹션의 코드를 다운로드하세요.
이 섹션 요약:
이 섹션에서는 브러시에 또 다른 옵션을 추가하는 또 다른 페인트 API인 셰이더(이미지 렌더링)를 소개합니다~ 코드를 보고 의구심이 들고, 코드를 붙여넣고 매개변수를 변경하는 방법을 모르신다면 이해가 되실 겁니다~ 좋아요, 이번 섹션은 여기까지입니다. 감사합니다~


