조각 예 - 하단 탐색 모음 구현(방법 1)
이 섹션 소개:
이전 섹션에서 우리는 Fragment에 대한 사전 이해를 갖고 개념, 라이프사이클, Fragment 관리 및 조각 트랜잭션과 조각의 동적 및 정적 로드. 이 섹션부터 시작하여 일부 Fragment의 실제 개발에 대해 설명합니다. 몇 가지 예! 이 섹션에서는 하단 탐색 모음 구현에 대해 설명합니다! 기본 하단 탐색 모음 방법에는 여러 가지가 있습니다. 예를 들어 TextView를 완전히 사용하거나 RadioButton을 사용하거나 TabLayout + RadioButton을 사용하는 것은 물론 복잡합니다. 이 경우에도 외부 레이어 레이아웃 방법을 사용해야 합니다! 이 섹션에서는 TextView를 사용하여 우리에게도 친숙한 하단 탐색 모음 효과를 만듭니다. 다음으로 Fragment를 사용해보세요! 좋아요, 이제 이 섹션을 시작하겠습니다!
1. 구현될 렌더링 및 프로젝트 디렉토리 구조:
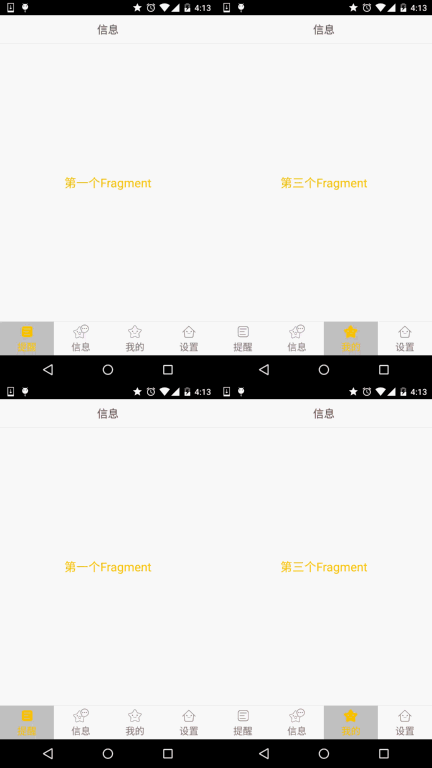
먼저 렌더링을 살펴보겠습니다.

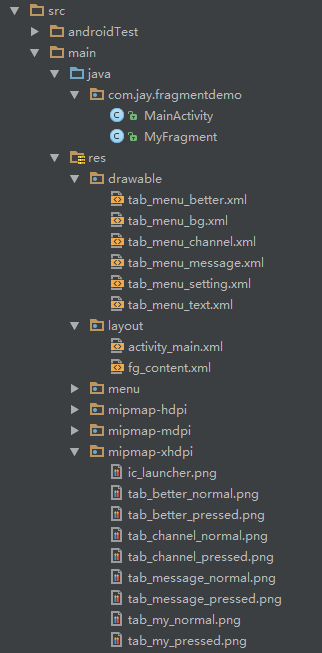
그런 다음 project의 디렉토리 구조를 살펴보세요. :

2. 구현 과정:
1단계: 하단 옵션에 대한 리소스 파일을 적습니다.
하단의 각 항목을 클릭하면 다른 효과가 나타나는 것을 그림에서 볼 수 있습니다. ? 선정 여부로 판단합니다! 우리가 작성하려는 리소스 파일은 먼저 그림, 텍스트, 배경입니다!
그림 그리기 가능 리소스: tab_menu_channel.xml
<selector xmlns:android="http://schemas.android .com/apk/res/android">
<item android:drawable="@mipmap/tab_channel_pressed" android:state_selected="true" />
<item android:drawable="@mipmap/tab_channel_normal" / >
</selector>
나머지 세 명도 따라갑니다!
텍스트 리소스: tab_menu_text.xml
<selector xmlns:android="http://schemas.android.com /apk/res/android">
<item android:color="@color/text_yellow" android:state_selected="true" />
<item android:color="@color/text_gray" />
</selector>
背景资源:tab_menu_bg.xml
<selector xmlns:android="http://schemas.android.com/ apk/res/android">
<item android:state_selected="true">
<shape>
<solid android:color="#FFC4C4C4" />
</shape>
< /item>
<item>
<shape>
<solid android:color="@color/transparent" />
</shape>
</item>
< /선택기>
2단계: 활동 레이아웃 작성
activity_main.xml:
xmlns:tools="http://schemas.android.com/tools"
android:layout_width=" match_parent"
android:layout_height="match_parent"
tools:context=".MainActivity">
<RelativeLayout
android:id="@+id/ly_top_bar"
android:layout_width="match_parent"
android:layout_height ="48dp"
android:Background="../style/images/bg_topbar">
<TextView
android:id="@+id/txt_topbar"
android:layout_width="match_parent"
android:layout_height ="match_parent"
android:layout_centerInParent="true"
android:gravity="center"
android:textSize="18sp"
android:textColor="@color/text_topbar"
android:text="信息"/> ㅋㅋㅋ android:layout_alignParentBottom="true"/>
</ RelativeLayout>
<LinearLayout
android:id="@+id/ly_tab_bar"
android:layout_width="match_parent"
android:layout_height="56dp"
android:layout_alignParent 하단="사실"
android:Background="../style/images/bg_white"
android:orientation="horizontal">
<TextView
android:id="@+id/txt_channel"
android:layout_width="0dp"
android:layout_height="match_parent"
android:layout_weight="1"
android:Background="../style/images/tab_menu_bg"
android:drawablePadding="3dp"
및 roid:drawableTop="@drawable/tab_menu_channel"
android:gravity="center"
android:padding="5dp"
android:text="@string/tab_menu_alert"
android:textColor="@drawable/tab_menu_text"
android:text 크기="16sp" />
<TextView
android:id="@+id/txt_message"
android:layout_width="0dp"
android:layout_height="match_parent"
android:layout_weight="1"
android:Background="../style/ Images/tab_menu_bg"
android:drawablePadding="3dp"
android:drawableTop="@drawable/tab_menu_message"
android:gravity="center"
android: 패딩="5dp"
android:text="@string/tab_menu_profile"
android:textColor="@drawable/tab_menu_text"
android:textSize="16sp" />
<TextView
android: id="@+id/txt_better"
android:layout_width="0dp"
android:layout_height="match_parent"
android:layout_weight="1"
android:Background="../style/images/tab_menu_bg"
android :drawablePadding="3dp"
android:drawableTop ="@drawable/tab_menu_better"
android:gravity="center"
android:padding="5dp"
android:text="@string/tab_menu_pay"
android:textColor=" @drawable/tab_menu_text"
android:textSize= "16sp" />
<TextView
android:id="@+id/txt_setting"
android:layout_width="0dp"
android:layout_height="match_parent"
android:layout_weight="1"
안드로이드: background="../style/images/tab_menu_bg"
android:drawablePadding="3dp"
android:drawableTop="@drawable/tab_menu_setting"
android:gravity="center"
android:padding="5dp"
android:text="@string/tab_menu_setting"
android:textColor="@drawable/tab_menu_text"
android:textSize="16sp"/>
< /LinearLayout>
< ; view = 안드로이드 : id = "@+id/div_tab_bar"
안드로이드 : layout_width = "match_parent"
adroid : layout_height = "2px"
android = "../ style/images/div_white"
Android : layout_above = "@id/ly_tab_bar"/>
<FrameLayout
android:layout_width="match_parent"
android:layout_height="match_parent"
android:layout_below="@id/ly_top_bar"
android:layout_above="@id /div_tab_bar"
android:id="@+id/ly_content">
</FrameLayout>
</RelativeLayout>
코드 분석:
먼저 상단 제목 표시줄의 스타일을 정의하고 48dp LinearLayout 중간에 제목으로 TextView를 추가하세요!
그런 다음 하단에 56dp 크기의 LinerLayout을 정의하고 여기에 1:1:1:1 비율로 4개의 TextView를 추가합니다. 관련 속성을 설정한 다음 이 LinearLayout에 선분을 추가하세요!
마지막으로 제목 표시줄과 하단 탐색 모음을 경계로 사용하고 Fragment의 컨테이너로 사용되는 FrameLayout, 너비 및 높이 match_parent를 작성합니다!
PS: 여기에 있는 4개의 TextView 속성이 반복됩니다. 직접 추출하여 스타일을 작성하고 설정할 수도 있습니다~
3단계: 상단 탐색 모음 숨기기
실수로 이전 속성을 발견했습니다. 활동 requestWindowFeature(Window.FEATURE_NO_TITLE)에서 호출되었습니다.
상단 탐색 표시줄이 함께 제공되지만 데모를 작성할 때 이 문장이 setContentView() 이전에 작성되었더라도 오류가 보고된다는 사실을 발견했습니다! 아마도 왜냐하면
상속받은 것은 Activity 클래스가 아닌 AppCompatActivity 입니다!
물론 이전 getSupportActionbar().hide()는 Actionbar를 숨기지만 여전히 인터페이스에 있습니다!
마지막으로 스타일을 직접 작성한 다음 AndroidManifest에서 이 애플리케이션용 테마를 설정하는 또 다른 방법이 있습니다. 오류를 보고하지 않고 ActionBar를 숨깁니다.
그런 다음 AndroidManifest.xml 테마 속성을 설정합니다.
android:theme="@style/Theme.AppCompat.NoActionBar"
PS "1.0" 인코딩="utf-8"?><LinearLayout xmlns:android="http://schemas.android.com/apk/res/android" android:orientation="vertical" 안드로이드: layout_width= "match_parent"
android:layout_height="match_parent"android:Background="../style/images/bg_white">
<TextView
android:id="@+id/txt_content" android: 레이아웃 _width= "match_parent" android:layout_height="match_parent" android: >
MyFragment.java:
/**
* 2015년 8월 28일 0028에 Coder-pig에 의해 작성되었습니다.
*/
public 클래스 MyFragment 확장 Fragment {
private String content;
public MyFragment( String content) {
This.content = content;
}
public View onCreateView(LayoutInflater inflater, ViewGroup 컨테이너, BundleSavedInstanceState) { View view = inflater. inflate(R.layout.fg_content,container, false); ~ TextView ) view.findViewById(R.id.txt_content);
txt_content.setText(content);}
코드 분석:
단순히 onCreateView() 메소드를 다시 작성하고, 다른 메소드는 필요에 따라 다시 작성할 수 있습니다!
5단계: MainActivity.java 작성
먼저 고려해야 할 몇 가지 주요 문제에 대해 이야기해 보겠습니다.
- Fragment는 언제 초기화되어 컨테이너에 추가되나요? 언제 숨기고 보여줄 것인가?
- TextView를 선택하는 방법은 무엇입니까? TextView를 선택한 후 어떤 작업을 수행해야 합니까?
- MainActivity에 들어간 후 Selected 상태의 TextView를 만드는 방법은 무엇입니까?
위의 질문에 하나씩 대답해 보겠습니다.
- TextView를 선택한 후 해당 조각이 비어 있는지 확인하고 비어 있으면 초기화하고 컨테이너에 추가합니다. hide의 경우 모든 Fragment를 숨기는 메소드를 정의하고 클릭 이벤트가 트리거될 때마다 이 hideAll 메소드를 먼저 호출합니다. 모든 Fragment가 숨겨져 있고 TextView에 해당하는 Fragment가 비어 있지 않으면 Fragment를 표시합니다.
- TextView를 클릭한 후 먼저 모든 TextView의 선택 상태를 false로 재설정합니다. 클릭 가능으로 설정한 다음 TextView의 선택된 상태는 true입니다.
- 이것은 클릭 이벤트를 통해 선택을 설정하므로 onCreate() 메서드에 트리거 이벤트를 추가합니다. 그게 유일한 방법 아닌가요~ txt_channel.performClick();
논리를 이해했으니 코드로 가세요:
MainActivity.java:
* 2015년 8월 28일 0028에 Coder-pig에 의해 작성되었습니다.
*/
public 클래스 MainActivity는 AppCompatActivity를 확장하여 View.OnClickListener를 구현합니다.{
//UI Object
private TextView txt_topbar;
private TextView txt_channel;
private TextView txt_message ;
비공개 TextView txt_better;
비공개 TextView txt_setting;
private FrameLayout ly_content;
//Fragment Object
private MyFragment fg1,fg2,fg3,fg4;
private FragmentManager fManager;
@Override
protected void onCreate (번들SavedInstanceState) {
super.onCreate(savedInstanceState); ㅋㅋㅋ 채널.performClick(); //模拟一次点击,既进去后选择第一项
}
//UI组件初始ization与事件绑定
private void bindViews() {
txt_topbar = (TextView) findViewById(R.id.txt_topbar);
txt_channel = (TextView) findViewById(R.id.txt_channel);
txt_message = (TextView) findViewById(R.id.txt_message);
txt_better = (TextView) findViewById(R.id.txt_better);
txt_setting = (TextView) findViewById (R.id.txt_setting);
ly_content = (FrameLayout) findViewById(R.id.ly_content);
txt_channel.setOnClickListener(this);
txt_message.setOnClickListener(this);
txt_better .setOnClickListener(this);
txt_setting .setOnClickListener(this);
}
//중요한 내용의 选中状态
private void setSelected(){
txt_channel.setSelected(false);
txt_message.setSelected(false);
txt_better.setSelected(false);
txt_setting.setSelected(false);
}
//隐藏所有Fragment
private void hideAllFragment(FragmentTransaction fragmentTransaction){
if(fg1 != null)fragmentaction.hide(fg1);
if(fg2 != null )fragmentTransaction.hide(fg2);
if(fg3 != null)fragmentTransaction.hide(fg3);
if(fg4 != null)fragmentTransaction.hide(fg4);
}
@Override
public void onClick(View v) {
FragmentTransaction f 트랜잭션 = fManager.beginTransaction() ;???? _channel.setSelected(true);
if(fg1 == null){
fg1 = new MyFragment("第一个Fragment");
fTransaction.add(R.id.ly_content,fg1);
}else{
fTransaction.show(fg1) ;
}
break;
case R.id.txt_message:
setSelected();
txt_message.setSelected(true);
if(fg2 == null){
fg2 = new MyFragment("第二个Fragment" );
fTransaction.add(R.id.ly_content,fg2);
}else{
fTransaction.show(fg2);
}
break;
case R.id.txt_better:
setSelected();
txt_better.setSelected(true);
if(fg3 == null){
fg3 = new MyFragment("第三个Fragment");
fTransaction.add(R.id.ly_content,fg3);
}else{
fTransaction.show(fg3);
}
break;
케이스 R.id.txt_setting:
setSelected();
txt_setting.setSelected(true);
if(fg4 == null){
fg4 = new MyFragment("네 번째 조각"); );
+
진술
: 사진 자료는 앱에서 가져옵니다:
better
, 이 코드는 데모용으로만 사용되며 상업적인 용도로는 쓸모가 없습니다!
4. 이 섹션 요약


