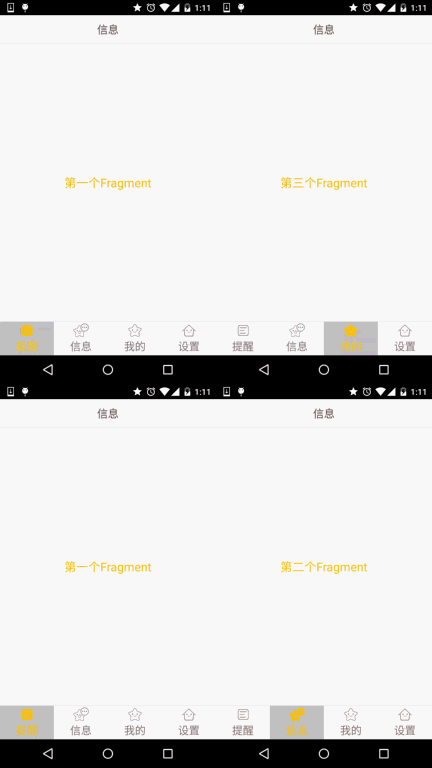
Fragment Examples - Implementation of the Bottom Navigation Bar (Method 2)
Introduction to this section:
In the previous section we used LinearLayout + TextView to achieve the effect of the bottom navigation bar. We have to reset it every time we click The status of all TextViews, and then selecting the clicked TextView is a bit troublesome, right? Next, we use another method: RadioGroup + RadioButton to achieve the effect of our previous section!
1. Some random thoughts
This section uses RadioButton to achieve the single selection effect. If you are not familiar with it or have not used it before, you can move it first. Step to: RadioButton To put it simply, we have a RadioGroup wrapping four RadioButtons, divided by the same ratio as before: 1:1:1:1;
In addition, we only need to rewrite the RadioGroup OnCheckedChange, judge the checkid to know which RadioButton was clicked!
Okay, let’s start stacking!
2. Implementation process
PS:The materials here are directly used from the materials in the previous section! In addition, the resources of the drawable class are all selected The status is changed to checked!
Step 1: Write some resource files for the bottom options
Picture Drawable resource: tab_menu_channel.xml
<selector xmlns:android="http://schemas.android.com/apk/res/android">
< item android:drawable="@mipmap/tab_channel_pressed" android:state_checked="true" />
Text resource:
tab_menu_text.xml<?xml version="1.0" encoding="utf-8"?>
<item android:color="@color/text_gray" />
</selector>
背景资源:tab_menu_bg.xml
<selector xmlns:android="http://schemas.android.com/apk/res/android">
<item android:state_selected="true">
<shape>
<solid android:color="#FFC4C4C4" />
</shape>
</item>
<item>
<shape>
<solid android:color="@color/transparent" />
</shape>
</item>
</selector>
Step 2: Write our Activity layout
When we used TextView to implement the bottom navigation bar, we discovered a problem. The properties of each TextView are almost the same. , and in the suggestions, we also asked everyone to extract the same attributes and write them into Style. Maybe some friends are lazy or don’t know. How to extract it and use it, here is a demonstration for you:
First we take out one of the RadioGroup tags:
android:id ="@+id/rb_channel"
android:layout_width="0dp"
android:layout_height="match_parent"
android:layout_weight="1"
android:background="../style /images/tab_menu_bg"
android:button="@null"
android:drawableTop="@drawable/tab_menu_channel"
android:gravity="center"
android:paddingTop="3 dp"
android:text="@string/tab_menu_alert"
我们可以把每个RadioButton都相同的属性抽取出来,写到style.xml文件中:
<item name="android:layout_width">0dp</item>
<item name="android:layout_weight">1</item>
<item name="android:layout_height">match_parent</item>
<item name="android:background">@drawable/tab_menu_bg</item>
<item name="android:button">@null</item>
<item name="android:gravity">center</item>
<item name="android:paddingTop">3dp</item>
<item name="android:textColor">@drawable/tab_menu_text</item>
<item name="android:textSize">18sp</item>
</style>
Then we don’t need to write the same code every time for RadioButton in our activity_main.xml. Just make RadioButton's style="@style/tab_menu_item" and that's it!
activity_main.xml:
xmlns:tools="http://schemas.android.com/tools"
android:layout_width="match_parent"
android:layout_height="match_parent"
android:background="../style/images/bg_gray"
tools:context=".MainActivity">
<RelativeLayout
android:id="@+id/ly_top_bar"
android:layout_width="match_parent"
android:layout_height="48dp"
android:background="../style/images/bg_topbar">
<TextView
android:id="@+id/txt_topbar"
android:layout_width="match_parent"
android:layout_height="match_parent"
android:layout_centerInParent="true"
android:gravity="center"
android:text="信息"
android:textColor="@color/text_topbar"
android:textSize="18sp" />
<View
android:layout_width="match_parent"
android:layout_height="2px"
android:layout_alignParentBottom="true"
android:background="../style/images/div_white" />
</RelativeLayout>
<RadioGroup
android:id="@+id/rg_tab_bar"
android:layout_width="match_parent"
android:layout_height="56dp"
android:layout_alignParentBottom="true"
android:background="../style/images/bg_white"
android:orientation="horizontal">
<RadioButton
android:id="@+id/rb_channel"
style="@style/tab_menu_item"
android:drawableTop="@drawable/tab_menu_channel"
android:text="@string/tab_menu_alert" />
<RadioButton
android:id="@+id/rb_message"
style="@style/tab_menu_item"
android:drawableTop="@drawable/tab_menu_message"
android:text="@string/tab_menu_profile" />
<RadioButton
android:id="@+id/rb_better"
style="@style/tab_menu_item"
android:drawableTop="@drawable/tab_menu_better"
android:text="@string/tab_menu_pay" />
<RadioButton
android:id="@+id/rb_setting"
style="@style/tab_menu_item"
android:drawableTop="@drawable/tab_menu_setting"
android:text="@string/tab_menu_setting"/>
</RadioGroup>
<View
android:id="@+id/div_tab_bar"
android:layout_width="match_parent"
android:layout_height="2px"
; android:layout_above="@id/rg_tab_bar"
; android:background="../style/images/div_white" />
; <FrameLayout
android: ID = "@+ID/ly_content"
android: layout_width = "match_parent"
android: layout_height = "MATCH_PARENT"
android: Lay OUT_ABOVE = "@ID/DIV_TAB_BAR"
Android :layout_below="@id/ly_top_bar"></FrameLayout>
</RelativeLayout>
##Step 3: Hide the top navigation bar
AndroidManifest.xml sets the theme attribute
Step 4: Create a simple layout and class of Fragment: Directly copy the layout and Fragment of the previous section:
fg_content.xml:
android:orientation="vertical" android:layout_width="match_parent"
android:layout_height="match_parent"
android:background="../style/images/bg_white">
<TextView
android:id="@+id/txt_content"
android:layout_width="match_parent"
android:layout_height="match_parent"
android:gravity="center"
android:text="Hehe"
android:textColor="@color/text_yellow"
android:textSize="20sp"/>
</LinearLayout>
MyFragment.java:
* Created by Coder-pig on 2015/8/29 0028.
*/
public class MyFragment extends Fragment {
private String content;
public MyFragment(String content) {
this.content = content;
}
@Override
public View onCreateView(LayoutInflater inflater, ViewGroup container, Bundle savedInstanceState) {
View view = inflater.inflate(R.layout.fg_content,container,false);
TextView txt_content = (TextView) view.findViewById(R.id.txt_content);
txt_content.setText(content);
return view;
}
}
Step 5: Write MainActivity.java
This is much simpler than the implementation of TextView, so I won’t explain it in detail. It’s very simple, just go to the code:
MainActivity.java
* Created by Coder-pig on 2015/8/29 0028.
*/
public class MainActivity extends AppCompatActivity implements RadioGroup.OnCheckedChangeListener{
private RadioGroup rg_tab_bar;
private RadioButton rb_channel;
//Fragment Object
private MyFragment fg1,fg2,fg3,fg4;
private FragmentManager fManager;
@Override
protected void onCreate(Bundle savedInstanceState) {
super.onCreate(savedInstanceState);
setContentView(R.layout.activity_main);
fManager = getFragmentManager();
rg_tab_bar = (RadioGroup) findViewById(R.id.rg_tab_bar);
rg_tab_bar.setOnCheckedChangeListener(this);
//获取第一个单选按钮,并设置其为选中状态
rb_channel = (RadioButton) findViewById(R.id.rb_channel);
rb_channel.setChecked(true);
}
@Override
public void onCheckedChanged(RadioGroup group, int checkedId) {
FragmentTransaction fTransaction = fManager.beginTransaction();
hideAllFragment(fTransaction);
switch (checkedId){
case R.id.rb_channel:
if(fg1 == null){
fg1 = new MyFragment("第一个Fragment");
fTransaction.add(R.id.ly_content,fg1);
}else{
fTransaction.show(fg1);
}
break;
case R.id.rb_message:
if(fg2 == null){
fg2 = new MyFragment("第二个Fragment");
fTransaction.add(R.id.ly_content,fg2);
}else{
fTransaction.show(fg2);
}
break;
case R.id.rb_better:
if(fg3 == null){
fg3 = new MyFragment("第三个Fragment");
fTransaction.add(R.id.ly_content,fg3);
}else{
fTransaction.show(fg3);
}
break;
case R.id.rb_setting:
if(fg4 == null){
fg4 = new MyFragment("第四个Fragment");
fTransaction.add(R.id.ly_content,fg4);
}else{
fTransaction.show(fg4);
}
break; hideAllFragment (FragmentTransaction fragmentTransaction){
if(fg1 != null)fragmentTransaction.hide(fg1);
if(fg2 != null)fragmentTransaction.hide(fg2);
if(fg3 != null)fragmentTransaction .hide(fg3);
if(fg4 != null)fragmentTransaction.hide(fg4);
}
}
##PS:
I forgot to mention something in the previous section. FragmentTransaction can only be used once, and FragmentManager must be called every time it is used. The beginTransaction() method obtains the FragmentTransaction transaction object!
In fact, the effect achieved in the previous section is the same:
4. Code download:
FragmentDemo2.zip :
:


