
Python에서 텐서플로우를 사용하여 장단기 메모리 LSTM을 구축하는 방법

- WBOYWBOYWBOYWBOYWBOYWBOYWBOYWBOYWBOYWBOYWBOYWBOYWB앞으로
- 2023-05-22 12:32:141432검색
LSTM 소개
1. RNN의 그래디언트 소멸 문제
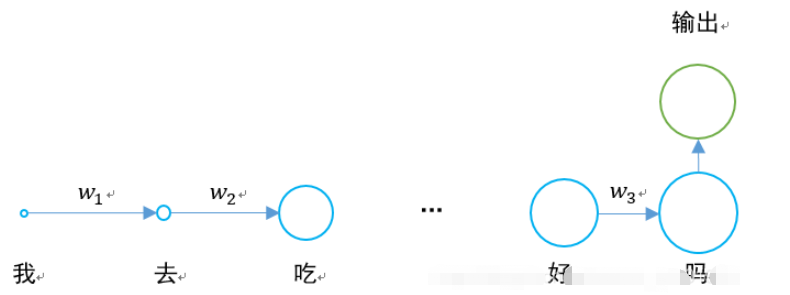
지난 시간에 RNN 순환 신경망의 구조 다이어그램은 다음과 같습니다.
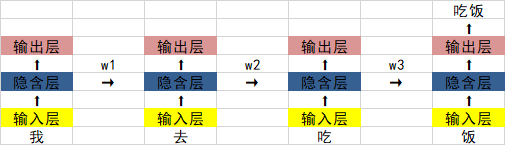
가장 큰 문제는 w1 , w2 w3과 w3의 값이 0보다 작은 경우, 문장이 충분히 길면 신경망이 역전파와 순전파를 수행할 때 그래디언트가 사라지는 문제가 발생합니다.
0.925=0.07. 문장이 20~30개의 단어로 구성된 경우 첫 번째 단어의 숨겨진 레이어 출력은 마지막 단어의 영향에 비해 원본의 0.07배가 됩니다. .
구체적인 상황은 다음과 같습니다.
경도 소멸 문제를 해결하기 위해 장단기 기억 네트워크가 등장했습니다.
2. LSTM의 구조
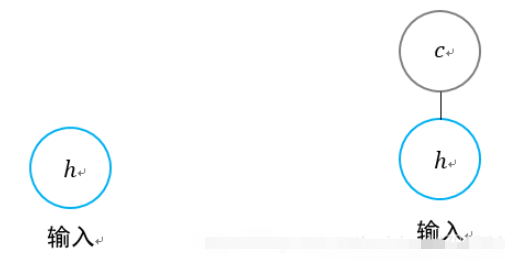
원래 RNN의 숨겨진 레이어에는 처음부터 끝까지 전달되는 상태 h가 하나만 있습니다.
다른 상태 c를 추가하고 장기 상태를 저장하면 문제가 해결될 수 있습니다.
RNN과 LSTM의 경우 두 단계 단위의 비교는 다음과 같습니다.
시간 차원에 따라 LSTM의 구조를 확장합니다.
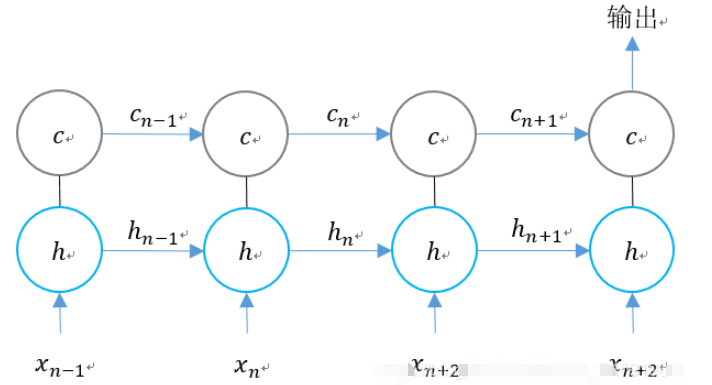
n 시간에 LSTM에 세 가지 입력이 있음을 알 수 있습니다.
1의 네트워크 입력 값입니다.
2. 마지막 순간의 LSTM 출력 값
3.
LSTM에는 두 가지 출력이 있습니다.
1. 현재 순간의 LSTM 출력 값
2.
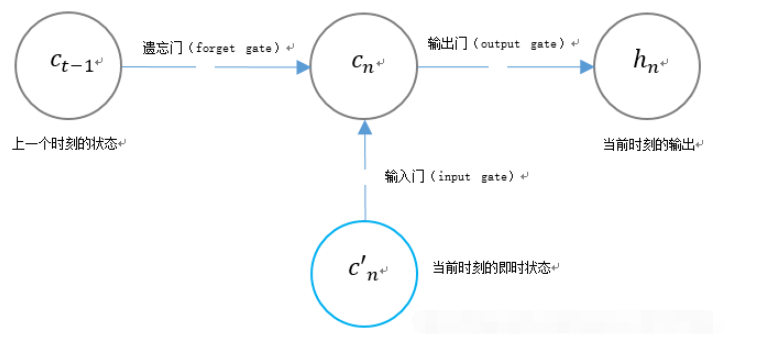
3. LSTM의 독특한 게이트 구조
LSTM은 두 개의 게이트를 사용하여 단위 상태 cn의 내용을 제어합니다.
1. 이전 순간의 단위 상태 cn-1을 결정하는 Forget Gate(포겟 게이트) 방법 much는 현재 순간에 유지됩니다.
2. 현재 순간에 네트워크의 입력 c’n이 장치 상태에 저장되는 양을 결정하는 입력 게이트(Input Gate)입니다.
LSTM은 게이트를 사용하여 현재 출력 값 hn의 내용을 제어합니다.
출력 게이트(출력 게이트)는 현재 순간에 장치 상태 cn이 갖는 출력 수를 결정합니다.
tensorflow
tf.contrib.rnn.BasicLSTMCell
tf.contrib.rnn.BasicLSTMCell(
    num_units,
    forget_bias=1.0,
    state_is_tuple=True,
    activation=None,
    reuse=None,
    name=None,
    dtype=None
)
num_units: RNN 단위의 뉴런 수, 즉 출력 뉴런 수.
forget_bias: 바이어스에 망각 게이트가 추가되었습니다. 복원된 CudnnLSTM 훈련 체크포인트를 0.0으로 수동으로 설정합니다.
state_is_tuple: True인 경우 허용 및 반환된 상태는 c_state 및 m_state의 2튜플입니다. False인 경우 열 축을 따라 연결됩니다. False는 더 이상 사용되지 않을 예정입니다.
활성화: 활성화 기능.
reuse: 기존 범위에서 변수를 재사용할지 여부를 설명합니다. 기존 범위에 이미 지정된 변수가 있고 True가 아닌 경우 오류가 발생합니다.
name: 레이어의 이름입니다.
dtype: 이 레이어의 데이터 유형입니다.
사용 시 다음과 같이 정의할 수 있습니다.
lstm_cell = tf.contrib.rnn.BasicLSTMCell(self.cell_size, forget_bias=1.0, state_is_tuple=True)
정의가 완료된 후 상태를 초기화할 수 있습니다.
self.cell_init_state = lstm_cell.zero_state(self.batch_size, dtype=tf.float32)
tf.nn.dynamic_rnn
tf.nn.dynamic_rnn(
    cell,
    inputs,
    sequence_length=None,
    initial_state=None,
    dtype=None,
    parallel_iterations=None,
    swap_memory=False,
    time_major=False,
    scope=None
)
cell: 위에서 정의한 lstm_cell.
입력: RNN 입력. time_major==false(기본값)인 경우 [batch_size, max_time, …] 모양의 텐서이거나 그러한 요소의 중첩된 튜플이어야 합니다. time_major==true인 경우 [max_time, 배치_크기, …] 모양의 텐서 또는 그러한 요소의 중첩된 튜플이어야 합니다.
벡터의 크기는 시퀀스_길이 매개변수에 의해 결정되며, 유형은 Int32/Int64입니다. 배치 요소의 시퀀스 길이가 초과되면 상태 및 0 출력을 통해 복사하는 데 사용됩니다. 따라서 정확성보다는 성능이 더 중요합니다.
initial_state: 위에 정의된 _init_state입니다.
dtype: 데이터 유형.
parallel_iterations: 병렬로 실행할 반복 횟수입니다. 이러한 작업은 시간 종속성이 없고 병렬로 실행될 수 있는 작업입니다. 이 매개변수는 시간과 공간을 교환합니다. 값이 클수록 메모리는 더 많이 소모하지만 연산 속도는 빨라지고, 값이 작을수록 메모리는 적게 사용하지만 계산 시간은 길어집니다.
time_major:输入和输出tensor的形状格式。这些张量的形状必须为[max_time, batch_size, depth],若表述正确,则它为真。这些张量的形状必须是[batch_size,max_time,depth],如果为假。time_major=true可以提高效率,因为它避免了在RNN计算的开头和结尾进行转置操作。默认情况下,此函数为False,因为大多数的 TensorFlow 数据以批处理主数据的形式存在。
scope:创建的子图的可变作用域;默认为“RNN”。
在LSTM的最后,需要用该函数得出结果。
self.cell_outputs, self.cell_final_state = tf.nn.dynamic_rnn(
	lstm_cell, self.l_in_y, initial_state=self.cell_init_state, time_major=False)
返回的是一个元组 (outputs, state):
outputs:LSTM的最后一层的输出,是一个tensor。如果为time_major== False,则它的shape为[batch_size,max_time,cell.output_size]。如果为time_major== True,则它的shape为[max_time,batch_size,cell.output_size]。
states:states是一个tensor。state是最终的状态,也就是序列中最后一个cell输出的状态。一般情况下states的形状为 [batch_size, cell.output_size],但当输入的cell为BasicLSTMCell时,states的形状为[2,batch_size, cell.output_size ],其中2也对应着LSTM中的cell state和hidden state。
整个LSTM的定义过程为:
    def add_input_layer(self,):
        #X最开始的形状为(256 batch,28 steps,28 inputs)
        #转化为(256 batch*28 steps,128 hidden)
        l_in_x = tf.reshape(self.xs, [-1, self.input_size], name='to_2D')

        #获取Ws和Bs
        Ws_in = self._weight_variable([self.input_size, self.cell_size])
        bs_in = self._bias_variable([self.cell_size])

        #转化为(256 batch*28 steps,256 hidden)
        with tf.name_scope('Wx_plus_b'):
            l_in_y = tf.matmul(l_in_x, Ws_in) + bs_in

        # (batch * n_steps, cell_size) ==> (batch, n_steps, cell_size)
        # (256*28,256)->(256,28,256)
        self.l_in_y = tf.reshape(l_in_y, [-1, self.n_steps, self.cell_size], name='to_3D')

    def add_cell(self):
        #神经元个数
        lstm_cell = tf.contrib.rnn.BasicLSTMCell(self.cell_size, forget_bias=1.0, state_is_tuple=True)

        #每一次传入的batch的大小
        with tf.name_scope('initial_state'):
            self.cell_init_state = lstm_cell.zero_state(self.batch_size, dtype=tf.float32)

        #不是主列
        self.cell_outputs, self.cell_final_state = tf.nn.dynamic_rnn(
            lstm_cell, self.l_in_y, initial_state=self.cell_init_state, time_major=False)

    def add_output_layer(self):
        #设置Ws,Bs
        Ws_out = self._weight_variable([self.cell_size, self.output_size])
        bs_out = self._bias_variable([self.output_size])
        # shape = (batch,output_size)
        # (256,10)
        with tf.name_scope('Wx_plus_b'):
            self.pred = tf.matmul(self.cell_final_state[-1], Ws_out) + bs_out
全部代码
该例子为手写体识别例子,将手写体的28行分别作为每一个step的输入,输入维度均为28列。
import tensorflow as tf
from tensorflow.examples.tutorials.mnist import input_data
import numpy as np

mnist = input_data.read_data_sets("MNIST_data",one_hot = "true")

BATCH_SIZE = 256     # 每一个batch的数据数量
TIME_STEPS = 28      # 图像共28行,分为28个step进行传输
INPUT_SIZE = 28      # 图像共28列
OUTPUT_SIZE = 10     # 共10个输出
CELL_SIZE = 256      # RNN 的 hidden unit size,隐含层神经元的个数
LR = 1e-3            # learning rate,学习率

def get_batch():    #获取训练的batch
    batch_xs,batch_ys = mnist.train.next_batch(BATCH_SIZE)
    batch_xs = batch_xs.reshape([BATCH_SIZE,TIME_STEPS,INPUT_SIZE])
    return [batch_xs,batch_ys]

class LSTMRNN(object):  #构建LSTM的类
    def __init__(self, n_steps, input_size, output_size, cell_size, batch_size):
        self.n_steps = n_steps
        self.input_size = input_size
        self.output_size = output_size
        self.cell_size = cell_size
        self.batch_size = batch_size

        #输入输出
        with tf.name_scope('inputs'):
            self.xs = tf.placeholder(tf.float32, [None, n_steps, input_size], name='xs')
            self.ys = tf.placeholder(tf.float32, [None, output_size], name='ys')
        #直接加层
        with tf.variable_scope('in_hidden'):
            self.add_input_layer()
        #增加LSTM的cell
        with tf.variable_scope('LSTM_cell'):
            self.add_cell()
        #直接加层
        with tf.variable_scope('out_hidden'):
            self.add_output_layer()
        #计算损失值
        with tf.name_scope('cost'):
            self.compute_cost()
        #训练
        with tf.name_scope('train'):
            self.train_op = tf.train.AdamOptimizer(LR).minimize(self.cost)
        #正确率计算
        self.correct_pre = tf.equal(tf.argmax(self.ys,1),tf.argmax(self.pred,1))
        self.accuracy = tf.reduce_mean(tf.cast(self.correct_pre,tf.float32))

    def add_input_layer(self,):
        #X最开始的形状为(256 batch,28 steps,28 inputs)
        #转化为(256 batch*28 steps,128 hidden)
        l_in_x = tf.reshape(self.xs, [-1, self.input_size], name='to_2D')

        #获取Ws和Bs
        Ws_in = self._weight_variable([self.input_size, self.cell_size])
        bs_in = self._bias_variable([self.cell_size])

        #转化为(256 batch*28 steps,256 hidden)
        with tf.name_scope('Wx_plus_b'):
            l_in_y = tf.matmul(l_in_x, Ws_in) + bs_in

        # (batch * n_steps, cell_size) ==> (batch, n_steps, cell_size)
        # (256*28,256)->(256,28,256)
        self.l_in_y = tf.reshape(l_in_y, [-1, self.n_steps, self.cell_size], name='to_3D')

    def add_cell(self):
        #神经元个数
        lstm_cell = tf.contrib.rnn.BasicLSTMCell(self.cell_size, forget_bias=1.0, state_is_tuple=True)

        #每一次传入的batch的大小
        with tf.name_scope('initial_state'):
            self.cell_init_state = lstm_cell.zero_state(self.batch_size, dtype=tf.float32)

        #不是主列
        self.cell_outputs, self.cell_final_state = tf.nn.dynamic_rnn(
            lstm_cell, self.l_in_y, initial_state=self.cell_init_state, time_major=False)

    def add_output_layer(self):
        #设置Ws,Bs
        Ws_out = self._weight_variable([self.cell_size, self.output_size])
        bs_out = self._bias_variable([self.output_size])
        # shape = (batch,output_size)
        # (256,10)
        with tf.name_scope('Wx_plus_b'):
            self.pred = tf.matmul(self.cell_final_state[-1], Ws_out) + bs_out

    def compute_cost(self):
        self.cost =  tf.reduce_mean(
            tf.nn.softmax_cross_entropy_with_logits(logits = self.pred,labels = self.ys)
            )

    def _weight_variable(self, shape, name='weights'):
        initializer = np.random.normal(0.0,1.0 ,size=shape)
        return tf.Variable(initializer, name=name,dtype = tf.float32)

    def _bias_variable(self, shape, name='biases'):
        initializer = np.ones(shape=shape)*0.1
        return tf.Variable(initializer, name=name,dtype = tf.float32)


if __name__ == '__main__':
    #搭建 LSTMRNN 模型
    model = LSTMRNN(TIME_STEPS, INPUT_SIZE, OUTPUT_SIZE, CELL_SIZE, BATCH_SIZE)
    sess = tf.Session()

    sess.run(tf.global_variables_initializer())

    #训练10000次
    for i in range(10000):
        xs, ys = get_batch()  #提取 batch data
        if i == 0:
        #初始化data
            feed_dict = {
                    model.xs: xs,
                    model.ys: ys,
            }
        else:
            feed_dict = {
                model.xs: xs,
                model.ys: ys,
                model.cell_init_state: state    #保持 state 的连续性
            }

        #训练
        _, cost, state, pred = sess.run(
            [model.train_op, model.cost, model.cell_final_state, model.pred],
            feed_dict=feed_dict)

        #打印精确度结果
        if i % 20 == 0:
            print(sess.run(model.accuracy,feed_dict = {
                    model.xs: xs,
                    model.ys: ys,
                    model.cell_init_state: state    #保持 state 的连续性
            }))
위 내용은 Python에서 텐서플로우를 사용하여 장단기 메모리 LSTM을 구축하는 방법의 상세 내용입니다. 자세한 내용은 PHP 중국어 웹사이트의 기타 관련 기사를 참조하세요!