Python 가상 머신에서 복소수의 구현 원리는 무엇입니까?
- 王林앞으로
- 2023-05-13 10:40:211497검색
복잡한 데이터 구조
cpython에서 복잡한 데이터 구조의 구현은 다음과 같습니다.
typedef struct {
    double real;
    double imag;
} Py_complex;
#define PyObject_HEAD                   PyObject ob_base;
typedef struct {
    PyObject_HEAD
    Py_complex cval;
} PyComplexObject;
typedef struct _object {
    _PyObject_HEAD_EXTRA
    Py_ssize_t ob_refcnt;
    struct _typeobject *ob_type;
} PyObject;
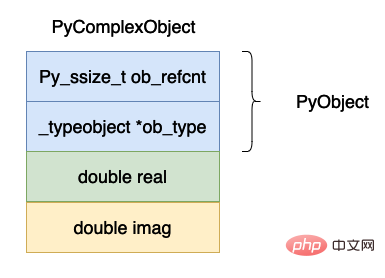
위의 데이터 구조 다이어그램은 다음과 같습니다.

복잡한 데이터는 전체 cpython 가상 머신에서 구현됩니다. 실수 부분과 허수 부분인 PyObject 헤드를 제외하고는 상대적으로 단순해야 합니다.
ob_refcnt는 객체의 참조 횟수를 나타냅니다. 이는 가비지 수집에 매우 유용합니다. 나중에 가상 머신의 가비지 수집 부분을 심층적으로 분석하겠습니다.
ob_type은 이 객체의 데이터 유형을 나타냅니다. Python에서는 때로는 데이터의 데이터 유형을 판단해야 합니다. 예를 들어 isinstance와 type이라는 두 키워드가 이 필드를 사용합니다.
real은 복소수의 실수부를 나타냅니다.
imag는 복소수의 허수부를 나타냅니다.
복소수 연산
복소수 덧셈
다음은 cpython에서 복소수 덧셈을 구현한 것입니다. 일부 쓸모없는 코드는 단순화를 위해 삭제되었습니다.
static PyObject *
complex_add(PyObject *v, PyObject *w)
{
    Py_complex result;
    Py_complex a, b;
    TO_COMPLEX(v, a); // TO_COMPLEX 这个宏的作用就是将一个 PyComplexObject 中的 Py_complex 对象存储到 a 当中
    TO_COMPLEX(w, b);
    result = _Py_c_sum(a, b); // 这个函数的具体实现在下方
    return PyComplex_FromCComplex(result); // 这个函数的具体实现在下方
}

// 真正实现复数加法的函数
Py_complex
_Py_c_sum(Py_complex a, Py_complex b)
{
    Py_complex r;
    r.real = a.real + b.real;
    r.imag = a.imag + b.imag;
    return r;
}

PyObject *
PyComplex_FromCComplex(Py_complex cval)
{
    PyComplexObject *op;

    /* Inline PyObject_New */
    // 申请内存空间
    op = (PyComplexObject *) PyObject_MALLOC(sizeof(PyComplexObject));
    if (op == NULL)
        return PyErr_NoMemory();
    // 将这个对象的引用计数设置成 1
    (void)PyObject_INIT(op, &PyComplex_Type);
    // 将复数结构体保存下来
    op->cval = cval;
    return (PyObject *) op;
}
위 코드의 전체 프로세스는 비교적 간단합니다.
먼저 PyComplexObject에서 실제 복잡한 부분을 추출합니다.
추출된 두 복소수를 더합니다.
얻은 결과를 기반으로 PyComplexObject 객체를 생성하고 이 객체를 반환합니다.
복소수 역산
복소수 역산 연산은 단지 실수부와 허수부를 반전시키는 것뿐입니다. 이 연산도 비교적 간단합니다.
static PyObject *
complex_neg(PyComplexObject *v)
{
    Py_complex neg;
    neg.real = -v->cval.real;
    neg.imag = -v->cval.imag;
    return PyComplex_FromCComplex(neg);
}

PyObject *
PyComplex_FromCComplex(Py_complex cval)
{
    PyComplexObject *op;

    /* Inline PyObject_New */
    op = (PyComplexObject *) PyObject_MALLOC(sizeof(PyComplexObject));
    if (op == NULL)
        return PyErr_NoMemory();
    (void)PyObject_INIT(op, &PyComplex_Type);
    op->cval = cval;
    return (PyObject *) op;
}
Repr 함수
복소수 유형의 repr 함수인 흥미로운 방법을 소개하겠습니다. 이 함수는 클래스의 __repr__ 함수와 동일한 효과를 갖습니다.
>>> data = complex(0, 1)
>>> data
1j
>>> data = complex(1, 1)
>>> data
(1+1j)
>>> print(data)
(1+1j)
Plural repr에 해당하는 C 함수는 다음과 같습니다.
static PyObject *
complex_repr(PyComplexObject *v)
{
    int precision = 0;
    char format_code = 'r';
    PyObject *result = NULL;

    /* If these are non-NULL, they'll need to be freed. */
    char *pre = NULL;
    char *im = NULL;

    /* These do not need to be freed. re is either an alias
       for pre or a pointer to a constant.  lead and tail
       are pointers to constants. */
    char *re = NULL;
    char *lead = "";
    char *tail = "";
    // 对应实部等于 0 虚部大于 0 的情况
    if (v->cval.real == 0. && copysign(1.0, v->cval.real)==1.0) {
        /* Real part is +0: just output the imaginary part and do not
           include parens. */
        re = "";
        im = PyOS_double_to_string(v->cval.imag, format_code,
                                   precision, 0, NULL);
        if (!im) {
            PyErr_NoMemory();
            goto done;
        }
    } else {
        /* Format imaginary part with sign, real part without. Include
           parens in the result. */
        // 将实部浮点数变成字符串
        pre = PyOS_double_to_string(v->cval.real, format_code,
                                    precision, 0, NULL);
        if (!pre) {
            PyErr_NoMemory();
            goto done;
        }
        re = pre;
        // 将虚部浮点数变成字符串
        im = PyOS_double_to_string(v->cval.imag, format_code,
                                   precision, Py_DTSF_SIGN, NULL);
        if (!im) {
            PyErr_NoMemory();
            goto done;
        }
        // 用什么括号包围起来
        lead = "(";
        tail = ")";
    }
    result = PyUnicode_FromFormat("%s%s%sj%s", lead, re, im, tail);
  done:
    PyMem_Free(im);
    PyMem_Free(pre);

    return result;
}
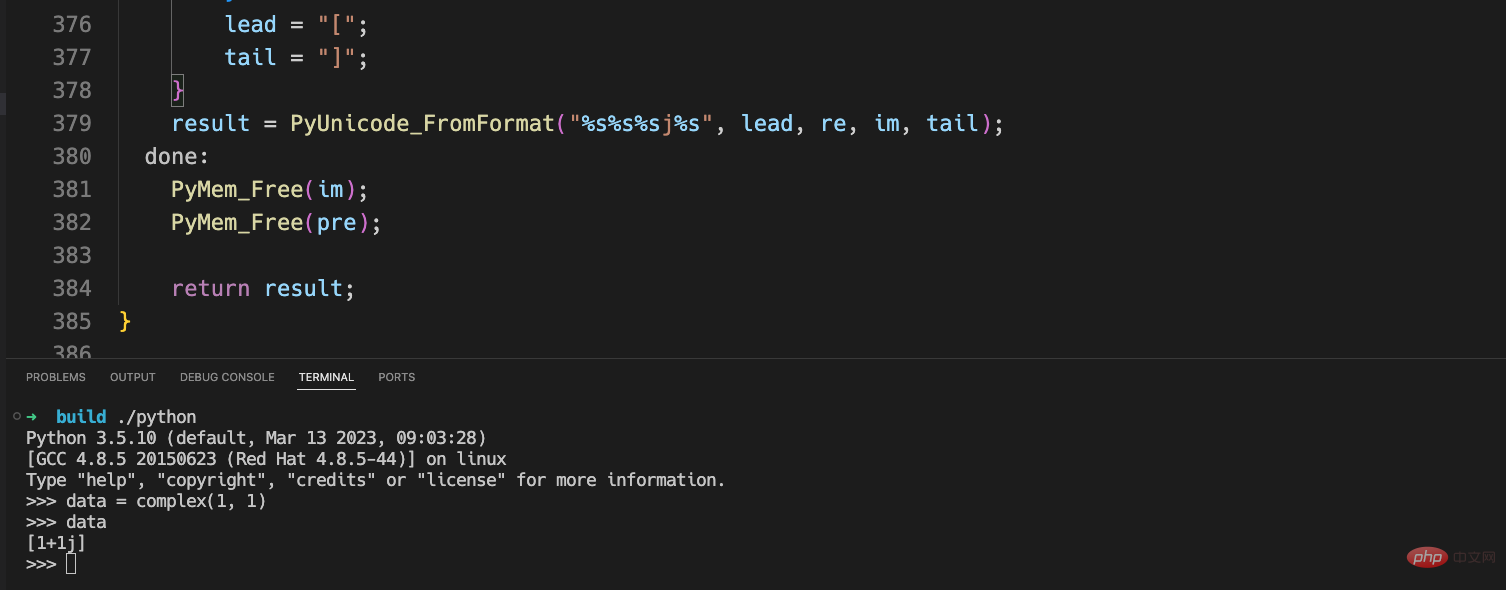
이제 위의 ()의 두 괄호를 []로 변경하도록 소스 프로그램을 수정합니다. 컴파일 후 실행 결과는 다음과 같습니다.

괄호가 []가 된 것을 볼 수 있습니다.
위 내용은 Python 가상 머신에서 복소수의 구현 원리는 무엇입니까?의 상세 내용입니다. 자세한 내용은 PHP 중국어 웹사이트의 기타 관련 기사를 참조하세요!

