
Python GUI 레이아웃 도구 Tkinter를 사용하는 방법

- 王林앞으로
- 2023-05-09 14:16:171915검색
그래픽 사용자 인터페이스(GUI)
그래픽 사용자 인터페이스(GUI)는 컴퓨터와 상호 작용하는 데 도움이 되는 데스크톱 응용 프로그램일 뿐입니다.
텍스트 편집기와 같은 GUI 응용 프로그램은 만들고, 읽고, 업데이트하고, 다양한 유형의 파일 삭제
스도쿠, 체스, 솔리테어와 같은 앱은 GUI 프로그램의 게임 버전입니다
Google Chrome, Firefox 및 Microsoft Edge와 같은 GUI 애플리케이션도 있습니다. 인터넷을 탐색하는 데 사용됩니다
이것들은 우리가 컴퓨터에서 매일 사용하는 몇 가지 다른 유형의 GUI 응용 프로그램입니다. 실제로 Tkinter를 통해 간단하고 유사한 응용 프로그램을 만들 수도 있습니다
오늘은 GUI에 대한 소개입니다. 매우 간단하고 아름다운 GUI 응용 프로그램이 만들어질 것입니다
Python GUI 생성을 위한 라이브러리
Python에는 수많은 타사 라이브러리가 있습니다. GUI 라이브러리의 경우 주로 다음과 같습니다:
Kivy
Python QT
wxPython
-
Tkinter
그 중에서 Tkinter는 사용하기 쉽고 Python 설치가 함께 제공되기 때문에 많은 학습자와 개발자가 가장 먼저 선택하는 것입니다.
Tkinter 기본 사항
아래 그림은 Tkinter에서 응용 프로그램이 실제로 어떻게 실행되는지 이해하기 위해 보여줍니다

먼저 Tkinter 모델을 가져온 다음 메인 창을 만듭니다. 이 창에서 작업을 수행하고 모든 시각 효과를 표시합니다. 다음으로 위젯을 추가하고 마지막으로 메인 이벤트 루프에 들어갑니다
여기에는 2개의 중요한 키워드가 있습니다
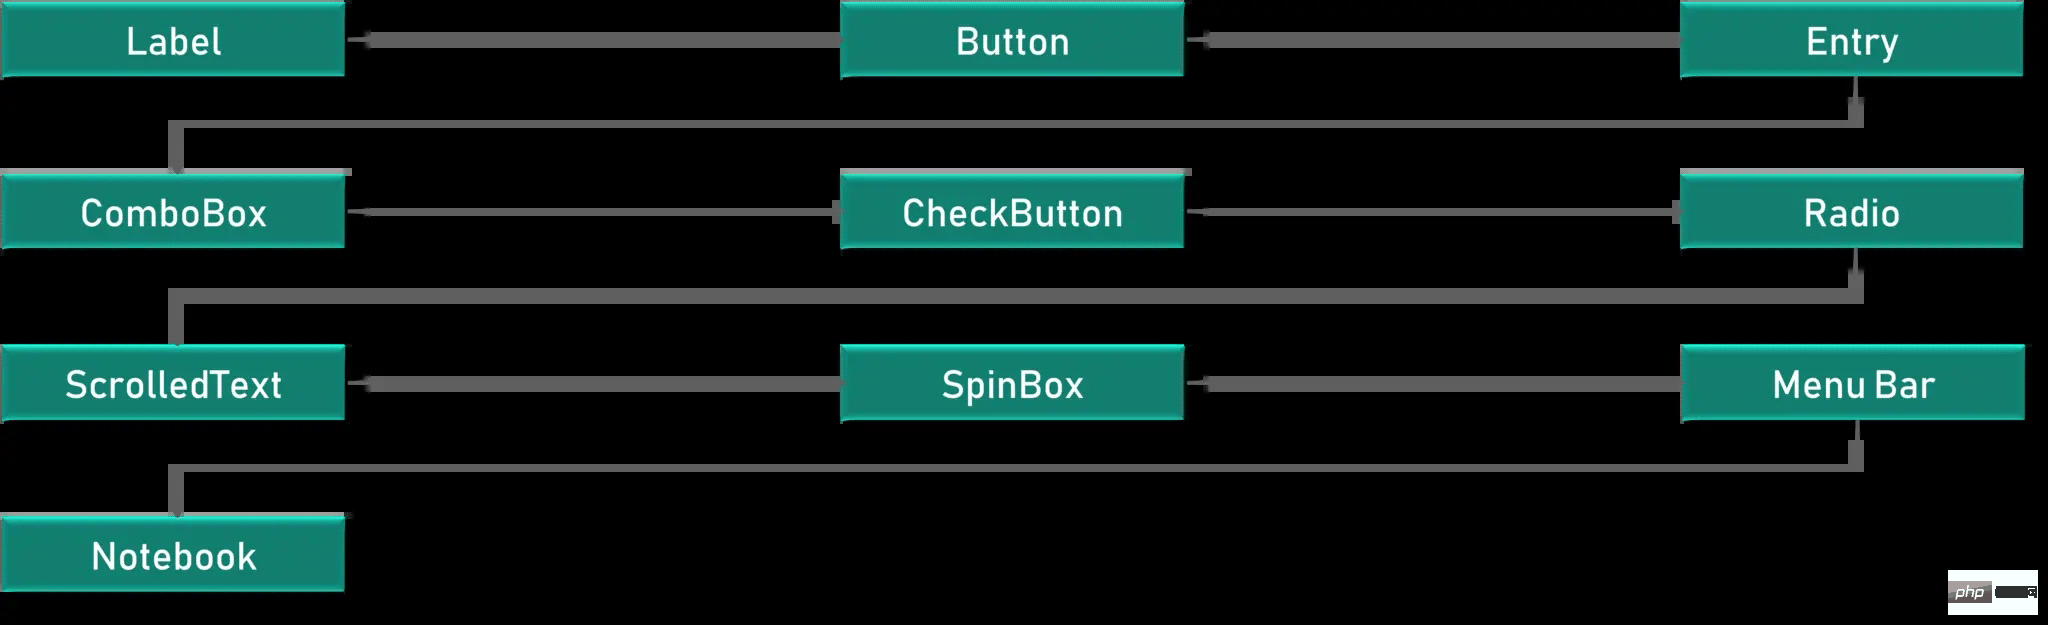
Widgets
Main Event Loop
이벤트 루프는 기본적으로 창을 수동으로 닫을 때까지 창을 계속 표시하도록 코드에 지시합니다. 이는 백그라운드에서 실행되는 무한 루프입니다.
위젯의 경우 연구하겠습니다. 나중에 별도로
다음 코드 예제를 통해 이해가 더 깊어질 것입니다
import tkinter
window = tkinter.Tk()
# to rename the title of the window window.title("GUI")
# pack is used to show the object in the window
label = tkinter.Label(window, text = "Hello World!").pack()
window.mainloop()
Tkinter 패키지를 가져오고 창을 정의한 다음 응용 프로그램을 열 때마다 창 제목을 수정할 수 있으며 제목이 제목에 표시됩니다. tab
마지막으로 창에 표시해야 하는 출력에 불과한 레이블도 정의합니다. 예제에서는 hello world

Tkinter Widgets
결국 위젯이란 무엇입니까
위젯은 HTML의 요소와 유사하며 Tkinter에서 다양한 요소 유형에 대해 다양한 유형의 위젯을 찾을 수 있습니다.
Tkinter의 모든 위젯에 대한 간략한 소개를 살펴보겠습니다
캔버스 - 캔버스는 그리는 데 사용됩니다. GUI의 모양
Button – 버튼은 Tkinter에 버튼을 배치하는 데 사용됩니다.
Checkbutton – Checkbutton은 응용 프로그램에서 확인 버튼을 만드는 데 사용됩니다.
Entry - Entry GUI에서 입력 필드를 만드는 데 사용됩니다.
Frame – 프레임은 Tkinter- Label에서 컨테이너로 사용됩니다. - Label은 텍스트, 이미지 등과 같은 한 줄 위젯을 만드는 데 사용됩니다.
- Menu - 메뉴는 Create 메뉴에서 사용됩니다. GUI
- 각 위젯의 사용법을 하나씩 살펴보겠습니다
Label
Label은 텍스트와 이미지 및 관련된 모든 것을 생성하는 데 사용되며 한 줄 정의만 가능하다는 점에 유의해야 합니다.
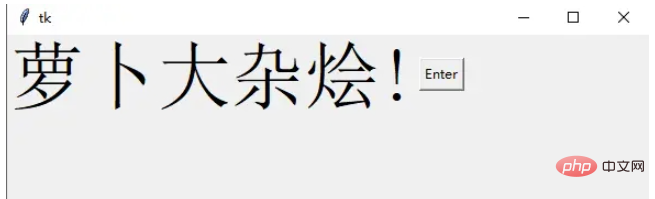
l1 = Label(window, text="萝卜大杂烩!", font=("ArialBold", 50))
l1.grid(column=0, row=0)
 기본적으로 창 크기를 변경하고 요구 사항에 따라 설정하는 데 사용되는 함수 기하학도 있습니다.
l1 = Label(window, text="萝卜大杂烩!", font=("ArialBold", 50))
window.geometry('350x200')
이 경우 너비 350픽셀, 높이 200픽셀로 설정했습니다.
다음은 버튼입니다.
Button
버튼은 라벨과 매우 유사합니다. 변수를 만들고 위젯 구문을 사용하여 버튼이 표현하려는 내용을 정의합니다.
window.geometry('350x200')
bt = Button(window, text="Enter")
 다음을 사용하여 버튼이나 다른 위젯의 전경색을 변경할 수도 있습니다. 코드 표시된 매개변수는 FG입니다. 마찬가지로 BG 속성을 사용하여 배경색을 변경할 수도 있습니다
bt = Button(window, text="Enter", bg="orange", fg="red")
bt.grid(column=1, row=0)
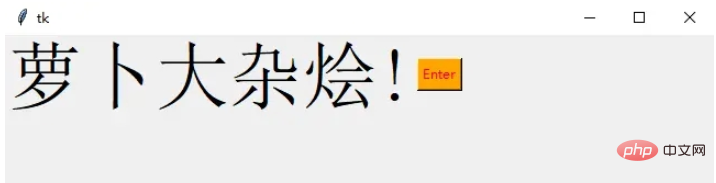 전경은 빨간색 텍스트로 정의되고 배경은 주황색으로 정의됩니다
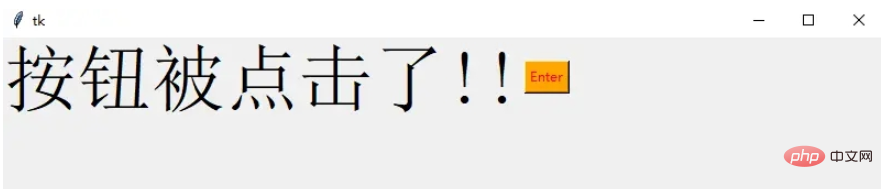
버튼 클릭 동작을 살펴보겠습니다
def clicked():
    l1.configure(text="按钮被点击了!!")
bt = Button(window, text="Enter", bg="orange", fg="red", command=clicked)
이것은 클릭 이벤트를 호출합니다. 버튼을 클릭하거나 클릭 이벤트가 트리거될 때 어떤 일이 발생해야 하는지에 대한 함수를 작성해야 합니다.
텍스트 메시지를 표시할 수 있는 clicked라는 함수를 정의하고 버튼에 command라는 매개 변수를 추가합니다. 클릭 이벤트 호출 정의
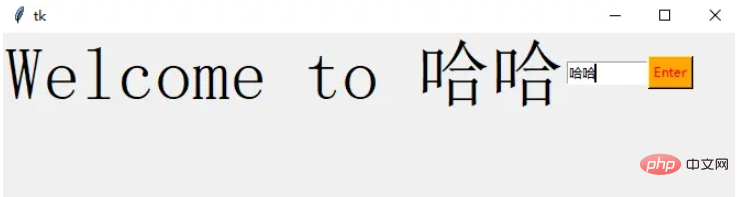
Entry
它用于在 GUI 中创建输入字段以接收文本输入
txt = Entry(window, width=10)
txt.grid(column=1, row=0)
def clicked():
    res = "Welcome to " + txt.get()
    l1.configure(text=res)
bt = Button(window, text="Enter", bg="orange", fg="red", command=clicked)
在这里,我们使用 Tkinter Entry 类创建一个文本框,grid 定义我们希望窗口小部件位于何处
同时 clicked 函数接收 Entry 的文本信息
Combobox
这是一个带有某些选项的下拉菜单
from tkinter.ttk import *
combo = Combobox(window)
combo['values']= (1, 2, 3, 4, 5, "Text")
combo.current(3)
combo.grid(column=0, row=0)

这样一个下拉菜单就完成了
Checkbutton
复选按钮是非常常用的组件
chk_state = BooleanVar()
chk_state.set (True)
chk = Checkbutton(window, text="Select", var=chk_state)
chk.grid(column=4, row=0)
我们首先创建一个 booleanvar 类型的变量,这是一个 Tkinter 变量
默认情况下,我们将设置状态保持为 true,这代表按钮已经被选中 接下来,我们将 chk_state 传递给 checkbutton 类来为我们设置检查状态

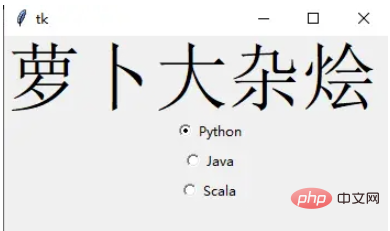
Radio Button
单选按钮也是非常常用的
rad1 = Radiobutton(window, text=Python', value=1)
rad2 = Radiobutton(window, text=Java', value=2)
rad3 = Radiobutton(window, text=Scala', value=3)
rad1.grid(column=0, row=0)
rad2.grid(column=1, row=0)
rad3.grid(column=2, row=0)
在这里,我们使用了不同的参数值,1,2和3,如果它们相同,则会导致冲突并出现错误
它们的文本数据是可以相同,在这里,我们使用了 Python、Java 和 Scala
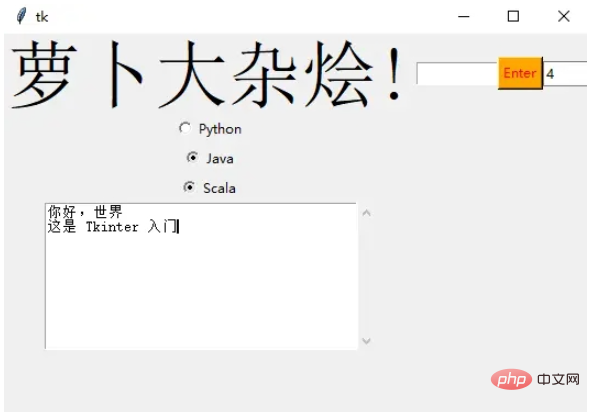
Scrolled Text
滚动文本组件
scro_txt = scrolledtext.ScrolledText(window, width=40,height=10)
scro_txt.grid(column=0, row=4)
我们指定了窗口的高和宽,否则默认会填充整个 Windiws 窗口
Message Box
消息组件可以方便的弹出提醒消息
def clicked():
    messagebox.showinfo('Message title', 'Message content')
btn = Button(window,text=‘ENTER', command=clicked)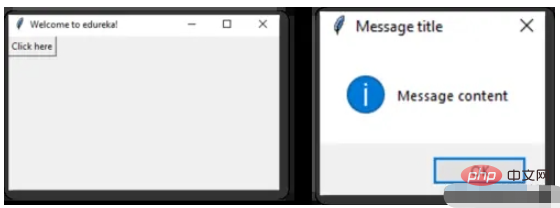
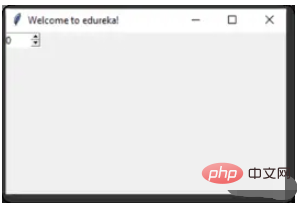
SpinBox
Spinbox 也是一个常见的组件,有两个选项卡,存在向上和向下滚动选项卡
pin = Spinbox(window, from_=0, to=100, width=5)
有 3 个参数——from、to 和 width
From – 告诉我们范围的开始和默认值
to – 给我们范围的上限阈值
width 基本上是将 widget 的大小设置为5个字符的空格
Geometry
Tkinter 中的所有 Widgets 都会有一些位置信息,这些度量使得我们可以组织 Widgets 及其父框架、窗口等
Tkinter 具有以下三个布局方式
pack():- 它在块中组织 Widgets,这意味着它占据了整个可用宽度,这是在窗口中显示 Widgets 的标准方法
grid():- 它以类似表格的结构组织 Widgets
place():- 它将 Widgets 放置在我们想要的特定位置
组织布局
为了在窗口中安排布局,我们将使用 Frame 类
Frame -- 在窗口中创建分区,我们可以根据需要使用 pack() 方法的侧面参数对齐框架
Button -- 在窗口中创建一个按钮,需要传递几个参数,如文本(按钮的值)、fg(文本的颜色)、bg(背景颜色)
在下面的代码中,我们使用 window、top_frame、bottom_frame 来布局
import tkinter
window = tkinter.Tk()
window.title("GUI")
# creating 2 frames TOP and BOTTOM
top_frame = tkinter.Frame(window).pack()
bottom_frame = tkinter.Frame(window).pack(side = "bottom")
# now, create some widgets in the top_frame and bottom_frame
btn1 = tkinter.Button(top_frame, text = "Button1", fg = "red").pack()# 'fg - foreground' is used to color the contents
btn2 = tkinter.Button(top_frame, text = "Button2", fg = "green").pack()# 'text' is used to write the text on the Button
btn3 = tkinter.Button(bottom_frame, text = "Button2", fg = "purple").pack(side = "left")# 'side' is used to align the widgets
btn4 = tkinter.Button(bottom_frame, text = "Button2", fg = "orange").pack(side = "left")
window.mainloop()
再来看一个登录的小栗子
import tkinter
window = tkinter.Tk()
window.title("GUI")
# creating 2 text labels and input labels
tkinter.Label(window, text = "Username").grid(row = 0) # this is placed in 0 0
# 'Entry' is used to display the input-field
tkinter.Entry(window).grid(row = 0, column = 1) # this is placed in 0 1
tkinter.Label(window, text = "Password").grid(row = 1) # this is placed in 1 0
tkinter.Entry(window).grid(row = 1, column = 1) # this is placed in 1 1
# 'Checkbutton' is used to create the check buttons
tkinter.Checkbutton(window, text = "Keep Me Logged In").grid(columnspan = 2) # 'columnspan' tells to take the width of 2 columns
# you can also use 'rowspan' in the similar manner
window.mainloop()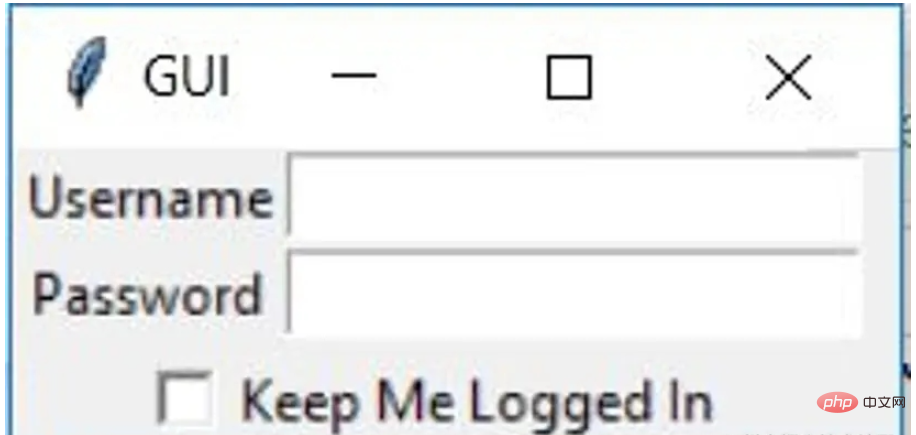
下面我们来了解 binding 函数
binding 函数
每当事件发生时调用函数就是绑定函数
在下面的示例中,当单击按钮时,它会调用一个名为 say_hi 的函数。 函数 say_hi 会创建一个带有文本 Hi 的新标签
import tkinter
window = tkinter.Tk()
window.title("GUI")
# creating a function called say_hi()
def say_hi():
    tkinter.Label(window, text = "Hi").pack()
tkinter.Button(window, text = "Click Me!", command = say_hi).pack() # 'command' is executed when you click the button
# in this above case we're calling the function 'say_hi'.
window.mainloop()
另一种绑定函数的方法是使用事件,事件类似于鼠标移动、鼠标悬停、单击和滚动等等
import tkinter
window = tkinter.Tk()
window.title("GUI")
# creating a function with an arguments 'event'
def say_hi(event): # you can rename 'event' to anything you want
    tkinter.Label(window, text = "Hi").pack()
btn = tkinter.Button(window, text = "Click Me!")
btn.bind("Button-1", say_hi) # 'bind' takes 2 parameters 1st is 'event' 2nd is 'function'
btn.pack()
window.mainloop()
单击事件有 3 种不同的类型,分别是 leftClick、middleClick 和 rightClick
下面的代码将使用对于的文本创建一个新标签
import tkinter
window = tkinter.Tk()
window.title("GUI")
#creating 3 different functions for 3 events
def left_click(event):
    tkinter.Label(window, text = "Left Click!").pack()
def middle_click(event):
    tkinter.Label(window, text = "Middle Click!").pack()
def right_click(event):
    tkinter.Label(window, text = "Right Click!").pack()
window.bind("Button-1", left_click)
window.bind("Button-2", middle_click)
window.bind("Button-3", right_click)
window.mainloop()
Images 和 Icons
我们可以使用 PhotoImage 方法添加图像和图标
import tkinter
window = tkinter.Tk()
window.title("GUI")
# taking image from the directory and storing the source in a variable
icon = tkinter.PhotoImage(file = "4.PNG")
# displaying the picture using a 'Label' by passing the 'picture' variriable to 'image' parameter
label = tkinter.Label(window, image = icon)
label.pack()
window.mainloop()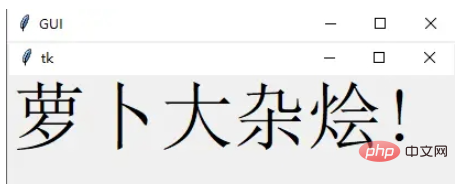
好了,进步的 Tkinter 知识我们都梳理完毕了,下面就完成一个简单的实战项目吧
计算器 APP
首先初始化页面
window = Tk()
window.geometry("350x380")
window.resizable(0, 0)  # this prevents from resizing the window
window.title("小小计算器")
接下来定义输入数字框
input_text = StringVar()
input_frame = Frame(window, width=312, height=50, bd=0, highlightbackground="black", highlightcolor="black",
                    highlightthickness=1)
input_frame.pack(side=TOP)
input_field = Entry(input_frame, font=('arial', 18, 'bold'), textvariable=input_text, width=50, bg="#eee", bd=0,
                    justify=RIGHT)
input_field.grid(row=0, column=0)
input_field.pack(ipady=10)
然后定义按钮方法,我们以清除按钮和除法按钮为例
clear = Button(btns_frame, text="C", fg="black", width=32, height=3, bd=0, bg="#eee", cursor="hand2",
               command=lambda: btn_clear()).grid(row=0, column=0, columnspan=3, padx=1, pady=1)
divide = Button(btns_frame, text="/", fg="black", width=10, height=3, bd=0, bg="#eee", cursor="hand2",
                command=lambda: btn_click("/")).grid(row=0, column=3, padx=1, pady=1)
最后就是计算equal逻辑
equals = Button(btns_frame, text="=", fg="black", width=10, height=3, bd=0, bg="#eee", cursor="hand2",
               command=lambda: btn_equal()).grid(row=4, column=3, padx=1, pady=1)
def btn_equal():
   global expression
   result = str(eval(expression))
   input_text.set(result)
   expression = ""
위 내용은 Python GUI 레이아웃 도구 Tkinter를 사용하는 방법의 상세 내용입니다. 자세한 내용은 PHP 중국어 웹사이트의 기타 관련 기사를 참조하세요!