Python Deep Learning 18 - 생성적 딥러닝의 DeepDream
- WBOYWBOYWBOYWBOYWBOYWBOYWBOYWBOYWBOYWBOYWBOYWBOYWB앞으로
- 2023-04-16 21:34:011820검색
DeepDream 소개
DeepDream은 예술적 이미지 수정 기술로, 주로 훈련된 컨벌루션 신경망 CNN을 기반으로 이미지를 생성합니다.
이미지를 생성할 때 신경망은 동결됩니다. 즉, 네트워크의 가중치는 더 이상 업데이트되지 않으며 입력 이미지만 업데이트하면 됩니다. 일반적으로 사용되는 사전 훈련된 컨벌루션 네트워크에는 Google의 Inception, VGG 네트워크 및 ResNet 네트워크 등이 포함됩니다.
DeePDream의 기본 단계:
- 입력 이미지 가져오기
- 이미지를 네트워크에 입력하고 시각화하려는 뉴런의 출력 값 가져오기
- 이미지의 각 픽셀에 대한 뉴런 출력 값의 기울기 계산
- 그라디언트 디센트를 사용하여 Picture를 지속적으로 업데이트
설정된 조건이 충족될 때까지 2, 3, 4단계를 반복합니다.
다음은 Keras를 사용하여 DeepDream을 구현하는 일반적인 프로세스입니다.
Keras를 사용하여 DeepDream 구현
테스트 사진을 받아보세요
[1]에서:
# ---------------
from tensorflow import keras
import matplotlib.pyplot as plt
%matplotlib inline

base_image_path = keras.utils.get_file(
"coast.jpg",
origin="https://img-datasets.s3.amazonaws.com/coast.jpg")

plt.axis("off")
plt.imshow(keras.utils.load_img(base_image_path))
plt.show()

위는 Keras와 함께 제공되는 해안선 사진입니다. 이 그림의 변경 사항은 다음과 같습니다.
사전 훈련된 모델 InceptionV3 준비
In [2]:
# 使用Inception V3实现
from keras.applications import inception_v3

# 使用预训练的ImageNet权重来加载模型
model = inception_v3.InceptionV3(weights="imagenet", # 构建不包含全连接层的Inceptino
 include_top=False)
Downloading data from https://storage.googleapis.com/tensorflow/keras-applications/inception_v3/inception_v3_weights_tf_dim_ordering_tf_kernels_notop.h5
87916544/87910968 [==============================] - 74s 1us/step
87924736/87910968 [==============================] - 74s 1us/step
In [3]:
model.summary()

DeepDream 구성 설정
In [4]:
# 层的名称 + 系数:该层对需要最大化的损失的贡献大小

layer_settings = {"mixed4":1.0,
"mixed5":1.5,
"mixed6":2.0,
"mixed7":2.5}

outputs_dict = dict(
[
(layer.name, layer.output) # 层的名字 + 该层的输出
for layer in [model.get_layer(name) for name in layer_settings.keys()]
]
)

outputs_dict
Out[4]:
{'mixed4': <KerasTensor: shape=(None, None, None, 768) dtype=float32 (created by layer 'mixed4')>,
 'mixed5': <KerasTensor: shape=(None, None, None, 768) dtype=float32 (created by layer 'mixed5')>,
 'mixed6': <KerasTensor: shape=(None, None, None, 768) dtype=float32 (created by layer 'mixed6')>,
 'mixed7': <KerasTensor: shape=(None, None, None, 768) dtype=float32 (created by layer 'mixed7')>}
In [5]:
# 特征提取

feature_extractor = keras.Model(inputs=model.inputs, outputs=outputs_dict)
feature_extractor
Out[5]:
<keras.engine.functional.Functional at 0x15b5ff0d0>
계산 손실
In [6]:
def compute_loss(image):
features = feature_extractor(image)# 特征提取
loss = tf.zeros(shape=())# 损失初始化

for name in features.keys():# 遍历层
coeff = layer_settings[name] # 某个层的系数
activation = features[name]# 某个层的激活函数
#为了避免出现边界伪影,损失中仅包含非边界的像素
loss += coeff * tf.reduce_mean(tf.square(activation[:, 2:-2, 2:-2, :])) # 将该层的L2范数添加到loss中;
return loss
Gradient ascent process
In [7]:
import tensorflow as tf

@tf.function
def gradient_ascent_step(image, lr): # lr--->learning_rate学习率
with tf.GradientTape() as tape:
tape.watch(image)
loss = compute_loss(image)# 调用计算损失方法
grads = tape.gradient(loss, image)# 梯度更新
grads = tf.math.l2_normalize(grads)
image += lr * grads
return loss, image

def gradient_ascent_loop(image, iterations, lr, max_loss=None):
for i in range(iterations):
loss, image = gradient_ascent_step(image, lr)
if max_loss is not None and loss > max_loss:
break
print(f"第{i}步的损失值是{loss:.2f}")

return image
이미지 생성
np. Expand_dims 사용법(개인 추가)
In [8]:
import numpy as np

array = np.array([[1,2,3],
[4,5,6]]
)
array
Out[8]:
array([[1, 2, 3],
 [4, 5, 6]])
In [9]:
array.shape
Out[9]:
(2, 3)
In [10]:
array1 = np.expand_dims(array,axis=0)
array1
Out[ 10] :
array([[[1, 2, 3],
[4, 5, 6]]])
In [11]:
array1.shape
Out[11]:
(1, 2, 3)
In [12]:
array2 = np.expand_dims(array,axis=1)
array2
Out[12]:
array([[[1, 2, 3]],

 [[4, 5, 6]]])
In [13]:
array2.shape
Out[13] :
(2, 1, 3)
In [14]:
array3 = np.expand_dims(array,axis=-1)
array3
Out[14]:
array([[[1],
[2],
[3]],

 [[4],
[5],
[6]]])
In [15]:
array3.shape
Out[15]:
(2, 3, 1)
np.clip 기능(개인 추가)
np.clip(
array,
min(array),
max(array),
out=None):
In [16 ]:
array = np.array([1,2,3,4,5,6])

np.clip(array, 2, 5)# 输出长度和原数组相同
Out[16]:
array([2, 2, 3, 4, 5, 5])
In [17]:
array = np.arange(18).reshape((6,3))
array
Out[17]:
array([[ 0,1,2],
 [ 3,4,5],
 [ 6,7,8],
 [ 9, 10, 11],
 [12, 13, 14],
 [15, 16, 17]])
In [18]:
np.clip(array, 5, 15)
Out[18]:
array([[ 5,5,5],
 [ 5,5,5],
 [ 6,7,8],
 [ 9, 10, 11],
 [12, 13, 14],
 [15, 15, 15]])
매개변수 설정
In [19 ]:
step = 20.#梯度上升的步长
num_octave = 3# 运行梯度上升的尺度个数
octave_scale = 1.4# 两个尺度间的比例大小
iterations = 30# 在每个尺度上运行梯度上升的步数
max_loss = 15.# 损失值若大于15,则中断梯度上升过程
이미지 사전 처리
In [20]:
import numpy as np

def preprocess_image(image_path):# 预处理
img = keras.utils.load_img(image_path)# 导入图片
img = keras.utils.img_to_array(img)# 转成数组
img = np.expand_dims(img, axis=0)# 增加数组维度;见上面解释(x,y) ---->(1,x,y)
img = keras.applications.inception_v3.preprocess_input(img)
return img


def deprocess_image(img):# 图片压缩处理
img = img.reshape((img.shape[1], img.shape[2], 3))
img /= 2.0
img += 0.5
img *= 255.
# np.clip:截断功能,保证数组中的取值在0-255之间
img = np.clip(img, 0, 255).astype("uint8")
return img
generated image
In [21]:
# step = 20.#梯度上升的步长
# num_octave = 3# 运行梯度上升的尺度个数
# octave_scale = 1.4# 两个尺度间的比例大小
# iterations = 30# 在每个尺度上运行梯度上升的步数
# max_loss = 15.0# 损失值若大于15,则中断梯度上升过程

original_img = preprocess_image(base_image_path)# 预处理函数
original_shape = original_img.shape[1:3]

print(original_img.shape)# 四维图像
print(original_shape)# 第2和3维度的值
(1, 900, 1200, 3)
(900, 1200)
In [22]:
successive_shapes = [original_shape]

for i in range(1, num_octave):
shape = tuple([int(dim / (octave_scale ** i)) for dim in original_shape])
successive_shapes.append(shape)
successive_shapes = successive_shapes[::-1]# 翻转

shrunk_original_img = tf.image.resize(original_img, successive_shapes[0])

img = tf.identity(original_img)
for i, shape in enumerate(successive_shapes):
print(f"Processing octave {i} with shape {shape}")
# resize
img = tf.image.resize(img, shape)
img = gradient_ascent_loop(# 梯度上升函数调用
img,
iteratinotallow=iterations,
lr=step,
max_loss=max_loss
)
# resize
upscaled_shrunk_original_img = tf.image.resize(shrunk_original_img, shape)
same_size_original = tf.image.resize(original_img, shape)

lost_detail = same_size_original - upscaled_shrunk_original_img
img += lost_detail
shrunk_original_img = tf.image.resize(original_img, shape)

keras.utils.save_img("dream.png", deprocess_image(img.numpy()))
결과는 다음과 같습니다:
Processing octave 0 with shape (459, 612)
第0步的损失值是0.80
第1步的损失值是1.07
第2步的损失值是1.44
第3步的损失值是1.82
......
第26步的损失值是11.44
第27步的损失值是11.72
第28步的损失值是12.03
第29步的损失值是12.49
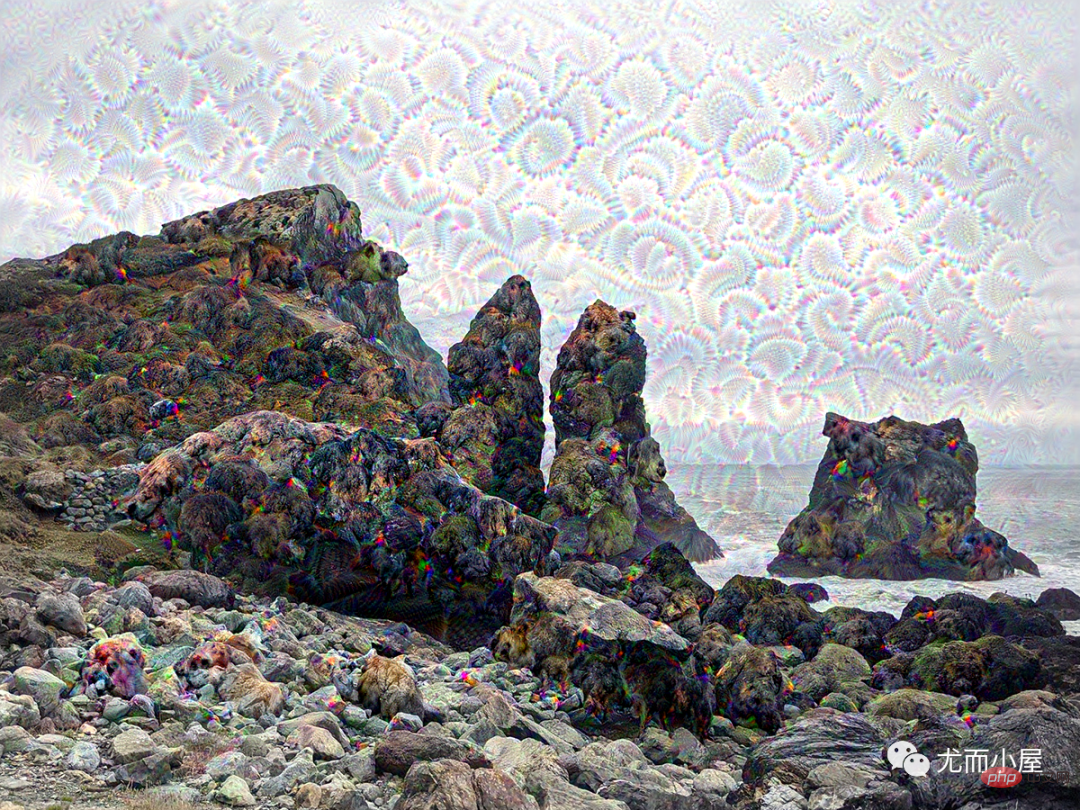
동시에 , 새로운 이미지가 로컬에서 생성됩니다. 사진, 효과 살펴보기:

원본 사진 다시 보기: 비교해 보면 새 사진은 약간 몽환적입니다!

위 내용은 Python Deep Learning 18 - 생성적 딥러닝의 DeepDream의 상세 내용입니다. 자세한 내용은 PHP 중국어 웹사이트의 기타 관련 기사를 참조하세요!

