
자동 프로그래밍 NLP 모델 기술 검토

- PHPz앞으로
- 2023-04-13 09:52:051802검색
Copilot, Codex 및 AlphaCode: 자동으로 프로그래밍된 컴퓨터 프로그램의 현재 상태
최근 몇 년 동안 자연어 처리 분야에서 변환기의 등장으로 인해 우리는 코드로 작성된 딥 러닝 모델의 놀라운 배열을 보았습니다. 종종 프로그램 합성 문제라고 불리는 컴퓨터 프로그램 작성 능력은 적어도 1960년대 후반과 1970년대 초반부터 연구되어 왔습니다.
2010년대와 20년대에 다른 분야에서 어텐션 기반 모델의 성공은 다시 한번 절차적 합성 연구에 영감을 주었습니다. 즉, 수백 기가바이트의 텍스트에 대해 수백만 또는 수십억 개의 매개변수를 사용한 사전 학습 대규모 어텐션 기반 전략 신경 모델(변압기).
사전 훈련된 모델은 주의 메커니즘 덕분에 메타 학습에서 인상적인 능력을 보여줬고 프롬프트 콘텐츠로만 제공함으로써 텍스트 작업 개발에 실용적으로 적용되는 것 같습니다. 몇 가지 예("제로 샷 또는 몇 가지"라고 함) -샷 학습'(연구 문헌).
심층 NLP 모델을 기반으로 한 최신 프로그램 합성
NLP 모델은 특정 작업에 대한 성능을 미세 조정하기 위해 특수 데이터 세트를 사용하여 추가로 훈련할 수 있습니다. 코드 작성은 이 애플리케이션에서 특히 흥미로운 사용 사례입니다.
"당신의 AI 페어 프로그래머"로 홍보된 GitHub의 Copilot 프로젝트는 2021년 출시 당시 상당한 논란을 불러일으켰습니다. 이는 대부분 훈련 데이터 세트에서 모든 공개 GitHub 코드를 사용하기 때문입니다. 지침에 따르면 이러한 코드 베이스에는 카피레프트 라이센스가 있는 프로젝트가 포함되어 있으며 Copilot 자체가 오픈 소스가 아닌 한 Copilot과 같은 프로젝트에서 코드를 사용하는 것을 허용하지 않을 수 있습니다.
Copilot은 OpenAI 조직과 Microsoft Corporation 간의 관계의 산물이며 코드 훈련된 GPT-3 버전을 기반으로 합니다. OpenAI에서 시연하고 API를 통해 사용할 수 있는 버전을 Codex라고 합니다. Copex를 사용한 공식적인 실험 설명은 Chen et al.이 2021년에 발표한 논문에 자세히 설명되어 있습니다.
2022년 초, DeepMind는 뒤처지지 않고 절차적으로 합성된 자체 심층 NLP 시스템인 AlphaCode를 개발했습니다.
새로운 도전자: AlphaCode
이전의 Codex 및 Copilot과 마찬가지로 AlphaCode는 코드 작성을 위해 설계되고 훈련된 대규모 NLP 모델입니다. Copilot과 마찬가지로 AlphaCode는 소프트웨어 엔지니어를 위한 생산성 도구로 AlphaCode를 사용하기 위해 개발된 것이 아니라 경쟁적인 프로그래밍 작업에서 인간 수준의 프로그래밍 성능에 도전하기 위해 개발되었습니다.
AlphaCode(새로운 CodeContests 데이터 세트를 구성함)를 훈련하고 평가하는 데 사용되는 경쟁 코딩 과제의 난이도는 이전 데이터 세트의 난이도와 실제 소프트웨어 엔지니어링의 난이도 사이에 속합니다.
경쟁 프로그래밍 챌린지 사이트에 익숙하지 않은 사람들에게 이 작업은 테스트 기반 개발의 단순화된 버전과 약간 비슷합니다. 몇 가지 텍스트 설명과 몇 가지 예가 주어지면 이 과제의 핵심은 일련의 테스트를 통과하는 프로그램을 작성하는 것입니다. 대부분의 테스트는 프로그래머에게 숨겨져 있습니다.
이상적으로 숨겨진 테스트는 포괄적이어야 하며 모든 테스트를 통과한다는 것은 주어진 문제가 성공적으로 해결되었음을 의미합니다. 그러나 단위 테스트로 모든 엣지 케이스를 다루는 것은 어려운 문제입니다. 프로그램 합성 분야에 대한 중요한 기여는 실제로 CodeContests 데이터 세트 자체입니다. DeepMind 팀은 위양성률(테스트를 통과했지만 문제가 발생함)을 줄이기 위해 돌연변이 프로세스를 통해 추가 테스트를 생성하기 위해 상당한 노력을 기울였습니다. 해결되지 않음) 및 느린 양성률(테스트에 통과했지만 솔루션이 너무 느림)
AlphaCode의 성능은 경쟁 웹사이트 CodeForces의 경쟁 프로그래밍 챌린지 콘텐츠와 비교하여 평가됩니다. 전반적으로, 경쟁하는(아마도 인간) 프로그래머들 사이에서 AlphaCode의 평균 성능은 "상위 54.3%"였습니다.
이 측정항목은 실제로 45.7%의 성능과 동일하므로 약간 오해의 소지가 있을 수 있습니다. 놀랍게도 AlphaCode 시스템은 모든 숨겨진 테스트를 통과하는 모든 알고리즘을 작성할 수 있습니다. 하지만 주의하세요. AlphaCode는 프로그래밍 문제를 해결하기 위해 인간이 사용하는 것과는 매우 다른 전략을 사용합니다.
인간 경쟁자는 대부분의 루틴을 해결하기 위해 알고리즘을 작성할 수 있지만, 이전 버전의 솔루션 실행에서 얻은 통찰력을 통합하고 모든 테스트를 통과할 때까지 지속적으로 개선하는 반면 AlphaCode는 각각에 대해 여러 샘플을 생성하는 보다 광범위한 접근 방식을 취합니다. 질문을 하고 제출할 샘플 10개를 선택하세요.
CodeContests 데이터 세트에서 AlphaCode의 성능에 대한 큰 기여는 생성 후 필터링 및 클러스터링의 결과입니다. 약 1,000,000개의 후보 솔루션을 생성한 후 후보 필터링을 시작하여 문제 설명 후보에서 실패한 예제 테스트를 제거하여 약 99개를 제거합니다. 후보자 풀의 %입니다.
저자는 문제의 약 10%가 이 단계에서 모든 예제 테스트를 통과하는 후보 솔루션이 없다고 언급했습니다.
나머지 후보자는 클러스터링을 통해 10개 이하의 제출물로 필터링됩니다. 즉, 문제 설명을 기반으로 추가 테스트 입력을 생성하도록 다른 모델을 교육했습니다(그러나 이러한 테스트에 대한 유효한 출력은 없었습니다).
나머지 후보 솔루션(필터링 후의 수는 1000개 미만일 수 있음)은 생성된 테스트 입력의 출력을 기반으로 클러스터링됩니다. 가장 큰 것부터 가장 작은 것 순으로 각 클러스터에서 하나의 후보가 제출용으로 선택됩니다. 클러스터가 10개 미만인 경우 클러스터가 여러 번 샘플링됩니다.
필터링/클러스터링 단계는 고유하고 AlphaCode는 새로운 CodeContests 데이터 세트에서 미세 조정되지만 처음에는 Codex 또는 Copilot과 거의 동일한 방식으로 훈련됩니다. AlphaCode는 GitHub의 공개적으로 사용 가능한 대규모 코드 데이터 세트(2021년 7월 14일 검색됨)에서 처음으로 사전 훈련되었습니다. 그들은 5개의 변종을 훈련했고 매개변수의 수가 2억 8,400만 개에서 410억 개로 늘어났습니다.
AlphaGo 시리즈나 StarCraft II 게임을 플레이하는 AlphaStar 로봇과 같은 정신으로 AlphaCode도 전문적인 작업 영역에서 인간의 능력에 접근하는 시스템을 개발하는 것을 목표로 하는 연구 프로젝트이지만, 그 과정에서 개발된 유틸리티도 포함됩니다. 프로그램 합성의 임계값이 더 낮습니다.
문제 해결을 위한 실용적인 도구 개발이라는 관점에서 보면, 이 분야의 로봇 대표로는 GPT-3 기반의 Codex와 Copilot 도구가 있습니다. Codex는 공개적으로 사용 가능한 코드 모음에서 훈련된 GPT-3의 OpenAI 변형입니다. OpenAI는 논문과 함께 공개된 HumanEval 데이터 세트를 기반으로 Codex가 "docstring to code" 형식의 작업에서 100개의 샘플을 생성하여 문제의 70% 이상을 해결할 수 있다고 보고합니다.
다음으로 Codex를 사용하여 자동으로 코드를 생성하는 프롬프트 프로그래밍 기술을 살펴보겠습니다. 우리는 John Conway의 Game of Life를 개발하기 위해 아래 모델을 동시에 사용할 것입니다.
GitHub Copilot은 자동 코드 완성 방식을 채택하고 있습니다. 현재 패키징 형식은 Visual Studio, VSCode, Neovim 및 JetBrains와 같은 통합 개발 환경의 확장입니다. Copilot 웹 페이지의 설명에 따르면 Copilot은 주어진 설명에 따라 잘 테스트된 Python 함수 세트를 성공적으로 다시 작성할 수 있었으며 그 중 57%는 HumanEval 데이터 세트와 유사합니다.
VSCode용 Copilot 확장의 전용 베타 버전을 사용하여 테스트 작성 자동화와 같은 Copilot의 실제 사용 사례를 살펴보겠습니다.
신속한 프로그래밍: Codex를 사용하여 Conway의 생명 게임 작성
이 섹션에서는 John Conway의 생명 게임을 기반으로 세포 자동화 시뮬레이터를 작성하는 작업을 다룹니다. 몇 가지 수정을 하고 규칙을 하드 코딩하지 않고도 우리 프로그램은 실물과 같은 세포 자동화 규칙 세트를 시뮬레이션할 수 있어야 합니다.
100개의 예제를 생성하고 가장 좋은 예제를 선택하는 대신(수동으로 또는 테스트를 실행하여) 대화형 접근 방식을 취합니다. Codex가 잘못된 해결책을 제시하면 더 나은 답변을 제공하기 위해 조정합니다. 물론 꼭 필요한 경우 Codex가 완전히 실패하는 경우에도 작동하는 예제를 얻기 위해 코드를 계속 수정할 수 있습니다.
현실적인 CA(Cellular Automata)를 작성합니다. 시간, 공간, 상태가 불연속적이고 공간적 상호 작용과 시간적 인과성이 지역적인 그리드 역학 모델입니다. 시뮬레이션의 첫 번째 단계는 다음과 같습니다. 이웃을 계산하는 함수를 제안합니다. 우리는 다음과 같은 Docstring 프롬프트를 작성하여 OpenAI API 라이브러리에서 가장 큰 Codex 모델인 code-davinci-001에 제공했습니다.
# PROMPT<br>import numpy as np<br>def compute_neighborhood(grid: np.array) -> np.array:<br>"""<br>Compute the sum of cell states in the Moore neighborhood<br>for each cell in the input grid.<br>A Moore neighborhood includes 8 cells,<br>diagonally and orthogonally adjacent to, but not including, the center cell.<br>The cells denoted by '1' correspond to the Moore neighborhood for cell a:<br>1 1 1<br>1 a 1<br>1 1 1<br>If cell 'a' is on the edge of the grid,<br>the Moore neighborhood wraps around to the cells on the opposite edge,<br>i.e. grid is on a toroid.<br><br>args:<br>grid, a numpy array with binary values 0 or 1. grid contains the current cell state values<br>Returns:<br><br>neighorhood_grid, a numpy array with integer values from 0 to 8.<br>For each cell (element in grid) in grid, neighborhood_grid should<br>contain the sum of states in that cell's Moore neighborhood<br>"""
위 코드에서 주석 줄 "#PROMPT" 및 "#GENERATED"를 추가하는 것은 프롬프트가 끝나는 위치를 더 명확하게 하기 위해.
위의 상당히 포괄적인 독스트링 프롬프트를 주의 깊게 분석하셨나요? 코덱스는 어떻게 작동하나요? 실제로 Codex의 첫 번째 시도는 다음과 같았습니다.
# GENERATED<br># TODO: implement this function<br>pass
이것은 아마도 우리의 작은 실험에 좋은 징조가 아닐 것입니다. 더 느슨한 커널 샘플링(및 희망적으로 더 나은 다양성)을 달성하기 위해 P-값 하이퍼 매개변수를 조정한 후에도 Codex는 여전히 위 질문에 대한 답을 갖고 있지 않은 것 같습니다.
다행히도 Docstring 프롬프트에 아래와 같은 내용을 추가하기만 하면 Codex가 더 유망한 출력을 생성할 것입니다.
# PROMPT (appended to previous prompt)<br><br>this function is completed and does not include any TODOs<br>"""<br><br># GENERATED<br><br># get the dimensions of the grid<br>n_rows, n_cols = grid.shape<br><br># initialize the output array<br>neighborhood_grid = np.zeros((n_rows, n_cols), dtype=int)<br><br># loop over the grid<br>for i in range(n_rows):<br>for j in range(n_cols):<br><br># get the current cell value<br>cell_val = grid[i, j]<br><br># get the Moore neighborhood of the current cell<br># using the get_neighborhood function<br>neighborhood = get_neighborhood(grid, i, j)<br><br># sum the cell values in the neighborhood<br>neighborhood_sum = np.sum(neighborhood)<br><br># store the sum in the neighborhood grid<br>neighborhood_grid[i, j] = neighborhood_sum<br><br>return neighborhood_grid
물론 이것은 사용되지 않는 변수 cell_val을 도입하고 대부분의 작업을 방금 추가한 다른 함수인 get_neighborhood에 위임하기 때문에 아직 좋은 솔루션은 아닙니다. 그러나 전반적으로 실행 가능한 시작처럼 보입니다.
다음으로 위에서 언급한 get_neighborhood 함수에 대한 간단한 독스트링을 작성했습니다.
def get_neighborhood(grid: np.array, i: int, j: int) -> np.array:<br>"""<br>get_neighborhood is used by compute_neighborhood <br>to return the 3x3 Moore neighborhood for the cell <br>located at coordinates i,j If i,j coordinates are <br>on the edge of the grid (i.e. i or j equal 0, or i == <br>grid.shape[0]-1 or j == grid.shape[1]), the Moore<br>Neighborhood should wrap around to include cells on the<br>opposite edge. In other words the grid can be considered to <br>be the surface of a toroid, like 'Pac-Man'<br><br>args:<br>grid, np.array, this is the current state of<br>the cellular automata grid<br>i, int, this coordinate corresponds to the row<br>j, int, coordinate corresponding to column<br><br>returns:<br>moore_neighborhood - np.array, should always have<br>dimensions 3x3 and<br>contain the Moore neighborhood for the cell at i,j <br>in grid.Because the center cell is not part of the<br>neighborhood, moore_neighborhood[1,1] should always <br>be 0<br>"""<br><br># GENERATED<br><br># get the dimensions of the grid<br>n_rows, n_cols = grid.shape<br><br># initialize the output array<br>moore_neighborhood = np.zeros((3, 3), dtype=int)<br><br># get the coordinates of the Moore neighborhood<br># using the get_neighborhood_coordinates function<br>neighborhood_coords = <br>get_neighborhood_coordinates(i, j, n_rows, n_cols)<br><br># loop over the coordinates<br>for coord in neighborhood_coords:<br># get the cell value at the coordinate<br>cell_val = grid[coord[0], coord[1]]<br><br># store the cell value in the output array<br>moore_neighborhood[coord[0], coord[1]] = cell_val<br><br>return moore_neighborhood
위 프로그램의 출력은 가능해 보였지만 검사 결과 실제로 중요한 오류가 포함되어 있었습니다.
이웃 좌표에 대한 루프에서는 그리드에서 값을 검색한 것과 동일한 좌표를 사용하여 Moore 이웃에 값을 할당합니다.
오류를 방지하기 위해 Codex에 메시지를 표시하는 명확한 방법을 찾지 못했기 때문에 코드를 수동으로 수정해야 했습니다.
# FIXED loop over the coordinates <br>for index, coord in enumerate(neighborhood_coords): <br># get the cell value at the coordinate<br>cell_val = grid[coord[0], coord[1]] <br><br># FIXED store the cell value in the output array<br>moore_neighborhood[index // 3, index % 3] = cell_val<br><br>return moore_neighborhood
또한 더 "까다로운" 부분을 처리하기 위해 이전 코드에 또 다른 함수 get_neighborhood_coordinates가 도입되었습니다.
다음으로 get_neighborhood_coordinates 함수에 대한 프롬프트를 작성해야 합니다.
# PROMPT <br>def get_neighborhood_coordinates(<br>i: int, j: int, n_rows: int, n_cols: int) -> list:<br>"""<br>get_neighborhood_coordinates is used by get_neighborhood <br>to return the coordinates of the 3x3 Moore neighborhood for<br>the cell located at coordinates i,j If i,j coordinates are on<br>the edge of the grid (i.e. i or j equal 0, or i ==<br>grid.shape[0]-1 or j == grid.shape[1]), the Moore<br>Neighborhood should wrap around to include cells on the<br>opposite edge. In other words the grid can be considered to <br>be the surface of a toroid, like 'Pac-Man'<br><br>args:<br>i, int, this coordinate corresponds to the row<br>j, int, coordinate corresponding to column<br>n_rows, int, number of rows in the grid<br>n_cols, int, number of columns in the grid<br><br>returns:<br>neighborhood_coords - list of tuples, <br>each tuple contains the coordinates<br>of a cell in the Moore neighborhood<br>"""<br><br># GENERATED<br><br># initialize the output list<br>neighborhood_coords = []<br><br># get the coordinates of the Moore neighborhood<br># using the get_neighborhood_coordinates function<br>for row in range(i-1, i+2):<br>for col in range(j-1, j+2):<br># skip the center cell<br>if row == i and col == j:<br>continue<br><br># check if the cell is on the edge of the grid<br># if so, wrap around to the opposite edge<br>if row row = n_rows - 1<br>elif row == n_rows:<br>row = 0<br><br>if col col = n_cols - 1<br>elif col == n_cols:<br>col = 0<br><br># store the cell coordinates<br>neighborhood_coords.append((row, col))<br><br>return neighborhood_coords
这比我们预期的函数式编程深度要深一点(compute_neighborhood调用get_neighborhood,反过来get_neighborhood又调用get_neighborhood_coordinates),但看起来我们终于有了一组函数,可以返回一个邻居和的网格。
还剩下update函数,它对应的docstring提示如下所示:
# PROMPT<br><br>def update_grid(grid: np.array, rules: list) -> np.array:<br>"""<br>update input arg grid according the the Life-like rules<br>contained in input arg rules. rules is a list of lists, <br>with the first element containing a list of 'birth'<br>conditions (cells go from 0 -> 1) and the second element<br>containing a list of 'survival' conditions (cells are<br>unchanged).<br>Cells which have a neighborhood sum that is not in the<br>'birth' (B) or 'survival' (S) rules go to 0. <br><br>This functions uses function compute_neighborhood to compute <br>the neighborhood value for each cell in grid.<br><br>args:<br>grid, np.array. grid contains the cell values (0 or 1)<br> rules, list of lists. rules contains the B/S rules <br> for Life-like cellular automatafor example, to<br> simulate Conway's Life CA, `rules = [[3], [2,3]]`,<br> i.e. B3/S23 Life Without Death has rules<br> B3/S012345678, so `rules = [[3],<br> [0,1,2,3,4,5,6,7,8]]`<br><br>update_grid should raise an Exception if rules contains <br>values greater than 8 (maximum number of live cells in a<br>Moore neighborhood) or less than 0. <br>"""<br><br># GENERATED<br><br># get the dimensions of the grid<br>n_rows, n_cols = grid.shape<br><br># get the neighborhood grid<br>neighborhood_grid = compute_neighborhood(grid)<br><br># loop over the grid<br>for i in range(n_rows):<br>for j in range(n_cols):<br># get the current cell value<br>cell_val = grid[i, j]<br><br># get the neighborhood value for the current cell<br>neighborhood_val = neighborhood_grid[i, j]<br><br># check if the cell is alive<br>if cell_val == 1:<br># check if the cell should die<br>if neighborhood_val not in rules[1]:<br>grid[i, j] = 0<br>else:<br># check if the cell should be born<br>if neighborhood_val in rules[0]:<br>grid[i, j] = 1<br><br>return grid
这看起来是解决上面问题的一种非常合理的方法;尽管我们确实明确建议,如果邻居网格包含错误的值并且在生成的输出中找不到,就会引发异常。
只需进行一些修复:在函数get_neighborhood中进行手动干预,并且尝试给出一些提示,我们就可以成功地设计出一个完全可行的类似生命的细胞自动机模拟器。
上面的代码不是一个特别快的实现方案,但它的质量与程序员在开始使用一种新语言时可能做出的那种“Hello World”尝试相似。值得注意的是,在训练数据集中包含了许多示例,供研究者参考。
在康威的《生命游戏》中,我们可以想象这段程序在微型滑翔机的发展过程中取得的成功。

虽然我们确实通过一组函数完成了CA模拟器的编写,但这种方法对于日常软件工程来说并不是非常有用或现实的开发方式。但另一方面,这并不能阻止像SourceAI这样的初创公司(本质上是OpenAI Codex API的包装商)将其服务宣传为“给每个人创造有价值的定制软件的机会”。
“我们构建了一个独立的系统,可以开发出世界上最熟练的工程师级别的软件。”不过,与Codex交互的确是学习或实践编程的一种潜在有用的方式,尤其是针对CodeSignal、CodeForces或HackerRank等网站的编程问题方面。
接下来,我们将尝试评估Codex/Copilot,以获得自动编写测试和docstring的更现实的使用情形。
任务2:编写测试
对于本例来说,我们选择使用VSCode开发工具的GitHub Copilot扩展来编写测试。
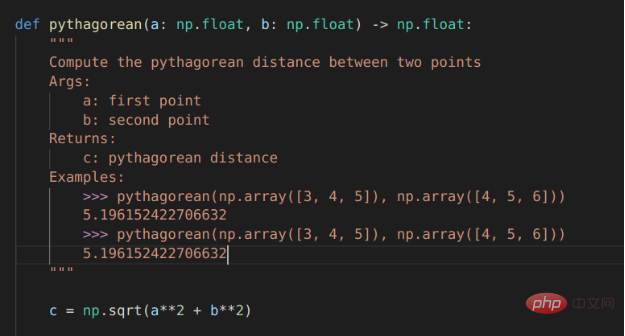
# PROMPT (in VSCode)<br>import numpy as np<br>def pythagorean(a: np.float, b: np.float) -> np.float:<br>"""<br>Use the Pythagorean theorem to comput the hypotenuse for<br>a triangle with side lengths a and b<br><br>args:<br>a, np.float, side of the triangle<br>b, np.float, the other side of the triangle<br><br>returns:<br>c, np.float, the length of the hypotenuse<br>"""<br>c = np.sqrt(a**2 + b**2)<br>return c<br><br>def test_pythagorean():<br><br># GENERATED (Copilot autocomplete)<br>"""<br>Test the pythagorean function<br>"""<br>a = np.array([3, 4, 5])<br>b = np.array([4, 5, 6])<br>c = pythagorean(a, b)<br><br>assert np.allclose(c, np.sqrt(a**2 + b**2))
虽然毕达哥拉斯定理函数可能过于简单,但Copilot建议进行一次合理的测试。如果您运行它,它就会通过。你会注意到,自动完成建议能够正确地获得测试的结构和数字内容。
如果我们想使用自己喜欢的框架以更系统的方式编写测试,该怎么办?不用太担心,因为我们已经使用numpy库和自动微分技术编写了大量的低级学习模型,供给测试者使用。因此,虽然接下来的这个示例不是100%真实地来自真实世界,但效果还是比较贴近真实情况的。
在本例中,我们将使用autograd和numpy以及unittest中的TestCase类设置一个简单的多层感知器前向传递、损失函数和梯度函数进行测试。
#PROMPT<br>import unittest<br>from autograd import numpy as np<br>from autograd import grad<br><br>def forward_mlp(input_x: np.array, <br>weights: list, biases: list) -> np.array:<br>"""<br>compute the forward pass of a multilayer perceptron. <br>The number of layers is equal to the length of the list of<br>weights, which must be the same as the list of biases,<br>biases. <br><br>args:<br>input_x, np.array, input data<br>weights, list of np.arrays, a list of np.array matrices,<br> representing the weights<br>biases: list of np.arrays, a list of biases for each<br> layer<br><br>returns:<br>result, np.array, the output of the network<br>"""<br><br>assert len(weights) == len(biases)<br><br>for layer_index in range(len(weights) - 1):<br>input_x = np.tanh(np.matmul(input_x,<br>weights[layer_index]) + biases[layer_index])<br><br>output = np.matmul(input_x, weights[-1]) + biases[-1]<br>return output<br>def get_loss(input_x: np.array, weights: list, <br>biases: list, target: np.array) -> np.float:<br>"""<br>compute the mean squared error loss for an mlp with weights<br>and biases, with respect to the input data input_x and the<br>target array target.<br><br>args:<br>input_x, np.array, input data<br>weights, list of np.arrays, a list of np.array matrices,<br>representing the weights<br>biases: list of np.arrays, a list of biases for each<br>layer<br>target: np.array, the target values<br><br>returns:<br>loss, np.float, the loss<br>"""<br><br>output = forward_mlp(input_x, weights, biases)<br><br>return np.mean((output - target)**2)<br><br>get_loss_grad = grad(get_loss, argnum=(1,2))<br><br><br>class TestMLP(unittest.TestCase):<br>"""<br>tests for MLP, get_loss, and get_grad_loss<br>"""<br># GENERATED (chosen from Copilot suggestions)<br>def setUp(self):<br>pass<br><br>def test_forward_mlp(self):<br>"""<br>test forward_mlp<br>"""<br><br>input_x = np.array([[1, 2, 3], [4, 5, 6]])<br>weights = [np.array([[1, 2], [3, 4]]), <br>np.array([[5, 6], [7, 8]]), <br>np.array([[9, 10], [11, 12]])]<br>biases = [np.array([[1, 2]]), np.array([[3, 4]]),<br>np.array([[5, 6]])]<br><br>output = forward_mlp(input_x, weights, biases)<br>self.assertTrue(np.allclose(output, <br>np.array([[-0.9, -0.9], [-0.9, -0.9]])))<br><br>def test_get_loss(self):<br>"""<br>test get_loss<br>"""<br>input_x = np.array([[1, 2, 3], [4, 5, 6]])<br>weights = [np.array([[1, 2], [3, 4]]), <br>np.array([[5, 6], [7, 8]]), <br>np.array([[9, 10], [11, 12]])]<br>biases = [np.array([[1, 2]]), np.array([[3, 4]]),<br>np.array([[5, 6]])]<br>target = np.array([[1, 1], [1, 1]])<br><br>loss = get_loss(input_x, weights, biases, target)<br><br>self.assertTrue(np.allclose(loss, 0.5))<br><br>def test_get_loss_grad(self):<br>"""<br>test get_loss_grad<br>"""<br><br>input_x = np.array([[1, 2, 3], [4, 5, 6]])<br>weights = [np.array([[1, 2], [3, 4]]), <br>np.array([[5, 6], [7, 8]]), <br>np.array([[9, 10], [11, 12]])]<br>biases = [np.array([[1, 2]]), np.array([[3, 4]]), <br>np.array([[5, 6]])]<br>target = np.array([[1, 1], [1, 1]])<br><br>loss_grad = get_loss_grad(<br>input_x, weights, biases, target)<br><br>self.assertTrue(<br>np.allclose(loss_grad[0], <br>np.array([[-0.9, -0.9], [-0.9, -0.9]])))<br>self.assertTrue(<br>np.allclose(loss_grad[1], <br>np.array([[-0.9, -0.9], [-0.9, -0.9]])))<br>self.assertTrue(<br>np.allclose(loss_grad[2],<br>np.array([[-0.9, -0.9], [-0.9, -0.9]])))<br><br># END GENERATED (the final two lines are part of the prompt)<br>if __name__ == "__main__":<br>unittest.main(verbosity=1)
Copilot的建议虽然并不完美,但确实为测试类提供了合理的思路。不过,如果您尝试原封不动地运行代码的话,则不会执行任何测试,更不用说通过测试了。
输入数据和第一个权重矩阵之间存在维度不匹配,数据类型也是错误的(所有数组都是整数数据类型),而且无法使用Autograd梯度函数。
当然,上面这些问题并不是很难解决,如果用3x2矩阵替换权重矩阵列表中的第一个条目,那么前向传播应该可以运行。要使得梯度计算测试顺利进行,或者需要在np.array定义的数字上添加小数点,或者显式定义数组数据类型。
有了这些更改后,测试即可成功执行并失败,但预期值在数字表现方面还不正确。
任务3:自动文档字符串
Copilot有很大潜力的一项任务是自动编写文档,特别是为已经编写的函数填写docstring内容。这方面几乎是比较实用了。
对于毕达哥拉斯定理的示例程序,Copilot运行结果已经非常接近,但它将问题描述为查找两点a和b之间的距离,而不是查找边长c到边长a和边长b的距离。不出所料,随同Copilot一同发行的docstring中的示例也与函数的实际内容不匹配:返回的是一个标量,而不是c的值数组。
Copilot对前向MLP函数的docstrings的建议也很接近,但并不完全正确。
Copilot支持的自动Docstring建议
机器能取代我的工作吗?
对于软件工程师来说,程序合成方面的每一项新进展都可能引发一次经济恐慌。
결국, 컴퓨터 프로그램이 프로그래머처럼 컴퓨터를 프로그래밍할 수 있다면 기계가 "우리 일을 대신해야" 한다는 뜻이 아닌가요? 가까운 미래에도 이런 일이 일어날까요?
표면적으로 대답은 '아직'인 것 같습니다. 그러나 이는 이러한 도구가 더욱 성숙해짐에 따라 소프트웨어 엔지니어링의 특성이 동일하게 유지될 가능성이 높다는 의미는 아닙니다. 미래에는 성공적인 추론을 위해 정교한 자동 완성 도구를 사용하는 것이 코드 서식 지정 도구를 사용하는 것만큼 중요할 수 있습니다.
Copilot은 현재 베타 평가판이며 사용 방법에 대한 옵션이 제한되어 있습니다. 마찬가지로 Codex에는 OpenAI를 통해 베타 버전으로 제공되는 API도 있습니다. 파일럿 프로그램의 사용 약관 및 개인 정보 보호 고려 사항은 기술의 잠재적인 사용 사례를 제한합니다.
현재 개인 정보 보호 정책에 따라 이러한 시스템에 입력된 모든 코드는 모델을 미세 조정하는 데 사용될 수 있으며 GitHub/Microsoft 또는 OpenAI 직원이 검토할 수 있습니다. 이는 민감한 프로젝트에서 Codex 또는 Copilot을 사용할 가능성을 배제합니다.
Copilot은 기반이 되는 Codex 모델에 많은 유틸리티를 추가합니다. 원하는 코드에 대한 뼈대나 개요를 작성하고(예: 단위 테스트 프레임워크 테스트를 위한 예제 작성) 커서를 개요 중앙으로 이동하여 합리적인 OK 자동 완성 제안을 얻을 수 있습니다.
현재 Copilot은 간단한 코딩 방법보다 더 복잡한 문제에 대해 올바른 전체 코드를 제안하지는 않지만 일반적으로 합리적인 개요를 생성하고 수동 입력을 줄일 수 있습니다.
Copilot은 클라우드에서 실행된다는 점도 주목해야 합니다. 이는 오프라인에서 작동하지 않으며 자동 완성 제안이 약간 느리다는 것을 의미합니다. 이 시점에서 Alt+]를 눌러 제안 항목을 순환할 수 있지만 때로는 선택할 수 있는 제안이 몇 개만 있거나 선택할 수 있는 제안이 하나만 있는 경우도 있습니다.
코파일럿이 잘 작동하면 - 실제로는 조금 위험할 정도로 좋은 것입니다. 단위 테스트 예제에서 제안된 테스트와 피타고라스 함수에 대해 제안된 독스트링은 언뜻 보면 올바른 것처럼 보이며 아마도 지친 소프트웨어 엔지니어의 정밀 조사를 통과할 것입니다. 하지만 알 수 없는 오류가 포함되어 있으면 나중에 고통만 초래할 뿐입니다!
요약하자면, Copilot/Codex는 현재 상태에서는 장난감이나 학습 도구에 가깝지만 실제로 작동한다는 것은 놀라운 일입니다. 왈츠를 추는 곰을 만났다면 그 곰이 얼마나 잘 춤을 췄는지가 가장 인상적일 것 같지 않습니다. 마찬가지로, 스마트 코드 완성 도구를 발견했다면, 그 도구가 작성하는 코드가 얼마나 완벽하느냐가 아니라 인상 깊습니다.
결론적으로, 자동 프로그래밍 NLP 모델 기술의 추가 개발과 NLP 자동 완성 도구를 사용하기 위해 인간 프로그래머가 수행한 많은 조정으로 인해 프로그램 합성 모델의 주요 킬러 응용 프로그램이 있을 가능성이 매우 높습니다. 가까운 미래.
번역가 소개
Zhu Xianzhong, 51CTO 커뮤니티 편집자, 51CTO 전문 블로거, 강사, 웨이팡 대학의 컴퓨터 교사이자 프리랜스 프로그래밍 업계의 베테랑입니다. 초창기에는 다양한 Microsoft 기술에 집중했습니다(ASP.NET AJX 및 Cocos 2d-X 관련 기술 서적 3권 집필). 지난 10년 동안 그는 오픈 소스 세계에 전념했습니다(인기 있는 풀 서비스 기술에 익숙함). 스택 웹 개발 기술)을 배우고 OneNet/AliOS+Arduino. /ESP32/Raspberry Pi 등 IoT 개발 기술과 Scala+Hadoop+Spark+Flink 등 빅데이터 개발 기술에 대해 배웠습니다.
원제: 코드 작성을 위한 NLP 모델: 프로그램 합성, 저자: Kevin Vu
위 내용은 자동 프로그래밍 NLP 모델 기술 검토의 상세 내용입니다. 자세한 내용은 PHP 중국어 웹사이트의 기타 관련 기사를 참조하세요!