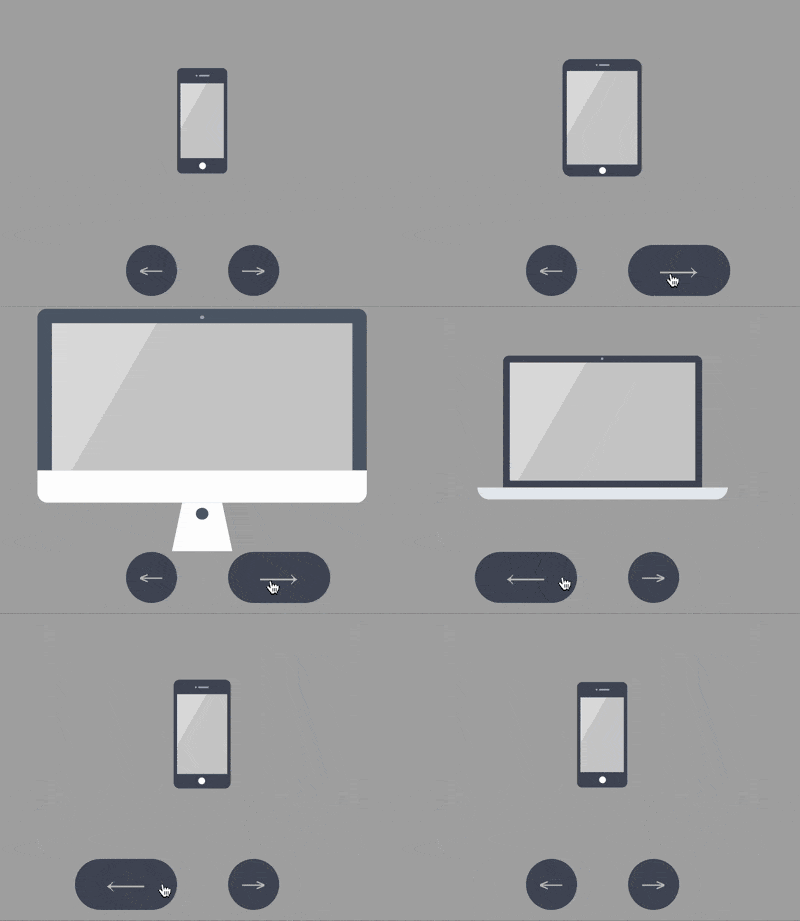
CSS 및 Vanilla.js를 사용하여 Apple 장치를 보여주는 대화형 애니메이션을 구현하는 방법(소스 코드 첨부)
- 不言앞으로
- 2018-10-22 13:43:262696검색
이 문서의 내용은 CSS 및 Vanilla.js를 사용하여 Apple 장치를 표시하기 위한 대화형 애니메이션을 구현하는 방법에 대한 것입니다(소스 코드 첨부). 필요한 친구들이 참고할 수 있기를 바랍니다. 도움이 되었습니다.
효과 미리보기

소스 코드 다운로드
https://github.com/comehope/front-end-daily-challenges
코드 해석
iPhone을 나타내는 5개의 하위 요소를 포함한 dom을 정의합니다. 5가지 기기: mini, ipad, macbook, imac:
<div>
    <div></div>
    <div></div>
    <div></div>
    <div></div>
    <div></div>
</div>
중앙 디스플레이:
body {
    margin: 0;
    height: 100vh;
    display: flex;
    align-items: center;
    justify-content: center;
    background-color: #aaa;
}
컨테이너의 하위 요소 레이아웃 설정:
.container {
    position: relative;
    display: flex;
    flex-direction: column;
    align-items: center;
}
기기의 공통 속성을 설정하면 선형 그라데이션 패턴이 다음과 같이 설정됩니다. 화면 배경으로 사용:
.device {
    box-sizing: border-box;
    position: relative;
    display: flex;
    justify-content: center;
    background: linear-gradient(120deg, #ddd 30%, #ccc 30%);
}

.device::before,
.device::after {
    content: '';
    position: absolute;
}
iphone, mini 및 iPad는 모두 비슷한 모양을 갖고 있으므로 모두 상단 카메라, 센서 개구부 및 하단 버튼이 있으므로 이러한 공통 속성을 함께 설정할 수 있습니다. 상단 세부 사항을 그리는 요소와 하단 버튼을 그리는 ::after 의사 요소입니다.
.iphone::before,
.mini::before,
.ipad::before {
    width: 2px;
    height: 2px;
    border-style: solid;
    border-color: #a5adbe;
    border-width: 0 12px 0 2px;
}

.iphone::after,
.mini::after,
.ipad::after {
    width: 8px;
    height: 8px;
    background-color: white;
    border-radius: 50%;
}
다음으로 장치를 하나씩 그립니다. 먼저 iPhone의 윤곽을 그립니다.
.iphone {
    width: 59px;
    height: 124px;
    border: #484f5e solid;
    border-width: 18px 4px;
    border-radius: 6px;
}
iPhone의 상단과 하단 세부 사항을 배치합니다.
.iphone::before {
    top: -10px;
}

.iphone::after {
    bottom: -13px;
}
마찬가지로 미니를 그립니다.
.mini {
    width: 93px;
    height: 138px;
    border: #484f5e solid;
    border-width: 14px 5px;
    border-radius: 10px;
}

.mini::before {
    top: -8px;
}

.mini::after {
    bottom: -11px;
}
그런 다음 iPad를 그립니다.
.ipad {
    width: 134px;
    height: 176px;
    border: #484f5e solid;
    border-width: 18px 13px;
    border-radius: 12px;
}

.ipad::before {
    top: -10px;
}

.ipad::after {
    bottom: -13px;
}
다음으로 MacBook을 그리고 먼저 화면을 그립니다. :
.macbook {
    width: 234px;
    height: 155px;
    border: 8px solid #484f5e;
    border-radius: 7px 7px 0 0;
}
::before 의사 요소를 사용하여 카메라 그리기: ::before 伪元素画出摄像头:
.macbook::before {
    width: 294px;
    height: 14px;
    background-color: #e8ebf0;
    top: calc(100% + 8px);
    border-radius: 0 0 14px 14px;
}
用 ::after 伪元素画出主机:
.macbook::after {
    width: 3px;
    height: 3px;
    background-color: #a5adbe;
    top: -6px;
    border-radius: 50%;
}
接下来画 imac,先画屏幕,屏幕的左、上、右的黑色边框没有用 border 属性画,是因为 border 会在端点处遗留一个斜角,所以改用 box-shadow 实现:
.imac {
    width: 360px;
    height: 215px;
    border-radius: 10px;
    box-shadow:
        inset 0 14px #484f5e,
        inset 14px 0 #484f5e,
        inset -14px 0 #484f5e;
    border-bottom: 33px solid #e8ebf1;
    transform: translateY(14px);
}
用 ::before 伪元素画出梯形的底座:
.imac::before {
    width: 90px;
    height: 0;
    top: calc(100% + 33px);
    border: solid transparent;
    border-bottom-color: #e2e4e8;
    border-width: 0 10px 47px 10px;
}
用 ::after 伪元素画出顶部的摄像头和屏幕底部的按钮,注意按钮是用 box-shadow 实现的:
.imac::after {
    width: 4px;
    height: 4px;
    background-color: #a5adbe;
    top: 5px;
    border-radius: 50%;
    box-shadow: 0 191px 0 4px #464e5d;
}
至此,设备全部绘制完成。
删除除 iphone 之外的其他设备的 dom 元素,只保留 1 个 dom 元素,后面的动画效果都在这个 dom 元素上变化:
<div>
        <div></div>
        <!-- <div class="device mini"></div>
        <div class="device ipad"></div>
        <div class="device macbook"></div>
        <div class="device imac"></div> -->
    </div>
设置容器尺寸,子元素垂直居中,设备的高度占容器高度的 75%:
.container {
    width: 360px;
    height: 350px;
    justify-content: center;
}

.device {
    transform: translateY(-25%);
}
在 dom 中增加 2 个按钮元素,分别用 .left 和 .right 表示:
<div>
    <div></div>
    <div>
        <span></span>
        <span></span>
    </div>
</div>
定位按钮的位置:
.buttons {
    position: absolute;
    width: inherit;
    font-size: 30px;
    height: 2em;
    bottom: 0;
    display: flex;
    justify-content: space-around;
}

.buttons > * {
    position: relative;
    width: 4em;
}
按钮为向左和向右的箭头:
.buttons > *::before {
    position: absolute;
}

.buttons .left::before {
    content: '←';
    right: 0;
}

.buttons .right::before {
    content: '→';
}
设置按钮样式为圆形:
.buttons > *t::before {
    position: absolute;
    width: 2em;
    height: 2em;
    background-color: #484f5e;
    color: silver;
    text-align: center;
    line-height: 2em;
    border-radius: 1em;
    cursor: pointer;
}
增加鼠标悬停效果:
.buttons > *::before {
    transition: 0.2s;
}

.buttons .left:hover::before {
    width: 4em;
    content: '⟵';
}

.buttons .right:hover::before {
    width: 4em;
    content: '⟶';
}
增加按钮点击效果:
.buttons > *:active {
    transform: scale(0.9);
    filter: brightness(0.8);
}
至此,按钮制作完毕,接下来创建交互脚本。
定义一个获取元素的函数 $
const $ = (className) => document.getElementsByClassName(className)[0]::after 의사 요소를 사용하여 호스트 그리기:
let devices = ['iphone', 'mini', 'ipad', 'macbook', 'imac']다음으로 imac을 그리고 먼저 화면, 화면의 왼쪽, 위쪽 및 오른쪽 검은색 테두리는 테두리가 끝점에 경사를 남기므로 테두리 속성으로 그려지지 않으므로 대신 상자 그림자가 사용됩니다.
let loop = {
    'left': () => devices.unshift(devices.pop()),
    'right': () => devices.push(devices.shift())
}
:before 의사 요소 사용 사다리꼴의 밑면 그리기:
Array.from($('buttons').children).forEach(element =>
    element.addEventListener('click', function(e) {
        loop[e.target.className]()
        $('device').className = 'device ' + devices[0]
    })
)
사용:: 이후 의사 요소는 화면 상단에 카메라를 그리고 버튼은 화면 하단에 그립니다. 버튼은 상자 그림자로 구현됩니다.
.device,
.device::before,
.device::after {
    transition: 0.4s cubic-bezier(0.5, 1.7, 0.5, 1.2);
}
At 이 시점에서 모든 장치가 그려집니다. iPhone을 제외한 다른 기기의 dom 요소를 삭제하고 dom 요소를 1개만 남겨두세요. 이후의 모든 애니메이션 효과는 이 dom 요소에서 변경됩니다.
rrreee
컨테이너 크기를 설정하고 하위 요소는 수직 중앙에 위치하며 높이는 컨테이너 높이의 75%를 차지하는 장치:rrreee
돔에 각각 .left 및 .right로 표시되는 2개의 버튼 요소를 추가합니다. 🎜rrreee🎜버튼 위치: 🎜rrreee🎜버튼은 왼쪽과 오른쪽입니다. 화살표: 🎜 rrreee🎜 버튼 스타일을 원형으로 설정: 🎜rrreee🎜 마우스 호버 효과 추가: 🎜rrreee🎜 버튼 클릭 효과 추가: 🎜rrreee🎜 이 시점에서 버튼이 생성된 후 대화형 스크립트를 생성합니다. 🎜🎜$ 요소를 가져오는 함수 정의: 🎜rrreee🎜장치 이름을 저장할 배열 정의: 🎜rrreee🎜왼쪽 버튼을 클릭하면 데이터 처리 방법을 정의합니다. 배열은 배열의 마지막에 저장되며, 왼쪽의 1번째 요소는 가장 오른쪽으로 이동하고, 반대로 오른쪽 버튼을 클릭하면 배열의 오른쪽에 있는 1번째 요소가 가장 왼쪽으로 이동됩니다. , 배열이 두 방향에서 반복될 수 있도록: 🎜rrreee🎜클릭 이벤트 정의, 배열 변경에 따라 장치 전환: 🎜rrreee🎜마지막으로 장치 전환 완화 효과 설정: 🎜rrreee🎜완료되었습니다! 🎜🎜🎜위 내용은 CSS 및 Vanilla.js를 사용하여 Apple 장치를 보여주는 대화형 애니메이션을 구현하는 방법(소스 코드 첨부)의 상세 내용입니다. 자세한 내용은 PHP 중국어 웹사이트의 기타 관련 기사를 참조하세요!

