SpringBoot의 Thymeleaf 템플릿에 대한 자세한 소개
- 不言앞으로
- 2018-10-11 15:19:323440검색
이 글은 SpringBoot의 Thymeleaf 템플릿에 대한 자세한 소개를 담고 있습니다. 도움이 필요한 친구들이 참고할 수 있기를 바랍니다.
1. 소개
Thymeleaf는 JSP를 대체하기 위해 등장했습니다. JSP는 오랫동안 존재했고 Java 웹 개발에 널리 사용되었지만 몇 가지 결함도 있습니다.
1 가장 명백한 문제는 다음과 같습니다. HTML이나 XML처럼 보이지만 그렇지 않습니다. 대부분의 JSP 템플릿은 HTML 형식이지만 다양한 JSP 태그 라이브러리의 태그와 혼합되어 있어 매우 혼란스럽습니다.
2. JSP 사양은 서블릿 사양과 밀접하게 결합되어 있습니다. 이는 서블릿 기반 웹 애플리케이션에서만 사용할 수 있음을 의미합니다. JSP 템플릿은 일반 템플릿(예: 이메일 형식 지정)으로 사용할 수 없으며 비서블릿 웹 애플리케이션에서도 사용할 수 없습니다.
JSP와 비교할 때 Thymeleaf는 이러한 단점을 매우 잘 해결합니다.
1. Thymeleaf 템플릿은 기본이며 태그 라이브러리에 의존하지 않습니다. 원시 HTML이 허용되는 경우 편집하고 렌더링할 수 있습니다.
2. 서블릿 사양과 결합되지 않기 때문에 백리향 템플릿은 JSP가 할 수 없는 영역에 들어갈 수 있습니다. 즉, Thymeleaf 템플릿은 JSP와 달리 어떤 종류의 처리도 거치지 않고도 원래 형식으로 편집하고 렌더링할 수 있다는 의미입니다. 물론 템플릿을 처리하고 원하는 최종 출력을 렌더링하려면 Thymeleaf가 필요합니다. 그럼에도 불구하고 특별한 처리 없이 home.html을 웹 브라우저에 로드하여 전체 렌더링과 유사하게 보일 수 있습니다.
Spring Boot는 웹 개발에 JSP를 사용하는 것을 권장하지 않습니다.
2. Thymeleaf 템플릿 엔진 통합
SpringBoot의 Thymeleaf 템플릿 엔진 지원도 매우 간단합니다.
1, pom.xml
<dependency>
    <groupId>org.springframework.boot</groupId>
    <artifactId>spring-boot-starter-thymeleaf</artifactId>
</dependency>
이제 Thymeleaf 템플릿에 대한 SpringBoot의 지원이 완료되었으며, 이제 웹 개발에 Thymeleaf 템플릿을 사용할 수 있습니다. 쉽죠?
이전 기사에서 언급됨
SpringBoot의 핵심은 "규칙"입니다. 이렇게 간단한 구성을 선택했기 때문에 개발 중에 Thymeleaf에 대한 SpringBoot의 요구 사항을 준수해야 합니다.
기존 솔루션에서 가장 중요한 점은 템플릿 파일이 템플릿 디렉터리에 배치된다는 것입니다. 즉, 템플릿 파서 접두사는 /templates/이고 접미사는 .html
2, application.yml
입니다.소위 기존 솔루션이 싫다면 생각해 보세요. 맞춤 구성은 어떨까요? 아래를 보세요:
spring:
  thymeleaf:
    prefix: classpath:/templates/
    suffix: .html
    servlet:
      content-type: text/html
    enabled: true
    encoding: UTF-8
    mode: HTML5
    cache: false
3, WebConfig.java
위 구성이 요구 사항을 충족할 수 없는 경우 뷰 파서, 템플릿 파서 및 템플릿 엔진 구성을 포함하여 Thymeleaf를 보다 자세히 제어하고 싶습니다. 아래 계획!
/**
 * 1、ThymeleafViewResolver 接收逻辑视图名称将它解析为视图
 * 2、SpringTemplateEngine会在Spring中启用Thymeleaf引擎,用来解析模板,并基于这些模板渲染结果
 * 3、TemplateResolver会最终定位和查找模板。
 */
@Configuration
public class WebConfig {
    /**
     * 配置 Thymeleaf 视图解析器 —— 将逻辑视图名称解析为 Thymeleaf 模板视图
     *
     * @param springTemplateEngine 模板引擎
     * @return
     */
    @Bean
    public ViewResolver viewResolver(SpringTemplateEngine springTemplateEngine){
        ThymeleafViewResolver resolver = new ThymeleafViewResolver();
        resolver.setTemplateEngine(springTemplateEngine);
        return resolver;
    }
    /**
     * 模板引擎 —— 处理模板并渲染结果
     *
     * @param templateResolver 模板解析器
     * @return
     */
    @Bean
    public SpringTemplateEngine springTemplateEngine(ITemplateResolver templateResolver) {
        SpringTemplateEngine springTemplateEngine = new SpringTemplateEngine();
        springTemplateEngine.setTemplateResolver(templateResolver);
        return springTemplateEngine;
    }
    /**
     * 模板解析器 —— 加载 Thymeleaf 模板
     *
     * @return
     */
    @Bean
    public ITemplateResolver templateResolver() {
        SpringResourceTemplateResolver templateResolver = new SpringResourceTemplateResolver();
        templateResolver.setPrefix("classpath:/templates/");
        templateResolver.setSuffix(".html");
        templateResolver.setTemplateMode(TemplateMode.HTML);
        templateResolver.setCacheable(false);
        templateResolver.setTemplateMode("HTML5");
        return templateResolver;
    }
}
3. Thymeleaf 템플릿 사용
위 구성을 완료한 후 SpringBoot에서 Thymeleaf 템플릿을 사용하는 방법을 살펴보겠습니다.
1. 템플릿 파일 - /templates/user/list.html
<!DOCTYPE html>
<html xmlns:th="http://www.thymeleaf.org">
<head>
    <meta charset="UTF-8" />
    <title>Insert title here</title>
</head>
<body>
<h2>用户列表</h2>
<div>
    <ul>
        <li  th:each="user:${users}">
            <span th:text="${user.uuid}"></span>-
            <span th:text="${user.name}"></span>-
            <span th:text="${user.age}"></span>-
            <span th:text="${user.address}"></span>
        </li>
    </ul>
</div>
</body>
</html>
2. 제어 계층 - ModelAndViews
여기서 모델은 다음을 의미합니다. 제어 계층은 요청을 처리하고 렌더링해야 하는 결과를 반환합니다. 보기는 다음을 의미합니다. 끝).
@Controller
@RequestMapping("/user")
public class UserController {

    @RequestMapping("/list")
    public String listUser(Model model) {
        List<UserDto> userList = new ArrayList<>();
        for (int i = 0; i < 10; i++) {
            userList.add(new UserDto(UUID.randomUUID().toString().replace("-", ""), "张三" + i, 1, "中国北京"));
        }
        model.addAttribute("users", userList);
        return "user/list";
    }
}
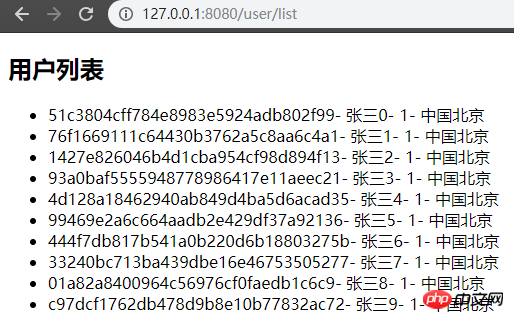
3. 효과

데모 소스 코드: https://github.com/JMCuixy/Thymeleaf
위 내용은 SpringBoot의 Thymeleaf 템플릿에 대한 자세한 소개의 상세 내용입니다. 자세한 내용은 PHP 중국어 웹사이트의 기타 관련 기사를 참조하세요!

