SpringBoot와 Vue.js는 프런트엔드와 백엔드를 분리하는 파일 업로드 기능을 구현합니다.
- 不言원래의
- 2018-06-30 09:47:337059검색
이 글은 프론트엔드와 백엔드 분리의 파일 업로드 기능을 구현하기 위해 SpringBoot+Vue.js를 주로 소개합니다. 필요한 친구들은 참고하면 됩니다.
이 글은 Vue와 SpringBoot에 대한 일정한 지식이 필요한 부분으로 나누어져 있습니다. 두 개의 프로젝트 중 하나는 프런트엔드 Vue 프로젝트이고, 다른 하나는 백엔드 SpringBoot 프로젝트입니다.
백엔드 프로젝트 구축
저는 SpringBoot1.5.10+JDK8+IDEA를 사용하고 있습니다. IDEA를 사용하여 새로운 SpringBoot 프로젝트를 생성하고 계속해서 다음을 클릭하세요
프로젝트가 성공적으로 생성된 후 Maven Pom 구성은 다음과 같습니다. 다음과 같이
<dependencies>
  <dependency>
   <groupId>org.springframework.boot</groupId>
   <artifactId>spring-boot-starter</artifactId>
  </dependency>
  <!--加入web模块-->
  <dependency>
   <groupId>org.springframework.boot</groupId>
   <artifactId>spring-boot-starter-web</artifactId>
  </dependency>
  <dependency>
   <groupId>org.springframework.boot</groupId>
   <artifactId>spring-boot-starter-test</artifactId>
   <scope>test</scope>
  </dependency>
  <dependency>
   <groupId>com.alibaba</groupId>
   <artifactId>fastjson</artifactId>
   <version>1.2.39</version>
  </dependency>
 </dependencies>
다음으로 업로드 API 인터페이스를 작성합니다
@RestController
@RequestMapping("/upload")
@CrossOrigin
public class UploadController {
 @Value("${prop.upload-folder}")
 private String UPLOAD_FOLDER;
 private Logger logger = LoggerFactory.getLogger(UploadController.class);
 @PostMapping("/singlefile")
 public Object singleFileUpload(MultipartFile file) {
  logger.debug("传入的文件参数:{}", JSON.toJSONString(file, true));
  if (Objects.isNull(file) || file.isEmpty()) {
   logger.error("文件为空");
   return "文件为空,请重新上传";
  }
  try {
   byte[] bytes = file.getBytes();
   Path path = Paths.get(UPLOAD_FOLDER + file.getOriginalFilename());
   //如果没有files文件夹,则创建
   if (!Files.isWritable(path)) {
    Files.createDirectories(Paths.get(UPLOAD_FOLDER));
   }
   //文件写入指定路径
   Files.write(path, bytes);
   logger.debug("文件写入成功...");
   return "文件上传成功";
  } catch (IOException e) {
   e.printStackTrace();
   return "后端异常...";
  }
 }
}
CrossOrigin 주석: 프론트엔드와 백엔드가 완전히 분리되어 있기 때문에 크로스 도메인 문제를 해결합니다. 이 주석을 추가하면 컨트롤러가 도메인 간을 지원하게 됩니다. 이 주석을 제거하면 프런트엔드 Ajax 요청이 백엔드로 이동하지 않습니다. 이는 도메인 간 솔루션일 뿐이며 이 문서에서 다루지 않는 다른 솔루션도 있습니다.
MultipartFile: 프런트엔드 요청에 의해 전달된 FormData를 수신하는 데 사용되는 SpringMVC의 multipartFile 개체입니다.
PostMapping은 HTTP 메소드 매핑을 단순화하기 위해 Spring 4.3 이후에 도입된 새로운 주석입니다. 이는 일반적으로 사용되는 @RequestMapping(value = "/xx", method = RequestMethod.POST)과 동일합니다.
백엔드는 이제 완료 완료, 쉽습니다.
프론트엔드 프로젝트 구축
Node8+Webpack3+Vue2를 사용하고 있습니다
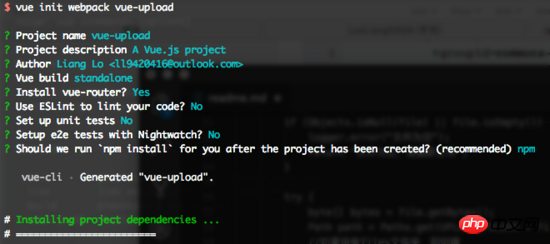
로컬에 노드 환경을 설치하고, Vue-cli를 설치하고, Vue-cli를 사용해 Vue 프로젝트를 생성해야 합니다.

프로젝트가 성공적으로 생성된 후 WebStorm으로 열면 간단한 업로드 예제를 작성할 수 있습니다. 주요 코드는 다음과 같습니다.
<template>
<p class="hello">
<h1>{{ msg }}</h1>
<form>
<input type="file" @change="getFile($event)">
<button class="button button-primary button-pill button-small" @click="submit($event)">提交</button>
</form>
</p>
</template>
<script>
import axios from 'axios';
export default {
name: 'HelloWorld',
data() {
return {
msg: 'Welcome to Your Vue.js App',
file: ''
}
},
methods: {
getFile: function (event) {
this.file = event.target.files[0];
console.log(this.file);
},
submit: function (event) {
//阻止元素发生默认的行为
event.preventDefault();
let formData = new FormData();
formData.append("file", this.file);
axios.post('http://localhost:8082/upload/singlefile', formData)
.then(function (response) {
alert(response.data);
console.log(response);
window.location.reload();
})
.catch(function (error) {
alert("上传失败");
console.log(error);
window.location.reload();
});
}
}
}
</script>
Axios를 사용하여 백엔드에 Ajax 요청을 보냅니다. H5의 FormData 개체 캡슐화 사용 이미지 데이터
Test
서버를 시작하고 BootApplication 클래스의 기본 메서드인 포트 8082

프론트 엔드를 시작하고 포트 기본값은 8080이며 cd를 사용하여 프런트엔드 디렉터리에서 각각 실행합니다:
npm install
npm run dev
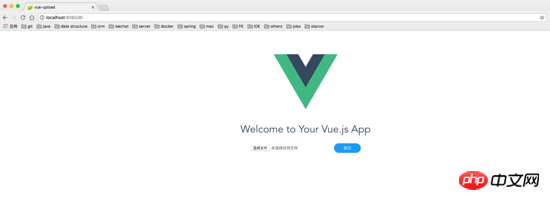
성공적인 시작 후 localhost:8080

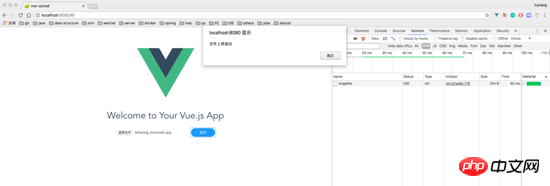
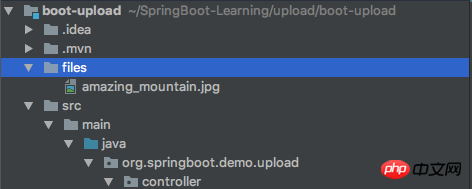
을 방문하세요. 업로드할 이미지를 선택하면 업로드에 성공한 후 이미지 파일이 있는 것을 볼 수 있습니다. 백엔드에 지정된 디렉터리


Summary
이제 프론트엔드와 백엔드가 분리된 업로드 데모가 완성되었습니다. 이 글은 업로드만 처리할 수 있는 간단한 데모입니다. 나중에 SpringBoot+Vue에 대한 기사를 작성하여 대용량 파일을 청크로 구현하겠습니다. 기대해 주세요.
위 내용은 이 글의 전체 내용입니다. 모든 분들의 학습에 도움이 되었으면 좋겠습니다. 더 많은 관련 내용은 PHP 중국어 홈페이지를 주목해주세요!
관련 권장 사항:
Vue-cli를 기반으로 구축된 프로젝트가 백엔드와 상호 작용하는 방법 소개
vue.js 프런트엔드 및 백엔드 데이터 상호 작용을 위한 데이터 제출 작업 정보
위 내용은 SpringBoot와 Vue.js는 프런트엔드와 백엔드를 분리하는 파일 업로드 기능을 구현합니다.의 상세 내용입니다. 자세한 내용은 PHP 중국어 웹사이트의 기타 관련 기사를 참조하세요!

