집 >운영 및 유지보수 >리눅스 운영 및 유지 관리 >Linux 유형의 이미지를 가져올 때 이미지 소스 구성이 성공했는지 확인하려면 cloud-init를 설치해야 합니다.
Linux 유형의 이미지를 가져올 때 이미지 소스 구성이 성공했는지 확인하려면 cloud-init를 설치해야 합니다.
- 坏嘻嘻원래의
- 2018-09-18 14:40:273133검색
이 문서의 내용은 Linux 유형 이미지를 가져올 때 성공적인 이미지 소스 구성을 보장하기 위한 것입니다. 필요한 친구가 참고할 수 있기를 바랍니다.
Cloud-init 설치
ECS 인스턴스 생성을 위해 기존 이미지를 사용해야 하는 경우 이미지 가져오기 기능을 통해 구성을 완료할 수 있습니다. Linux 유형의 이미지를 가져올 때 가져온 이미지의 호스트 이름, NTP, Yum 소스가 성공적으로 구성되었는지 확인하기 위해 소스 서버, 가상 머신 또는 클라우드 호스트에 cloud-init를 미리 설치하는 것이 좋습니다.
Notes
현재 cloud-init 설치를 지원하는 Linux 배포판에는 CentOS, Debian, Fedora, FreeBSD, Gentoo, RHEL(Red Hat Enterprise Linux), SLES(SUSE Linux Enterprise Server) 및 Ubuntu가 있습니다.
소스 서버, 가상 머신 또는 클라우드 호스트에 cloud-init가 설치된 경우 cloud-init 버전 번호가 0.7.9보다 높은지 확인해야 합니다. 더 낮은 버전의 cloud-init가 포함된 이미지는 관련 인스턴스 구성 오류를 발생시킵니다. , 예를 들어 NTP, HostName 및 Yum 등
소스 서버, 가상 머신 또는 클라우드 호스트에 로그인하세요.
cloud-init --version을 실행하여 cloud-init 버전을 쿼리하세요.
cloud-init 버전 번호가 0.7.9보다 높으면 이 버전을 사용할 수 있다는 의미입니다. 그렇지 않으면 cloud-init를 설치해야 합니다.
전제 조건
cloud-init를 설치하기 전에 소스 서버, 가상 머신 또는 클라우드 호스트에 다음 소프트웨어가 설치되어 있어야 합니다.
git: cloud-init 소스 코드 패키지 다운로드
yum 설치 방법: yum install git
Python2.7: cloud-init 운영 및 설치의 기초
yum 설치 방법: yum install python
pip: 설치 cloud-init 종속 Python 라이브러리
yum 설치 방법: yum install python-pip
yum 설치 방법은 여기에 나열되어 있습니다. zypper나 apt-get 패키지 관리자의 설치 방법은 yum의 설치 방법과 유사합니다.
cloud-init 설치
cloud-init를 설치하려면 다음 단계를 따르세요.
가져올 이미지의 소스 서버, 가상 머신 또는 클라우드 호스트에 로그인하세요.
git clone https://git.launchpad.net/cloud-init를 실행하고 cloud-init 공식 웹사이트에서 cloud-init 소스 코드 패키지를 다운로드하세요.
cd cloud-init를 실행하여 cloud-init 디렉터리로 들어갑니다.
python setup.py install을 실행하여 cloud-init 설치 파일 setup.py를 설치하세요.
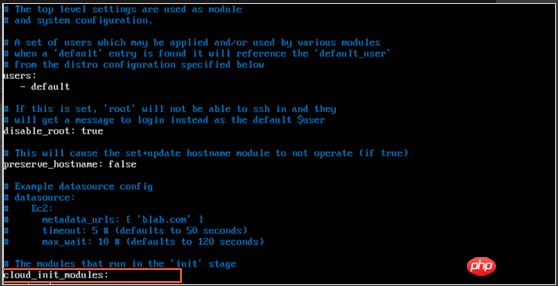
vi /etc/cloud/cloud.cfg를 실행하여 cloud.cfg 구성 파일을 수정하세요.

cloud_init_modules의 이전 구성을 다음과 같이 수정하세요.
# Example datasource config
 # The top level settings are used as module
 # and system configuration.
 # A set of users which may be applied and/or used by various modules
 # when a 'default' entry is found it will reference the 'default_user'
 # from the distro configuration specified below
 users:
    - default
 user:
     name: root
     lock_passwd: False
 # If this is set, 'root' will not be able to ssh in and they
 # will get a message to login instead as the above $user
 disable_root: false
 # This will cause the set+update hostname module to not operate (if true)
 preserve_hostname: false
 syslog_fix_perms: root:root
 datasource_list: [ AliYun ]
 # Example datasource config
 datasource:
     AliYun:
         support_xen: false
         timeout: 5 # (defaults to 50 seconds)
         max_wait: 60 # (defaults to 120 seconds)
 #      metadata_urls: [ 'blah.com' ]
 # The modules that run in the 'init' stage
 cloud_init_modules:
Troubleshooting
다른 이미지의 누락된 라이브러리가 다를 수 있습니다. 설치 후 위의 4단계를 반복하세요. .
the six 및 oauthlib 라이브러리가 없습니다
설치 과정에서 다음 메시지가 나타나면 Python에 six 라이브러리가 없다는 의미입니다. pip를 사용하여 6개의 라이브러리를 설치할 수 있습니다: pip install six.
File "/root/cloud-init/cloudinit/log.py", line 19, in <module>
      import six
  ImportError: No module named s  )
설치 과정에서 다음 메시지가 나타나면 Python에 oauthlib 라이브러리가 없다는 의미입니다. pip를 사용하여 oauthlib 라이브러리를 설치할 수 있습니다: pip install oauthlib.
File "/root/cloud-init/cloudinit/url_helper.py", line 20, in <module>
      import oauthlib.oauth1 as oauth1
  ImportError: No module named oauthlib.oaut  )
오류 메시지가 표시될 때 누락된 종속 라이브러리가 없다는 명확한 메시지가 없습니다.
설치 오류가 보고되고 어떤 종속 라이브러리가 누락되었는지에 대한 명확한 메시지가 없으면 다음에 표시된 라이브러리를 기반으로 pip install -r을 실행할 수 있습니다. cloud-init 요구사항.txt의 요구사항.txt 파일은 모든 종속 라이브러리를 설치합니다.
다음 단계
사용자 정의 이미지를 가져올 수 있습니다.
위 내용은 Linux 유형의 이미지를 가져올 때 이미지 소스 구성이 성공했는지 확인하려면 cloud-init를 설치해야 합니다.의 상세 내용입니다. 자세한 내용은 PHP 중국어 웹사이트의 기타 관련 기사를 참조하세요!

