
jQuery 트리 플러그인 zTree를 올바르게 사용하는 방법

- 小云云원래의
- 2018-01-12 13:16:421966검색
이 글은 주로 jQuery 트리 플러그인 zTree의 사용법을 자세히 소개합니다. 관심 있는 친구들이 참고하면 도움이 될 것입니다.
최근에 트리 구조를 만들어서 jQuery 트리 플러그인을 사용했는데 느낌이 꽤 좋네요
페이지의 기본 구조는 이렇습니다
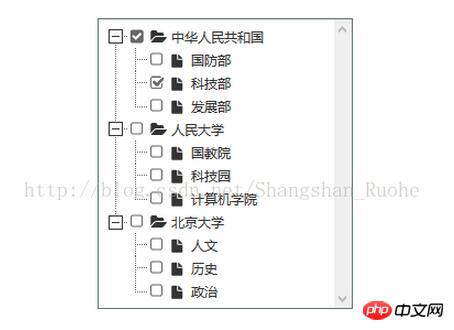
여기 스타일은 물론 부트스트랩 스타일의 MetroStyle 폴더에 있는 클래스는 먼저 ztree 플러그인을 다운로드해야 하며 다운로드가 완료된 후 해당 API와 몇 가지 예제가 사용됩니다.
jQuery zTree 트리의 다운로드 링크
페이지 jsp는 다음과 같습니다.
<html>
<head>
<meta http-equiv="content-type" content="text/html; charset=UTF-8">
<title> ZTREE DEMO - checkbox</title>
<link rel="stylesheet" href="/css/demo.css" rel="external nofollow" >
<link rel="stylesheet" href="/css/metroStyle.css" rel="external nofollow" >
<script type="text/javascript" src="/js/jquery-3.2.1.js"></script>
<script type="text/javascript" src="/js/jquery.ztree.core.js"></script>
<script type="text/javascript" src="/js/jquery.ztree.excheck.js"></script>
<script type="text/javascript" src="/js/jquery.ztree.exedit.js"></script>
<script type="text/javascript">
var setting = {
check: {
enable: true
},
data: {
simpleData: {
enable: true
}
},
callback:{
onCheck:onCheck
}
};
// var zNodes =[
// { id:1, pId:0, name:"随意勾选 1", open:true},
// { id:11, pId:1, name:"随意勾选 1-1", open:false},
// { id:111, pId:11, name:"随意勾选 1-1-1"},
// { id:112, pId:11, name:"随意勾选 1-1-2"},
// { id:12, pId:1, name:"随意勾选 1-2", open:false},
// { id:121, pId:12, name:"随意勾选 1-2-1"},
// { id:122, pId:12, name:"随意勾选 1-2-2"},
// { id:2, pId:0, name:"随意勾选 2", checked:false, open:false},
// { id:21, pId:2, name:"随意勾选 2-1"},
// { id:22, pId:2, name:"随意勾选 2-2", open:false},
// { id:221, pId:22, name:"随意勾选 2-2-1", checked:false},
// { id:222, pId:22, name:"随意勾选 2-2-2"},
// { id:23, pId:2, name:"随意勾选 2-3"},
// { id:3, pId:0, name:"随意勾选 3", checked:false, open:false},
// { id:231, pId:3, name:"随意勾选 3-1"},
// { id:232, pId:3, name:"随意勾选 3-2", open:false},
// { id:2321, pId:232, name:"随意勾选 3-2-1", checked:false},
// { id:2322, pId:232, name:"随意勾选 3-2-2"},
// { id:233, pId:3, name:"随意勾选 3-3"}
// ];
var code;
function setCheck() {
var zTree = $.fn.zTree.getZTreeObj("treeDemo"),
py = $("#py").attr("checked")? "p":"",
sy = $("#sy").attr("checked")? "s":"",
pn = $("#pn").attr("checked")? "p":"",
sn = $("#sn").attr("checked")? "s":"",
type = { "Y":py + sy, "N":pn + sn};
zTree.setting.check.chkboxType = type;
// showCode('setting.check.chkboxType = { "Y" : "' + type.Y + '", "N" : "' + type.N + '" };');
// showCode('setting.check.chkboxType = { "Y" : "", "N" : "" };');
showCode('setting.check.chkboxType = { "Y" : "s", "N" : "ps" };');
// setting.check.chkboxType = { "Y" : "", "N" : "" };
}
function showCode(str) {
if (!code) code = $("#code");
code.empty();
code.append("<li>"+str+"</li>");
}
var zNodes =[];
$(document).ready(function(){
var t = $("#treeDemo");
$.ajax({
type: "POST",
url: "/Units/ListTree",
dataType: 'json',
success: function(result) {
console.log(result);
$.extend( true, zNodes, result );
console.log(zNodes);
t = $.fn.zTree.init(t, setting, zNodes);
// demoIframe = $("#testIframe");
}
});
});
$(document).ready(function(){
$.fn.zTree.init($("#treeDemo"), setting, zNodes);
setCheck();
$("#py").bind("change", setCheck);
$("#sy").bind("change", setCheck);
$("#pn").bind("change", setCheck);
$("#sn").bind("change", setCheck);
});
function onCheck(e,treeId,treeNode){
var treeObj=$.fn.zTree.getZTreeObj("treeDemo"),
nodes=treeObj.getCheckedNodes(true),
v="";
for(var i=0;i<nodes.length;i++){
v+=nodes[i].name + ",";
alert(nodes[i].id); //获取选中节点的值
}
}
</script>
</head>
<body>
<p class="tree" style="margin-left: 534px;background: #316ac5;width: 0px;">
<ul id="treeDemo" class="ztree" style="background: white;height: inherit;margin-top: 295px;"></ul>
</p>
<input type="checkbox" id="py" class="checkbox first" checked style="display:none;" />
<input type="checkbox" id="sy" class="checkbox first" checked style="display:none;"/>
<input type="checkbox" id="pn" class="checkbox first" checked style="display:none;"/>
<input type="checkbox" id="sn" class="checkbox first" checked style="display:none;"/>
</body>
</html> 위의 죽은 데이터는 ajax 메소드를 사용하여 백그라운드에서 할당한 값으로 대체됩니다. 물론 백그라운드에서는 필요합니다. 상호 작용을 위해 json을 사용하려면
Java 코드 컨트롤러 코드는 다음과 같습니다.
@Controller
@RequestMapping("/Units")
public class UnitsController{


 @Autowired
 private UnitsService unitsService;


 @RequestMapping("/ListTree")
 @ResponseBody
 public List<JSONObject> ListTree(){

  List<JSONObject> jsonList = new ArrayList<JSONObject>();
  List<Units> zTreeAll = unitsService.zTreeAll();

  for (Units units : zTreeAll) {
   JSONObject json = new JSONObject();
//   { id:1, pId:0, name:"随意勾选 1", open:false}
   if(units.getUnitsId() == units.getNodeData()){


    JSONObject json1 = new JSONObject();

    json1.put("id", units.getUnitsId());
    json1.put("pId", 0);
    json1.put("name", units.getUnitsName());
    json1.put("open", false);

    jsonList.add(json1);

    json.put("id", -1);
    json.put("pId", units.getNodeData());
    json.put("name", units.getSectorName());
    json.put("open", false);

   }else{

    json.put("id", units.getUnitsId());
    json.put("pId", units.getNodeData());
    json.put("name", units.getSectorName());
    json.put("open", false);

   }

   jsonList.add(json);

  }
// for (JSONObject units : jsonList) {

//  System.out.println(jsonList.toString());

// }


  return jsonList;
 }
}
이 방법으로 필요한 것을 얻을 수 있습니다. 트리 구조, ztree 트리는 무한히 확장될 수 있으며 개인 필요에 따라 템플릿을 선택하기만 하면 됩니다.
jsp의 이 코드는 현재 선택 값 id를 가져오는 것입니다. 웹 페이지 만들기
위 내용은 jQuery 트리 플러그인 zTree를 올바르게 사용하는 방법의 상세 내용입니다. 자세한 내용은 PHP 중국어 웹사이트의 기타 관련 기사를 참조하세요!
성명:
본 글의 내용은 네티즌들의 자발적인 기여로 작성되었으며, 저작권은 원저작자에게 있습니다. 본 사이트는 이에 상응하는 법적 책임을 지지 않습니다. 표절이나 침해가 의심되는 콘텐츠를 발견한 경우 admin@php.cn으로 문의하세요.