집 >위챗 애플릿 >미니 프로그램 개발 >WeChat 애플릿 장바구니 구현 코드
WeChat 애플릿 장바구니 구현 코드
- 小云云원래의
- 2018-01-05 13:13:098809검색
이 글에서는 WeChat Mini 프로그램 실습 장에서 장바구니 구현 코드 예제를 주로 소개합니다. 장바구니의 기능 구현에 대해 자세히 소개하고 있으니 관심 있는 분들이 참고하시기 바랍니다. 그것은 모두에게 도움이 될 수 있습니다.
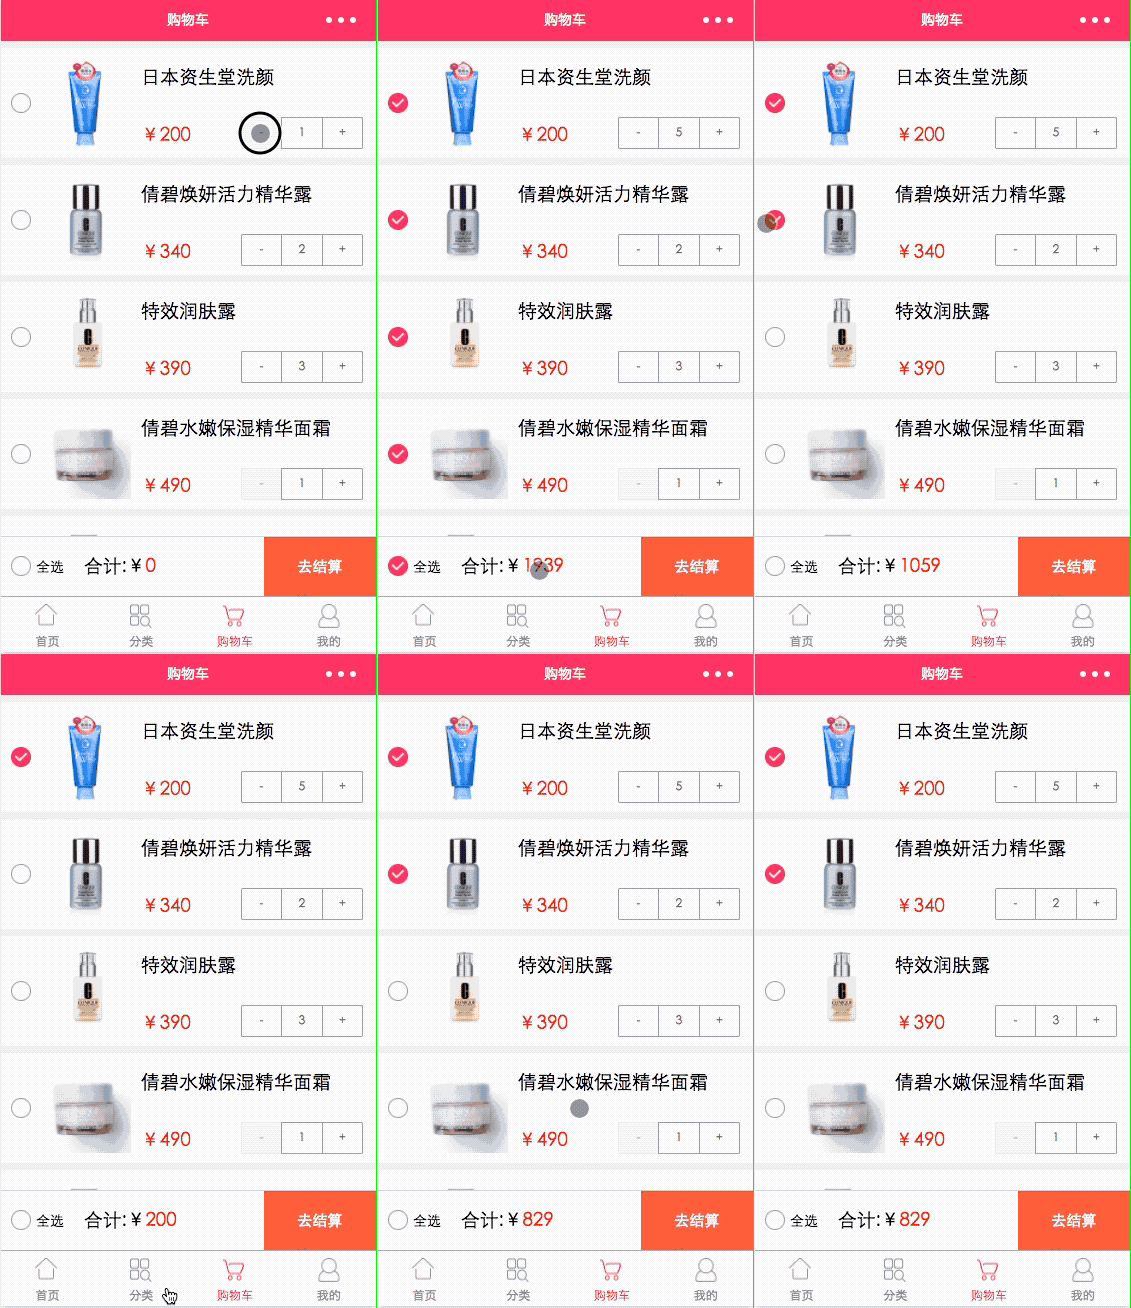
장바구니의 인터페이스는 구현하기 어렵지 않습니다. 작은 프로그램이든 APP이든, 장바구니의 논리를 다루는 것이 가장 어렵습니다. 효과부터 시작하여 장바구니를 구현하는 방법 그림:

쇼핑 카트 구현
cart.wxml
<import src="/template/quantity/index.wxml" />
<scroll-view class="scroll" scroll-y="true">
<view class="separate"></view>
<view wx:for="{{carts}}">
<view class="cart_container">
<image class="item-select" bindtap="switchSelect" data-index="{{index}}" data-id="{{index}}" src="{{item.isSelect?'../../images/cart/comment_select.png':'../../images/cart/comment_normal.png'}}" />
<image class="item-image" src="{{item.pic}}"></image>
<view class="column">
<text class="title">{{item.name}}</text>
<view class="row">
<text class="sku-price">¥</text>
<text class="sku-price">{{item.price}}</text>
<view class="sku">
<template is="quantity" data="{{ ...item.count, componentId: index }}" />
</view>
</view>
</view>
</view>
<view class="separate"></view>
</view>
</scroll-view>
<view class="bottom_total">
<view class="bottom_line"></view>
<view class="row">
<image class="item-allselect" bindtap="allSelect" src="{{isAllSelect?'../../images/cart/comment_select.png':'../../images/cart/comment_normal.png'}}" />
<text class="small_text">全选</text>
<text>合计:¥ </text>
<text class="price">{{totalMoney}}</text>
<button class="button-red" bindtap="toBuy" formType="submit">去结算</button>
</view>
</view>레이아웃은 순환하는 순환 목록입니다. 장바구니 제품과 결제를 위한 하단 컨트롤. 기억해야 할 점은 스크롤 보기 레이어를 루프 목록 외부에 추가해야 데이터가 많을 때 스크롤할 수 있다는 것입니다. 스크롤 뷰에 익숙하지 않으신 분은 설명이 포함된 이전 기사를 직접 읽어보시기 바랍니다.
cat.wxss
/* pages/cart/cart.wxss */
.cart_container {
 display: flex;
 flex-direction: row;
}
.scroll {
 margin-bottom: 120rpx;
}
.column {
 display: flex;
 flex-direction: column;
}
.row {
 display: flex;
 flex-direction: row;
 align-items: center;
}
.sku {
 margin-top: 60rpx;
 margin-left: 100rpx;
}
.sku-price {
 color: red;
 position: relative;
 margin-top: 70rpx;
}
.price {
 color: red;
 position: relative;
}
.title {
 font-size: 38rpx;
 margin-top: 40rpx;
}
.small_text {
 font-size: 28rpx;
 margin-right: 40rpx;
 margin-left: 10rpx;
}
.item-select {
 width: 40rpx;
 height: 40rpx;
 margin-top: 90rpx;
 margin-left: 20rpx;
}
.item-allselect {
 width: 40rpx;
 height: 40rpx;
 margin-left: 20rpx;
}
.item-image {
 width: 180rpx;
 height: 180rpx;
 margin: 20rpx;
}
.bottom_line {
 width: 100%;
 height: 2rpx;
 background: lightgray;
}
.bottom_total {
 position: fixed;
 display: flex;
 flex-direction: column;
 bottom: 0;
 width: 100%;
 height: 120rpx;
 line-height: 120rpx;
 background: white;
}
.button-red {
 background-color: #f44336; /* 红色 */
}
button {
 position: fixed;
 right: 0;
 color: white;
 text-align: center;
 display: inline-block;
 font-size: 30rpx;
 border-radius: 0rpx;
 width: 30%;
 height: 120rpx;
 line-height: 120rpx;
}
wxss 스타일에 대해서는 할 말이 없습니다. 그냥 속성을 이해하고 클래스를 호출하세요. .cart.js에 집중합시다. 전체 로직은 그 안에 있습니다
// pages/cart/cart.js
var Temp = require('../../template/contract.js');
Page(Object.assign({}, Temp.Quantity, {
data: {
isAllSelect:false,
totalMoney:0,
// 商品详情介绍
carts: [
{
pic: "http://mz.djmall.xmisp.cn/files/product/20161201/148058328876.jpg",
name:"日本资生堂洗颜",
price:200,
isSelect:false,
// 数据设定
count: {
quantity: 2,
min: 1,
max: 20
},
},
{
pic: 'http://mz.djmall.xmisp.cn/files/product/20161201/148058301941.jpg',
name: "倩碧焕妍活力精华露",
price: 340,
isSelect: false,
// 数据设定
count: {
quantity: 1,
min: 1,
max: 20
},
},
{
pic: 'http://mz.djmall.xmisp.cn/files/product/20161201/14805828016.jpg',
name: "特效润肤露",
price: 390,
isSelect: false,
// 数据设定
count: {
quantity: 3,
min: 1,
max: 20
},
},
{
pic: 'http://mz.djmall.xmisp.cn/files/product/20161201/148058228431.jpg',
name: "倩碧水嫩保湿精华面霜",
price: 490,
isSelect: false,
// 数据设定
count: {
quantity: 1,
min: 1,
max: 20
},
},
{
pic: 'http://mz.djmall.xmisp.cn/files/product/20161201/148057953326.jpg',
name: "兰蔻清莹柔肤爽肤水",
price: 289,
isSelect: false,
// 数据设定
count: {
quantity: 10,
min: 1,
max: 20
},
},
{
pic: "http://mz.djmall.xmisp.cn/files/product/20161201/148057921620_middle.jpg",
name: "LANCOME兰蔻小黑瓶精华",
price: 230,
isSelect: false,
// 数据设定
count: {
quantity: 1,
min: 1,
max: 20
},
},
],
},
//勾选事件处理函数
switchSelect: function (e) {
// 获取item项的id,和数组的下标值
var Allprice = 0,i=0;
let id = e.target.dataset.id,
index = parseInt(e.target.dataset.index);
this.data.carts[index].isSelect = !this.data.carts[index].isSelect;
//价钱统计
if (this.data.carts[index].isSelect) {
this.data.totalMoney = this.data.totalMoney + this.data.carts[index].price;
}
else {
this.data.totalMoney = this.data.totalMoney - this.data.carts[index].price;
}
//是否全选判断
for (i = 0; i < this.data.carts.length; i++) {
Allprice = Allprice + this.data.carts[i].price;
}
if (Allprice == this.data.totalMoney)
{
this.data.isAllSelect=true;
}
else
{
this.data.isAllSelect = false;
}
this.setData({
carts: this.data.carts,
totalMoney: this.data.totalMoney,
isAllSelect: this.data.isAllSelect,
})
},
//全选
allSelect: function (e) {
//处理全选逻辑
let i = 0;
if (!this.data.isAllSelect)
{
for (i = 0; i < this.data.carts.length; i++) {
this.data.carts[i].isSelect = true;
this.data.totalMoney = this.data.totalMoney + this.data.carts[i].price;
}
}
else
{
for (i = 0; i < this.data.carts.length; i++) {
this.data.carts[i].isSelect = false;
}
this.data.totalMoney=0;
}
this.setData({
carts: this.data.carts,
isAllSelect: !this.data.isAllSelect,
totalMoney: this.data.totalMoney,
})
},
// 去结算
toBuy() {
wx.showToast({
title: '去结算',
icon: 'success',
duration: 3000
});
this.setData({
showDialog: !this.data.showDialog
});
},
//数量变化处理
handleQuantityChange(e) {
var componentId = e.componentId;
var quantity = e.quantity;
this.data.carts[componentId].count.quantity = quantity;
this.setData({
carts: this.data.carts,
});
}
}));사용 방법을 소개합니다. 매개변수
- isAllSelect: 전체 선택 여부
- totalMoney: 총 금액
- carts: 장바구니 제품 데이터
- switchSelect 버튼을 확인하기 위해 수행해야 하는 논리 처리
- All Check, 모두 체크되면 하단의 모두 선택 버튼이 켜집니다. 물론 이는 단지 판단의 방법일 뿐이며 틱 수로 판단할 수도 있습니다.
- 예. 추가를 수행하려면 버튼을 확인하거나 취소하세요. 총 가격의 뺄셈 계산
- this.setData, 데이터 업데이트, 이것이 핵심입니다. 데이터를 처리할 때마다 데이터를 업데이트하는 것을 잊지 마세요
- all선택 버튼 논리 처리
- 모두 선택 항목별로 체크 아이콘을 켜고 총 가격을 계산합니다. 모두 선택하지 않은 경우 회색으로 표시되며 총 가격은 0
- this.setData가 데이터를 업데이트합니다
1. 데이터 방식 수정
data:{
 name:'我是初始化的name'
}
1, this.data.name
this.data.name='我是代码君data'
2, this.setData
 this.setData({
   name:'我是代码君setData'
  })
이 두 가지 방법 this.setData의 장점은 실시간으로 데이터를 업데이트하는 상쾌한 효과를 얻을 수 있다는 것입니다 2. 객체 배열 수정
data:{
person:{
 name:'代码君',
 city:'厦门'
}
}
모든 객체 수정
this.setData({
   person:{
    name:'新代码君',
    city:'湖南'
   }
  })
일부 데이터 수정
this.setData({
   'person.name': '代码君只修改名字'
  })
//多个数组用这个
this.setData({
   'person[0].name': '代码君只修改名字'
  })
3. 데이터 추가 및 삭제
1. 데이터 추가 concat
//假设这一段是我们要新增的数组
var newarray = [{
    name:'增加的数据--'+new Date().getTime() ,
}];
//向前--用newarray与this.data.list合拼
this.data.list = newarray.concat(this.data.list);
//向后--用this.data.list与newarray合拼
this.data.list = this.data.list.concat(newarray);
2. 데이터를 삭제한 후 반환 삭제된 데이터
//删除
 remove:function (e){
  var dataset = e.target.dataset;
  var Index = dataset.index;
  //通过index识别要删除第几条数据,第二个数据为要删除的项目数量,通常为1
  this.data.list.splice(Index,1);
  //渲染数据
  this.setData({
    list:this.data.list
  });
 }
3. 데이터 지우기
//清空
 clear:function (){
  //其实就是让数组变成一个空数组即可
   this.setData({
     list:{}
   });
 }
요약
오늘은 js에서 데이터 로직을 처리하는 방법을 주로 설명하고, 데이터의 추가, 삭제, 수정, 확인에 대해서도 설명하겠습니다. . 돌아갈 때 더 많은 연습이 필요한 지식 항목입니다. 그럼 오늘은 여기까지입니다 모두 행복한 주말 보내세요~
관련 추천 :
위 내용은 WeChat 애플릿 장바구니 구현 코드의 상세 내용입니다. 자세한 내용은 PHP 중국어 웹사이트의 기타 관련 기사를 참조하세요!

