집 >위챗 애플릿 >미니 프로그램 개발 >WeChat 애플릿 UI 및 컨테이너 구성 요소
WeChat 애플릿 UI 및 컨테이너 구성 요소
- 高洛峰원래의
- 2017-02-25 09:15:432106검색
WeChat Mini 프로그램 UI 및 컨테이너 구성 요소 요약
1. 요약 및 개요
2. 컨테이너 구성 요소
2.1 구성 요소 컨테이너(뷰)
2.2 스크롤뷰 컨테이너(스크롤뷰)
2.3 슬라이더뷰 컨테이너(스와이프)
1.
1.1 UI 구성요소 요약도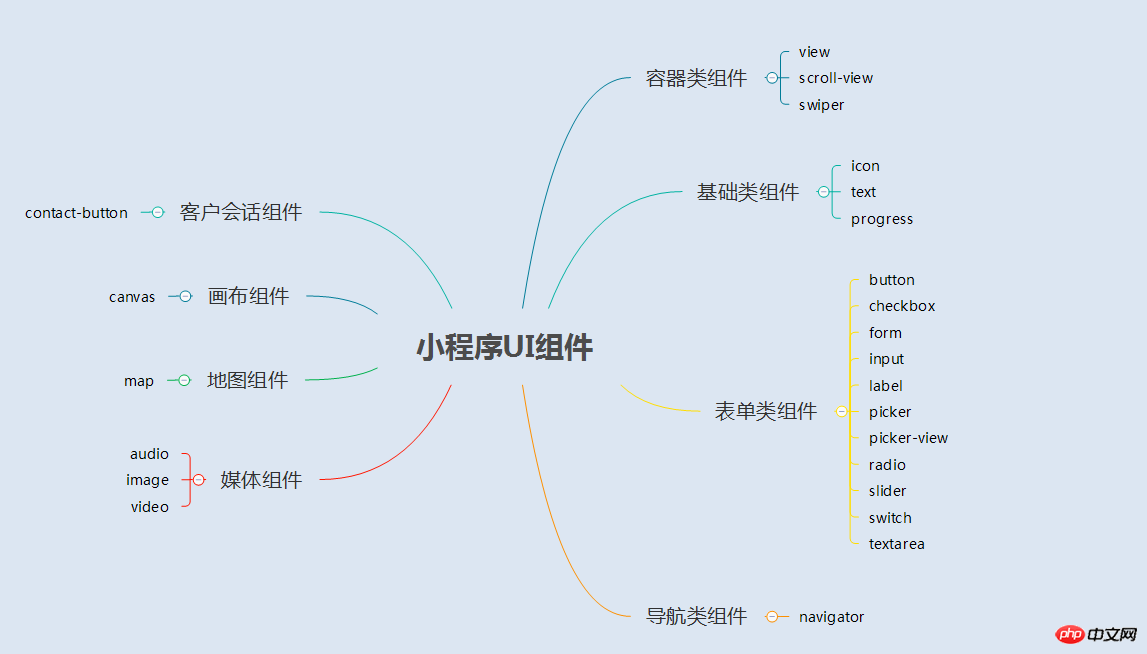
1.2 개요
mini의 UI 프로그램 구성 요소는 HTML 태그와 유사하게 사용자 인터페이스를 정의하는 일련의 태그입니다. 전체 사용자 응답 프로세스: 이벤트 트리거 - > UI 구성요소가 이벤트에 응답하도록 js 함수를 트리거함 - > UI 업데이트
2. 컨테이너 구성요소
2.1 컨테이너 컴포넌트(보기)
(1) 요약

(2) 예시
렌더링
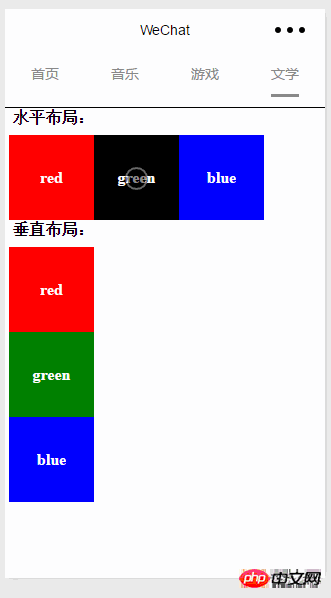
page.wxml
<view>
 <text class="row-view-title">水平布局:</text>
 <view class="flex-wrp-row">
  <view class="flex-item-red" hover="true" hover-class="hover-style"><text class="color-text">red</text></view>
  <view class="flex-item-green" hover="true" hover-class="hover-style"><text class="color-text">green</text></view>
  <view class="flex-item-blue" hover="true" hover-class="hover-style"><text class="color-text">blue</text></view>
 </view>
</view>
<view>
 <text class="column-view-title">垂直布局:</text>
 <view class="flex-wrp-column" >
  <view class="flex-item-red" hover="true" hover-class="hover-style"><text class="color-text" >red</text></view>
  <view class="flex-item-green" hover="true" hover-class="hover-style"><text class="color-text">green</text></view>
  <view class="flex-item-blue" hover="true" hover-class="hover-style"><text class="color-text">blue</text></view>
 </view>
</view>
page.wxss
.flex-item-red{
 background-color: red;
 height: 200rpx;
 width: 200rpx;
 text-align: center;
 line-height: 200rpx;
}
.flex-item-green{
 background-color: green;
 height: 200rpx;
 width: 200rpx;
 text-align: center;
 line-height: 200rpx
}
.flex-item-blue{
 background-color: blue;
 height: 200rpx;
 width: 200rpx;
 text-align: center;
 line-height: 200rpx
}
.flex-wrp-row{
 flex-direction: row;
 display: flex;
 margin-left: 10rpx;
 margin-top: 20rpx;
}
.flex-wrp-column{
 flex-direction: column;
 display: flex;
 margin-left: 10rpx;
  margin-top: 20rpx;
}
.color-text{
 color: snow;
 font-family: 'Times New Roman', Times, serif;
 font-weight: bold;
}
.hover-style{
 background-color: black;
}
.row-view-title,.column-view-title{
 margin-left: 20rpx;
 font-family: 'Times New Roman', Times, serif;
 font-weight: bold;
}
/*重要属性:
 display: flex; //与display:box;是类似,是flexbox的最新语法格式,有更好的适配效果
 flex-direction: column; //表示子布局垂直布局
 flex-direction: row; //表示子布局为水平布局
*/
2.2 스크롤뷰 컨테이너(스크롤뷰)
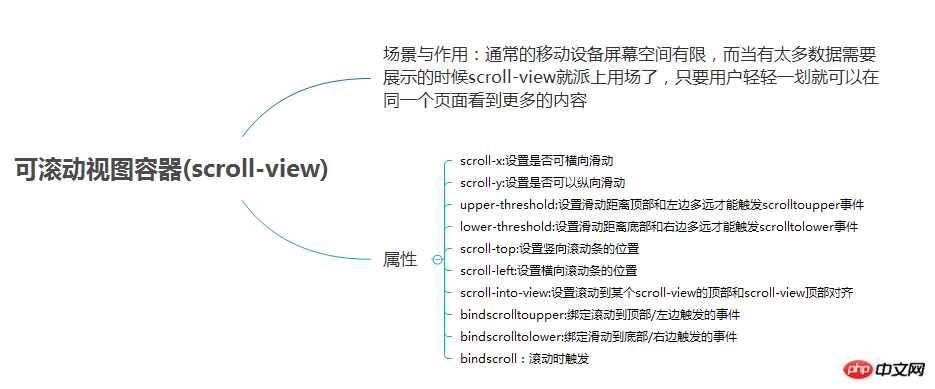
(1) 요약
(2) 예시
렌더링:
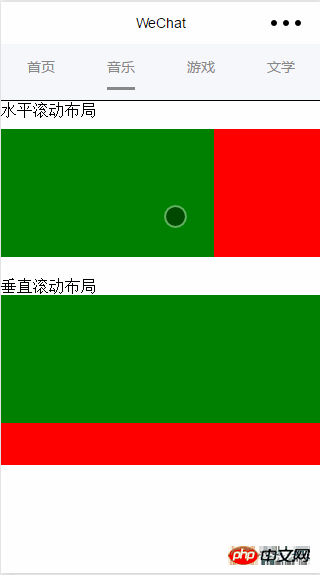
page.wxml
wxss
<view>
<text>水平滚动布局</text>
</view>
<view class="x-view">
 <scroll-view class="scroll-view-x" scroll-x="true" bindscrolltoupper="scrollXToUpper" bindscrolltolower="scrollXToLower" bindscroll="scroll" scroll-left="0" scroll-into-view="{{green}}">
  <view id="green" class="x_green"></view>
  <view id="red" class="x_red"></view>
  <view id="yellow" class="x_yellow"></view>
  <view id="blue" class="x_blue"></view>
 </scroll-view>
</view>
<view>
<text>垂直滚动布局</text>
</view>
<view class="y-view">
 <scroll-view class="scroll-view-y" scroll-y="true" bindscrolltoupper="scrollYToUpper" bindscrolltolower="scrollYToLower" bindscroll="scroll" scroll-top="0" scroll-into-view="{{green}}">
  <view id="green" class="y_green"></view>
  <view id="red" class="y_red"></view>
  <view id="yellow" class="y_yellow"></view>
  <view id="blue" class="y_blue"></view>
 </scroll-view>
</view>
page.js
.x_green{
 background-color: green;
 width: 500rpx;
 height: 300rpx;
 display: inline-flex;
}
.x_red{
 background-color: red;
 width: 500rpx;
 height: 300rpx;
 display: inline-flex;

}
.x_blue{
 background-color: blue;
 width: 500rpx;
 height: 300rpx;
 display: inline-flex;
}
.x_yellow{
 background-color: yellow;
 width: 500rpx;
 height: 300rpx;
 display: inline-flex;
}
.y_green{
 background-color: green;
 width: 100%;
 height: 300rpx;
}
.y_red{
 background-color: red;
 width: 100%;
 height: 300rpx;
}
.y_yellow{
 background-color: yellow;
 width: 100%;
 height: 300rpx;
}
.y_blue{
 background-color: blue;
 width: 100%;
 height: 300rpx;
}
.scroll-view-x{
 display: flex;
 white-space: nowrap;
 width: 100%;
 margin-bottom: 20px;
 margin-top: 10px;
 height: 300rpx;
}
.scroll-view-y{
 height: 400rpx;
}
/*重要属性:
 white-space: nowrap;//设置内部元素不换行显示,与display: inline-flex;属性联合使用才会有水平布局的效果
*/
2.3 슬라이더 뷰 컨테이너(스와이프)
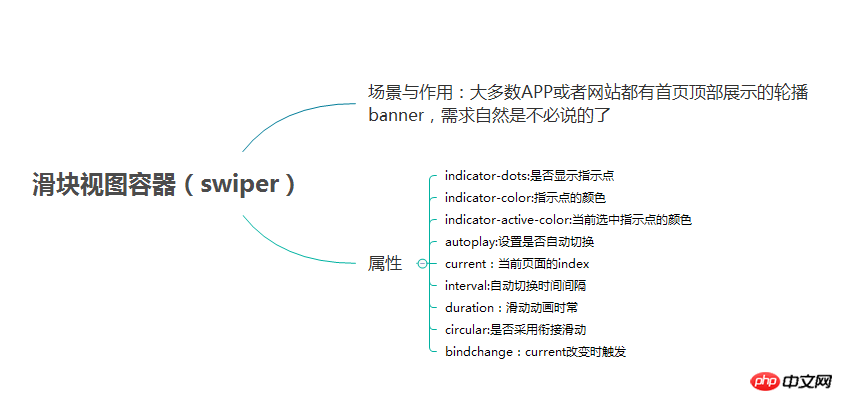
(1) 요약
(2) 예
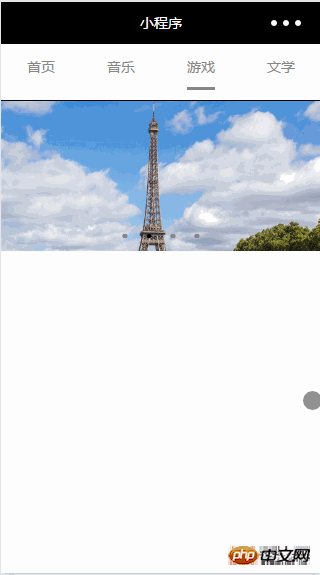
렌더링:
page.wxml
//index.js
//获取应用实例
var app = getApp()
//var color_index=['green','red','yellow','blue'];
Page({
 data:{
 toview:'red',
 },
/*滑动到左边触发*/
scrollXToUpper:function(){
 console.log('scrollXToUpper')
},
/*滑动到右边触发 */
scrollXToLower:function(){
 console.log('scrollXToLower')
},
/*滑动到顶部触发*/
scrollYToUpper:function(){
 console.log('scrollYToUpper')
},
/*滑动到左边触发 */
scrollYToLower:function(){
 console.log('scrollYToLower')
},
/*滑动触发 */
scroll:function(){
 console.log("scroll")
},
onLoad: function () {
 console.log('onLoad')
 var that = this
 },
})
page.js
<swiper data-current="0" current="0" bindchange="itemChangeFunc" circular="true" indicator-dots="{{indicatorDots}}"
 autoplay="{{autoplay}}" interval="{{interval}}" duration="{{duration}}">
 <block wx:for="{{imgUrls}}" wx:key="swiperkeys">
  <swiper-item>
  <image src="{{item}}" class="slide-image" width="355" height="150"/>
  </swiper-item>
 </block>
</swiper>
읽어주셔서 감사합니다. 모두에게 도움이 되기를 바랍니다. 이 사이트를 지원해 주신 모든 분들께 감사드립니다!
WeChat 애플릿 UI 및 컨테이너 구성요소에 대한 더 많은 기사를 보려면 PHP 중국어 웹사이트를 주목하세요!
성명:
본 글의 내용은 네티즌들의 자발적인 기여로 작성되었으며, 저작권은 원저작자에게 있습니다. 본 사이트는 이에 상응하는 법적 책임을 지지 않습니다. 표절이나 침해가 의심되는 콘텐츠를 발견한 경우 admin@php.cn으로 문의하세요.

