Android UI 컨트롤 시리즈: RelativeLayout(상대 레이아웃)
- 黄舟원래의
- 2017-01-19 09:59:551472검색
RelativeLayout은 하위 View 요소를 상대적 위치에 표시하는 VeiwGroup입니다. 뷰의 위치는 형제 요소(예: 주어진 요소의 왼쪽 또는 아래쪽) 또는 RelativeLayout 영역에 대해 즐겨찾는 요소를 기준으로 지정할 수 있습니다. 위치(예: 하단 정렬, 나머지 중앙)
RelativeLayout은 사용자 인터페이스 레이아웃을 설정하는 데 매우 강력하게 사용됩니다. 중첩된 ViewGroup을 제거할 수 있기 때문입니다. 중첩된 LinearLayout이 여러 개 있습니다. 그룹의 경우 별도의 RelativeLayout으로 대체할 수 있습니다
1. HelloRelativeLayout
이라는 새 프로젝트를 시작합니다. 2. res/layout/main.xml 파일을 열고 다음 정보를 삽입합니다
<?xml version="1.0" encoding="utf-8"?>
<RelativeLayout xmlns:android="http://schemas.android.com/apk/res/android"
    android:orientation="vertical"
    android:layout_width="fill_parent"
    android:layout_height="fill_parent"
    >
        <TextView
                android:id="@+id/label"
            android:layout_width="fill_parent"
            android:layout_height="wrap_content"
            android:text="Type here:"
    />
           <EditText
                   android:id="@+id/entry"
                   android:layout_width="fill_parent"
                   android:layout_height="wrap_content"
                   android:background="@android:drawable/editbox_background"
                   android:layout_below="@id/label"
    />
    <Button
            android:id="@+id/ok"
            android:layout_width="wrap_content"
            android:layout_height="wrap_content"
            android:layout_below="@id/entry"
            android:layout_alignParentRight="true"
            android:layout_marginLeft="10dip"
            android:text="OK"
    />
    <Button
            android:layout_width="wrap_content"
            android:layout_height="wrap_content"
            android:layout_toLeftOf="@id/ok"
            android:layout_alignTop="@id/ok"
            android:text="Cancel"
    />
</RelativeLayout>
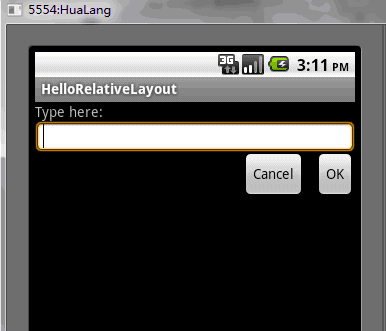
3. 각 android:layout_* 속성(예:layout_below,layout_alignParentRightRight,layout_toLeftOf)에 주의하세요. RelativeLayout을 사용할 때 이러한 속성을 사용하여 원하는 내용을 설명할 수 있습니다. 각 속성은 각 뷰의 위치를 정의합니다. 알 수 없는 유형의 상대 위치. 일부 속성은 동일한 수준 보기의 리소스 ID를 사용하여 자체 상대 위치를 정의합니다. 예를 들어, 마지막 Button은 ID ok로 정의된 뷰의 왼쪽과 상단에 정렬되도록 정의되고 모든 레이아웃 속성은 RelativeLayout.LayoutParams
에 정의됩니다. 4. 이제 HelloLinearLayout.java를 열고 확인합니다. onCreate() 메소드에 res/layout/main.xml 레이아웃 파일
public void onCreate(Bundle savedInstanceState) {
        super.onCreate(savedInstanceState);
        setContentView(R.layout.main);
가 로드되었습니다. 5. 다음 레이아웃을 볼 수 있습니다

위는 Android UI 컨트롤 시리즈의 내용입니다: RelativeLayout(상대 레이아웃) 관련 내용을 더 보려면 PHP 중국어 웹사이트(www.php.cn)를 참고하세요!

